Showing posts with label Blueberry Bushel. Show all posts

Tuesday, 14 November 2023

Winter Meadow projects inspired by November mood board

Stampin Up mood board colour combo idea

 
Kickstart your Christmas creativity with my November mood board. There’s enough inspiration on this board to help you create all kinds of projects, and I used it as my starting point for several Stampin’ Up!® projects using Grassy Grove, the Christmas Classics bundle and Winter Meadow Designer Series Paper. 
 
But first, how to use a mood board. It’s simple: just take inspiration from any or some of the photos and colours. 
 
In this board, the colours are Soft Sea Foam, Lost Lagoon, Pecan Pie, Crumb Cake and Lemon Lolly. 
 
There are no hard and fast rules so you can add extra colours, use the nearest you have, or ignore the colours and simply be inspired by one or more of the images. 
 

Tuesday, 13 June 2023

Eclipse technique: three cards using Cheerful Daisies

Stampin Up Cheerful Daisies eclipse technique
 
Have you ever tried the eclipse technique? I’ve used this fun technique here with the new Cheerful Daisies bundle from Stampin’ Up!® but you can use it with almost any of your dies or punches. You get to use every bit of the cardstock too, which taps into my love of Zero Waste. 

Wednesday, 22 January 2020

Happy Birthday to You - celebrate with a product-heavy card


Simple stamping? Not today! Heavily inspired by Stesha Bloodhart and Lauren Alarid, this is technique and product-heavy card featuring white embossing, dry embossing, paint splattering, two stamp sets, dies and a punch. Well if you've got it, why not use it?

I used Artisan Textures to stamp Balmy Blue splatters on my Whisper White cardstock before running it through the Tin Tile embossing folder (LOVE this folder!) and splattering with Champagne Mist Shimmer Paint.

The main image is from Happy Birthday to You from the Sale-a-Bration collection and the exciting news is that there will be dies to match this set available from 4th February, while supplies last.


My cake was stamped and embossed in white and coloured with Blueberry Bushel and Balmy Blue inks using Blender Pens. In the absence of dies (which as a demonstrator I can order now but haven't done yet), I fussy cut it, along with another couple of flowers which I popped up to add dimension.

The filigree die is from the Painted Labels dies from the Peaceful Poppies Suite and the punch is that old favourite, the Sprig Punch – not just for Christmas!

Embossing the image makes colouring it in really easy. You just colour in circles over the top, and the embossed areas will resist the ink. Just make sure you use a water-based colouring medium, rather than our alcohol-based Stampin’ Blends, as alcohol ink will stick to the shiny embossing and you’ll lose the white.


Wednesday, 18 December 2019

Christmas Ornament Week: Polar Bears


Today’s ornament features beautiful polar bears die-cut and placed onto an MDF circle which I painted all over with almost neat Blueberry Bushel ink.

The whole thing is spritzed with some rubbing alcohol mixed with Champagne Mist Shimmer Paint to make it all sparkle - unfortunately you can only see this under lights, not on the photo!

Stamp and emboss the snowflakes first. If you try to stamp on top of the inked surface, the embossing powder sticks to the whole area. Ask me how I know!

Wednesday, 23 October 2019

Nature's Beauty meets Feels Like Frost

If only real winters were as beautiful as the Feels Like Frost Designer Series Paper!

I've used this pack for loads of projects already and it still shows no signs of running out. The beauty of this pack is that you have lovely wintry views on one side, and white and silver foil designs on the other, which you can colour, brayer, sponge... you name it, you can do it.

This was the Make & Take for a party on Friday evening; guests could choose their piece of paper so all their cards were different.

Cut your Designer Series Paper slightly smaller than the white panel on the front of these Silver Foil-Edged Cards and you get the appearance of an extra layer without adding bulk or weight. 


Monday, 21 October 2019

Christmas blues with Peaceful Boughs


Got the Christmas blues already? Even though I'm a bit of a traditionalist and usually favour red and green for my Christmas projects, I do like this combo of Blueberry Bushel, Real Red and Whisper White, with a splash of silver. I used Stazon to stamp onto the silver foil because it's a permanent ink which dries quickly.

Using the Stamparatus for embossing is a real game-changer. It means you can ink the stamp more than once and stamp repeatedly to get more ink on the page before embossing. I always “double up” when embossing in white; I use White Craft ink AND White embossing powder to get a really crisp and clear look.  


Wednesday, 21 August 2019

Friendly Silhouettes meet Perennial Essence DSP

 
I love these Friendly Silhouettes Dies and couldn't wait to get my hands on them... and then, as is so often the case, they sat in the craft room unused for weeks. I finally managed to play with them last week and came up with these two projects for my team achievers this month.

I had planned to create watercoloured backgrounds but time was short so the Perennial Essence Designer Series Paper came to the rescue. With the white silhouettes in front, I think it works just as well, if not better.

Your eyes are not deceiving you, by the way; the top card is slightly deeper than the bottom one, because I got my cutting measurements wrong! Still, there are no mistakes, eh?

 The 3/8" Reversible Ribbon in Old Olive/Pretty Peacock was just right to go with these cards but was too wide to work well; it just overwhelmed. So I snipped off the edge and extracted some of the shiny threads from the length of the ribbon to add some colour and shimmer behind the greeting. 


Friday, 31 May 2019

Beautiful boats in the Come Sail Away Suite


There are so many possibilities with the new Come Sail Away Suite, which is why I've bought the whole suite - unheard of for me!

I loved this card by French demonstrator Sandrine Greusard and couldn't resist making my own version. The lifebelt is inspired - although quite fiddly! I made two matching circles using Layering Circle Dies, then attached them together lightly, white on top, before snipping away sections to reveal the Blueberry Bushel beneath. I didn't have the Baker's Twine (I've ordered it now!) so used linen thread to wrap around the joins. 


You can purchase this beautiful suite from 4th June - it’s definitely one you won’t want to miss. 

 
http://helenread.stampinup.net

Wednesday, 20 February 2019

Flowering Desert Week: cacti get the blues


Thinking – and stamping – out of the box... I opted for a blue colour scheme for this fun cactus card. I used the same arrangement of stamps, just changed the colours for all the blues. Too wild? I love it!


Wednesday, 30 January 2019

Cat or dog? One card, two pets...


Whether you’re a cat fan or a dog fan, there’s a stamp set for you in the Spring/Summer catalogue, and both are really cute.

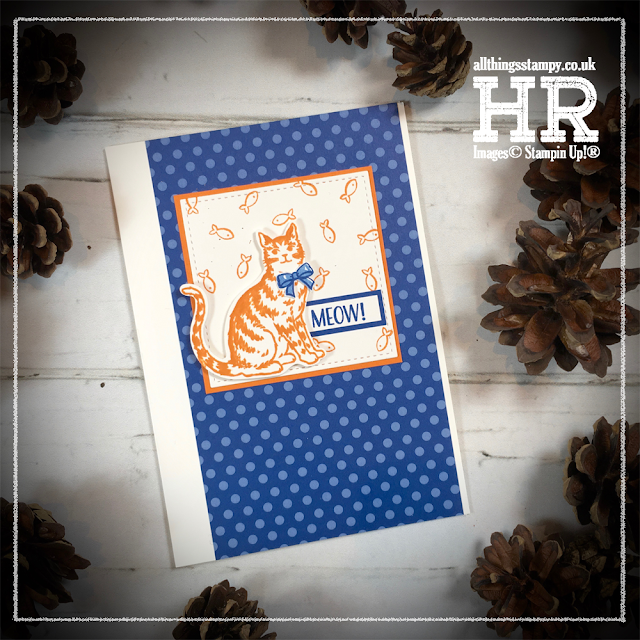
Here I’ve made the same card design using Nine Lives and Happy Tails; I just changed the layer colour to match the Pumpkin Pie of the ginger cat the Real Red of the dog collar. It’s even the same piece of Designer Series Paper; just flip it over to get polka dots or stripes.


The dog is coloured with Stampin' Blends... and also stamped with the cute patches which come with the set. I stamped and coloured a batch of these, so you’ll be seeing him again. The background is stamped in Crumb Cake, but stamped off for a lighter effect.


The cat is simply stamped in Pumpkin Pie, then stamped on top with the tabby-effect stamp. You have to get your eye in but it’s not too difficult and you can always fill in any white areas with a Blender Pen and the ink from your ink pad lid. The little bow is a two-step stamp, too; I stamped off in Blueberry Bushel to get the background.

As a bonus project, I made this little cat box. It's a slider, so when you pull the ribbon, the chocolate slides out with it.  As you can see, this is no tabby cat... there’s another stamp within the set that enables you to create a pretty tortoiseshell, or a lovely ginger and white, as here.


Wednesday, 23 January 2019

Valentine cats - reversed image


Here’s another way you can use a reverse image – to create a cute catty Valentine’s card. This was my first attempt at mirror stamping and I couldn’t believe my luck when the cats ended up positioned so perfectly close together.

To find out how to do this, using the Stamparatus and a silicone sheet, please check out my video on my Facebook page.

Monday, 21 January 2019

Video tutorial: Reverse stamping with Nine Lives cats


This is such a fun technique, I can’t understand why I haven’t tried it before. It worked first time and blew my mind, so I knew it would have the same effect when I demoed the technique at a party on Friday evening. This little box uses the new Nine Lives stamp set, which co-ordinates with the existing cat punch. For this cute project, I stamped the cats on both sides of the cardstock so, no matter which way you turn it, the cats are facing you.


Wednesday, 12 December 2018

Snowflakes and Peaceful Noel


This is one of my “bulk” Christmas cards this year – I took all the supplies away on holiday with me, but didn’t actually manage to make them until I get back. To be honest, I’m not very good at crafting away from home.

I used the Peaceful Noel stamp set and the Blizzard Dies, along with the Stitched Shapes Framelits and one of my favourite festive colour combinations; red, white and blue. Hope you like it!

Monday, 19 November 2018

Colourful Christmas with Snow is Glistening


I have loved playing with the Snow is Glistening stamp set, and really enjoyed creating these colourful cards with the Stamparatus.

I inked up the stamp using sponge daubers, then stamped onto the Whisper White cardstock. The great thing about the Stamparatus is that if you miss a bit, you can stamp again, perfectly.

Scroll down for close-ups of all the colours...


Wednesday, 14 November 2018

Snow is glistening, snowflakes are glowing


Clean and Simple these cards ain’t! But sometimes it’s fun to get stuck in and enjoy some fun techniques. 

I made these projects using the new, limited edition Snow is Glistening stamp set, which is available for November only, and even then only while supplies last.

For all of these cards, I used Pacific Point cardstock and stamped and embossed in white; I find white ink AND white embossing powder gives you a stronger image.
I sponged around the image in Pacific Point ink, then around the edges of the cardstock in Blueberry Bushel to provide more depth. This seems to make the images ‘glow’. 

For the starry/snowy event, I flicked some Frost White Shimmer Paint over the cardstock; I love it! I used the same paint, mixed with this Real Red ink, to create the delicate red dots, but here I must issue a word of caution, as over a week later, they still haven’t fully dried and I need to get round to sealing them somehow. 

You can buy this beautiful stamp set, and some great accessories to go with it, by clicking here

Friday, 28 September 2018

Blizzard Thinlits meet Peaceful Noel


Today I want to show you the last of three workshops we completed at my Autumn All-Day Craftathon.

We returned to the Christmas theme by combining Peaceful Noel with the Blizzard Thinlits die to create this no-waste set of projects. Can you see what we did?


We began by die-cutting the snowflakes from Pool Party and carefully prised out all the snowflakes to leave this lovely template behind. It would be a waste to discard this so it formed the basis of the front of this Night of Navy gift envelope, again using the Farmhouse Elements, this time sponged in Blueberry Bushel.


As you can see, it’s just a standard envelope, created using the Envelope Punch board. We used it to store four gift tags, but it could easily contain a gift card, money, or a small gift of jewellery.

Take a look at the tags close up... we’ve used the little stars from Farmhouse Elements, too, as well as red rhinestones for a touch of glamour. The “splodge” and greeting both come from Peaceful Noel.


As for the card, that continues the theme but keeps things Clean and Simple, too.


I hope you’ve enjoyed looking at my Craftathon projects. The next All-Day event will be early next year and in you’re local to Derbyshire I hope you’ll join me. The ladies have asked for fewer workshops next time, to give them more time to chat, so we’ll be doing one in the morning and one in the afternoon, with a buffet lunch in the middle and lots of cake available all day. Hope you can come!

Wednesday, 26 September 2018

Peaceful Noel split-top box ... but NOT Christmas


Welcome back to part two of my look back at Saturday’s projects from my All-Day Craftathon.

This was our second workshop of the day, a split-top box containing three notecards. It shows how you can use the Peaceful Noel stamp set (which everyone received in their kit) to create non-Christmas projects.

This is how the box opens; fun, eh? I’ll post the tutorial on my Facebook page tomorrow.


Inside are three very simple cards, stamped exactly how everyone wanted to (although some chose to copy exactly!) To steer away from Christmas, we used the greetings from Botanical Tags.

I love this colour combination - Blueberry Bushel goes SO well with Mint Macaron, it’s really lovely.


Monday, 13 August 2018

Blueberry dandelions


Let’s start the week with another Dandelion Wishes project - and why not? It’s proving to be the most popular stamp set from the 2018 Annual Catalogue so far!


I used the Stamparatus to stamp the image in Blueberry Bushel, then stamp again on top in Versamark so it could be embossed. Clearly some of the embossing missed the mark as the blue ink has spread when I watercoloured in Lovely Lipstick, but I don’t mind as the result is quite effective.


I know some people are resistant to the new In Colors, because they’re rather bright, but I think they are a great addition to our collection, and can be quite tasteful when separated from the crowd!

The small print

This is my personal blog and my sole responsibility as an Independent Stampin' Up!® demonstrator. All images are © Stampin' Up!® All content including photographs, projects and text are © Helen Read, unless otherwise stated. Please feel free to copy my ideas for your personal use and inspiration - if you are a SU demonstrator you may use these ideas for your events but please give credit where it is due. Please do not use my ideas for monetary gain, competitions or publication. The images on this blog - including blog buttons - should not be copied and used elsewhere on the internet or on CDs.