Sorry I can't update the blog right now. Please find me on Facebook

Showing posts with label Blender Pens. Show all posts

Tuesday, 25 January 2022

How to add colour to Awesome Otters using Watercolour Pencils, Blender Pens and Blending Brushes

Stampin Up UK Awesome Otters

Stampin’ Up!® is really good at creating cute stamp sets that everyone wants to own – and Awesome Otters, the new Sale-a-Bration stamp set, is a prime example. It’s been really popular with my customers here in the UK, as many of them love wildlife as much as I do. We do have otters here in Derbyshire but they are very elusive – maybe 2022 will be the year that I see one?
 
Stampin Up UK Awesome Otters

This stamp set, which is free with a £45 order, is perfect for new crafters or those who are new to Stampin’ Up!® and want to start building up their collection as it features both greetings and images; three fun otters which can be used separately or together.
 
Stampin Up UK Awesome Otters
 
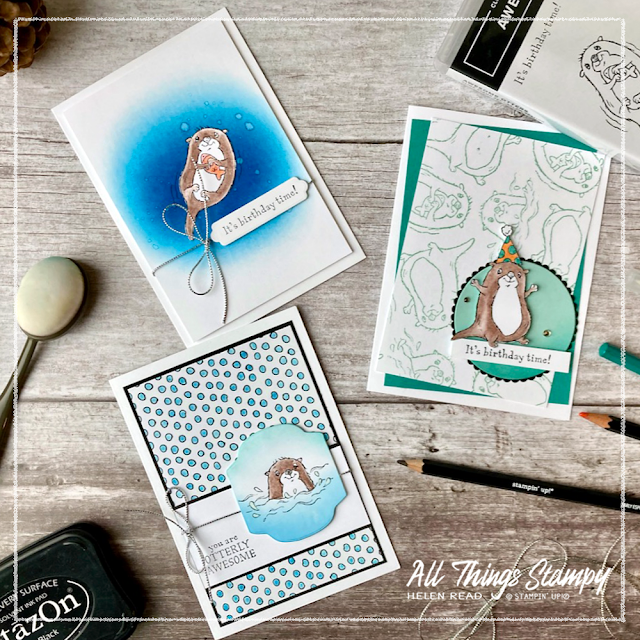
I’ve made a card with each of the otter images to add to my very depleted birthday card stash. I think these cards could be sent to anyone – men, women and children – and I would be more than happy to receive an otter birthday card myself. 
 
These cards show you how to add colour to your images using watercolour pencils with blender pens, and also how to add depth using Blending Brushes. 

All the images on my cards are stamped in Stazon and coloured with watercolour pencils and Stampin’ Up!® Blender Pens. When I say Blender Pens I mean the clear markers that you use with ink or pencils and not Stampin’ Blends, which are coloured alcohol markers. I know there is often some confusion because of the very similar product names.

When using Blender Pens (the clear ones), ideally use a permanent ink such as Stazon, although you can get away with a water-based ink such as Memento Tuxedo Black if you allow it to dry fully and work sparingly. 
 
Colour with your pencils, concentrating on the areas where you want darker colour to appear. Make sure you have enough colour on before you start blending as it’s difficult to add extra colour with the pencils once you have used the Blender Pens. When you are happy with the level of colour, gently blend it with your Blender Pens, working towards the uncoloured areas to create a soft graduated look.

Stampin Up UK Awesome Otters

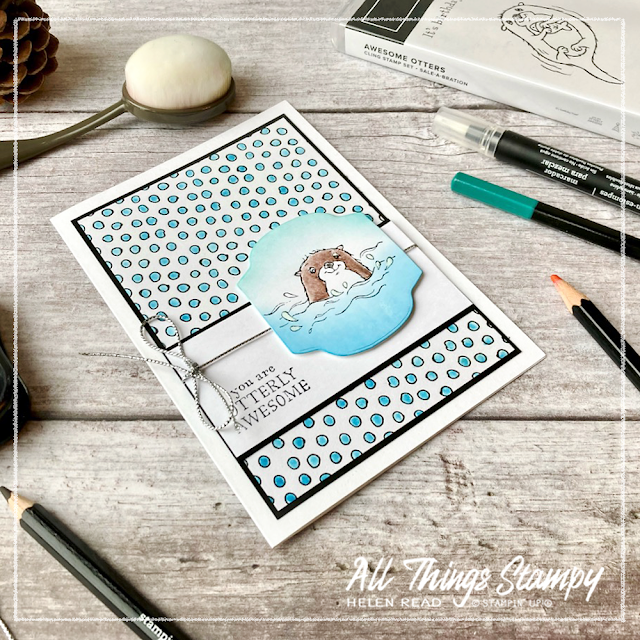
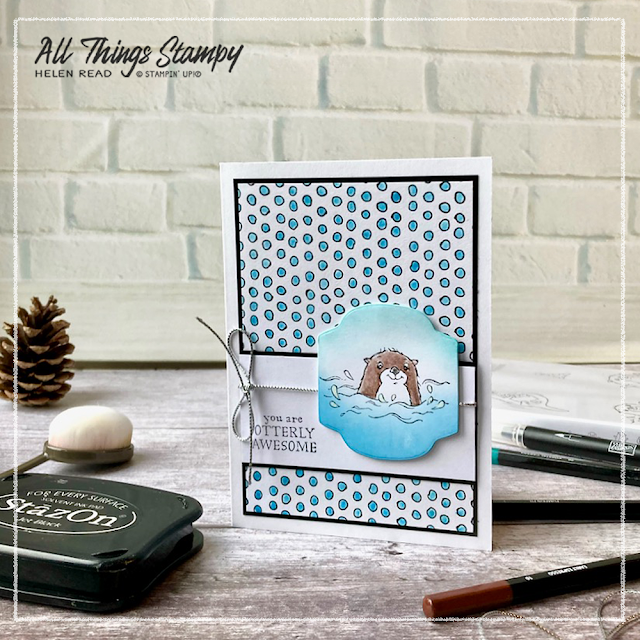
For my first card, I have created a background panel using patterned paper from the Pattern Party Designer Series Paper Pack, which is one of the host products in the Stampin’ Rewards section of the Stampin’ Up!® catalogue. This means you cannot buy it, but you can earn it free when you host a party with a workshop total of £150 or more or place your own order to this amount. The paper has bright colours one one side and black and white designs on the reverse; I’ve used one of these to create a blue spotty panel, adding the colour using my Pacific Point ink pad and a Blender Pen.
Stampin Up UK Awesome Otters

For my main element, I stamped the partially submerged otter onto a label die-cut using Seasonal Labels Dies. These dies were in the July-December Mini Catalogue but have carried over into the first part of 2022. I coloured the image using an Early Espresso watercolour pencil, then added extra colour using Stampin’ Up!® Blending Brushes; a hint of Pool Party at the top and some Pacific Point at the bottom. Blending brushes are an excellent way to add colour and depth to an element. 
 
Stampin Up UK Awesome Otters
 
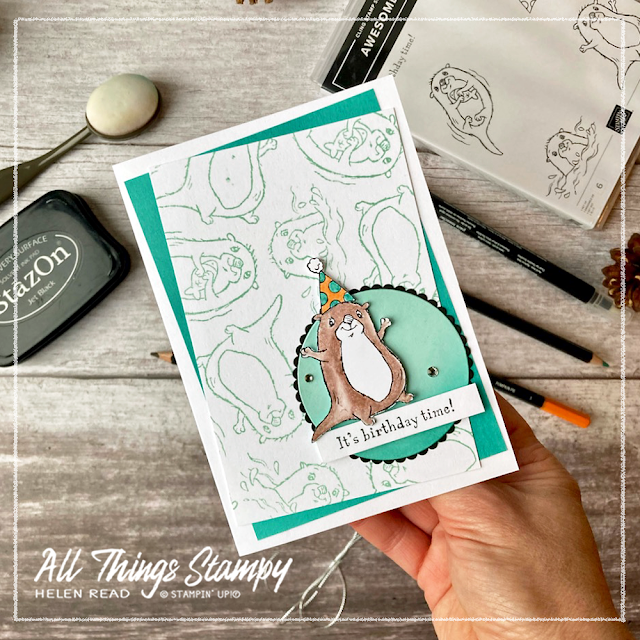
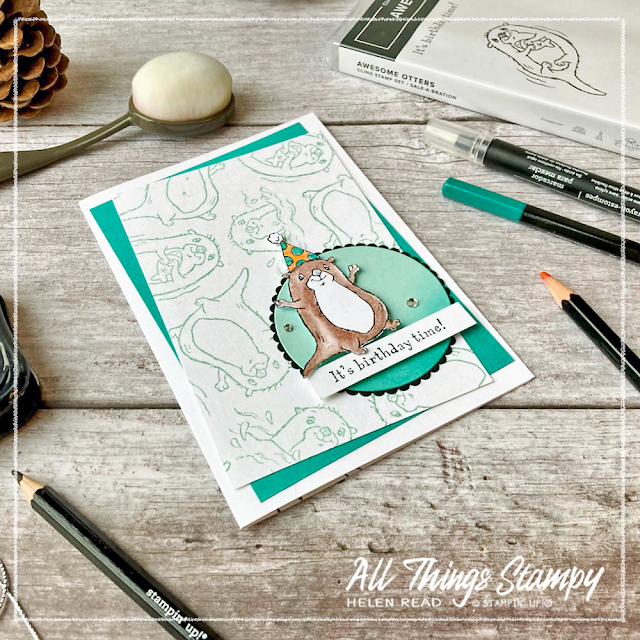
I’ve used a Blending Brush on this second card, too, to add a little depth to the Pool Party circle. The Pool Party theme is continued on the background, where I’ve stamped all the different otters at random, as close together as possible. This is a quick and easy way to make your own patterned paper to match your project perfectly.
Stampin Up UK Awesome Otters
 
The main otter image is stamped and cut out freehand, with a little party hat cut out and added on top. I’ve popped him up onto the Pool Party circle using Stampin’ Dimensionals, just resting his little foot and tail to overlap onto the greeting banner.
 
Stampin Up UK Awesome Otters
 
By positioning the stamped panel and the Bermuda Bay panel behind it at jaunty angles, this emphasises the fun feel of the card. It’s not necessarily something I would do for a more serious occasion, such as a sympathy card. 
 
Stampin Up UK Awesome Otters

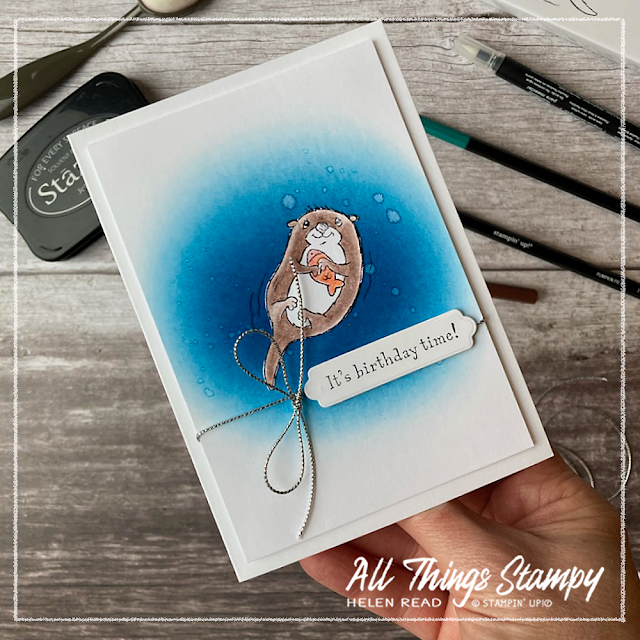
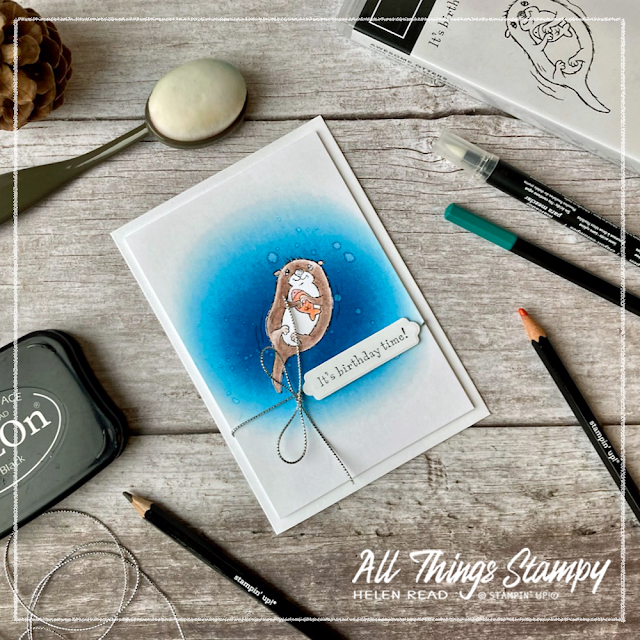
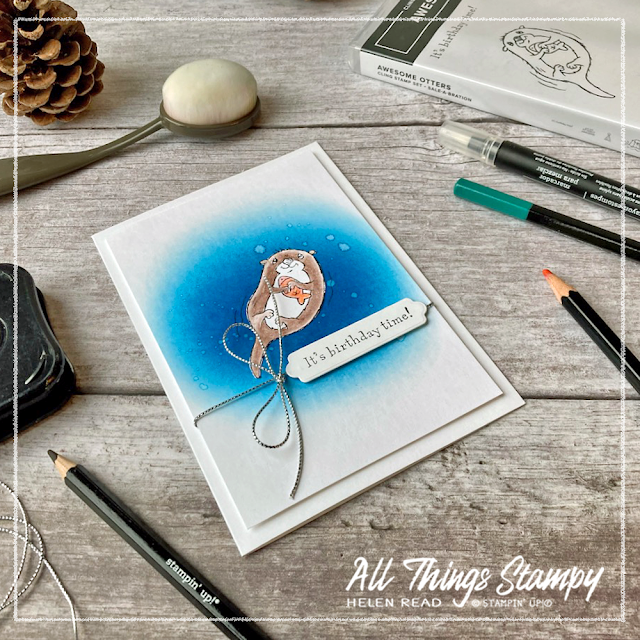
My third card really makes use of the Blending Brush by creating a dark pool of blue water in the centre of the card with the bright otter standing out from the background. I did this by stamping the otter onto a separate piece of Basic White cardstock and cutting it out closely. 
 
Stampin Up UK Awesome Otters

For the background, I applied Pacific Point ink with a Blending Brush in a circular motion, which creates much darker colour in the centre, graduating out to paler blue towards the edge of the cardstock layer. I stamped the otter directly on top of this blue ink, which meant I retained the finer details such as the movement lines. 
 
Stampin Up UK Awesome Otters

After I did this, I flicked some clear tap water onto the blue ink and allowed it to dry. This soaks up some of the ink to create pale splashes and is one of my very favourite techniques. Next I stuck the cut-out otter on top of the stamped blue layer, matching up the images perfectly. This is a great tip if you have fine details, such as whiskers or hair, that you really can’t fussy cut successfully.

The banner on this card, too, is cut out with Seasonal Labels Dies, and fits the “It’s birthday time!” greeting perfectly. It’s finished off with some Elegant Trim from the Stampin’ Up!® Annual Catalogue, for quite a clean and simple card. 
 
Stampin Up UK Awesome Otters
 
What I love about these projects is that they are largely created with white cardstock, which means you can adapt them to suit the ink pads you have. Any blue will do for this final card, although I love the richness and depth of Pacific Point. 
 
Stampin Up UK Awesome Otters
 
The fun birthday card could use any colours which can be picked up in the party hat and the background layer could be swapped to match.
Stampin Up UK Awesome Otters
 
And the Pattern Party Designer Series Paper, with its black and white designs, can be coloured in any colour – or none! – depending on what supplies you already own. These designs would also work with other animal images. 
 
It just shows you don’t have to own everything to make great projects; you can often work with what you have.
 
I hope you enjoyed my Awesome Otter projects and will consider adding this fabulous stamp set to your order next time. If you are in the UK and would like to order, please visit my store and, if you use the current host code RNU3JCR9, I’ll send you a thank you gift next month month. 


Does your wish list come to more than £99? Please get in touch and I will help you get more for your money and unlock discounts all year round.  


Wednesday, 9 October 2019

Simple Stamping with Animal Outing


As a Stampin’ Up!® demonstrator, you can imagine that I have a pretty impressive stash of craft supplies and the temptation is always there to as much as possible for each project.

But sometimes it’s good to scale things back and show that crafting doesn't have to be complicated at all. These little cards (they’re half-sized so you get four from a full sheet of cardstock) use just stamps, ink, cardstock, watercolour pencils and blender pens... and that last item is optional. Ok I confess I used the Stamparatus, too – but I was making a LOT of these!

If you're not sure where to add shading when colouring an image, be guide by the original artist. Look for the shading on the stamped image – under the chin, between the legs, etc – and add your darker colouring there. 


Monday, 22 July 2019

Magnolia Blooms note card


Introducing the Magnolia Blooms stamp set. This little set is great starter set... which is exactly why you will only find it in the new Experience Creativity brochure for new crafters.


This little publication is a great place to start someone on their crafting journey, so if you're in the UK and would like a copy to pass on to someone who needs crafting in their life, please drop me a line.


Don’t be afraid to mix and match products. The Magnolia Blooms stamp set is designed to 
co-ordinate with the Magnolia Lane Suite and the Magnolia Lane Designer Paper. However, I don’t have any of these products so used the Come Sail Away Designer Paper instead. It has a similar striped Mossy Meadow sheet which works just as well, and the fine print design is neutral enough to go with anything.
Friday, 12 April 2019

#Simplestamping with Accented Blooms


My new(ish) Cuppa & Card sessions at Dawson's Café in Borrowash are a great way to meet new people... and I’ve already signed two of them up into my team. Not a bad start to the year.

This month we used the lovely Accented Blooms stamp set, which is really popular not just because of the great images but because there's a co-ordinating punch. Who doesn't love a co-ordinating punch?


I kept things simple (#simplestamping is the best!); the first card is just stamped in Gorgeous Grape and the colour pulled from the edges using a Blender Pen. The second card is a little more complex, with the image coloured in using ink pads and blender pens.


Wednesday, 6 February 2019

Wonderful Romance - Stampin' Blends or Blender Pens?


Stampin’ Blends or Blender Pens - which do you prefer?

The image on the left is coloured with Blender pens in a mixture of greens, including Granny Apple Green, which is why it is more vivid. The one on the right is coloured with Old Olive and Calypso Coral Stampin’ Blends (light and dark), with an outline of light Pool Party.

Both are stamped onto Very Vanilla cardstock and cut out with the fabulous new Stitched Rectangle Framelits.

But the most important thing to remember when colouring is this...


Monday, 4 February 2019

Wonderful Romance in Calypso Coral


Last week was my monthly Crafty Friday event, where we used the new Wonderful Romance stamp set.

This has a variety of sentiments, for weddings, anniversaries, Valentine’s, even sympathy (see above), but can be used for any occasion, even a simple notecard, as below.

We coloured the image above using ink pads and Blender Pens. Come back later in the week to see another version coloured with Stampin’ Blends.


Friday, 18 January 2019

Simple Stamping with Love What You Do


I have started new Cuppa & Card sessions at Bugs Tucker Cafe in Borrowash, near Derby. These are the cards we made at our first session. They use a lovely, spring-like colour palette, with blender pens to colour in the images.


Wednesday, 16 January 2019

Home to Roost Sale-a-Bration stamp set


This is my other joint favourite stamp set from Sale-a-Bration. It's called Home to Roost and we made this card with it on Crafty Friday last week.

The images are stamped in Crumb Cake, then coloured using ink pad lids and Blender Pens. Calypso Coral for this handsome cockerel's comb, Pool Party and Bermuda Bay for his tummy and tail feathers, Crushed Curry and Mango Melody for his back and chest.

Monday, 14 January 2019

By the Bay Sale-a-Bration stamp set


This was my joint first choice out of the Sale-a-Bration brochure... luckily my order meant I could earn more than one freebie.

Every £45 you spend during SAB (Jan-Mar) earns you a freebie from the brochure. I highly recommend By the Way, used here on a product-heavy card which we made at Crafty Friday.

Look out for two carryover items; the Sprig Punch and Braided Trim, both still available from the Autumn/Winter catalogue.


Wednesday, 8 March 2017

Tasty Trucks... speeding away


This fab Tasty Trucks card was designed by my friend and helper, Kelly, for a colouring class. I love the clever use of Gorgeous Grunge inside to represent the speeding van... and the way the cakes are tumbling out of the back.


You can tell this project didn’t come out of my head because of the bright colours used! But I have to concede that they suit this stamp set perfectly. The image is coloured with our lovely new watercolour pencils... which just happen to be the most popular item from the Spring/Summer catalogue with my customers.

Monday, 16 January 2017

Mix It Up Monday: Tasty Trucks


I’m quite excited about this Mix It Up Monday project, which began its life in Friday morning’s discussion with my friend Kelly. I’m impressed that I managed to make it work all by myself without a tutorial (I struggle with anything other than basic folds!), although the slider is a little tight and doesn’t return as easily as I’d like. 

So here we have a cute little van with cakes and the fun sentiment, “Happy Birthday, now where’s the cake?”


Pull out the slider and the cakes are being stolen by a cheeky goat. Yes, I love goats, too, just as much as llamas!

In fact, it was the llama which started it all, as we were hoping to squeeze a llama into the van from the Sale-a-Bration set, Tasty Trucks. When we realised it was too big, I dug out my Barnyard Babies set and the rest is history. 


As for the colour combination, it is no secret that I have a hate-hate relationship with Pêche Fraiche (I can’t even bring myself to say the English name) but I have to confess that this colour combination isn’t too bad. And if you’re wondering why you’re seeing so many Peach combinations on Mix It Up Monday recently, it’s because I’m rapidly working my way through the Peach combinations  from my In Color charts so I can wash my hands of them!

Friday, 10 June 2016

Love You Lots froggy card


Oh happy day indeed! My big order came - it was sooooo exciting, especially as much of it was for me, and most of my stuff was FREE. Why free? Well, as a demonstrator, I get to earn special rewards for sales and recruiting during Sale-a-Bration - and the long redemption period means I can save them up for new catalogue products. 

There was a distinct animal theme to my order, with birds, a flamingo, llama and foxes among my stamp sets, plus another out-of-character floral set. One of my flower-loving customers, Grace, says her influence is rubbing off. And it probably is; I do think that stamping with other people opens your eyes to other styles and ideas… not to mention giving you access to even more fun products! So if you’re not hold stamping play dates with your crafty friends, why not? And if you don’t have any crafty friends, why not join a class or sign up as a demonstrator? (There’s a GREAT offer on at the moment - just sayin’.)


Anyway, today’s project is project is another Love you Lots card, as I haven’t actually had time to make anything with my new stuff yet. Hope you like the fun froggy!

Please come back tomorrow for Caturday in the morning... then another Around the World Blog Hope late in the evening. 


Blender Pens
[102845]
£9.00

The small print

This is my personal blog and my sole responsibility as an Independent Stampin' Up!® demonstrator. All images are © Stampin' Up!® All content including photographs, projects and text are © Helen Read, unless otherwise stated. Please feel free to copy my ideas for your personal use and inspiration - if you are a SU demonstrator you may use these ideas for your events but please give credit where it is due. Please do not use my ideas for monetary gain, competitions or publication. The images on this blog - including blog buttons - should not be copied and used elsewhere on the internet or on CDs.