Tuesday 31 August 2021

Birthday card using Happy Holly-Days Christmas stamp set

Happy Holly Days card idea Stampin' Up! 
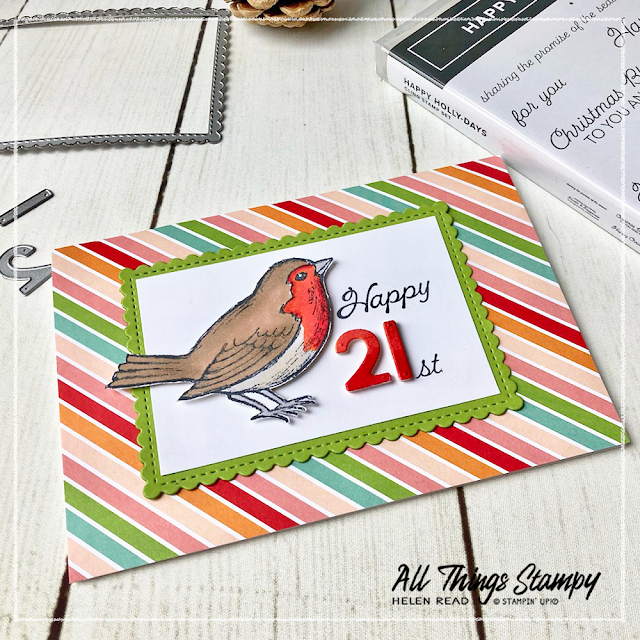
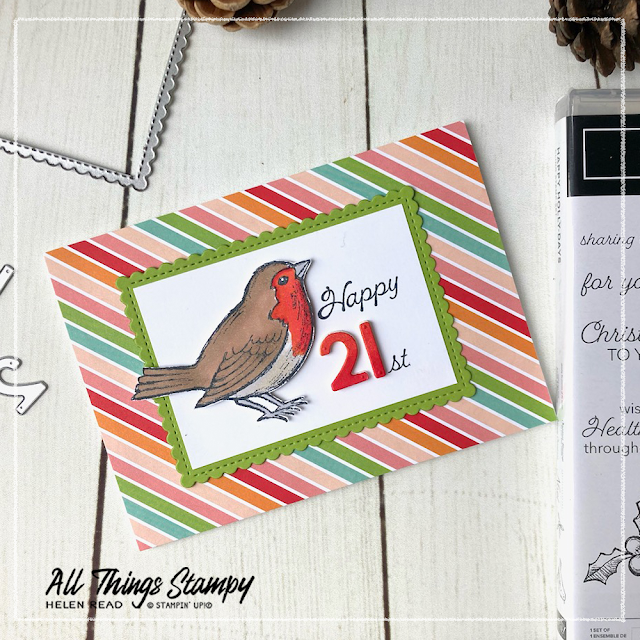
Although I can’t yet face making Christmas cards as that feels like the end of summer – I like to wait until schools have reopened at least – I knew the Happy Holly-Days stamp set in the new Stampin’ Up!® Mini Catalogue would be perfect for a friend’s 21st birthday card. When your name is Robin, no other image will do! I’m a day early here but I don’t think anyone will see it until tomorrow; I won’t share this on social media until tomorrow, just in case!

Happy Holly Days stamp set from Stampin' Up!
 

When I saw this lovely Happy Holly-Days stamp set in the new Stampin’ Up!® Mini Catalogue, I may just have punched the air a little because we UK demonstrators have been asking for a proper European robin for our Christmas cards ever since Stampin’ Up’!® launched here in 2007. 

Happy Holly Days card idea Stampin' Up!

I coloured the robin from Happy Holly-Days using Stampin’ Up!® Stampin’ Blends. I didn’t have quite the right shades so mixed them directly on the paper. I used Gray Granite with a hint of Ivory on the belly, Poppy Parade with a hint of Pumpkin Pie on the chest, and Crumb Cake with a hint of Bronze on the back. The beak and legs are just Gray Granite; they should really be black but I thought that would look a bit stark. 

Happy Holly Days card idea Stampin' Up!

I fussy cut the image to pop up on Stampin’ Dimensionals. Did I fussy cut between the legs? Of course not. What do you take me for? I would have done if I’d been mounting it onto a different colour but as it’s white on white, it wasn’t worth the effort and risk of damage.

Study your greeting stamps carefully as you may be able to create new words from them. Here I have used this Christmas stamp set to create my greeting. I used tape to mask off the word “Christmas” to leave “Happy” and then cleaned it up and masked the same stamp to leave “st” within the word Christmas. Remember to remove the tape before stamping or you will just end up with a messy splodge!
 
Happy Holly Days card idea Stampin' Up!
 
I created the 21 using the Playful Alphabet Dies, which are a must-have addition to your craft stash in my opinion. I could have used Poppy Parade cardstock but as I already had some white cardstock mounted onto the oh-so-useful Foam Adhesive Sheets, I just used this and coloured the numbers with Stampin’ Blends.

This layer is mounted onto Granny Apple Green cardstock cut out with the also must-have Stitched So Sweetly Dies.

Happy Holly Days card idea Stampin' Up!

I covered my card front with this cheery Designer Series Paper which comes from the absolutely huge Pattern Party 12x12 pack which is exclusively available to hosts. You get 48 sheets so it’s the equivalent of four standard packs.

The designs are really cheery on one side, and black and white on the reverse so you can colour them in your chosen shade if you wish. I love this bright and cheerful rainbow effect, which meant I could pick out the Granny Apple Green for my layer and Poppy Parade for the numbers and colouring of the robin’s red breast. 
 
Robin for Stampin' Up Christmas cards
 
For international readers, the robin redbreast is a traditional symbol of Christmas in Britain. Year-round visitors to our gardens, robins are much-loved because of their confidence around humans. They became synonymous with Christmas in Victorian times; postmen were nicknamed robins because they wore red waistcoats and were often depicted on Christmas cards. 
 
In real life, robins have an orange chest rather than red, so why do we call them a robin redbreast? This is one of my favourite fun facts and it’s because they were named before the English language had developed enough to come up with a word for orange. Hence we also have the red squirrel, red deer and red kite. 
 
Happy Holly Days card idea Stampin' Up!

Happy Holly Days card idea Stampin' Up!

Think this would make a great addition to your craft stash, Christmas or otherwise? If you’re in the UK, you can order Happy Holly-Days and any other current Stampin’ Up!® products from my store

Does your wish list come to more than £99? Please get in touch and I will help you get more for your money and unlock discounts all year round.  


Tuesday 24 August 2021

Counting Sheep stamp set - FREE in August and September

Counting Sheep Stampin' Up card idea demonstrator UK

 
How fun is this card? I am so proud that one of my team members promoted to the next Stampin’ Up!® level and wanted to make her a card to accompany the gift I sent her to celebrate this impressive achievement.

This is a very silly card but has the perfect sentiment – You’re Amazing! – and was a great opportunity to enjoy my new Counting Sheep stamp set. 
 
Counting Sheep Stampin' Up card idea demonstrator UK
 
Counting Sheep Stampin' Up stamp set demonstrator UK

This fun rubber stamp set is part of our Sale-a-Bration offering, and free with a £45 order during August and September. There are three fun sheep in the stamp set, as well as two greetings, a party hat and some grass.
 
Sheep Dies Stampin' Up demonstrator UK
 
There are Sheep Dies, too, which are also free with a £45 order. The dies feature shapes to cut out the sheep, plus this cute gate, a sun, balloon, party hat, flag, and the mounds of grass I’ve used in today’s card, which would also work as clouds.  
 
I love that the stamps and dies are available separately, giving you the option to have one or both products, and to split your purchases across two months. 
 
A word of warning; the Sheep Dies are only available while supplies last so, although it may seem back to front, I have been recommending that my customers get these first, then get the stamps next month, as they are guaranteed to be available throughout Sale-a-Bration.

Counting Sheep Stampin' Up card idea demonstrator UK

I coloured my sheep using Stampin’ Blends... giving them a very light touch. Just a bit of Ivory on the faces and legs, and some light Smoky Slate on the hooves. 
 
Counting Sheep Stampin' Up card idea demonstrator UK
 
It’s finished off with some gorgeous gingham ribbon. Black and white gingham ribbon is always popular with crafters so I‘m delighted to see it return. If you’re not into Halloween, you could easily overlook this product, but you’ll find it on page 51 of the Mini Catalogue, and also on p74 in the accessories section.

As I write, Counting Sheep is the second most popular Stampin’ Up!® stamp set in the UK – and I can see why. It’s cute, it’s fun and best of all... it’s free!
 
Counting Sheep Stampin' Up card idea demonstrator UK
 
If you love these sheep stamps and dies as much as I do, you can earn them free during August and September. If you’re in the UK, please shop using this link.
 
Does your wish list come to more than £99? Please get in touch and I will help you get more for your money and unlock discounts all year round.  


Tuesday 17 August 2021

Introducing the Feels Like Home Sale-a-Bration stamp set

Stampin Up Feels Like Home Sale-a-Bration card idea

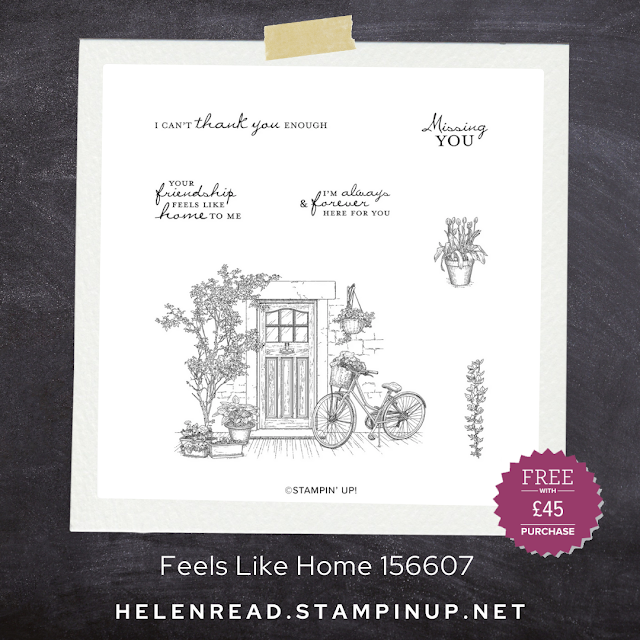
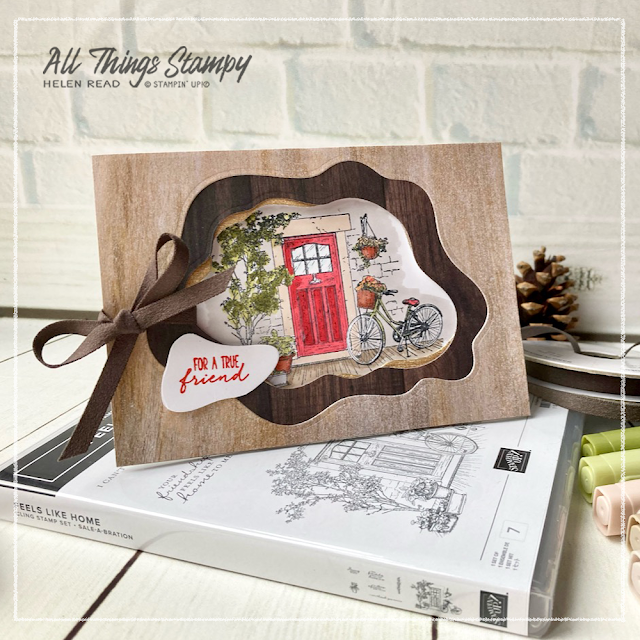
I do have lots more Nature’s Harvest projects to show you but thought I’d better vary things a little before you got bored and walked away. So today I would like to introduce the Feels Like Home Sale-a-Bration stamp set which is free with any Stampin’ Up!® order of £45 or more. 

Stampin Up Feels Like Home Sale-a-Bration stamp set
 

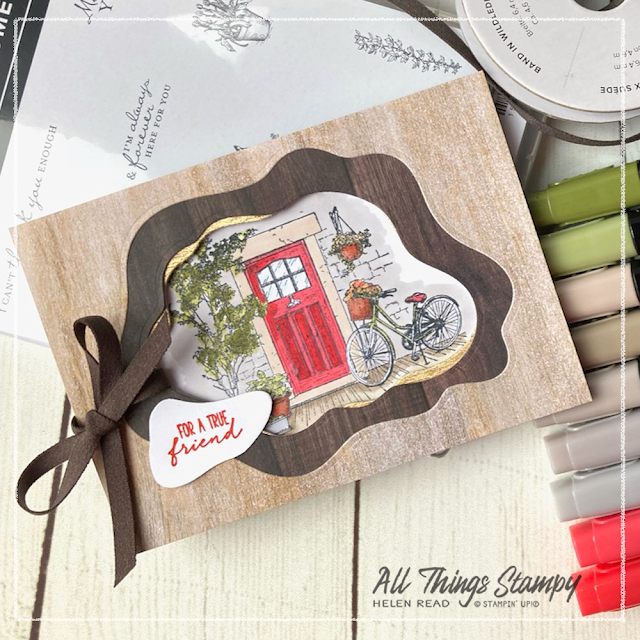
Feels Like Home is a really beautiful cling rubber stamp set with so much detail that it can look a bit daunting at first.  But I really wanted to use it to welcome an old friend back into my Stampin’ Up!® team as it really does feel like she’s coming home. Donna has returned to the fold, taking advantage of the free bundle she could add to her kit during Sale-a-Bration in August and September.

Stampin Up Feels Like Home Sale-a-Bration card idea

I began by stamping the image in Memento Tuxedo Black so I could colour the image using Stampin’ Blends. 

Always use a water-based ink with Stampin’ Blends if you use a permanent ink pad, the alcohol in the markers will lift it and cause smudging.


Stampin Up Feels Like Home Sale-a-Bration card idea

Colouring isn’t one of my favourite craft activities but I steeled myself for this main image and discovered that while it’s not always obvious where one section ends and another begins – particularly within the plants and flowers – the image is actually extremely forgiving.

In the end, for the flowers and climbing plant, I vaguely coloured them using my paler Stampin’ Blends and then added the darker shades just by dotting my marker onto the image. 

Stampin Up Feels Like Home Sale-a-Bration card idea

I coloured the front door using Poppy Parade, using the dark marker in the recesses of the door and a little around the top left corner.

The door frame was coloured in Ivory, while the brickwork was Light Gray Granite. The area in front of the door is Crumb Cake light and dark. I coloured the basket and terracotta pots in light and dark Cajun Craze and then used Old Olive light and dark for the greenery, and Pale Papaya light and dark for the flowers. The tulips at the front are Rich Razzleberry. 

Of course, you don’t have to colour the image at all if you don’t want to. Here are a couple of samples made by the Stampin’ Up!® design team...

Stampin Up Feels Like Home Sale-a-Bration card idea

 But if you can face the colouring challenge, I do think it’s worth the effort.

Stampin Up Feels Like Home Sale-a-Bration card idea

When I’d finished, I realised the shape of the stonework lent itself perfectly to the shape of the Layering Diorama Dies, which are a favourite purchase of mine. I love how they provide a completely new way of framing our images and I cut various sizes in different wood-grain designs from In Good Taste Designer Series Paper, as well as the gorgeous new Brushed Metallic Paper in gold. 

Stampin Up Feels Like Home Sale-a-Bration card idea

Now a little confession... just as I was writing this card to send (in a hurry, as usual), I realised I’d forgotten to attach the tulip image to the front so had to take my photos again really quickly. So that’s why some of the images you see here don’t have that finishing touch! Had you noticed?

Stampin Up Feels Like Home Sale-a-Bration card idea
 

If you are in the UK and would like to order, please visit my store.


Does your wish list come to more than £99? Please get in touch and I will help you get more for your money and unlock discounts all year round.  


Tuesday 10 August 2021

More ideas for the Nature’s Harvest bundle


Friday was supposed to be my first in-person Stampin' Up!® party since the start of the pandemic. Everyone was very excited to get together in a safe outdoor setting and actually enjoy some face-to-face chatting and crafting.

You know what’s coming, don’t you? Yep, COVID struck and the host had to isolate. Undeterred, we switched to a Zoom meeting and I did my best to make it fun for everyone who attended.


This project was supposed to be the Make & Take for the evening but of course that didn’t happen. Instead I will send all the ladies a kit to make a modified version with die-cut flowers and grasses instead of stamping with the Nature’s Harvest stamp set as I have done here.
 
 
I’d made two versions ahead of the event, showing how different the flowers could look when stamped onto white cardstock or Crumb Cake. I love the look of stamping onto Crumb Cake, especially with a flower of his type as it means you can colour the petals using the Chalk Marker.


For this version, I stamped in Memento Tuxedo Black and coloured using Stampin’ Blends in Calypso Coral, Mint Macaron and Mango Melody. I’ve added some stamping in Soft Succulent in the corner, too. 


On the night, I demonstrated this version, using the fun polling tool in Zoom to allow the guests to vote on how I made it. They chose this Bumblebee side of the Harvest Meadow Designer Series Paper, then chose a Soft Succulent layer over Calypso Coral and also chose for me to stamp onto Crumb Cake instead of white. 


When using delicate dies such as the grasses from the Harvest Dies shown here, it is a lot easier to stick them down if you use Adhesive Sheets. To use these, you will want to stick a rectangle of cardstock to the sheet before die-cutting. If you try to stick the pre-cut shape to the sheet, you'll just end up with a sticky mozzarella-style mess.  
 

If you love the Nature’s Harvest bundle of stamps and dies as much as I do, you’ll be delighted to know that if you purchase them together you will save 10% on the individual prices. If you're in the UK and buy them during August or September, you will also qualify for a free Sale-a-Bration gift.


Want it all? If you have a BIG wish list, please get in touch and I will help you get even more for your money.  


Tuesday 3 August 2021

Introducing the new Stampin' Up!® Harvest Meadow Suite

Harvest Meadow Stampin Up card idea

Today the new Stampin’ Up!® July-December Mini Catalogue goes live (yes I know it’s August but hey, Covid!) and I’m excited to introduce you to the new Harvest Meadow Suite.

It’s not often I buy a whole suite of products from a Stampin’ Up!® catalogue but just sometimes it’s easier to type that single item code than wade my way through all those different numbers. This was the case with this gorgeous suite. 

Harvest Meadow Stampin Up card idea

I love everything in this suite; the Nature’s Harvest stamp set, the Harvest Dies, the Timeworn Type 3D Embossing Folder, the Diamond Weave Ribbon, the Brushed Metallic Adhesive-Backed Dots, the Cork Speciality Paper and of course the lovely Harvest Meadow Designer Series Paper.

Not all of those products are shown here but I had a pretty good stab at many of them to make these two cards. 

Harvest Meadow Stampin Up card idea

The first card here is based on the one on page 71 of the new Mini Catalogue. You often find extra card ideas at the back of the catalogue where the bundles are displayed. The colours of the card sample in the catalogue didn’t speak to me so I swapped the paper for this lovely Misty Moonlight design from the Harvest Meadow Designer Series Paper pack. 

Harvest Meadow Stampin Up card idea

I coloured the image using Stampin’ Blends; Calypso Coral for the petals, Mango Melody for the flower centres and Mint Macaron for the leaves and stems.

Die-cut leaves, stems and flowers provide a fitting backdrop for the coloured image. I cut these from Crumb Cake, Bumblebee and some lovely gold paper from the Gold & Rose Gold 6" X 6" Metallic Speciality Paper pack.

Harvest Meadow Stampin Up card idea

The greeting is stamped in black, cut out with the long die from the set and overlaid onto a piece of gorgeous cork, which I’ve hand cut (and which no matter how hard I tried, still looks wonky!).

It’s finished off with a linen thread bow and dotted around are Brushed Metallic Adhesive-Backed Dots.

Harvest Meadow Stampin Up card idea

For the second card I repeated the same greeting on cork motif, along with a similar arrangement of stamped and die-cut images, but laid these onto a white panel which is popped up on Stampin' Dimensionals to make it stand out from the Designer Series Paper background. I love this sheet of paper from the same Harvest Meadow Designer Series Paper pack; this pack really is very varied, while keeping with the colour theme. 

Harvest Meadow Stampin Up card idea
 

This time I’ve used a greeting stamp from another set – Artistically Inked – and added the dots either side of the words. This is a good way of making it look like your sentiment fits the die-cut panel perfectly!

Behind the greeting panel is a swirl of linen thread. I confess I always struggle with these. The trick seems to be to use double-sided tape directly onto your project, then just loop your thread around and stick it to the tape to hold it down as you go. 

I had a great time playing with this new suite and hope you like the projects and products as much as I do! 

Harvest Meadow Stampin Up card idea

Remember, not only has the Mini Catalogue gone live but Sale-a-Bration has started! If you are in the UK, buying this whole suite collection would earn you two Level 1 Sale-a-Bration freebies, or one Level 2.


Alternatively, you could spend £99 and upgrade to the Starter Kit which would grant you access to my Stampin’ Up!® team, along with ongoing discounts and sneak peeks. I’d love to have you on board so please message me via my website if you would like more details or if you’d like me to give you a call. 


The small print

This is my personal blog and my sole responsibility as an Independent Stampin' Up!® demonstrator. All images are © Stampin' Up!® All content including photographs, projects and text are © Helen Read, unless otherwise stated. Please feel free to copy my ideas for your personal use and inspiration - if you are a SU demonstrator you may use these ideas for your events but please give credit where it is due. Please do not use my ideas for monetary gain, competitions or publication. The images on this blog - including blog buttons - should not be copied and used elsewhere on the internet or on CDs.