Saturday 30 June 2018

Caturday: Ginger stunner


What a stunning kitty this is! We spotted him (I assume him, as most gingers are) on a walk not far from home and I couldn’t resist stopping to take a pic, even though it breaks my self-imposed rule of not photographing people’s homes.

Sadly, he was too scared to come up for a chin rub, so I had to settle just for the photo.

Friday 29 June 2018

Peaceful Place - watercoloured onto Crumb Cake


Peaceful Place is a stamp set with my name all over it. Woodland, trees, a squirrel...

I confess I was a little put off by the sentiments but decided that the images more than made up for them. In fact, I’ve cut the long sentiment up so I can just use “Thinking of you” on its own, which will make the stamp set much more versatile, for me at least.


Using the Stamparatus, I stamped the image onto Crumb Cake with Soft Suede ink, then cleaned the stamp before stamping again in Versamark, then heat embossing with clear embossing powder.

The beauty of the Stamparatus is that you can do this in exactly the same place, which makes embossing in ANY colour really easy.


Next I painted the image, because I wanted to see what it would look like on Crumb Cake. I am quite happy with the effect; you just have to bear in mind that colours will come out much more subdued.

The water and sky are painted in Balmy Blue; the grass in Pear Pizzazz, the big tree in Old Olive, the pines in Mossy Meadow, the bush in Mint Macaron, riverbank in Crumb Cake and rocks in Gray Granite. What do you think?


Wednesday 27 June 2018

Animal Outing cart


How cute are these animals? I must have another play with this stamp set, which I confess I haven’t used since creating the projects for my OnStage Telford display.

I used the Wood Crate Framelits to make the cart, which I stamped in Real Red with the Hardwood background stamp.  The handle is just a strip of Night of Navy cardstock with a punched circle folded in half to make a handle. As for the animals, they’re propped up like this...


There are three narrow strips of cardstock running along the inside, so the animals can be stuck onto the front and create the 3D effect. It was such a fun project to make - hope you like it!

Monday 25 June 2018

Heat embossing with the Stamparatus


Thanks to Aussie demo Carolyn Bennie for the tutorial for this lovely card using the All the Good Things stamp set from the new Distinktive range. These are highly detailed stamps which give you an incredible depth of colour from just one impression. 

To make them stand out even more, the fish are embossed... which also makes it possible to watercolour in the background without muddying the colours. 

How do you emboss the fish? It’s so simple with the Stamparatus. Just ink up the stamp in Pumpkin Pie and stamp onto your cardstock. Then clean off the stamp, ink it again in Versamark and stamp on top so you can apply embossing powder and heat set. 

What would have been extremely challenging, even with the Stamp-a-ma-jig, is now REALLY easy... thanks to the Stamparatus. Yeah, I’ve done a U-turn. You can’t say you didn’t see it coming. Please don’t gloat. 


Saturday 23 June 2018

Caturday: Ambergate (?) cat


I can’t remember exactly where we were when we saw this beautiful tortoiseshell cat but it was on a walk around the Ambergate area. She didn’t want to stop and chat...

Friday 22 June 2018

Love What You Do with gorgeous Grapefruit Grove


I made this card a while ago but it seems to have slipped through the net. I CASEd and adapted it from Amy Koenders and the perfectionists among you will notice the slight mis-stamp on one of the green sprigs. Normally this sort of thing bothers me and I would stamp it again, but I decided to let it go – nothing in nature is perfect, after all.

Don’t you just love the colour combination? I’m a massive fan of the new Grapefruit Grove. And yes, I know it’s peach and I have not held back in my disdain for the thankfully now retired PĂȘche Fraiche, but this is a MUCH nicer peach which is a lot easier on the eye. That’s my story and I’m sticking to it.


Wednesday 20 June 2018

Tutorial: Rooted in Nature teabag holder


Every month I like to honour and reward my team members who have gone above and beyond. for my first level team members, there are rewards for promotions, achievements and for simply selling more than they did in the previous month.

For my extended team, I also send out three “random rewards” which are little handmade gifts to three people chosen at random (the only qualification is that they have placed an order during the month).


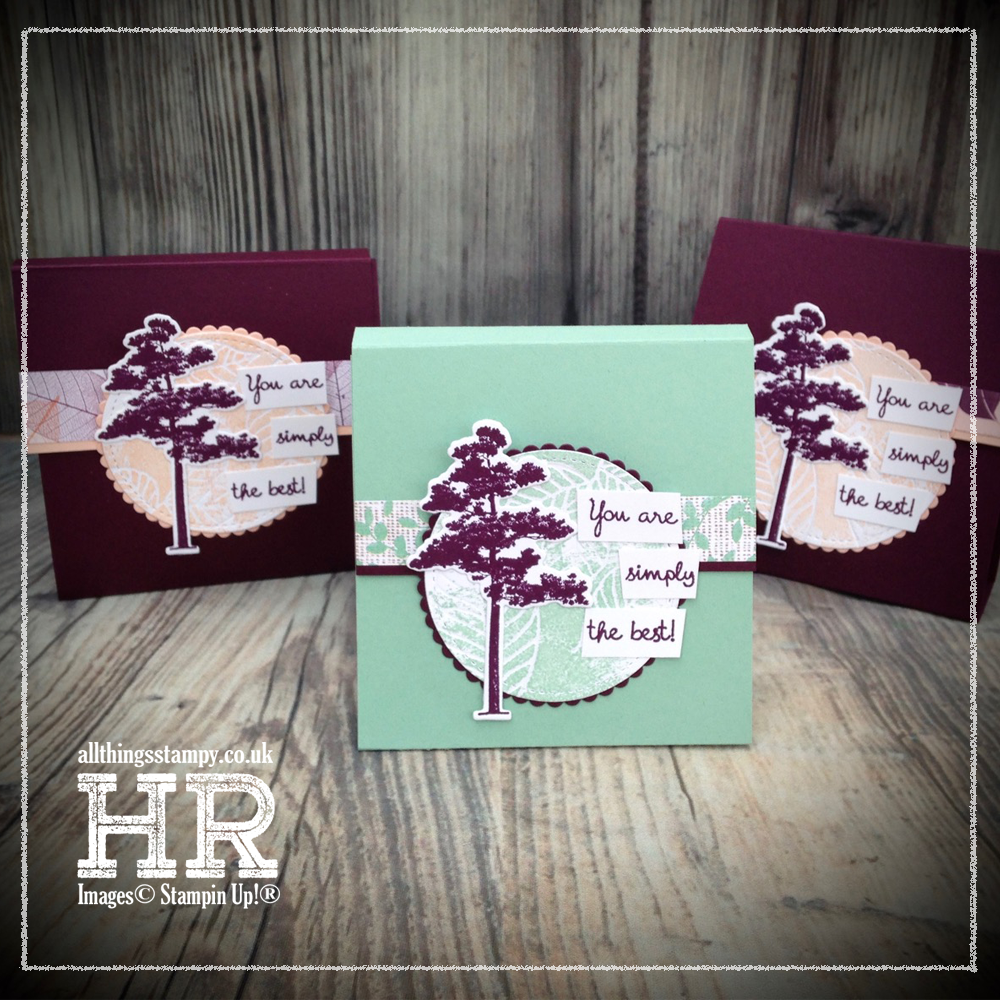
This month I sent out these cute teabag holders, inspired by a gift from my downline Stampy Sue and shown on Monday in this post. Inside are three little envelopes, each containing an individually wrapped teabag - plastic-free of course!

But before I show you how to make these, here’s a close-up of the front. For the circle panel, I embossed using the clever leaf embossing dies from the Rooted in Nature bundle. Then I stamped on top using the Artisan Textures stamp set, for a rustic look. 


Here are the measurements... you should be able to see a larger image if you click on it.

Once you’ve made the outer, as shown above, you simply make three little envelopes using the Envelope Punch Board. I’m turning to inches for these as it’s easier... 

They are made from 5.5" squares
The first score line is at 2 3/4"
Then simply proceed as normal, turning the DSP 90Âș anticlockwise to make the envelope.

These are then stuck inside - onto the green M shape in the diagram above. 


Finally, decorate the front, making sure you leave the top section of your decorative panel without adhesive, so the front flap can slide in and out easily. 

Hope you like it - and have fun!

Monday 18 June 2018

Tropical Chic in super bright colours


I held a Stampin’ Up!® party on Friday for the first time in years. This is a shameful admission when you think I am very keen for other people to hold them. And it also made me wonder I haven’t been doing it more often as I had a great time... didn’t have to pack the car or drive anywhere, and thoroughly enjoyed choosing my free products!

A BIG thank you is in order to everyone who came along and ordered products, and generally made the evening a fun one.

I demoed the Tropical Chic bundle, which I’m delighted to play with at last. I’ve had the dies since February, for my Display Team projects, but have only just taken delivery of the stamps.

Above is the Make & Take, which I CASEd from the latest edition of Stampin’ Success (the magazine for demonstrators) but changed to even brighter colours. I’m a big fan of the new, revamped Brights collection!


This was the prize for the evening which, in the absence of Karen, inevitably went to Sharon. This seems to be how it works at EVERY party. Karen nearly always wins (although she denies it!) and, if she’s not there, Sharon will win.


This was my 3D demonstration... a fun little teabag holder. I used the ‘smoosh technique’ on the watercolour paper before cutting out with this fun die.

As for the teabag holder, I have another version of this to show you on Wednesday so please do pop back, and I may even have some instructions for you.

What do you think of the colour combo? Too bright? Not bright enough? I’d love to hear your thoughts...

Saturday 16 June 2018

Friday 15 June 2018

Varied Vases vibrant colours


I had lots of fun creaeting these vases of leaves and succulents using the new Varied Vases stamp set. The stamp set was inspired by Mary Fish, a US demonstrator who recently hit her $1m sales mark and was given the privilege of helping to design the stamp set.

So it seemed only natural to turn to the creator for inspiration for this project; I love Mary’s style anyway and CASEd the vase layout from her colour block card from this post.

I liked it so much that I adapted it for a set of Thank You cards (yet to be used, so look surprised if you receive one!)...


Naturally, when making this many of the same design, things are bound to go “different” at certain points. Can you spot the differences between the two cards below?


As for the colour combination, I turned to my charts for the perfect combo, but ended up changing it slightly to add the Shaded Spruce. I do love this combo, but feel it gives the card a slight “vegetable box” vibe. If I find the image I’m thinking of, I’ll let you know.


Wednesday 13 June 2018

Lilypad Lake rubber band technique


This was a super-fun and effective technique demonstrated by my friend and downline Tricia on a crafty weekend away last month, and I must get round to trying it again – a fun one for a Crafty Friday I think!

We began by masking the strip with sticky notes.

To create the “reeds”, we wrapped elastic bands around a clear block in a random fashion, then pressed it into an ink pad before spritzing lightly with water and stamping onto the masked off area. Repeat without reinking, then reink when necessary. We used Sahara Sand and Garden Green here, then sponged over the top (when dry) with Coastal Cabana. I love it!

Finally, we all added our herons/cranes? and greetings to suit. I kept mine very simple as I didn’t want to distract from the clever technique.


Monday 11 June 2018

Delightfully Detailed Golden wedding anniversary card


I don’t normally do card commissions but my Mum laid on the emotional blackmail pretty thickly so I caved in for this one. To tell the truth, I’d agreed to create a golden wedding anniversary card before the true scale of the job was revealed. Gold-themed card? No problem. “With their names on...” Aaaaaaagh!

I have known Jean and Tony all my life so know Jean isn’t a fan of bright colours and favours pastels. (She also likes frogs but I held back, despite the temptation of using Animal Outing...) So I created a gentle watercolour wash background and, thankfully, managed to stamp their names right first time using the Pick a Pennant stamp set.

You may recognise the watercoloured background from these projects, which were made from the leftover pieces.

You can’t see from the photo but I have applied Wink of Stella all over the laser-cut DSP to give a hint of glitz, and the sequins and gold “celebrate” are a further reinforcement that this is for a 50th anniversary celebration.


Saturday 9 June 2018

Caturday: Marvin


Poor little Marvin had a tough start to life... he was from an abandoned litter of four kittens. Sadly, one died, but the rest were successfully hand-reared by veterinary nurses.

Marvin has just suffered the trauma of moving house and his owner was so worried because she thought he'd escaped and got lost. It turned out he was just hiding in his new house!

Friday 8 June 2018

Retro colour combo for Rooted in Nature


It’s weird but whenever a new catalogue comes along and I have loads of lovely new products to play with, for some reason I always lose my mojo. You’d think the opposite would apply but I suspect I am overwhelmed by too much choice!

Pinterest came to the rescue; specifically this project by Aussie demo Kate Morgan, which was sent to me by my friend Donna.

I modified it by laying the leaves (from Rooted in Nature) on the diagonal, and used a retro and slightly autumnal colour combination.

Some copper trim and a copper leaf finishes it off nicely, I think. But more importantly, what do YOU think?


Wednesday 6 June 2018

Hi! - Lined Alphabet meets Pick a Pennant


Showcasing some of the lovely new In Colors. The new colours this year are Bright with a capital B, but if that’s not your style, I’ve shown here how they can be toned down with a background of Smoky Slate. A bit of freestyle doodling adds interest to the main panel.

I do regret stamping the bird in Smoky Slate - I think it would stand out more in black or Blueberry Bushel, but it’s not the end of the world so I left it as it is. What do you think?

Monday 4 June 2018

Varied Vases - and a summery colour combination


How gorgeous is this colour combo? Three new colours mixed with Daffodil Delight give us a really summery look. I’ve decided I’m not going to commit to Mix It Up Monday this year, but will be bringing you colour combinations as and when I use them. You can still see all of my colour combinations on my Facebook page, here (you don’t have to be a member to view).

I’ve used Varied Vases, a brand new stamp set which handily has a co-ordinating punch, so you don’t have to fussy cut those vases. I did, however, fussy cut ALL of those yellow flowers... which are actually stamped in every shade of yellow possible. 

I confess, however, that I only went down that route because I messed up the stamping of the stem (should have used the Stamparatus!) so wanted to cover it up. There’s always a way!


The background is watercoloured using Balmy Blue, Highland Heather and Daffodil Delight. I painted one big piece then cut it in half to make the panels for these two cards; you can probably see where the Balmy Blue section originally joined.

Hope you like them! I confess I love them!


Saturday 2 June 2018

Caturday: Molly


This is Molly - full name Molly Billy Bunny (that’s what happens when you let kids name pets) - making the most of a box. She belongs to a friend who has somehow managed to get a lovely cat who just happens to get on very well with their lovely dog. We can't even get our cats to get along with each other!

The small print

This is my personal blog and my sole responsibility as an Independent Stampin' Up!® demonstrator. All images are © Stampin' Up!® All content including photographs, projects and text are © Helen Read, unless otherwise stated. Please feel free to copy my ideas for your personal use and inspiration - if you are a SU demonstrator you may use these ideas for your events but please give credit where it is due. Please do not use my ideas for monetary gain, competitions or publication. The images on this blog - including blog buttons - should not be copied and used elsewhere on the internet or on CDs.