Sorry I can't update the blog right now. Please find me on Facebook

Showing posts with label Stamparatus. Show all posts

Monday, 9 November 2020

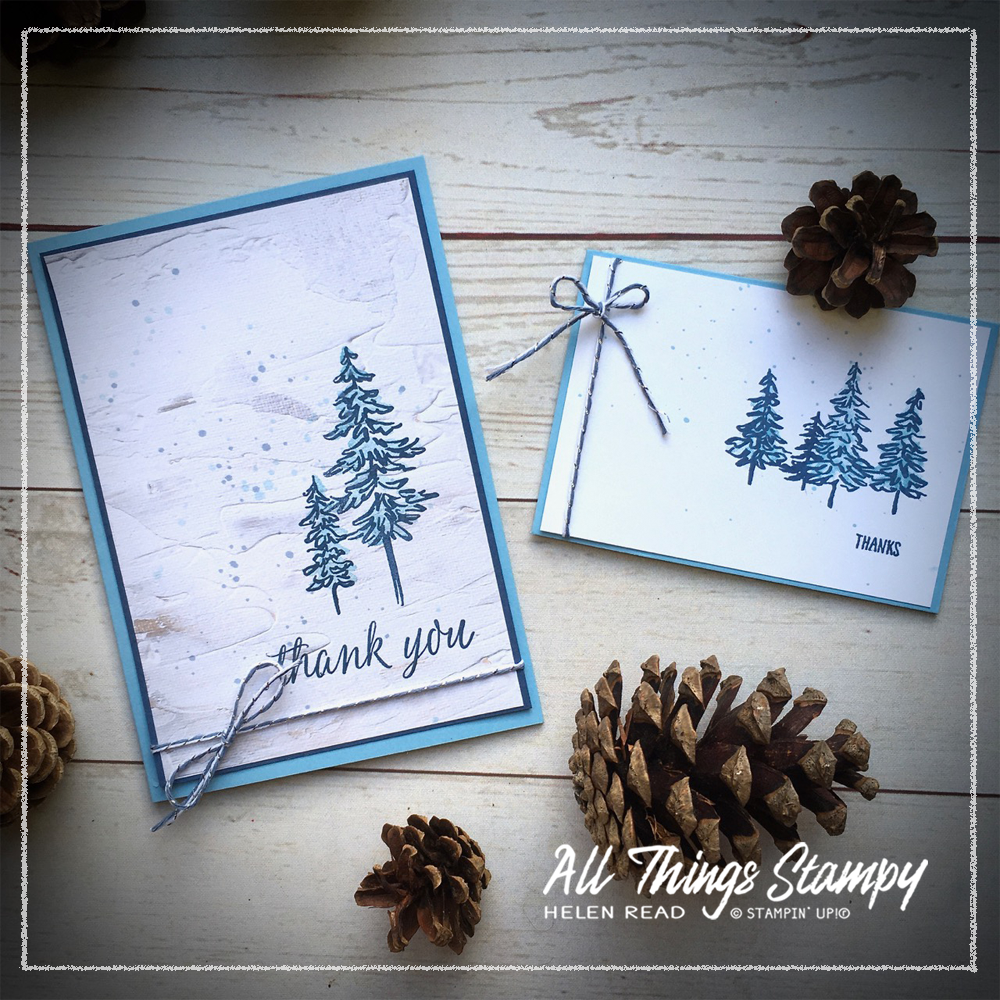
In the Pines stamped onto DSP

In The Pines Stampin Up

In The Pines is not just for Christmas! I used it recently to make a batch of cards for a variety of occasions.

The small cards are to thank customers who ordered from me at a party I held for a long-time customer, Mandy. Mandy has stuck with me for many years, for which I’m truly grateful. 

In The Pines Stampin Up

So how did I make them? The small cards are simply a standard card base cut in half. I stamped them using the Stamparatus for speed and accuracy, in Balmy Blue and Misty Moonlight ink. The “Thanks” comes from Waterfront – a must-have set which has been around a few years but remains as versatile and useful as ever – and the gorgeous Misty Moonlight twine is from the Flowers for Every Season Combo Pack.

In The Pines Stampin Up

The spattering is done with a paintbrush. I wet the brush and then picked up some Balmy Blue ink from the ink pad lid, then tapped the brush on top to spatter the ink across the project. Very simple but very effective.

In The Pines Stampin Up

In The Pines Stampin Up

For the standard-sized cards, I stamped directly on to In Good Taste Designer Series Paper, which gives the card a look of texture without the bulk. Then I stamped as before, with larger stamps, using the Stamparatus and the same colours. I used various greetings; some from Beautiful Autumn and the congratulations sentiment is from Beautiful Friendship

The BIG celebration was my downline Sue, who celebrated her 10th anniversary as a Stampin' Up!® demonstrator. This is an amazing achievement but of course, she wouldn't have stuck around if it hadn’t been so much fun! 

In The Pines Stampin Up

On these cards, I spattered ink in both colours; Balmy Blue and Misty Moonlight. The water dilutes the colour for a soft effect.

I really enjoyed making these projects and it made a change from Christmas cards! I love how the trees look in blue and it just shows how In The Pines – which at appears at first glance to be a Christmas stamp set – offers so many more possibilities.

If you’d like to order this set – or anything else – please follow the link below and use the November 2020 host code RMK743TS if you’re spending less than £150. If you’re spending more than £150, please talk to me first and I will help you get the best value. 


Friday, 12 June 2020

Silhouette stamping with Field of Flowers


Field of Flowers: have you seen this new stamp set yet? I think it’s absolutely gorgeous and will be running a class with it next month. Here I’ve stamped onto beautiful watercoloured backgrounds, which really shows off the rich silhouettes.


The best way to stamp onto watercolour paper is to use the Stamparatus so you can stamp in the same spot multiple times to get the richest, darkest image.


Wednesday, 11 September 2019

Nature's Beauty with Feels Like Frost DSP


Woodland theme again! You can't escape it on this blog because it's my favourite theme. And how gorgeous is the Feels Like Frost Designer Series Paper with this lovely Nature's Beauty stamp set?

The animals are coloured with Stampin' Blends but I was concerned the colours weren't quite right so I gave the rabbit and deer a swipe with some Seaside Spray ink on a sponge to tie them in with a hint of blue.

The silver birches are stamped in Seaside Spray, too, but stamped off so they don't overwhelm. I used the Stamparatus for perfect positioning - just move the plate along one slot each time.


The copper leaf accent brings out the colour of the fox (coloured in Calypso Coral Stampin' Blends). I made sure to position them on opposite sides of the card to balance it out. 
 

Wednesday, 31 July 2019

Offset mirrored seahorses using the Stamparatus


I have always loved seaside images, so the new Seaside Notions stamp set was always going to be high on my wish list. The fact that it comes with lovely and practical greetings is a bonus.

I demoed this card at my Launch Party and will be making this or something very similar at some of my events this month, too. It's a twist on the mirrored image idea and you can find all the instructions if you download the tutorial from here:


Get the offset look by moving the Stamparatus plate down one notch before stamping the second seahorse. And you can achieve two-tone seahorses by inking in Terracotta Tile then adding some Soft Suede with a sponge dauber. 
 

Monday, 29 July 2019

Masked Seaside Notions seashells on clear block background


Stamping, masking, clear block stamping... this is a fun technique card which is easy to create and looks pretty effective (in my opinion).

Clear block stamping is a really fun technique; just ink up your block (you can use ink pads or water-based markers), then spritz with water before pressing onto your paper. Bizarrely, despite this being a faux watercolour technique, it works best with Whisper White cardstock rather than watercolour paper.
The shells are masked using sticky notes so that the images don't overlap. The secret here is to work from the front to the back, so you stamp the large shell first, mask it, then stamp the images 'behind' it. Another top tip is to retain your masks - keep them in the stamp box for future use, as this will save you time when you revisit the technique. 


Friday, 12 July 2019

Simple, Casual, Avid... a Beautiful Friendship card for every type of crafter


One design, three stages of crafting. A single-layer card for the time-strapped crafter, a casual crafter project with the addition of a punch and some embellishments, and one for the avid crafter who is definitely not short of supplies! Which one are you?


The same basic design can be adapted to suit your supplies. If you're just starting out, the #simplestamping project just needs a pack of Note Cards & Envelopes, one stamp set and some ink pads. But #simplestamping projects are just as useful for crafters in a hurry. If you need a big batch of these, you can stamp them using the Stamparatus and get them done in a fraction of the time it would take to stamp them by hand.  
 

Wednesday, 8 May 2019

Floating Frame with Rooted in Nature


Ever since I saw the Floating Frame card concept, I've wanted to give it a try... so you can imagine my disappointment when I discovered I needed a mystery product called Press ’n’ Seal. I’ve since discovered you can buy it on Amazon but a) I don’t need a whole roll and b) apparently it’s not a perfect solution after all.

But back to my workaround... I tried a few different things and eventually settled on lightly spraying some Craft Mount (spray mount) onto a piece of vellum. This was too sticky so I removed some of the tackiness by laying it, sticky side down, onto a microfibre cloth. Just once. Twice made it not sticky enough!


Then you die-cut the frame and add Stampin’ Dimensionals to every separate piece before gently prising the vellum away. I won’t go into huge detail as plenty of demonstrators have already made a better job of it with video tutorials. 


Suffice to say it’s a time-intensive, fiddly project but on the plus side, you do get two for the price of one. 


Monday, 4 March 2019

Incredible Like You week: simple thank you cards


After ignoring the stamp set for several months, recently I’ve been stamping up a storm with the Incredible Like You stamp set, so I will be showcasing this versatile set all week. 

I made a BIG batch of cards like these to thank my February customers (and still ran out!). I’ve used Calypso Coral for the flowers, and everybody’s favourite Mint Macaron for the leaves and greeting. The Designer Series Paper is Nature’s Poem. 

And, of course, the Stamparatus made producing multiples of these cards incredibly speedy!

http://helenread.stampinup.net

Monday, 28 January 2019

Stamparatus Skills Workshop projects


Saturday was my much-anticipated Stamparatus Skills Workshop. I have been waiting for Sale-a-Bration to offer this class so that everyone could use the same stamp set. Guests each received a Stamparatus and the Hello Cupcake set in their kit and we made these two cards, using seven amazing Stamparatus techniques.

If you’d like the tutorials for these two projects, detailing all the Stamparatus techniques, simply order a Stamparatus and the Hello Cupcake stamp set from me before the end of February and I'll send them to you.

You can order by emailing me or shop at my online store using the host code VSQ3YGCB


Wednesday, 23 January 2019

Valentine cats - reversed image


Here’s another way you can use a reverse image – to create a cute catty Valentine’s card. This was my first attempt at mirror stamping and I couldn’t believe my luck when the cats ended up positioned so perfectly close together.

To find out how to do this, using the Stamparatus and a silicone sheet, please check out my video on my Facebook page.

Monday, 17 December 2018

Sneak peek: Amazing Life


Christmas is over, crafting-wise... and it’s all about looking forward from now on because, as a Stampin’ Up!® demonstrator, I am now able to order from the upcoming Spring/Summer catalogue!

But those of us who attended OnStage have had a head start, with the items we were allowed to order early and with all the gifts we were given on the day. This was one of them – a lovely stamp set called Amazing Life.

I made this fun card using the new set, the Stamparatus (for perfect positioning of the cakes) and my Stampin’ Blends. What do you think? Will this set be on your wish list?


Friday, 14 December 2018

Waterfront #simplestamping thank you card


We demonstrators have been challenged to go back to basics with some #simplestamping. The challenge was to make a thank you card using just notecards, one stamp set and ink. I used the Stamparatus to get perfect positioning for all 12 of my cards, which were heavily inspired by my recent week in the Lake District. Just one reason that Waterfront is one of my favourite stamp sets!

Monday, 19 November 2018

Colourful Christmas with Snow is Glistening


I have loved playing with the Snow is Glistening stamp set, and really enjoyed creating these colourful cards with the Stamparatus.

I inked up the stamp using sponge daubers, then stamped onto the Whisper White cardstock. The great thing about the Stamparatus is that if you miss a bit, you can stamp again, perfectly.

Scroll down for close-ups of all the colours...


Wednesday, 31 October 2018

Precision stamping with the Stamparatus


The Stamparatus is for so much more than repeat stamping. Here I’ve used it to create two-tone words using Bermuda Bay and Old Olive. All you have to do is ink up half of the image and stamp, then ink up the other half of the image and stamp directly on top. Perfect positioning, every time.

I felt like a break from festive colours so created a big batch of these for my customers this month in bright cheery Lemon Lime Twist. Just what we need to brighten up the chilly days ahead.

The stamp set is Warm Hearted, one of the host sets from the Autumn/Winter catalogue. I love this big bold "Thanks".

Wednesday, 17 October 2018

Dashing Deer and Winter Woods... a match made in heaven


I can’t get enough of Dashing Deer and Winter Woods... as I’m sure you’ve noticed. They are a match made in heaven and perfect for really simple projects like the one above, as well as more complicated technique cards like this Winter Woods card using a Stamparatus technique or this vibrant brayered deer card.

I needed lots of these cards to thank my lovely customers, so brought out the Stamparatus for speed stamping. Once those stamps are in position, you can stamp really quickly and accurately. The only image I stamped by hand was the one to represent the ground. As I needed this to be stamped repeatedly and largely at random, it was easier to use a clear block.

The Designer Series Paper you see here is no longer available I’m afraid – I forgot to post this project in September, sorry – but you will find a great range of equally beautiful and suitable designs in my online store and in both the Annual Catalogue and the Autumn/Winter catalogue.

Monday, 17 September 2018

Winter Woods layered ink project


This is a lovely Stamparatus technique which I found thanks to Patty Bennett's great video tutorial. I didn’t have all the green markers I needed so incorporated some ink sponging, too.

I used one of my favourite stamp sets of the moment, Winter Woods, which is in the Autumn/Winter catalogue and is just perfect for loads of occasions, not just Christmas. It goes brilliantly with the Wood Textures Designer Series Paper, too... all of my favourite things in one project!


Monday, 13 August 2018

Blueberry dandelions


Let’s start the week with another Dandelion Wishes project - and why not? It’s proving to be the most popular stamp set from the 2018 Annual Catalogue so far!


I used the Stamparatus to stamp the image in Blueberry Bushel, then stamp again on top in Versamark so it could be embossed. Clearly some of the embossing missed the mark as the blue ink has spread when I watercoloured in Lovely Lipstick, but I don’t mind as the result is quite effective.


I know some people are resistant to the new In Colors, because they’re rather bright, but I think they are a great addition to our collection, and can be quite tasteful when separated from the crowd!

Friday, 20 July 2018

A totally tropical colour combo


I’m ending my Tropical Chic week with another celebration... this time of my faboulous team. Each month I send out reward vouchers and random gifts to my team members for various reasons.


Five of them received a voucher in one of these cheery cards. Can I tell you something about these cards? They are not 100% identical... but they’re pretty close! And it’s all thanks to the Stamparatus, which made quick work of stamping such a complicated design five times.


And three will receive a little notebook surprise on the same theme. Yes, I know there are only two in the photo, but one of my team who was on the list to receive one of these just happened to pop by before I’d had chance to photograph them, so she received her gift there and then.

Finally, the totally tropical colour combo to round things off...


The small print

This is my personal blog and my sole responsibility as an Independent Stampin' Up!® demonstrator. All images are © Stampin' Up!® All content including photographs, projects and text are © Helen Read, unless otherwise stated. Please feel free to copy my ideas for your personal use and inspiration - if you are a SU demonstrator you may use these ideas for your events but please give credit where it is due. Please do not use my ideas for monetary gain, competitions or publication. The images on this blog - including blog buttons - should not be copied and used elsewhere on the internet or on CDs.