Monday 21 February 2022

Zero Waste Friends of the Forest project – and tips for reducing waste

Stampin up uk Friends of the Forest

Reducing waste and minimising our impact on the planet is a big passion of mine and my Stampin’ Up! UK customers – so I thought I’d make a theme of it for my social media posts this week with projects and tips all week long. Please visit my Facebook page or Instagram to get the full experience!

The starting point for this themed week is my very first Instagram Hop, on the theme of Zero Waste. Please visit my Instagram page to find the others in the hop. 

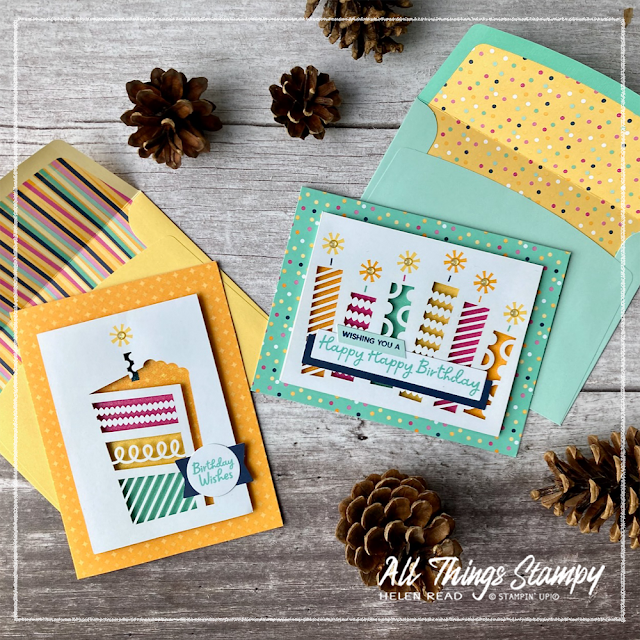
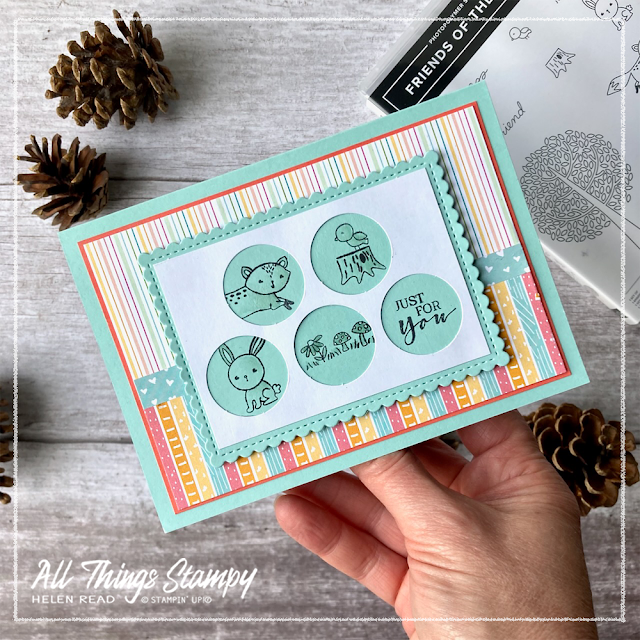
There’s a bit of a back story to my hop project. I went away last weekend and took the Light the Candles Kit with me for some relaxing crafting. I love these kits as you don’t have to think! And everything gets used, with very little waste. 


Stampin up uk Light the Candles card kit
 

However, there was a small amount of paper waste left over once I’d completed the kit and just as I was about to put it into the recycling bag, I had an idea for this Zero Waste project. 

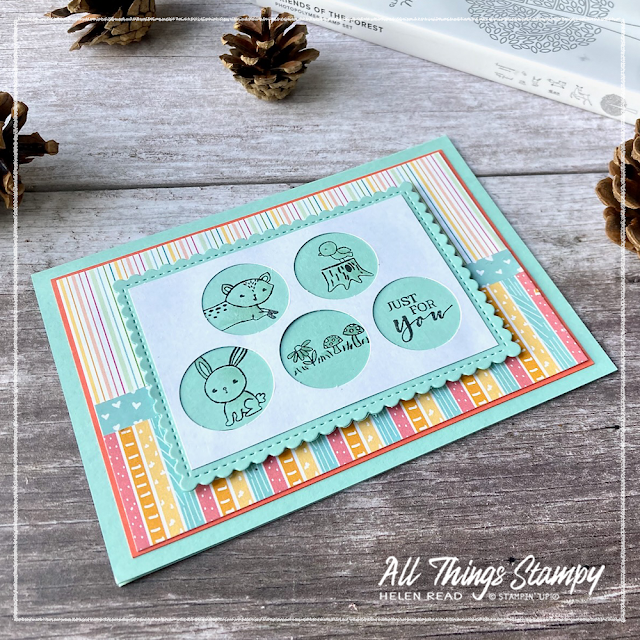
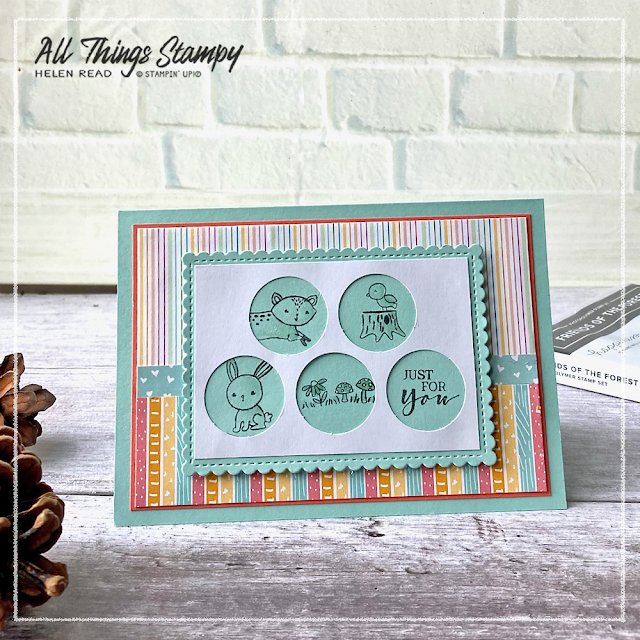
I searched through my stamp collection to find Friends of the Forest; the little creatures are just the right size to peep through the circles. 


Stampin up uk Friends of the Forest 

I didn’t want to stamp them onto white as I knew the white wouldn’t match the paper from the kit but I thought Pool Party (one of my favourite colours) was a nice compromise here and goes well with Sunshine & Rainbows Designer Series Paper, a Sale-a-Bration product which is free with a £45 order until the end of February.

Originally I had planned to stamp the images directly onto the back panel but that was never going to work as they would overlap. To save making more waste by trying this several times, I stamped each animal onto a small piece of Pool Party card so it could be positioned accurately with no overlapping ink. However, these were all taken from my scraps box. 


Stampin up uk Friends of the Forest 

I also used scraps of Sunshine & Rainbows Designer Series Paper for the background. I managed to find pieces which were almost the right size so hardly had to trim these at all. In another attempt to reduce waste, I mounted these onto the backing piece from the DSP pack, then cut it to size before adding to the card. 


Stampin up uk Friends of the Forest

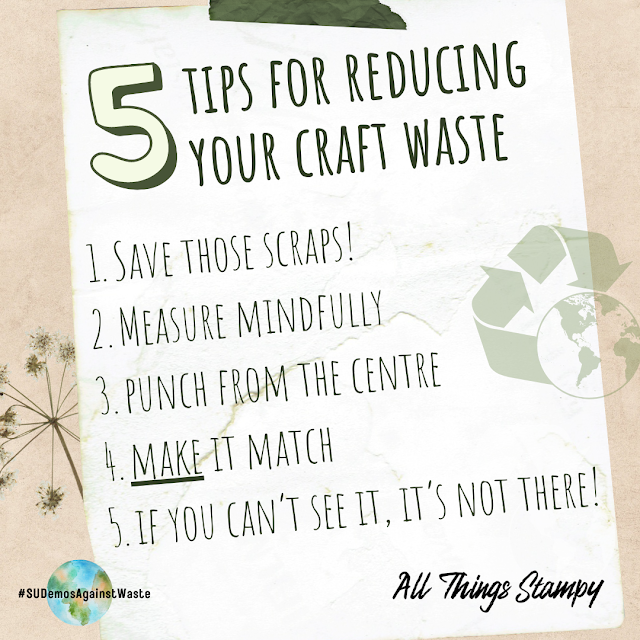
Here are some great tips for reducing waste when you craft:

1. Save those scraps! Narrow strips are good for stamping greetings. Smaller scraps can be used to make tiny punched shapes for confetti or embellishments.

2. Measure mindfully. When creating multiples of a project, think how you can cut your cardstock up into equal pieces to avoid waste. With A4 cardstock, this could be 7cm x 9.9cm layers which mean you get nine equal shapes from one sheet.

3. It’s in our nature to die-cut and punch shapes up to the edge of a piece of cardstock to avoid waste... but you can actually avoid waste by cutting from the centre, as this means you can use the leftover piece as a layer.

4. Have Designer Series Paper you don’t love, or which doesn’t go with your project? Stamp on it, sponge it, colour it – you can MAKE it match.

5. Finally, remember: if you can’t see it, it’s not there. Cut out centres of cardstock layers and use on another project. Don’t wrap ribbon all the way around layers or cards; just tape it behind where you can’t see. 

Stampin up uk tips for reducing waste
 

If you love any of the products you see here and are in the UK, please consider shopping at my online store as every order helps to support my small business. As a thank you, if you use the February 2022 host code 2FYQAK7T, I’ll send you a thank you gift in the following month.

Does your wish list come to more than £99? Please get in touch and I will help you get more for your money and unlock discounts all year round.  


Monday 14 February 2022

Amazing Thanks rainbow blog hop

Stampin Up UK Demonstrator Amazing Thanks
 
Today I am taking part in an international blog shop showcasing Stampin’ Up!® ideas on a rainbow theme. At the bottom of this blog post you will find links to other rainbow-themed projects made by Stampin’ Up!® demonstrators around the world. 
 

Rainbows are a BIG crafting theme in 2022, with Stampin’ Up!® offering us a fabulous Rainbow of Happiness bundle in the January-June Mini Catalogue (see what I made with it here) and the bright and cheery Sunshine & Rainbows Designer Series Paper in the Sale-a-Bration brochure (see what I made with that here).

But there are many other ways to make a rainbow, too, so I decided to try something new using the Amazing Thanks Dies from the January-June Mini Catalogue. 
 
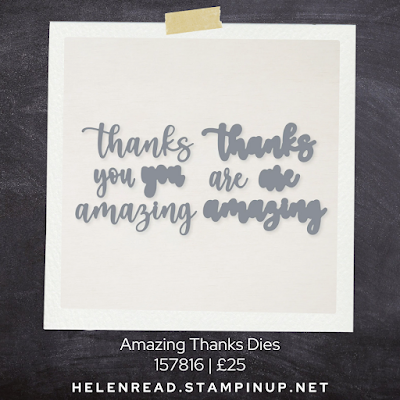
Amazing Thanks Dies Stampin' Up UK
 
These Amazing Thanks Dies are unique in that you get dies to cut the words, plus a slightly larger one to create an outline effect. 
 
Stampin Up UK Demonstrator Amazing Thanks
 
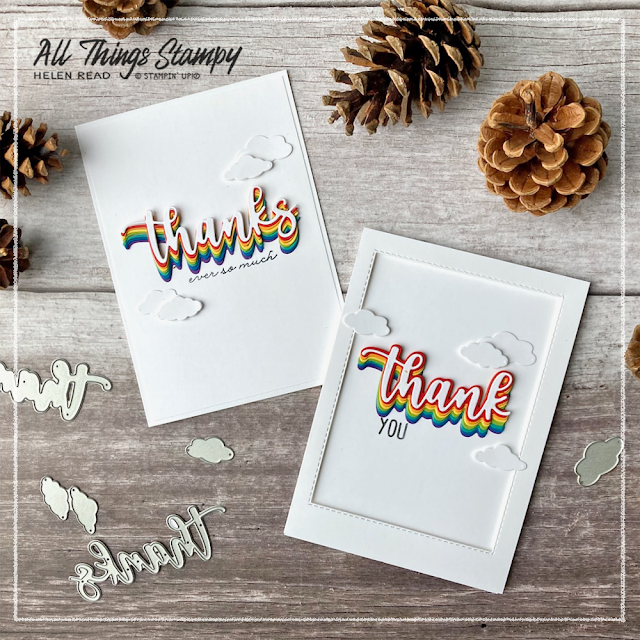
I made two versions of my card and really put my Stampin’ Cut & Emboss Machine (and my turning elbow) through its paces by die-cutting the word eight times for each one; in white and in every colour of the rainbow. 
 
Stampin Up UK Demonstrator Amazing Thanks
 
This version is my favourite. I used the outline stamp to create the coloured layers, then die-cut just the “thanks” in Basic White to layer on top.

After carefully cutting off the S from each die-cut piece, I stamped YOU using Happiest of Birthdays. I did this using a Basic Black Stampin’ Write Marker to ink just this word out of the whole stamp. I stamped this first and then shuffled my Basic White panel around to ensure the word appeared where I wanted it. 
 
Stampin Up UK Demonstrator Amazing Thanks

It’s all framed by another layer of Basic White, created using the Stitched Rectangles Dies and popped up on Stampin’ Dimensionals. The clouds are cut out using the Brilliant Rainbow Dies to provide a subtle finishing touch. 
 
Stampin Up UK Demonstrator Amazing Thanks

Similar but different... the second card uses just the “thanks” die to create an effect which could be reproduced using any word dies. I teamed it with the Ornate Thanks stamp set, which has lots of different sayings which go perfectly.

This is simply layered onto a panel of Basic White and again finished off with some die-cut clouds. 
 
Stampin Up UK Demonstrator Amazing Thanks
 
I love the rainbow effect here against the stark Basic White background and hope you do, too. To see lots more rainbow inspiration from around the world, please visit the blogs in this hop. Happy hopping!

Blog Hop Index

Do you love rainbows? You can buy any of the products mentioned here from my Stampin’ Up!® UK store. I would love it if you chose me as your demonstrator and if you use the current host code 2FYQAK7T, I’ll send you a thank you gift in the following month.

Does your wish list come to more than £99? Please get in touch and I will help you get more for your money and unlock discounts all year round.  


Tuesday 8 February 2022

Four easy cards using Driving By Sale-a-Bration stamp set

Stampin Up UK demonstrator Driving By card ideas
 

Driving By is not just the most popular Sale-a-Bration stamp set among Stampin' Up!® UK customers but the most popular stamp set of all right now so I thought it was time I used it to create some fun and easy cardmaking projects.

The rubber stamp set features a sports car, a Volkswagen Beetle and a classic VW camper van, plus some fun sayings to go with them. It's perfect if you love colouring so I’ve used it here with Stampin’ Blends alcohol markers. 

Stampin Up UK demonstrator Driving By card ideas

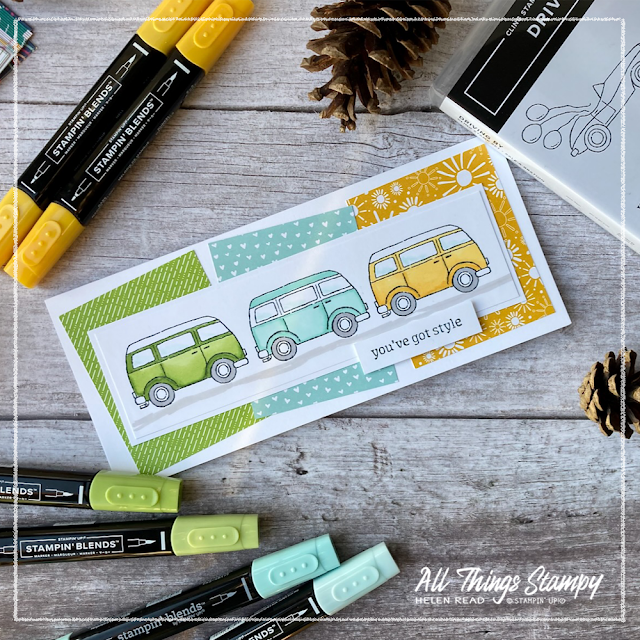
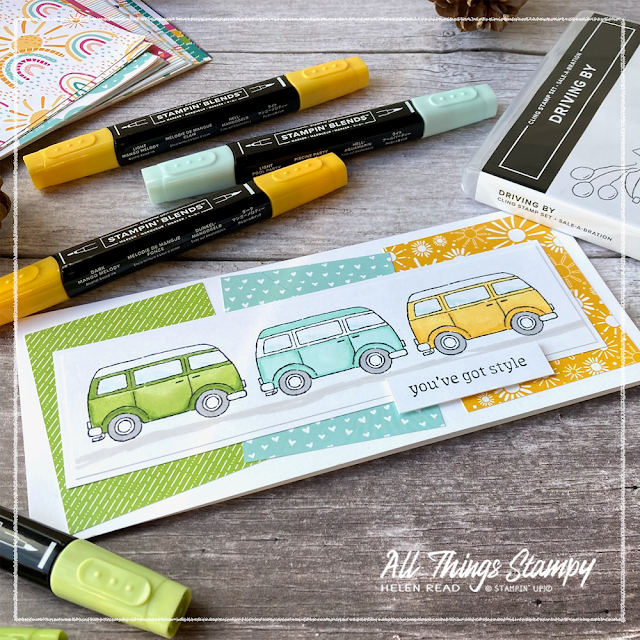
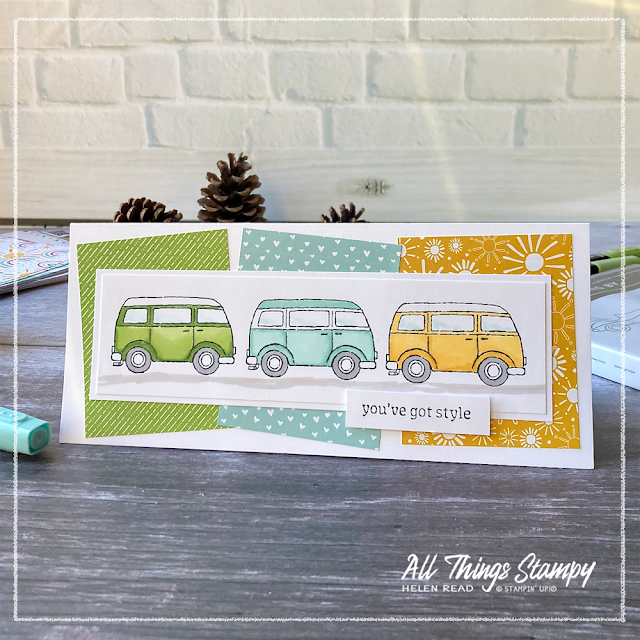
My first card is a trendy slimline design to fit our new Slimline Envelopes. Other than that, the design is really simple and can be made with just white cardstock, black ink and the Sunshine & Rainbows Designer Series Paper from the Sale-a-Bration brochure. I picked three colours from this brightly coloured pack of fun patterned paper to colour my camper vans, choosing from the centre of the Venn diagram of “colours in the paper pack” and “Stampin’ Blends I own”. This gave me Granny Apple Green, Pool Party and Mango Melody.

Stampin Up UK demonstrator Driving By card ideas

I positioned the three vans using the Stamparatus and a variation of the hinge step technique. Instead of removing the Stamparatus plate across, I moved my cardstock. This is ideal if your image doesn’t fit the exact distances provided by the hinge slots. I might have to make a video to demonstrate that as I don’t think I’ve explained it very well.

I mounted this panel onto another piece of Basic White cardstock purely because I couldn’t decide which colour to use but I wanted to give it a little more depth. It just shows that you don’t need lots of supplies to make a striking card – you can do a lot with just white and a pack of patterned paper.

Stampin Up UK demonstrator Driving By card ideas

Behind this panel I used three patterns of Designer Series Paper from the Sunshine & Rainbows pack, choosing one in each of the three colours I’d used. I cut these into blocks of just under a third of the width of the card with the intention of positioning them straight... but they slipped before I could glue them and I liked the angled look better.

Finally, I stamped “You’ve got style’ onto a scrap of white and popped this up on Stampin’ Dimensionals.

Stampin Up UK demonstrator Driving By card ideas

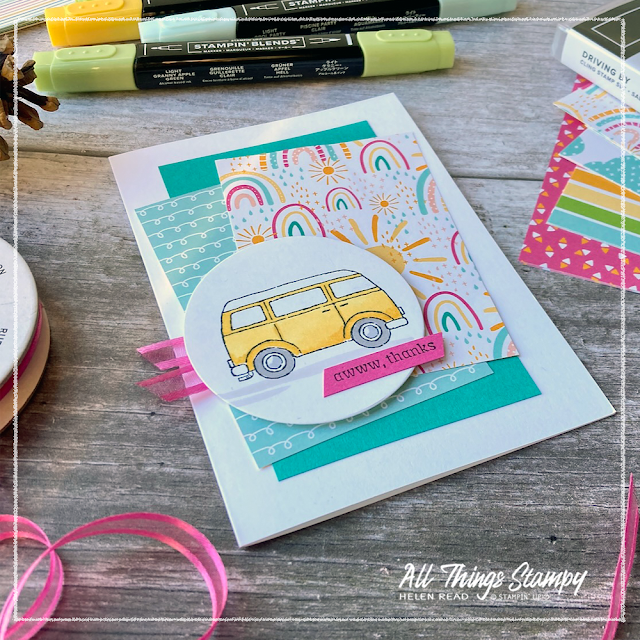
For the next three cards I stamped one of each of the Driving By images and cut them out using Layering Circles Dies. Each card uses the reverse pattern of the designs I used on the slimline card.

Stampin Up UK demonstrator Driving By card ideas

This card uses a fun rainbow striped design with the addition of some white Baker's Twine. I love the clean Basic White card base and the contrast with that and the bright colours of the Sunshine & Rainbows Designer Series Paper.

Stampin Up UK demonstrator Driving By card ideas

The sports car card uses a very similar card design, just turned on its side. I chose this paper because its main colours are Granny Apple Green and Pool Party, which pick up the colours of the Stampin’ Blends alcohol markers I used to colour my image. There’s just a hint of Denim Ribbon there, picking up the Misty Moonlight used on the rainbows. 

Stampin Up UK demonstrator Driving By card ideas

The camper van card just had to have rainbows and sunshine images, to evoke the beach vibes of the van. I’ve used Bermuda Bay cardstock with two patterned papers, and a tiny strip of Magenta Madness cardstock for the greeting. The ribbon is Polished Pink, but it’s close enough to coordinate with Magenta Madness.

Stampin Up UK Saleabration products Driving By Sunshine Rainbows  
I hope you like my Driving By cards and will consider this stamp set if you place a qualifying Sale-a-Bration order which, in the UK, is £45. The stamp set is free with a £45 order, or you could choose the Sunshine & Rainbows Designer Series Paper instead if you wish, as that is also free with a £45 order.

Plus, if you place an order at my online store using the host code 2FYQAK7T, I will send you a thank you gift next month. This month I sent out rolls of Scalloped Lace Trim to those who use the host code, so be sure to remember... unless you are ordering over £150, as then you can choose your own free gifts at the checkout.

If you are in the UK and would like to order, please visit my store and, if you use the current host code DQPJEQF9, I’ll send you a thank you gift in the following month.


Does your wish list come to more than £99? Please get in touch and I will help you get more for your money and unlock discounts all year round.  


Tuesday 1 February 2022

Friends of the Forest card ideas – night and day

Stampin Up UK Demonstrator Friends of the Forest

I love animal images so was instantly drawn to the Friends of the Forest stamp set in the Stampin’ Up!® January-June 2022 Mini Catalogue. I love the stylised fox and rabbit and when I discovered the the deer image coordinates with the Deer Builder Punch which has carried over from the July-December Mini Catalogue it went straight onto my shopping list.

Today I have two versions of a similar card design to show you using this gorgeous Friends of the Forest stamp set. The cards feature a variety of techniques, including colouring with Stampin’ Blends, masking and colouring with Blending Brushes. 
 
Stampin Up UK Demonstrator Friends of the Forest
 
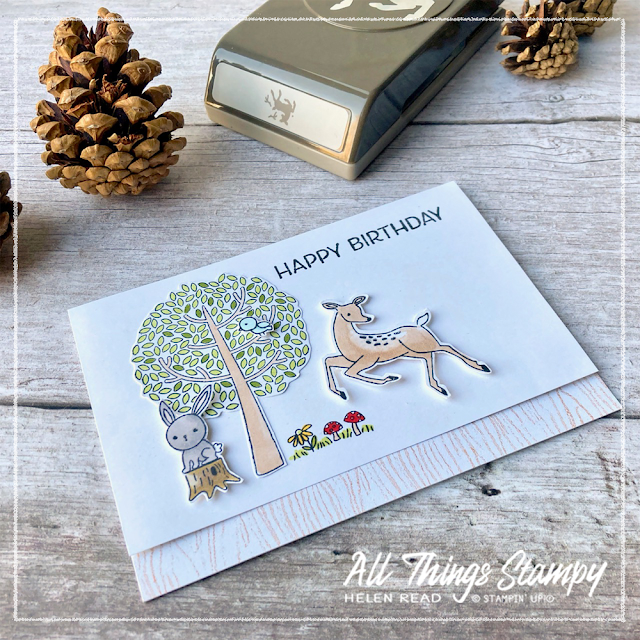
I made the white card a few weeks ago, having fun colouring the images using Stampin’ Blends. I coloured the deer using the Ivory marker, creating a paler area on her back by missing that area out and blending it slightly using the Color Lifter.

The tree is coloured using Ivory for the trunk and branches and light and dark Granny Apple Green for the leaves. This was quite a laborious/therapeutic task, depending on your views on colouring! It is fussy cut and glued flat to the card front.

The rabbit is Smoky Slate on a Crumb Cake log, the flower is Daffodil Delight and the toadstools are Poppy Parade.

Stampin Up UK Demonstrator Friends of the Forest

To finish off, I used a strip of Bloom Where You’re Planted Designer Series Paper as it has the perfect woodgrain effect to go with the tree and woodland creatures. 
 
I often find that Stampin’ Up!’s patterned paper goes with lots of different stamp sets, especially when you turn it over to find the more subtle designs on the reverse. This strip of paper is glued flat to the card front, while the white panel is popped up on Stampin’ Dimensionals to create a step and add interest. 
 
Stampin Up UK Demonstrator Friends of the Forest

That was several weeks ago and the card has sat waiting for its moment in the limelight. Finally its time has come!

Stampin Up UK Demonstrator Friends of the Forest
 
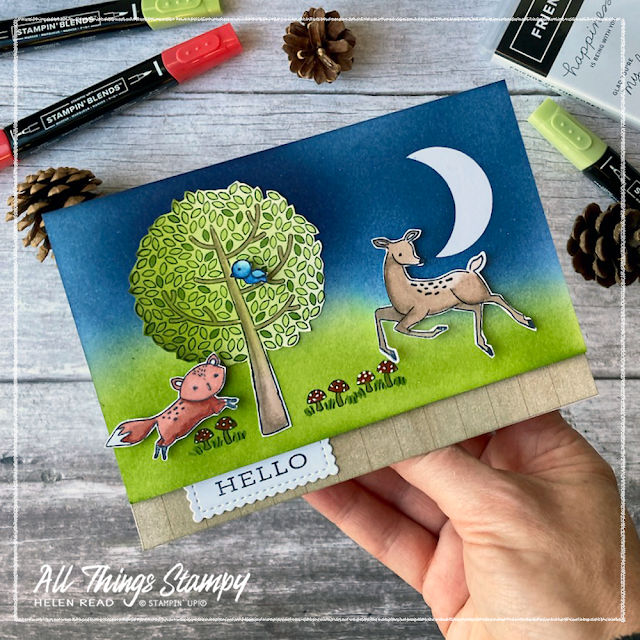
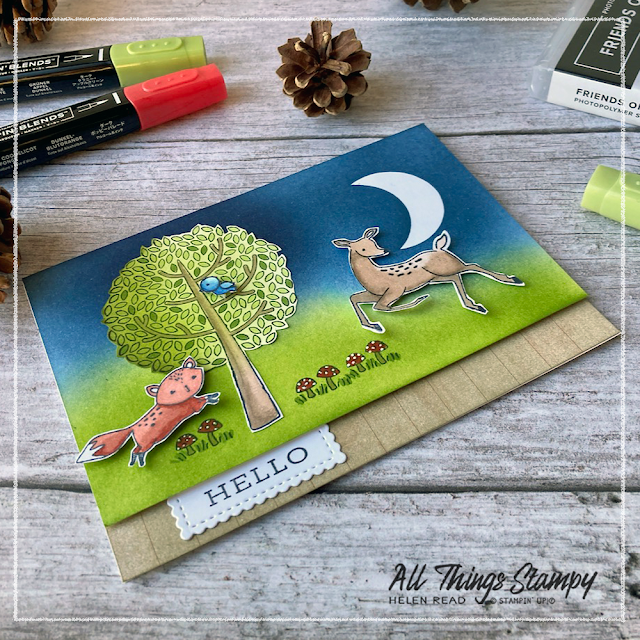
While browsing on Instagram I happened upon a gorgeous creation by Laura Mackie, a hugely talented UK Stampin’ Up!® Demonstrator, who had created a night-time card featuring these cute little Friends of the Forest. I decided to take her night-time idea and remake my first card using Blending Brushes and some masking to create an atmospheric scene.

Stampin Up UK Demonstrator Friends of the Forest

I created a moon mask using Layering Circles Dies on a sticky note and added colour around it using Misty Moonlight, plus a little Night of Navy in the area behind the tree. I wish I’d made a smaller moon but didn’t have the time or inclination to start again.

The grassy area is Granny Apple Green, one of my favourite colours as it is so bright and cheery. I coloured the tree using Granny Apple Green Stampin’ Blends, too, with some extra ink added afterwards using a Blending Brush. 
 
Stampin Up UK Demonstrator Friends of the Forest

I masked off the flower as I am too pedantic to have a flower in full bloom in a night-time scene and added extra toadstools. As they were stamped onto green, I used a dark Poppy Parade Stampin’ Blend to add the colour, then a Chalk Marker to pick out the white spots.

In fact, I went a little darker on every colour when colouring the images on this card, as I wanted them to reflect the moodier night-time theme. So I used Crumb Cake instead of Ivory on my deer and tree trunk, and chose Cajun Craze for the fox, instead of the Smoky Slate of the daytime rabbit. The bird is Light Night of Navy and Dark Balmy Blue on the night-time scene, instead of subtle Pool Party on the daytime card. 

Stampin Up UK Demonstrator Friends of the Forest

I didn’t have any more woodgrain paper but found a wood-panelled design in the same Bloom Where You’re Planted pack and sponged it with some Crumb Cake to make it darker. And instead of stamping onto the card – which wouldn’t show up against the night sky – I used a little Stitched So Sweetly label with the word “hello”.

This tip will save you lots of time! Whenever I die-cut a label from Basic White cardstock, I cut a few spares from different dies, so I can do them all at the same time. The unused labels go into a box which I keep on my stamping trolley. This means I often have a suitable label to use for a greeting when I am making a card. 
 
 
Stampin Up UK Demonstrator Friends of the Forest
 
Which card do you prefer? The clean white of the daytime card or the dark moody night-time project? 

If the Friends of the Forest stamp set is on your wish list and you live in the UK, I would love it if you considered shopping with me. If you are in the UK and would like to order, please visit my store and, if you use the current host code 2FYQAK7T, I’ll send you a thank you gift in the following month. Don’t forget if you spend more than £45 during February 2022, you will qualify for a FREE Sale-a-Bration gift, too!

Does your wish list come to more than £99? Please get in touch and I will help you get more for your money and unlock discounts all year round.  


The small print

This is my personal blog and my sole responsibility as an Independent Stampin' Up!® demonstrator. All images are © Stampin' Up!® All content including photographs, projects and text are © Helen Read, unless otherwise stated. Please feel free to copy my ideas for your personal use and inspiration - if you are a SU demonstrator you may use these ideas for your events but please give credit where it is due. Please do not use my ideas for monetary gain, competitions or publication. The images on this blog - including blog buttons - should not be copied and used elsewhere on the internet or on CDs.