Friday 29 April 2011

Yikes! A scrapbook page!

“Why don’t you post more scrapbooking pages on your blog?” was the quite reasonable question put to me the other day, at my Woodland Walk scrapbooking class.

There are several reasons for this.

  1. I don’t like putting pix of my children (or me!) on the internet.
  2. I am really bad at finishing my scrapbook pages! I have several that “just need a little bit more”
  3. They are really hard to photograph!
But mainly, it’s because I don’t do that much scrapbooking these days. Something I’d love to rectify! So, if I lay on some scrapbooking classes, will people come?  I’m thinking the 2nd Wednesday of the month, two pages (which we WILL finish – with journalling!) with some fun products and techniques: £10? Please email me if you’d like to register your interest!

Anyway, this is one we made at the Woodland Walk class. We did four pages, which was WAY too many. I am always worried about short-changing people but I realise now that I’m actually doing people a disservice by trying to cram too much in, as it makes it rushed.

This was quite a fiddly page, with lots of little strips of paper and ribbon and the focus on one image. Mine isn’t the most striking image but I didn’t want to get bogged down in finding the perfect picture, when I should be prepping a class!

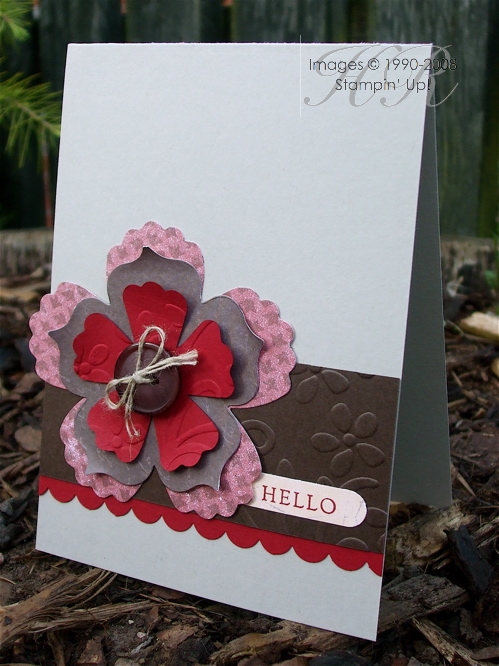
The flower is a paper daisy, which we inked with Crumb Cake ink in the centre and an Early Espresso marker around the tips of the petals. We then sprayed it with Champagne Mist shimmer spray and allowed it to dry.

To make the heart detail in the centre, we punched a heart out of a scrap of cardstock and then punched a circle around it. A scrap of Designer Paper behind it gives it some interest. 

Stamps: Just Perfect Alphabet, Growing Green
Cardstock: Wild Wasabi, Early Espresso, Crumb Cake
Paper: Woodland Walk
Ink: Early Espresso, Crumb Cake, Early Espresso marker
Accessories: Small heart punch, 1” circle punch, paper daisies, eyelet border punch, 5/8” Grosgrain Ribbon - Very Vanilla, ¼” Grosgrain Ribbon - Certainly Celery

All products by Stampin’ Up!®

Thursday 28 April 2011

It's that butterfly again!


A ropey photo ... and a card that didn’t quite turn out as I’d hoped. Too much Designer Series Paper showing? Perhaps that’s it. But another opportunity to use my Beautiful Wings embosslit!

Stamps: Oval All
Cardstock: Pear Pizzazz, Baja Breeze, Early Espresso, Whisper White
Paper: Greenhouse Gala
Ink: Early Espresso
Accessories: Large Oval Punch, Scallop Oval Punch, Scallop Edge Punch, Beautiful Wings Embosslit die, Big Shot, Basic Rhinestones

All products by Stampin’ Up!®            

Wednesday 27 April 2011

More Hopeful Thoughts

NB: I have removed my blog background for now as I was tipped off that it may be causing problems for some of you.
Another sympathy card... I seem to be using a lot of these at the moment, unfortunately. And I was very sorry to have to make this one for a fellow demonstrator who is going through a really tough time at the moment. But Hopeful Thoughts made the unfortunate task easy as it’s such a beautiful stamp set.

As you can see, I couldn’t resist a tiny butterfly – still obsessed with my Big Shot!

The card looks like Riding Hood Red but it’s actually my bad photography; it’s really Rose Red. But now I’m thinking Riding Hood Red would look great with Daffodil Delight and Pear Pizzazz so, from one mistake comes a new colour combination!

Stamps: Hopeful Thoughts
Cardstock:  Rose Red, Pear Pizzazz, Whisper White, Daffodil Delight
Ink: Pear Pizzazz, Rose Red
Accessories: 1/8” Taffeta ribbon – Daffodil Delight, Eyelet Border punch, Big Shot, Beautiful Wings Embosslit die

All products by Stampin’ Up!®            

Tuesday 26 April 2011

Butterfly box


What a horrible, gloomy picture which does the project no justice whatsoever! This was one of the projects we made at my Mini Catalogue launch all those weeks ago. It’s a simple box, made special with a vellum window, a crimped handle and some gorgeous butterflies on the front. What was so lovely, too, was that everybody’s box looked different, even though they were all using the same supplies.

Stamps: Nature Walk
Cardstock: Baja Breeze, Cherry Cobbler, Early Espresso, Vellum cardstock
Ink: Baja Breeze
Accessories: Bird punch, Modern label punch, Big Shot, Beautiful Wings Embosslit die, crimper, basic rhinestones

All products by Stampin’ Up!®            

Sunday 24 April 2011

Mini make and take


Happy Easter - don't eat too much chocolate today! As usual I have completely failed to make any Easter papercraft projects but never mind... this is the card we made at my Mini Catalogue launch – and again at a Shoebox Swap I held for my downlines recently. I love the Cherry Cobbler against the Very Vanilla – for a more striking effect, you could go for Real Red against Whisper White but this is much gentler for a soft image such as the butterfly from Nature Walk.

We stamped the words and the butterfly first and then positioned the Very Vanilla cardstock within the embossing folder. It’s much easier to do it this way round than to emboss first! 

With a small piece of card like this (the full card is 9cm square) you have lots of options for moving it around within the embossing folder. This version is "debossed" but you can have the flowers raised quite easily by turning the cardstock 90ยบ. 

Stamps: Nature Walk, Basic Phrases
Cardstock: Cherry Cobbler, Very Vanilla
Ink: Cherry Cobbler, Baja Breeze
Accessories: Seam Binding ribbon – Baja Breeze, Big Shot, Elegant Bouquet embossing folder

All products by Stampin’ Up!®            

Friday 22 April 2011

Happy Anniversary


I had it in mind that it was my brother’s first wedding anniversary today... but it isn’t. Yes, he got married on Good Friday last year but, of course, Easter is a movable feast so this anniversary card ended up being about three weeks late. Oops.

I had grand ideas for this card... but once I’d stamped the greeting and embossed the card, I decided I liked it so much like that I just added some ribbon and left it at that.

Stamps: Something to Celebrate (hostess set)
Cardstock: Crumb Cake
Ink: Elegant Eggplant
Accessories: Big Shot, Elegant Bouquet embossing folder, taffeta ribbon - Very Vanilla

All products by Stampin’ Up!®

Wednesday 20 April 2011

Earthy flowers


This was the second demonstration at my Mini catalogue launch at the beginning of the month. I really love the dark, earthy colours together, and all the embossing... and well, I just like it, ok?

I die-cut the flower and then ran the smallest flower through the Big Shot again using the Elegant Bouquet embossing folder.

There’s barely any stamping on this card... and no Whisper White or Very Vanilla, which is quite unusual for me. Even the “Hello” is stamped onto a tiny scrap of Botanical Gazette Designer Series Paper.

Stamps: Basic Phrases
Cardstock: Sahara Sand, Early Espresso, Cherry Cobbler
Paper: Botanical Gazette
Ink: Cherry Cobbler
Accessories: Big Shot, Elegant Bouquet embossing folder, Fun Flowers die, Word Window Punch, Designer Big buttons – Sweet Stitches, linen thread, scallop edge punch

All products by Stampin’ Up!®

Tuesday 19 April 2011

Botanical journal


When I saw the beautiful papers in the Botanical Gazette collection, I just knew I’d have to cover another journal. The only question was: which sheet to use?

Eventually, after much wrangling, I settled on this one – and decided to let the paper do most of the talking. All I added was a couple of strips of torn cardstock, some extravagantly ruffled ribbon and a flower embellishment.

To create this flower, I die-cut it from Cherry Cobbler and then punched a hole in the centre using a 1” circle punch. I then snipped towards the centre between two of the petals. I soaked the flower with water and then scrunched it up, opening it out and kind of pleating it to make it look more natural. It sounds like a lot of work but it wasn’t, honest.

Top tip: I may have said this before but it bears repeating... if you have the spiral punch, punch it through a scrap of cardstock and carry it around with you in your purse. When you see cheap notebooks on sale, you can then hold the cardstock up to the spiral binding to see if it matches. Many of them do.

Stamps: Sense of Time, Tiny Tags
Cardstock: Early Espresso, Old Olive, Cherry Cobbler, Very Vanilla
Paper: Botanical Gazette
Ink: Cherry Cobbler
Accessories: 1 ¾” circle punch, 1” circle punch, spiral punch, Fun Flowers die, Big Shot, basic rhinestones, wide striped Grosgrain Ribbon – Old Olive, taffeta ribbon – Old Olive, art journal

All products by Stampin’ Up!®

Saturday 16 April 2011

Wedding bells are ringing


It’s wedding season and therefore time to get out of my comfort zone. I’m not great at “pretty” or “elegant” but needed a couple of wedding cards.

Of course, at the moment I cannot possibly make a card without using the Big Shot, so Elegant Bouquet was perfect for the job.

First I stamped “congratulations” in Melon Mambo on Whisper White cardstock, then ran it through the Big Shot with the embossing folder. I really like the look this achieves as the stamping is partially embossed, too. The stamp set is the brand new Level 2 Hostess Set from the Mini catalogue. I don’t usually mount and use my hostess sets but this one is REALLY useful as it contains all those greetings you’ve been longing for. Book a party and let’s see if we can earn it for you free!

To create the flower, I ran some Melon Mambo cardstock and vellum cardstock through the Big Shot using the Bigz L Die, Fun Flowers. You can do several sheets of cardstock at a time with this hefty die!

The vellum flower was then embossed using the Elegant Bouquet embossing folder – I love this look, too.

I thought it would look nice sparkly, so I sprayed it with some Champagne Mist shimmer spray, which I made using our Champagne Mist shimmer paint, mixed with isopropyl alcohol and water. This did indeed give it a lovely shimmery finish – and also made it curl, which I quite liked.

The button is the same as yesterday’s – just an old button covered with some Newsprint DSP, wetted and moulded to shape.

The ribbon is Whisper White taffeta – using a needle and thread (gasp!), I ran some long stitches through the length of the ribbon and gathered it up to make random pleats. I stuck the ribbon down using Sticky Strip, carefully covering any thread which showed.

Stamps: Something To Celebrate
Cardstock: Melon Mambo, Basic Black, Whisper White
Paper: Newsprint
Ink: Melon Mambo
Accessories: Big Shot, Elegant Bouquet embossing folder, Fun Flowers die, old SU button, Champagne Mist shimmer paint, Whisper White taffeta ribbon

All products by Stampin’ Up!®            

Thursday 14 April 2011

Playing with my new toy


Sometimes you have to craft where the muse takes you... or, rather, you can’t wait to play with your new stuff. I was preparing my scrapbooking class when the UPS man arrived with my latest delivery. It was a hefty order so I’d qualified for hostess benefits (yes, demonstrators get hostess benefits, too!) and chosen, among other things, the Pillow Box die. I couldn’t wait to play with it so grabbed the first piece of card that was the right size (Not Quite Navy) and made my first pillow box.

Hmmm... I thought. What would happen if I embossed it, too? Because my Big Shot is brand new so I have to use it on absolutely everything, right?

So I embossed the pillow box and this is it. The flower die I was using at the time was just too big for this project so I made some flowers with the 5-Petal Flower punch. I wet them, scrunched them, opened them out and allowed them to dry. The centre is an old button covered with wetted Newsprint Designer Series Paper and dabbed with Champagne Mist Shimmer Paint. I dabbed a bit more on the Cherry Cobbler petals.

I love this project – great colours and that little pillow box is so fab and easy. You just glue down the sides (Sticky Strip is best) and then pop the ends in. It’s perfect for packaging small gifts, ideal for jewellery makers, wedding favours... I can think of loads of uses for this great little box.

Cardstock: Not Quite Navy, Cherry Cobbler, Very Vanilla
Paper: Newsprint
Accessories: Big Shot, Elegant Bouquet embossing folder, Pillow Box die, 5-Petal flower punch, old SU button, Champagne Mist shimmer paint

All products by Stampin’ Up!®            

Monday 11 April 2011

Mini inspiration

When creating in a hurry I find it easier to copy or adapt other people’s designs – and this one is taken from the Mini catalogue itself, page 24, although if you compare the two cards you’ll see they still turned out quite different.

I made my own background paper by stamping some Very Vanilla with the En Francais background stamp from the main catalogue. I added some butterflies and bees and distressed it a little using the Distressing Essentials Kit.

To create the large tag for the main element, I cut a corner off a rectangle, then flipped it over and held it over the opposite corner, using it as a guide. This means the corners match up (more or less).

Stamps: Nature Walk, En Francais
Cardstock: Sahara Sand, Very Vanilla, Old Olive, Baja Breeze
Ink: Early Espresso, Sahara Sand, Old Olive
Accessories: Baja Breeze seam binding ribbon, Scallop Edge Punch, Distressing Essentials Kit, Jewellery Tag Punch, Linen Thread

All products by Stampin’ Up!®            

Saturday 9 April 2011

A winner... and a colourful card


First of all an announcement... the winner of the prize draw following last weekend's Mini Catty launch is... Hazel P! Hazel was delighted to hear this news and is looking forward to playing with her new Itty Bitty Bits stamp set. Congratulations, Hazel. 

Today's project is the first card I made using the Big Shot – it’s so much fun and perfect for a beautiful spring day like today. It’s a simple card but I needed quite a few of them. This butterfly Embosslits die is perfect for using up all your little scraps of cardstock – there’s really no reason to throw anything away any more!

Cardstock: Various Brights, Shimmery White
Accessories: Elegant Bouquet embossing folder, Beautiful Wings Embosslits Die, Big Shot, Basic Pearls

All products by Stampin’ Up!®            

Friday 8 April 2011

Ooooh, lovely embossing folder!


I'm getting together with some of my team this evening for a shoebox swap, which should be exciting! It's the first time we've tried a shoebox swap, so it's something a bit different for us. In case you're unfamiliar with the concept, we all take all the supplies and tools for everyone to make a card, so we should all come away with several completed projects. IF we hurry! The idea is that they are all easily demonstratable or can be used as Make & Takes in our own workshops, so we should get lots of ideas. It's great meeting up with the team anyway, as we always bounce ideas around and, most of all, have a laugh. If you'd like to be part of a great team like this, please get in touch to find out more about becoming a demonstrator. It's really not scary at all and it's loads of fun. 

This card is similar to the one I'm taking for the shoebox swap this evening. It combines my two favourite things from the new Mini catalogue: the Big Shot embossing folders and the Nature Walk stamp set. Oh, and as Stampin' Up!® is all about sharing, it's blatantly copied from this one I saw out in Blogland.

It's very easy to make. First stamp your butterfly and then run the cardstock through the Big Shot in the Elegant Bouquet embossing folder. You can have an embossed or a “debossed” result – I went with the debossed version because of the direction of the butterfly. For my shoebox swap card, which is smaller and square, it is possible to get the butterfly in the right direction as well as an embossed effect, simply by turning the cardstock 90ยบ within the embossing folder. You’ll see what I mean when I get round to posting it!

Stamps: Nature Walk
Cardstock: Cherry Cobbler, Shimmery White, Sahara Sand
Ink: Cherry Cobbler
Accessories: Elegant Bouquet embossing folder, Baja Breeze seam binding ribbon

All products by Stampin’ Up!®

Wednesday 6 April 2011

More catalogue inspiration


This is another card inspired by the Idea Book & Catalogue; this time it’s based on the Just Believe card on page 49.

I began by stamping the sprig on a piece of Very Vanilla cardstock (yes, I know it looks Whisper White but it was sunny outside!) and then applying some ink around the edges of the cardstock using the flat stamp from the Distressing Essentials kit. I pierced all the way around and then tore off the corner. This is layered onto a piece of Old Olive, also torn in the corner, and a piece of Early Espresso cardstock, which isn't.

There are more sprigs stamped on the card base, as well as one on the circle accent, which features something which could be a bee, could be a hoverfly – any entomologists out there to put me straight?

Stamps: Nature Walk
Cardstock: Baja Breeze, Early Espresso, Old Olive, Very Vanilla
Ink: Baja Breeze, Early Espresso
Accessories: Seam Binding ribbon – Baja Breeze, Neutral Buttons, 1 3/8” circle punch, paper piercing tool, mat pack, Distressing Essentials Kit

All products by Stampin’ Up!®

Monday 4 April 2011

Watch the birdie


Ruffled ribbon is all the rage at the moment and this new Seam Binding ribbon from the Mini catalogue is perfect for the job. It comes in Baja Breeze (shown here), Crumb Cake, Pear Pizzazz and Rose Red. What you do is fray the end a little and take one of the strands from the centre. Pull and the ribbon will begin to ruffle. The more you pull, the tighter the ruffles will be – just play around... whatever you do with it will look fabulous.

I’ve stamped on the Designer Series Paper here to add a little interest – I used Cherry Cobbler ink and the foliage and eggs from the Nature Walk stamp set. Lots of torn edges as these products just cry out for a “shabby” look, in my opinion!

Stamps: Nature Walk
Cardstock: Cherry Cobber, Early Espresso, Baja Breeze, Very Vanilla, Sahara Sand
Paper: Botanical Gazette
Ink: Early Espresso, Cherry Cobbler
Accessories: Seam Binding Ribbon – Baja Breeze

All products by Stampin’ Up!®

Sunday 3 April 2011

Beautiful butterflies

I love these gorgeous colours. Nearly all my new Mini catalogue samples so far have been made using this gorgeous combination. They will look lovely when displayed together – and it also makes it easier for me to work to a limited colour palette as I don’t have to keep getting new supplies out!

You can’t see it on the photo but the butterflies are mounted on a piece of Shimmery White cardstock, which gives the card a subtle touch of glamour. The butterflies are created with the Beautiful Wings Embosslits die using very small scraps of cardstock placed over the relevant butterfly. There really is no need to throw away any scraps ever again as I will always be able to make butterflies with them!

Stamps: Basic Phrases
Cardstock: Sahara Sand, Early Espresso, Shimmery White, Baja Breeze, Cherry Cobbler, Old Olive
Ink: Cherry Cobbler
Accessories: Curly Label Punch, Beautiful Wings Embosslits Die, Big Shot

All products by Stampin’ Up!®            

Saturday 2 April 2011

Walking with nature

No comments yesterday? Does that mean nobody’s looking? Come on, please don’t be shy – we all need a bit of validation now and again!

My favourite stamp set in the Mini catalogue just has to be Nature Walk. It features just the kind of earthy, rustic images that I love so much. And I adore the Botanical Gazette Designer Series Paper that goes with it – it’s right up my street!

Here’s a card I made with both of them. I’ve used a strip of the paper along the bottom and pleated another strip to go across the middle of the card. It wasn’t my idea, of course; this card is a loose translation of one on page 54 of the Idea Book & Catalogue. But that’s what an Idea Book is for, right?

To colour the image, markers would be ideal but I don’t have a Cherry Cobbler marker, so I compromised. I inked the top half of the image using a Cherry Cobbler ink pad, then cleaned the ink off the leaves and stems using a cotton bud. Then I inked the leaves and stems using an Old Olive marker. There’s always a way!

I love these colours and have been having lots of fun making sample cards with a limited palette which includes all my favourites: Old Olive (of course!), Cherry Cobbler and Early Espresso. Not to mention Baja Breeze... but that comes later.

Stamps: Nature Walk, Basic Phrases
Cardstock: Old Olive, Very Vanilla, Cherry Cobbler
Paper: Botanical Gazette
Ink: Cherry Cobbler, Old Olive (marker)
Accessories: ¼” Grosgrain Ribbon – Old Olive, 1/8” taffeta ribbon – Early Espresso,  Sweet Stitches Designer Big Buttons

All products by Stampin’ Up!®

Friday 1 April 2011

Introducing the Mini catalogue... and the Big Shot!

The Mini Catalogue is here at last and, wow, what a Mini it is!

The BIG news that we’ve all been waiting for is that, at last, we have the Big Shot die-cutting machine! This is very exciting news indeed. There are 23 dies and folders in the Mini catalogue, 17 of which are exclusive to Stampin’ Up!, so be sure to check those out.

For this card I’ve used the Beautiful Wings Embosslits Die to make these sweet embossed butterflies. This clever little die embosses the cardstock and cuts the butterflies out at the same time. Very convenient!

The piece of Designer Paper is from a fabulous new pack called Botanical Gazette and I have to say that, for me, it’s the best paper Stampin’ Up!® have produced yet! I really, really love it and I’m sure you’ll be sick of hearing me say that soon because I can’t stop going on about it!

What’s so special about it? Well, for a start, it’s nicely “dirty” with distressed edges and a lovely rustic feel. There are images of butterflies, bees, birds, birdcages, blackberries... lots of images which co-ordinate with two of the new stamp sets in the Mini. I have one of the sets... but you’ll have to wait to see a project made with it. Can’t blow all my new projects on the first day, can I?

Stamps: Perfect Punches
Cardstock: Cherry Cobbler, Early Espresso, Old Olive, Very Vanilla
Paper: Botanical Gazette
Ink: Early Espresso
Accessories: Wide Oval Punch, Beautiful Wings Embosslits die, Big Shot

All products by Stampin’ Up!®            

The small print

This is my personal blog and my sole responsibility as an Independent Stampin' Up!® demonstrator. All images are © Stampin' Up!® All content including photographs, projects and text are © Helen Read, unless otherwise stated. Please feel free to copy my ideas for your personal use and inspiration - if you are a SU demonstrator you may use these ideas for your events but please give credit where it is due. Please do not use my ideas for monetary gain, competitions or publication. The images on this blog - including blog buttons - should not be copied and used elsewhere on the internet or on CDs.