Have you ever tried the eclipse technique? I’ve used this fun technique here with the new Cheerful Daisies bundle from Stampin’ Up!® but you can use it with almost any of your dies or punches. You get to use every bit of the cardstock too, which taps into my love of Zero Waste.
In a nutshell, for the eclipse technique, you die-cut or punch out a shape and then pop it up within its original slot on a dark background.The technique was the focus of my Crafty Friday online class at the beginning of June; these events are open to anyone in the UK and cost just £10 for the consumable supplies. You use your own stamps and dies, which means all the projects turn out differently.
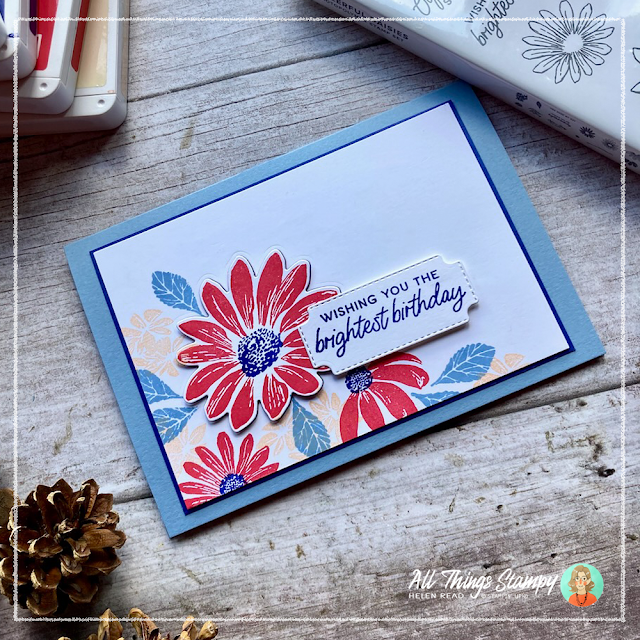
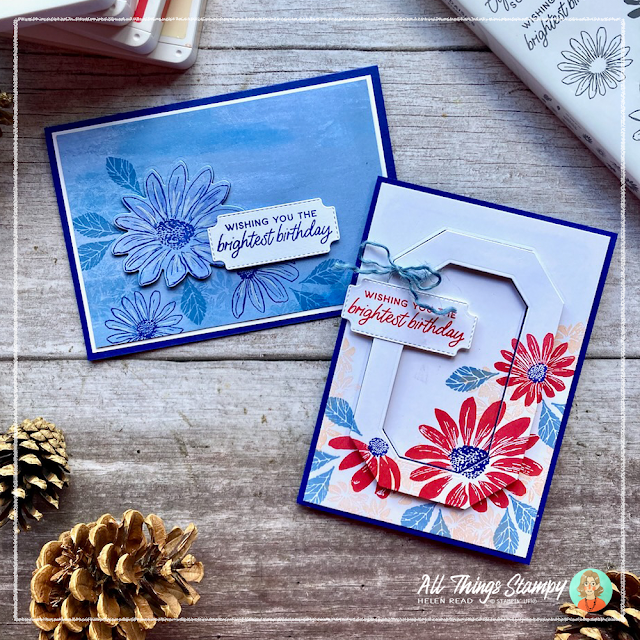
For my first eclipse card, I’ve chosen to die-cut the large flower from the Cheerful Daisies stamp set, so it really stands out from its background.
I began by working out where I wanted my main element to go, as this would be popped up. This was the largest Cheerful Daisies flower so I stamped it in position and then worked outwards, stamping flowers and leaves around it, in a diagonal across the bottom left of the card.
Cheerful Daisies set is a two-set stamp set but for this card I decided to omit the outlines and keep it simple. The big bold flowers and leaves really stand out against the white.
The next step is to die-cut the flower and retain both pieces. You mount the white background piece onto some darker cardstock and then pop up the flower using Stampin’ Dimensionals. You don’t offset it, just pop it up in the same position as before. The darker cardstock behind accentuates the gap to create the eclipse effect.
To finish off my card I stamped a greeting on a die-cut label from the same Cheerful Daisies dies and mounted it onto a Boho Blue card base.
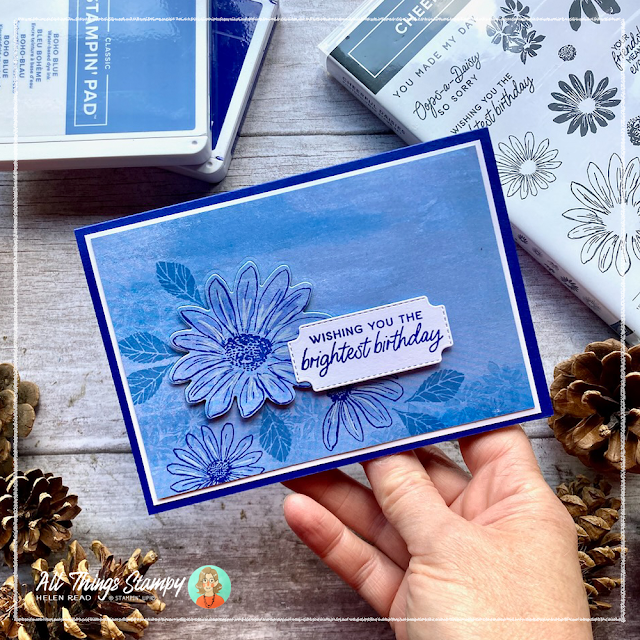
You can use this technique on Designer Series Paper, too. Some Stampin’ Up!® paper matches our Stampin’ Up!® dies perfectly, and they would be ideal, or you can do what I’ve done here and stamp onto Designer Series Paper.
This is Fresh as a Daisy Designer Series Paper from the same suite as the Cheerful Daisies bundle. One side of the paper has busy floral designs, while the reverse has lovely single-colour paint effects, like this one in Boho Blue.
For this card I stamped roughly the same arrangement of flowers, except this time I stuck to all blues. I used Blueberry Bushel for the flower outlines and centres, and Boho Blue for the leaves. For the background flowers, I stamped off in Boho Blue; in other words, I stamped onto scrap paper first to get rid of some ink so I could achieve a paler look on my project.
This time I used the outline stamp for the flowers, and coloured them using a water painter and a small amount of Blueberry Bushel ink. I then used some Craft White ink and a water painter to add some white highlights.
You’ll notice the Designer Series Paper is mounted onto white cardstock in this instance but you can still achieve the dark eclipse effect by adding a square of dark cardstock behind; it doesn’t have to be a full piece, just where you’ll see.
The card base is Blueberry Bushel so I lined the inside with white cardstock which I stamped (but forgot to photograph).
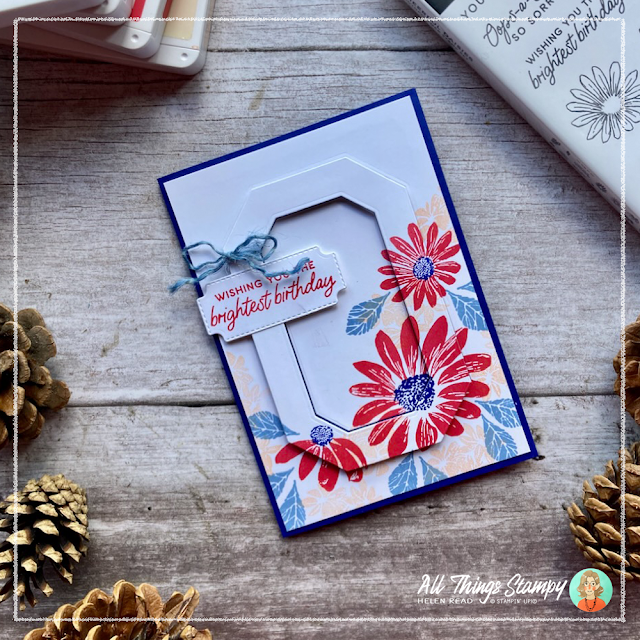
But what if you don’t have any dies which fit around a stamped image? I knew you were going to ask that, which is why I created a second card which uses a slightly different eclipse technique.
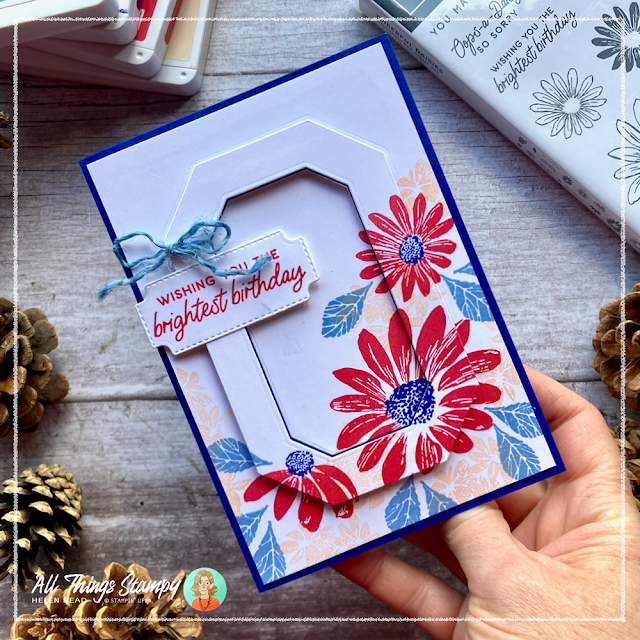
This time I stamped my arrangement of Cheerful Daisies flower and leaves as before. But instead of die-cutting a flower, I used my new Countryside Corners dies to die-cut a border. Any nesting dies will work here but I do advise creating a reasonably wide border, purely because that will be more forgiving if your positioning isn’t as perfect as you’d like.
I mounted the white layer directly onto the card front, which is Blueberry Bushel so provides the dark background I wanted.
Next comes the potentially tricky positioning of the layers, so what I did here was slot in the border without sticking it down, then apply glue to the back of the centre panel and slot that into the border. This way everything lined up perfectly and I could flip out the border (which wasn’t stuck down, remember) and then add it back in once the Stampin’ Dimensionals were applied to the back.
If you wish to add some ribbon or twine to the border, it’s a good idea to do this before sticking down; otherwise, like me, you’ll be threading it through and trying to avoid the Stampin’ Dimensionals!
Just like the blue card, I lined this card with white cardstock stamped with more flowers. Just like the blue card, I forgot to photograph it. And just like the others, I can’t find them anywhere!
I hope you enjoy my eclipse technique projects and are inspired to create your own.
For two of these projects, I used one of the colour combinations from my 2023 charts, as I have challenged myself to use at least one a month!
Does
your wish list come to more than £99? Please get in touch and I will
help you get more for your money and unlock discounts all year round.








No comments:
Post a Comment
Thank you so much for taking the time to comment.