Monday 30 April 2018

Sneak Peek: Tropical Thinlits mini house plants tutorial


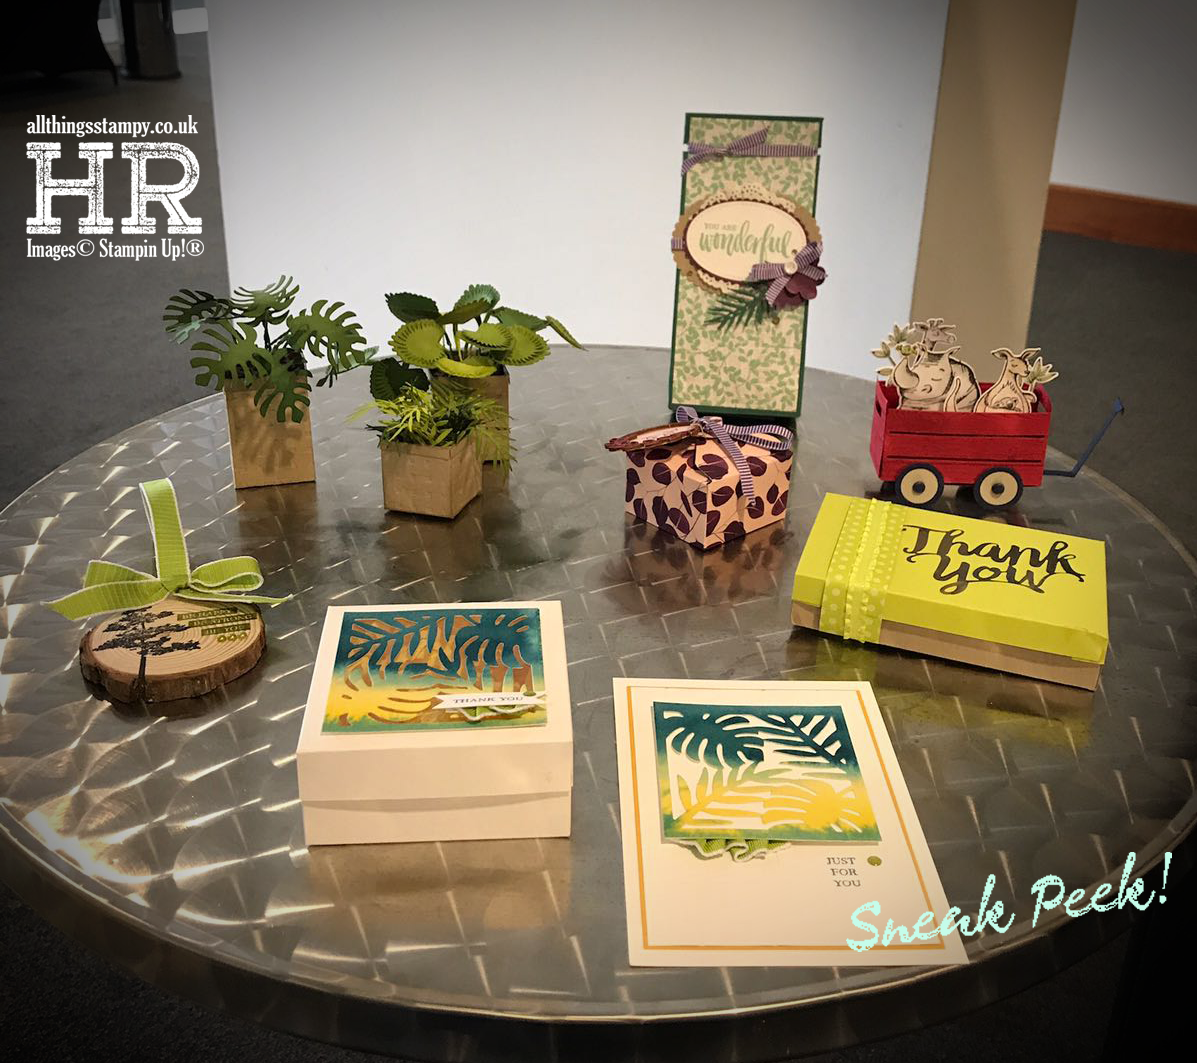
Time for another Sneak Peek! This was one of the projects I made for my display at OnStage Telford at the beginning of the month and it was probably the one I was most proud of... mainly because it’s so far out of my comfort zone.

I was sent a pack of Tropical Thinlits – some fabulous new tropical leaf dies from the upcoming catalogue. However, I was not sent the co-ordinating stamps (not complaining, I received LOADS of products!) so was left wondering about how to use them. It’s actually interesting trying to work without the catalogue as you have NO pre-conceived ideas about using the set and I got it into my head that they were intended to make a 3D plant. Now of course I have the catalogue... and it features precisely zero 3D projects made with these dies!

I was confused by a die that I haven’t used here, but it turned out that it works with a flower stamp which I fully intend to order when I can!

Anyway, lots of people were asking how I made these, so here’s how. Sorry there are no images but seriously I can NEVER make these again!

1. Die-cut LOADS of leaves in various shades of green cardstock

2. Sponge those leaves in same or slightly darker ink

3. Curl using bone folder

4. Cut very narrow strips (5mm, ish) of green cardstock for stems, then break down the fibres using a bone folder. Eventually, the cardstock will split into two layers which can be separated. This makes it thinner and easier to work with.

5. Wrap these thin layers of cardstock around some florists’ wire, spiral-fashion, and secure with Tombow or similar wet glue. I think I actually applied PVA with a paintbrush. Allow to dry then assemble the leaves.

Make the boxes. These are simple 5cm square boxes, at different heights. If you cut and score first, then emboss, you can line up one of the edges to the edge of the embossing folder so you can get it all done. Does that make sense?

There’s a narrow strip of cardstock around the top edge of each planter, and the edges are all sponged in Crumb Cake.

Ok, the science bit... getting the plants to stand up in the planters.

1. Make a platform the same size as the box (ie with a 5cm square top) but about 1cm smaller in height. This will look like a simple drawing of a stool or table. So that would be a piece of cardstock measuring about 5cm x 13cm, scored at 4cm from either end.

2. Punch holes in the top of the platform - ie the centre square, then poke the leaves through, taping underneath. From the side it might look like this...

3. Don’t worry about arranging the leaves just yet as they’ll only move. 

4. When all the leaves are taped in, you can apply glue to the sides of the platform and then slide it into the box.

5. Next I took some Early Espresso cardstock, which I tore into small pieces and rolled into tiny balls. This was very, very boring to do but was really worth it as everyone was asking about them because they did look like soil. 

6. I applied a thick layer of Tombow onto the top of the platform, in between the leaf stems, and filled it with the balls of cardstock. 

Finally, it’s time to arrange the leaves to look nice. A lot of effort but was it worth it? I think so, yes. Would I do it again? Definitely not!


Saturday 28 April 2018

Caturday: Lake District cat 4


FOUR cats in the Lake District? This was a record for us, although sadly this one did NOT want to be stroked, and was only captured on camera with a long zoom.

Friday 27 April 2018

Retiring Product Focus: Bird Banter and Tutti Frutti DSP


Do parrots eat kiwis? I bet they wouldn’t turn their beaks up at it, so here they are together on a “last hurrah” card before these products head to the retired box.

Please don’t delay if you want to order any retiring products... some items do sell out fairly quickly as needless to say, the warehouse won’t be restocking.


Wednesday 25 April 2018

Retiring product focus: Brick Wall embossing folder (cracked glass technique)


Crafty Friday back at the beginning of the month was a chance to show the ladies the cracked glass technique. We were a small group but that worked out well as I’d forgotten just how many layers of clear embossing you need to get it thick enough to crack! We all made slightly different cards...


... And I’m pleased to say that retiring products on here are minimal. The only things which are going are the Brick Wall Embossing Folder (shame – it’s one of my faves!), Hearts & Stars Elements, the Natural Trim and the Crushed Curry Chevron Ribbon.

Lift Me Up and Wood Words (which we used for the greeting) are both carrying over.

Monday 23 April 2018

Sneak Peek: OnStage Make & Takes


These are some of the Make & Takes from OnStage this year; they were all really impressive this year. 

Having spent a couple of months working with this beautiful stamp set, Rooted In Nature – which is one of the stamp sets I received for my Display Board project – I was happy to be inspired to use it in yet another way. 

The set is absolutely gorgeous, themed around trees of course, and again, you’re going to love it. 


I confess when I first saw this set, my first thought was that this meant the end for Lovely as a Tree but no, the good news is, we get both!


This is another speciality DSP in the new catalogue; in fact, it’s Designer Vellum, from the Graceful Glass Suite. You can colour the vellum with either Stampin’ Write markers or Stampin’ Blends. 


There are two of the brand new In Colors on here – the collection really POPS this year!

Saturday 21 April 2018

Caturday: Lake District cat 3


This friendly tabby was found in the heart of Ambleside, and I believe we have met before on a previous visit. She was very obliging, although I wasn’t risking a tummy rub especially as it may have caused her to fall into the road.

Friday 20 April 2018

Retiring product focus: Bird Banter and Tutti Frutti DSP


I really really love the fruity patterns from the Tutti Frutti Designer Series Paper stack but I confess I’m less keen on the co-ordinating stamp set (both are retiring soon, by the way). But when I paired that lovely paper with Bird Banter, I felt like I’d wasted the last few months! Why didn’t I open the paper sooner?

This was the Make & Take for a party this week. We coloured with Stampin’ Blends, which are currently unavailable but I promise you they will be back soon!

Wednesday 18 April 2018

Retiring product focus: Pick a Pattern Suite


I know this wasn’t one of the most popular stamp sets in the 2017-18 catalogue but it was one of my favourites as it is so much fun. I love the little dinosaur and the Designer Series Paper is fab.

So it will soon be farewell to Pieces & Patterns and the Pick a Pattern Designer Series Paper. Not to mention the Emerald Envy cardstock that features in the DSP, the Stylized Birthday single stamp on the card on the left and the ribbon from both cards!


To create the main focal points on both of these cards I used a mixture of clear embossing powder and glitter. For the one above I “smooshed” some ink onto some wet watercolour paper and allowed it to dry. Next I stamped and heat embossed Happy Birthday in white, then covered the whole lot with clear embossing powder mixed with a little Dazzling Diamonds glitter and heat set it.


This one is the same principle but without the watercolouring. I simply stamped and embossed in white onto Tranquil Tide cardstock then covered the whole lot in clear embossing powder mixed with a little glitter. It’s a good way of stopping it from going everywhere!

Monday 16 April 2018

Sneak Peek: OnStage Make and Takes


As I clear out my craft room of retiring products – including cardstock and ink pads – I thought I’d change Monday’s focus away from colour combinations temporarily and towards Sneak Peeks.

So today I have two of the gorgeous Make & Takes from OnStage 2018 (you’d have had all four but Blogger is playing up!). This suite is lovely – very much not my usual style but I was smitten and have ordered both the printed note cards (in Blackberry Bliss and Mint Macaron - whoohoo!) and this beautiful laser-cut Delightfully Detailed DSP. Yes, this is DSP and you’re going to love it...


And finally, the Share What You Love Suite... which will be available to purchase in bundles from 1st May. This Designer Series Paper is stunning – and it’s actually cardstock weight so perfect for making boxes.

What do you think of what you’ve seen so far? Excited for the new catalogue?


Saturday 14 April 2018

Caturday: Lake District cat 2 (Peggy Hill)


I named this beauty Peggy Hill, as I found her on Peggy Hill in Ambleside on our recent trip to the Lake District. Again, I was surprised to find a cat to pester, as they are usually nowhere to be seen!

Friday 13 April 2018

Book your slot now for my Colour Club


A Colour Revamp is always exciting, but it can be a big outlay to get your hands on all the new Stampin’ Up!® colours straight away.

What you need is my Colour Club!


Over four months, you will collect ALL 16 new Core Colour ink pads in the great new and improved ink pad design, as well as matching A4 cardstock and a selection of co-ordinating ribbons.


PLUS, everyone who joins my Colour Club will receive this fabulous 7cm x 7cm swatch of cardstock, featuring ALL 53 colours, lovingly and painstakingly labelled by me so you can navigate your way easily through the full range.


What do you get?


For £40 per month, you will receive the following items each month:

FOUR brand new ink pads in the new design – by the end of the club (September) you will have all 16 new colours to join the Core Collections.


FOUR sheets of A4 cardstock in the same colours as that month’s ink pads


ONE full roll of ribbon to co-ordinate with one/two of that month’s colours. Over the four months you will receive all of the following:


  1. 1/2” Textured Weave Ribbon in Granny Apple Green (9.1m)
  2. 1/4” Mini Striped Ribbon in Gorgeous Grape (9.1m)
  3. 1/4” Mini Striped Ribbon in Poppy Parade (9.1m)
  4. Metallic Ribbon Combo Pack in Petal Pink/Shaded Spruce (4.6m of each each)


Plus these one-off gifts:


  • Cardstock swatch to help you with your colour combinations

  • 2018 Stampin’ Up!® Annual Catalogue
  • £15 of FREE products of your choice in your host month


Just want the swatch?

This is available from me at £7, local collection or posted second class within the UK. 

So what are you waiting for? Please reserve your slot now!

(This offer is exclusive to Helen Read, Independent Stampin’ Up!® Demonstrator)


Terms and conditions

  • The £40 a month charge is for local collection. If you require your order posting to a UK address, this will be charged at cost. Sorry, I cannot post outside the UK.
  • In Colors are not included in the Colour Club; this is just for the new and returning Core Colours.
  • No substitutions can be made as I will be ordering the discounted bundled of 16 pads each month. 
  • This offer is exclusive to Helen Read, Independent Stampin’ Up!® Demonstrator and is not an official SU bundle. 


Wednesday 11 April 2018

An exciting Colour Revamp!

Whoohoo! We’re getting a Colour Revamp! No, not a Refresh (that’s just a mini tweak) but a full-blown Revamp! Here are the details...


Yes, all of the above are leaving us, so please do stock up if you think you can’t live without any of them. And I urge you not to delay as they are only available while supplies last!

But before you go into mourning, let’s take a look at the exciting NEW colours we are getting in their place. We have 10 brand new core colours!


PLUS... back from beyond the grave, some of our old favourite In Colors... finally promoted to the permanent collections!


The eagle-eyed will have spotted that Flirty Flamingo is back before it’s even gone! That’s a pretty quick comeback, isn’t it?

So how do they shape up as a collection? The biggest change is that will we have THREE extra colours! We will have four collections of 10, as before, but Whisper White, Very Vanilla and Basic Black have been booted out into their own little club of "Basics", which makes sense.

And you’ll see some COLOUR in the Neutrals! This is because focus groups and feedback told SU that these are the shades that are generally used as neutrals. Nothing is done on a whim, you know – it's all very scientific!


Don’t they look fresh and exciting in their new collections? The Brights have become brighter... the Regals have become richer... the Subtles have become cleaner... the Neutrals have become so much more versatile.

What about the In Colors? You’ll love these if you’re a fan of Brights. They’re perfect for celebrating Stampin’ Up!® 30th anniversary as they have a real 80s vibe and will fill a need for people who love to create projects in their school/team colours etc...


So that’s that. Exciting, eh? Let me know what you think in the comments please!

Monday 9 April 2018

MASSIVE sneak peeks!

Picture: Tricia H

I was honoured to be invited to create projects for the display boards at last weekend’s OnStage event. For those unaware, OnStage is a huge gathering of demonstrators, all over the world – the UK event was in Telford and welcomed more than 500 demonstrators.

Picture: Tricia H

For my project I was sent a big box of brand new, unseen Stampin’ Up!® goodies – some weren’t even in their proper packaging yet – way back in February. I have had to keep these a secret since then which has NOT been easy! SU were more than generous and I was very excited with the products I received.

There’s no room to show them all off here so I have created an album which can be found at at my All Things Stampy Facebook page. There you will find a close-up of every project, so please go take a look!


No post yet but it will be worth the wait!

Please be patient!

Please come back this evening (after 8pm) to see some amazing sneak peeks from the upcoming Annual Catalogue!

I don’t normally share products this early as I think it’s a bit unfair if you can’t get your hands on them for almost two months, but I made samples for the OnStage 2018 display boards which other demonstrators are sure to be sharing, so I thought I’d better join in this time!


Saturday 7 April 2018

Caturday: Lake District cat 1


I love visiting the Lake District but tend to resign myself to a cat-free week as there just aren’t that many to be seen in and around Ambleside. Could have something to do with the huge number of visitors’ dogs! But we struck lucky on our first day this week, with this gorgeous kitty, sunning herself on a car bonnet. She even rolled over for us...


Friday 6 April 2018

Waterfront “painted” beach scene


Inspired by US demonstrator Tami Hewlett, I just had to have a go at her fabulous beach scene using the gorgeous, must-have Waterfront stamp set. I don’t love mine as much as I love Tami’s but it was fun having a go!


Wednesday 4 April 2018

Bird Banter meets Wood Textures DSP


Another UFO gets thrown together for my last-minute blog projects... this time some colouring with Stampin’ Blends on the fabulous Bird Banter stamp set. I love this Wood Textures paper, too... and am happy to say that I ’ve heard on the grapevine that it will be carrying over to the new catalogue. Hurrah! Hope Bird Banter makes the cut, too - it’s such fun.

Monday 2 April 2018

Foxy Friends meets Wood Textures DSP


The theme for this week’s blog - if a theme is needed - is UFOs (UnFinished Objects).

Would you believe this is only the third project I’ve ever made with this fabulous stamp set? And I remember wanting it so badly when it came out. I’ve no idea what has been holding me back but a sudden need to complete some UFOs has brought about its sudden appearance.

I realised last night that I had nothing for this week’s blog posts so hastily finished off some UFOs - thankfully, I have plenty to choose from. I knew they’d come in handy one day.

Honestly, I have been crafting up a storm but I’m not allowed to show you any of it just yet as every single project features brand new as-yet-unseen products from the upcoming Annual Catalogue.

I’ve made 30-odd projects for the Display Boards at OnStage in Telford, then yesterday I made a batch of team gifts for the same event, along with some team recognition cards and gifts (to be given out on the day or posted out to them after the event). So I'm sitting surrounded by lovely craft projects (at least I think they’re lovely!) and they ALL have to stay under wraps. The wait will be worth it, I promise.

The small print

This is my personal blog and my sole responsibility as an Independent Stampin' Up!® demonstrator. All images are © Stampin' Up!® All content including photographs, projects and text are © Helen Read, unless otherwise stated. Please feel free to copy my ideas for your personal use and inspiration - if you are a SU demonstrator you may use these ideas for your events but please give credit where it is due. Please do not use my ideas for monetary gain, competitions or publication. The images on this blog - including blog buttons - should not be copied and used elsewhere on the internet or on CDs.