Showing posts with label Highland Heather. Show all posts

Tuesday, 28 September 2021

Scrappy strip technique - and mosaic technique

Stampin Up scrappystriptechnique scrappy strips
 

Have you heard of the Scrappy Strips technique developed by Aussie Stampin’ Up!® demonstrators Kylie and Bruno Bertucci? It’s brilliant for using up little scraps of cardstock and DSP and you can mix and match to your heart’s content.

It’s a simple 4-step technique:

1. Cut a panel to fit your card (I make my 5mm smaller than my card front, so if you’re using A4 cardstock that’s 10cm x 14.3cm)
2. Prepare four pieces of cardstock or Designer Series Paper – I cut these to 10.5cm x 14.8cm, so a quarter sheet of A4.
3. Cut these into 2cm wide (or 1") strips (along the length or width, it doesn’t matter), then cut each strip on the diagonal, roughly, without measuring.
4. Assemble these strips onto your panel and trim off the excess.

That’s it. You now have a fun panel to add to your card front and finish off with a greeting label. 

Stampin Up scrappystriptechnique scrappy strips
 

Oh and best of all, if you start off with four different colours/designs on the equivalent of four card fronts, you should have enough strips to create four cards as I did here. 


Stampin Up scrappystriptechnique scrappy strips


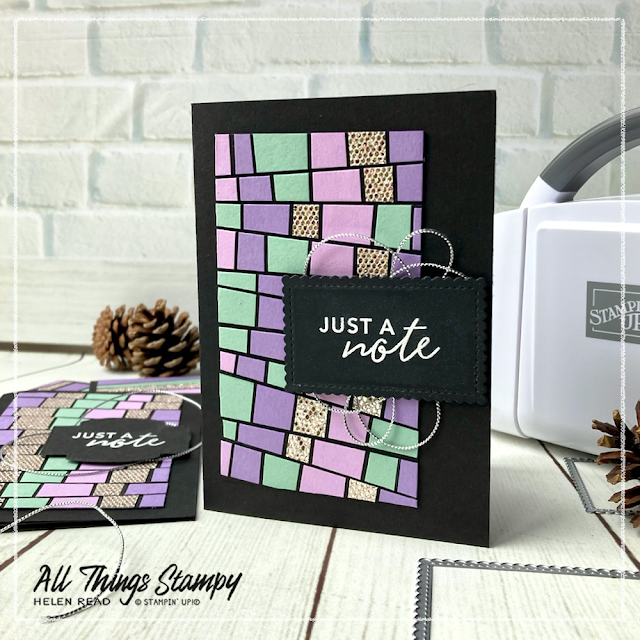
I used a subtle colour combination of Highland Heather, Mint Macaron and Fresh Freesia against striking Basic Black, because I don’t do well with pale colours normally.
I like the idea of including a metallic finish in the design, although this lovely Be Dazzling Speciality Paper from the Sale-a-Bration collection is quite thick, so make sure you stick it down firmly and be careful when you cut it up. 

Remember, Sale-a-Bration ends on Thursday so if you want Be Dazzling paper or any of the free items, or want to join my team and get yourself a free bundle, please act VERY fast. Don’t leave it until Thursday evening as the SU office will be closed so no tech help will be available. 


Stampin Up colour combination Fresh Freesia Highland Heather Mint Macaron

I have used this technique a few times without thinking much about its origin but last week I saw a card which took it to the next level and discovered that it had been developed by a demonstrator called Linda Driggs and again showcased by Kylie Bertucci.

Stampin Up scrappystriptechnique scrappy strips

This turns your scrappy strips into a wonderful mosaic pattern. What you do is complete steps 1-4 as above, then cut your finished panel up again into further strips. I learned after making my version that simple strips would suffice, but I went off-piste and cut my strips on the diagonal again. This results in a slightly eye-boggling finished card but I still quite like it. 

Stampin Up scrappystriptechnique scrappy strips

I mounted my panels onto black cardstock as I think that makes them extra striking, and finished off with an embossed greeting in white on black. However, I’m afraid I’ve broken my own rule here and used a retired greeting; Just a Note comes from the retired Simply Citrus Card Kit, but it’s such a useful sentiment and size of stamp that I hung onto it. I didn’t realise my error until I was taking photos of the projects. Oops.

Have you tried the scrappy strip technique? Why not give it a go this week? Honestly, if you get hooked on this technique you will never throw any scraps of cardstock of DSP away again. 

Stampin Up scrappystriptechnique scrappy strips

 If you are in the UK and would like to order, please To order these or any other current Stampin’ Up!® products from my store, please shop using this link

Does your wish list come to more than £99? Please get in touch and I will help you get more for your money and unlock discounts all year round.  


Monday, 10 May 2021

A passion for purples with the Hand-Penned Suite

Hand Penned Petals Stampin Up card

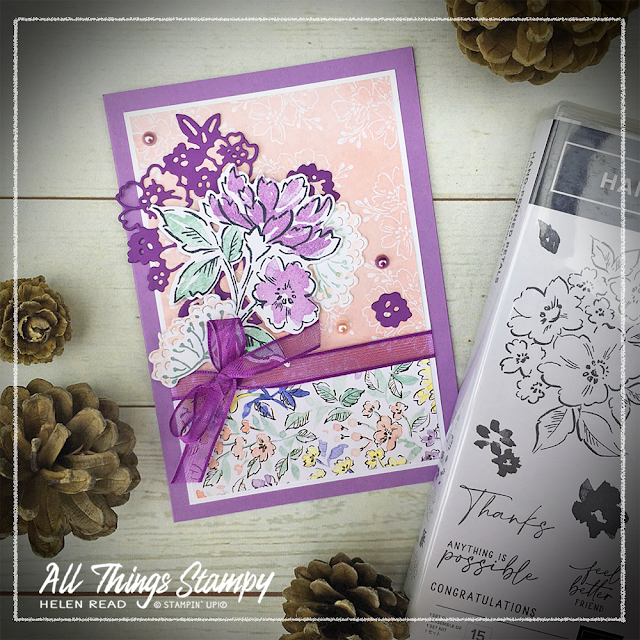
My regular customers and I have rediscovered a penchant for purples lately, which was the inspiration for this card using Stampin’ Up!’s new Hand-Penned Suite.

It's a busy card for the ‘avid’ crafter, using the new Hand-Penned Petals bundle and Hand-Penned Designer Series Paper. This is such a pretty, delicate suite which reminiscent of the hugely popular Cath Kidston designs.

Hand Penned Petals Stampin Up card

Hand-Penned Petals is a two-step stamp set, which means you can colour the images instantly by stamping on top. And no, they’re not supposed to fill right to the edges! If you want a full image with no gaps, you can colour them with Stampin’ Blends or one of our other many options. 
 
Hand Penned Designer Series Paper Stampin Up
Hand-Penned 12x12 Designer Series Paper

The Hand-Penned Designer Series Paper features lots of colours, giving you many choices for your project's colour scheme. For this card, in keeping with our purple passion, I’ve concentrated on the Highland Heather and Mint Macaron, which are both found in there. 
 
I’ve used a piece of the Blushing Bride patterned paper as my background as it’s subtle enough to allow the die-cut flowers to stand out. Slicing a section off and flipping it over gives you this beautiful floral design which features Highland Heather flowers. 

Hand Penned Petals Stampin Up card

The main image is stamped in Memento Tuxedo Black and then on top with Highland Heather and Mint Macaron. I’ve left the base of the flower blank as there isn’t a stamp for this, but you could colour it in if you preferred.

The pink and green flowers around it are stamped and die-cut with the lovely dies. I’ve stamped in Blushing Bride and Mint Macaron. 
 
If you like precision, stamp the stem first, then die-cut this shape before adding the seed heads. That way you can get the heads within the die-cut image – which you can do easily as the set is photopolymer.

Hand Penned Petals Stampin Up card

Behind the stamped flowers is a die-cut flower cluster in Gorgeous Grape, created using the Penned Flowers dies from the bundle. The smaller flowers are also from this set and, handily, you get two larger ones and three small ones in the set, so you can create multiples in one go. 
 
Hand Penned Petals Stampin Up card

I’ve finished off with some Gorgeous Grape ribbon and some Pastel Pearls, which conveniently come in all the colours used on the card. I haven’t added a greeting to this card as I think it stands alone – I can always add one later if I change my mind. Lots of my crafty friends do this an I think it’s an excellent idea.

Is this set on your wish list? I’d be very surprised if it isn’t!

If you are in the UK and would like to order, please visit my store and, if you use the May host code RMSS4YFY, I’ll send you a thank you gift in June!


Does your wish list come to more than £99? Please get in touch and I will help you get more for your money and unlock discounts all year round.  
 
 
Hand Penned Petals Stampin Up card


Monday, 19 October 2020

Sponged trees with the Evergreen Forest 3D Embossing Folder

Evergreen Forest Embossing Folder Stampin Up

This Evergreen Forest 3D Embossing Folder delivers SO much more than it seems to at first glance. Yes, it looks great when used on green cardstock, and super-classy when used on crisp white cardstock but stop! Why not have a bit of fun with it?

I saw these beautiful designs by Barry and Jay at Mitosu Crafts and couldn’t resist having a go myself. It’s just a simple case of embossing then sponging on some colour. 

Evergreen Forest Embossing Folder Stampin Up

For the blue card, I used Seaside Spray, Misty Moonlight and just a hint of Night of Navy in the corners.

Evergreen Forest Embossing Folder Stampin Up

For the purple version, I used Highland Heather, Gorgeous Grape and just a hint of Blackberry Bliss in the corners and at the base. 

Evergreen Forest Embossing Folder Stampin Up

Next I took some diluted Whisper White Craft Ink (about 1:1) and, using a small paintbrush, spattered it across the sponged sections. And they’re finished off with some Adhesive-Backed Snowflakes which I absolutely adore.

Evergreen Forest Embossing Folder Stampin Up 
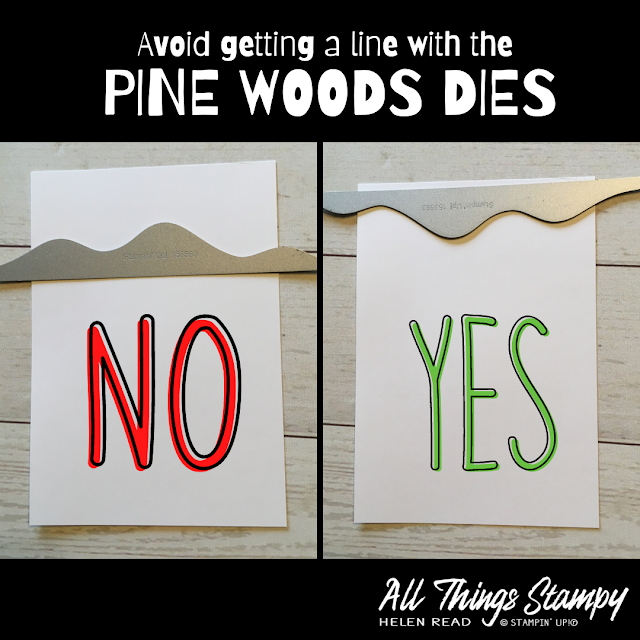
For the base of the cards, I used the Pine Woods Dies, which I LOVE, obviously, and I have two great tips for these dies, in case you decide to add them to your stash (which I highly recommend, obviously). 

Evergreen Forest Embossing Folder Stampin Up

The Foam Adhesive Sheets are ideal when die-cutting this tree. It may feel a bit fiddly to press out but that’s because the die may not have gone all the way through to the backing sheet, but if you peel the tree out carefully it will be perfectly fine. And it looks so much more professional without all those fiddly little bits of cut-up Stampin’ Dimensional on the back.

Pine Woods Dies Stampin Up tip

When I was cutting the snowy hill using these dies, I kept getting an unsightly embossed line where the edge of the die had been. Then I had a light-bulb moment and realised I was using them upside-down. Use them as I have done in the pic on the right, and the embossed line will be on the piece you discard (unless you wish to trim it off and have a smaller hill for another project).

So what do you think? Are you going to have a go at sponging this gorgeous embossing folder? Which colours do you prefer?


Friday, 7 February 2020

Painted Poppies Week: Monochromatic Poppies

Painted Poppies Stampin Up Helen Read Allthingsstampy Monochromatic


It’s the last day of Painted Poppies Week here at All Things Stampy but I’m sure this won’t be the last you see of this lovely stamp set!

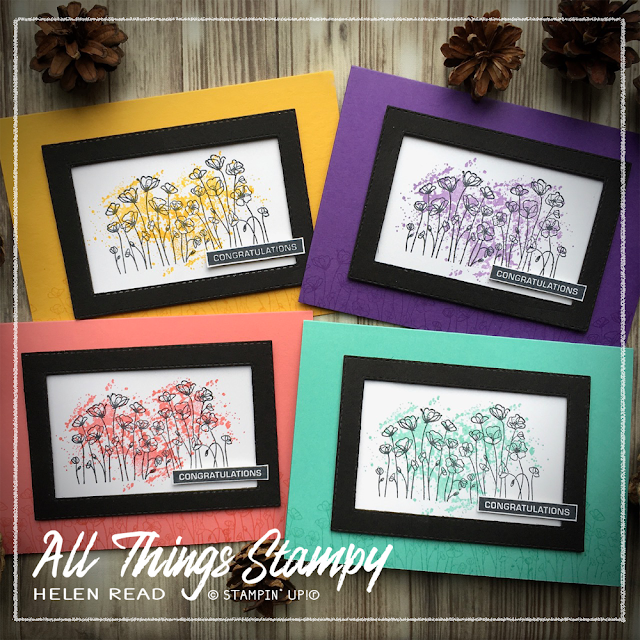
These four fun cards were quick and easy to make – and I love how you can tailor the design to almost any of our lovely colours.

Painted Poppies Stampin Up Helen Read Allthingsstampy Monochromatic

Painted Poppies Stampin Up Helen Read Allthingsstampy Monochromatic

Painted Poppies Stampin Up Helen Read Allthingsstampy Monochromatic

Painted Poppies Stampin Up Helen Read Allthingsstampy Monochromatic

I borrowed the idea from Lynn Dunn, but simplified her design slightly to use Label Me Bold instead of embossing – I really have to be in the mood for embossing!

My colours are Crushed Curry, Gorgeous Grape (but with Highland Heather stamping), Flirty Flamingo and Coastal Cabana. Which one is your favourite?

Some colours will swamp your poppy heads, which is why I used Highland Heather instead of Gorgeous Grape. If you don't have a paler ink, you can stamp off onto scrap paper first, then this will give you a lighter shade.


Friday, 24 January 2020

Peaceful Poppies desk calendar

 
We all love a no-waste project, don't we? And this pretty desk calendar gives you two projects in one.

Inspired by Susan Itell, who has detailed instructions here, (https://simplestampin.com/2017/12/super-practical-oh-easy.html), I made this for my purple-loving host, using Peaceful Poppies Designer Series Paper. It's hard to cover the gorgeous flower images but this Blackberry Bliss side is beautiful, too.

Because the project is made from half a sheet of 12"x12' cardstock, from which you cut a 3"x6" piece, you get to make a sweet little 3"x3" card with the leftovers. Very easy, very cute and a great January project.


Colour your leaves from Peaceful Poppies simply by stamping on top with the large splatter stamp from the same set. No faff, and you can do two or more at a time!


Friday, 2 August 2019

Beautiful Friendship thank you cards


It’s Friendship Day on Sunday, apparently, and this Beautiful Friendship stamp set just keeps coming into its own. I love the hydrangeas stamped in Highland Heather, combined with the Seaside Spray. I've used the small stamp set, Magnolia Blooms for the words, as I needed a thank you stamp and this one fits the bill perfectly.

The images are stamped around the left edge and bottom of the white layer to draw the eye into that area. This uses the “rule of thirds” concept to create a simple but pleasing design. 


Tuesday, 2 April 2019

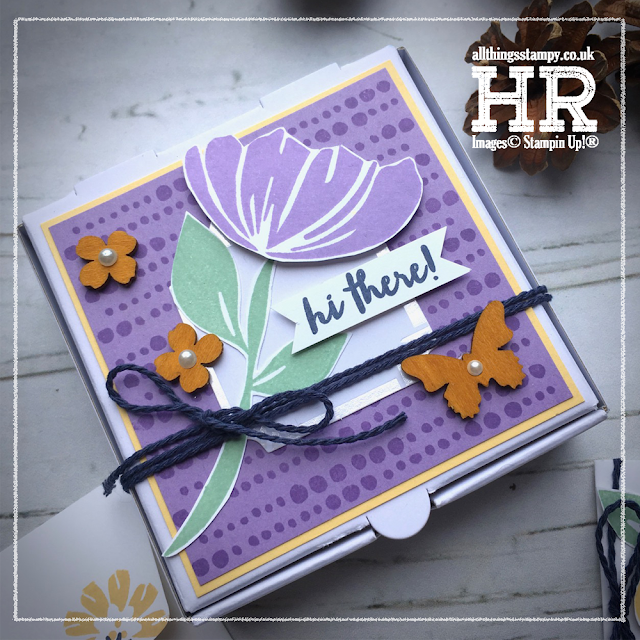
Bloom by Bloom mini pizza box and cards


Sale-a-Bration is over now, which means I now have time to show you the rest of my All-Day Craft Event projects. This was our morning project - a mini pizza box with four small cards inside (two of each design). 


Everyone’s kit contained – among other items – the Bloom By Bloom stamp set, a roll of Night of Navy Baker's Twine and some Butterfly Elements, which made it a very relaxed occasion as nobody had to wait around for stamps. The Butterfly Elements are no longer available as they were a Sale-a-Bration item, but the Frames Elements (146906) contain leaf sprigs and hearts, so would do a similar job.

Together, the box of small cards would make a lovely gift, or you could use the cards and use the box for a different present.


http://helenread.stampinup.net

Wednesday, 6 February 2019

Wonderful Romance - Stampin' Blends or Blender Pens?


Stampin’ Blends or Blender Pens - which do you prefer?

The image on the left is coloured with Blender pens in a mixture of greens, including Granny Apple Green, which is why it is more vivid. The one on the right is coloured with Old Olive and Calypso Coral Stampin’ Blends (light and dark), with an outline of light Pool Party.

Both are stamped onto Very Vanilla cardstock and cut out with the fabulous new Stitched Rectangle Framelits.

But the most important thing to remember when colouring is this...


Friday, 18 January 2019

Simple Stamping with Love What You Do


I have started new Cuppa & Card sessions at Bugs Tucker Cafe in Borrowash, near Derby. These are the cards we made at our first session. They use a lovely, spring-like colour palette, with blender pens to colour in the images.


Monday, 19 November 2018

Colourful Christmas with Snow is Glistening


I have loved playing with the Snow is Glistening stamp set, and really enjoyed creating these colourful cards with the Stamparatus.

I inked up the stamp using sponge daubers, then stamped onto the Whisper White cardstock. The great thing about the Stamparatus is that if you miss a bit, you can stamp again, perfectly.

Scroll down for close-ups of all the colours...


The small print

This is my personal blog and my sole responsibility as an Independent Stampin' Up!® demonstrator. All images are © Stampin' Up!® All content including photographs, projects and text are © Helen Read, unless otherwise stated. Please feel free to copy my ideas for your personal use and inspiration - if you are a SU demonstrator you may use these ideas for your events but please give credit where it is due. Please do not use my ideas for monetary gain, competitions or publication. The images on this blog - including blog buttons - should not be copied and used elsewhere on the internet or on CDs.