Showing posts with label Stitched Shapes Framelits. Show all posts

Wednesday, 3 April 2019

Happiness Blooms Memories & More Card - quick and easy!


Sale-a-Bration has eclipsed everything for the past three months but now it’s time to take a look at some of the other gorgeous products on offer in the Spring/Summer catalogue. It won’t be long before these are retiring, so now is our chance to stock up on any favourites.

Something I particularly love is the Happiness Blooms Memories & More Card Pack. These packs are really versatile; even if you’re not a scrapbooker, you can use them for many other projects. Think of them as a pack of Designer Series Paper that somebody has already cut up for you.

Team them with the co-ordinating note cards and envelopes and you can have great cards in seconds. An absolute boon for the time-strapped crafter!


http://helenread.stampinup.net

Friday, 1 March 2019

Incredible Like You - Crafty Friday projects


Today is Crafty Friday and the first day of a new organised me! With an increasing number of events planned, I have decided to focus on one stamp set per month ... for most of my events at least. This means that this month, at least three of my events will be using this lovely stamp set called Incredible Like You.

I have owned this stamp set since last November, when I was given it at OnStage Local in Telford. However, I dismissed it as “not really me” until last month when I was inspired by Mikaela at The Crafty oINK Pen to start using it. And, I have to say (U-turn alert!), I’ve really enjoyed it.


These are the projects we will be making at this morning’s Crafty Friday event. I love how you can make the stripes really evenly spaced using the Stamparatus, or just wing it by doing it freehand, because the stamps are photopolymer, which means you can see where you’re stamping.

We’ll start with the #simplestamping project above, then move on to the slightly more complicated card below, which uses Soft Sea Foam for the background spots (love this polka dot effect).

The flowers are stamped in Lovely Lipstick, to match the Sale-a-Bration foil (still available in the UK but low inventory!). What is incredible about this stamp set is that you can stamp the background to the flowers and the foreground petals using the same ink pad, without having to stamp off – the stamps are VERY cleverly designed. The same goes for the two-tone leaves.

Hope you like them!


http://helenread.stampinup.net

Monday, 25 February 2019

Home to Roost copper tin and cards


At my Hygge Night last Friday, we made this lovely tin of cards inspired by the Sale-a-Bration brochure. I’ve been looking for a reason to use these Copper Tea Tins, and this was it. 

For the samples, I used the Grapefruit Grove foil from the Sale-a-Bration brochure, but gave the guests Copper Foil, too, so they could choose. It has been run through the Big Shot using the Tin Tile Embossing Folder.


The tin is stamped with Versamark ink then embossed with clear embossing powder to create this lovely subtle effect.


The cockerel is coloured with Stampin’ Blends. I used Old Olive (light and dark), Night of Navy (dark), Calypso Coral (light and dark), Crumb Cake (light and dark), Daffodil Delight (dark) and Cherry Cobbler (light).


For the cards, I used four different dies from the Stitched Shapes Framelits set, so they could all be run through the Big Shot together, to save time.

This is a gorgeous stamp set which is one of my favourites from this year’s Sale-a-Bration collection. You can earn it FREE with a £45 order... if you’re in the UK, just click here to start shopping!


Monday, 14 January 2019

By the Bay Sale-a-Bration stamp set


This was my joint first choice out of the Sale-a-Bration brochure... luckily my order meant I could earn more than one freebie.

Every £45 you spend during SAB (Jan-Mar) earns you a freebie from the brochure. I highly recommend By the Way, used here on a product-heavy card which we made at Crafty Friday.

Look out for two carryover items; the Sprig Punch and Braided Trim, both still available from the Autumn/Winter catalogue.


Wednesday, 12 December 2018

Snowflakes and Peaceful Noel


This is one of my “bulk” Christmas cards this year – I took all the supplies away on holiday with me, but didn’t actually manage to make them until I get back. To be honest, I’m not very good at crafting away from home.

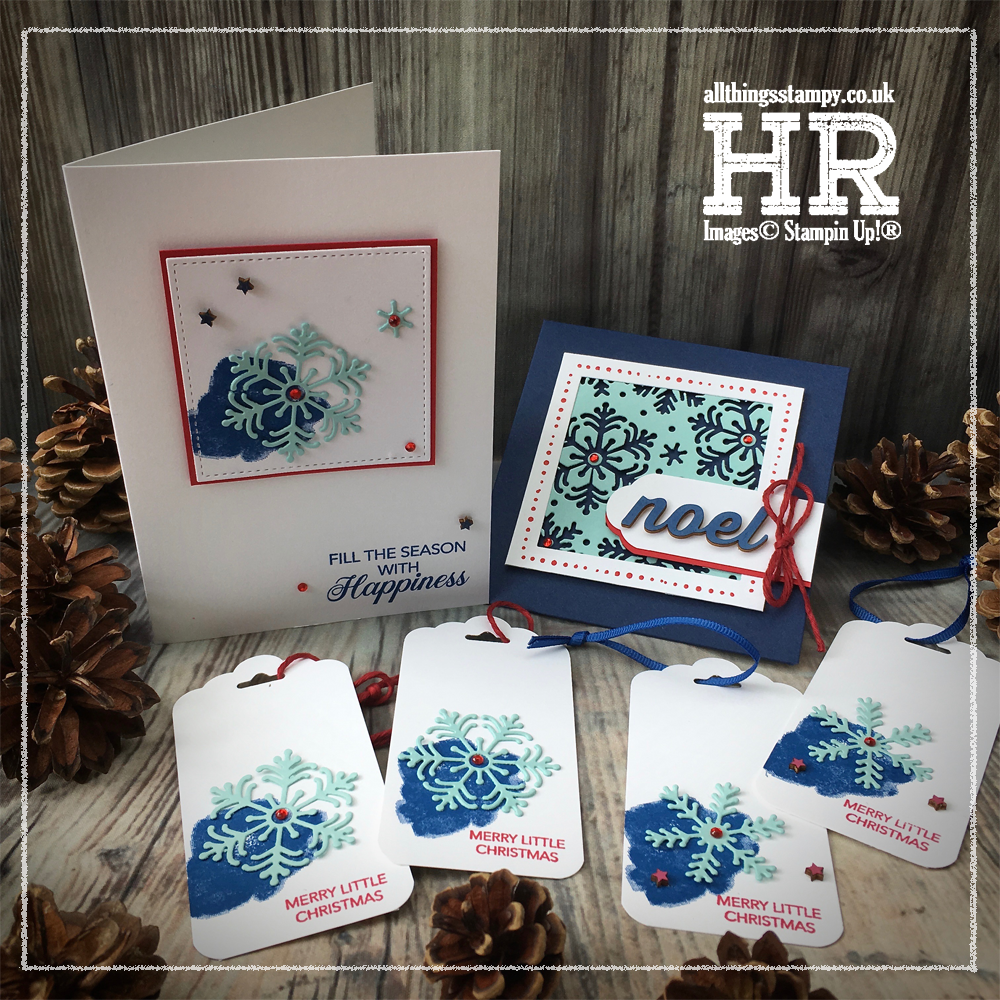
I used the Peaceful Noel stamp set and the Blizzard Dies, along with the Stitched Shapes Framelits and one of my favourite festive colour combinations; red, white and blue. Hope you like it!

Friday, 23 November 2018

Frosted Floral card, three ways


I needed three cards to contain garden centre vouchers, so this Frosted Floral Designer Series Paper proved perfect once again. I wanted to make them all different, so picked a colour from each piece of pattern to highlight.

I think the Blackberry Bliss one is my favourite, although my favourite design of paper is the one below...


Wednesday, 7 November 2018

Copper and navy themed Tin Tile card


I promised you more on Crafty Friday and here it is; the first of two projects we made. As I designed my projects for this event, I realised they bore no relation to each other whatsoever. Then I realised that this was an advantage... Crafty Friday has become so popular lately that we need two tables, and having two entirely different projects using different products makes that so much easier... and is easier on my legs!

This was one of the projects, using the Tin Tile embossing folder. We embossed it onto Night of Navy cardstock and then very gently swiped across it using a sponge dauber dipped in Copper Shimmer Paint.


The copper theme is continued with a copper embossed leaf, and some copper thread behind the greeting. And the little scalloped feature is from the Delightfully Detailed Laser-cut DSP.

I love this colour scheme; it was inspired by a visit to Trowell Garden Centre, where there was a beautiful display of navy and copper Christmas decorations. I took a photo as I planned to make all my Christmas cards with this theme, but it hasn’t happened of course. But the seed was planted for this card, so it wasn’t wasted!


Friday, 28 September 2018

Blizzard Thinlits meet Peaceful Noel


Today I want to show you the last of three workshops we completed at my Autumn All-Day Craftathon.

We returned to the Christmas theme by combining Peaceful Noel with the Blizzard Thinlits die to create this no-waste set of projects. Can you see what we did?


We began by die-cutting the snowflakes from Pool Party and carefully prised out all the snowflakes to leave this lovely template behind. It would be a waste to discard this so it formed the basis of the front of this Night of Navy gift envelope, again using the Farmhouse Elements, this time sponged in Blueberry Bushel.


As you can see, it’s just a standard envelope, created using the Envelope Punch board. We used it to store four gift tags, but it could easily contain a gift card, money, or a small gift of jewellery.

Take a look at the tags close up... we’ve used the little stars from Farmhouse Elements, too, as well as red rhinestones for a touch of glamour. The “splodge” and greeting both come from Peaceful Noel.


As for the card, that continues the theme but keeps things Clean and Simple, too.


I hope you’ve enjoyed looking at my Craftathon projects. The next All-Day event will be early next year and in you’re local to Derbyshire I hope you’ll join me. The ladies have asked for fewer workshops next time, to give them more time to chat, so we’ll be doing one in the morning and one in the afternoon, with a buffet lunch in the middle and lots of cake available all day. Hope you can come!

Monday, 24 September 2018

Peaceful Noel tealight holder and card


Are you in a festive mood yet? I hope you will be by the end of this post as this is the first project from my Autumn All-Day Craftathon. ”Autumn” was a bit of a misnomer as two out of the three classes were decidedly Christmassy, starting with this fun card and gift set. 

The card is largely based on this beautiful project by Monica Gale. As you can see, CASEing (Copy and Share Everything) doesn’t have to be exact; I’ve taken my favourite elements of Monica’s card – the stitched circle frame, the stamped background, the die-cut words and the Pinewood Planks embossed layer, and made them fully festive with brand new products from the Autumn/Winter catalogue. These included as the lovely Farmhouse Elements, which come in grey but can easily be sponged with ink, or coloured with markers (as long as you leave them at least 20-30 minutes to dry).

Inside, the card looks like this...


At this point, I should state that every guest had the Peaceful Noel stamp set in their kit, so all the projects were geared around this set. And I believe we used every single stamp from the set during the course of the day.


To accompany the card, we made this fun tealight box, although the guests had festive apple and cinammon-scented red candles to put inside their creations, instead of bog standard white!

The candles slide out, matchbox-style, and there’s a fun lift-up lid, too...


I love this project which I made using this tutorial from German demonstrator Nicole Schlack.  For a tutorial in English, please visit the Notes section of my Facebook page tomorrow.

I hope it’s helping to put you in a Christmassy mood... but if not, don’t despair as I have a non-Christmas project for you on Wednesday.


Wednesday, 12 September 2018

Winter Woods Christmas card


I LOVE the new Winter Woods stamp set, and have always loved the Wood Textures Designer Series Paper so, for me, this is a match made in heaven.

This was the second project at my Crafty Friday event last week, using the circle we cut from the shaker card I showed you on Monday.

I can't get enough of tree stamps, woodland themes etc - I'm happiest when I'm in a wood. When I found out about shinrin yoku, it all began to make sense!


Monday, 27 August 2018

Botanica Bliss brayered card


I’ve rediscovered brayering since the arrival of the new sponge brayers, and used it to create a set of thank you cards to accompany this month’s orders.

I stamped using the Botanical Bliss stamp set, with its striking bird and delicate leaves, which stand out well against the brayered background.


I’ve used the Subtles Embossing Folder again - I just can’t get enough of it. It’s definitely a must-have product and I highly recommend it. It turns any piece of cardstock into textured cardstock for a really elegant look.

Monday, 20 August 2018

Sneak peek: Peaceful Noel


Fancy a sneak peek? This is a gorgeous new stamp set from the upcoming Autumn/Winter catalogue called Peaceful Noel. Yes, it’s a Christmas set, but I took one look at it and decided it could be so much more.

This is why I chose it for my upcoming All-Day Craftathon - everybody who attends will receive this set in their kit, and we’ll be using it during the day to make festive projects as well as non-Christmas projects such as this one.

Not everybody was impressed with my efforts though... Hamish just loves to photobomb when I’m trying to sort out my project images.


I love this colour combination, but I have to confess it’s the first outing for Pacific Point for absolutely ages. I don’t know why; it looks lovely with Mint Macaron here. Maye that’s why? Maybe I needed Mint Macaron and Mossy Meadow to come back (I’m so pleased they did).


Monday, 30 July 2018

Tropical Chic with a brayered background


I thought it was high time I tried the sponge brayers so gave them a whirl for this card. I’ve always loved playing with background techniques and enjoyed creating this graduated look with Pool Party, Bermuda Bay and Pacific Point.

It’s a six-colour combo, but I think it works... and sometimes you need two or three shades to really make the most of a brayered background. 

I topped it off with some Tropical Chic flowers and some beautiful leaves from the Delightfully Detailed Laser-cut Designer Series Paper, which is a total must-have as it will add a real “wow” to your projects. This special paper is Very Vanilla on one side and Whisper White on the other, which is perfect for sponging as I’ve done here with Soft Sea Foam and a hint of Old Olive. 


Wednesday, 25 July 2018

Botanical Tags silhouette card


I do love a silhouette image, and although I completely overlooked the Botanical Bliss stamp set initally, I was instantly drawn to the co-ordinating Botanical Tags dies.

When I realised I could earn both for free thanks to my sales during Sale-a-Bration (ask me about this – it’s fab!), I decided to go for it and challenge myself. The blue background is stamped in Balmy Blue using the big “splodgy” image from Love What You Do - quick, easy and effective.

I may not have challenged myself with the stamps just yet – there are still too many stamps to get through! – I have had a play with the dies and this is my first project. I hope you like it!

I’ve used the Subtle Embossing Folder on the white layer. After running it through the Big Shot the first time, I turned the cardstock 90º and did it again, to get this lovely linen look. Hope you can see it; the folder is called Subtle for a reason!


Wednesday, 20 June 2018

Tutorial: Rooted in Nature teabag holder


Every month I like to honour and reward my team members who have gone above and beyond. for my first level team members, there are rewards for promotions, achievements and for simply selling more than they did in the previous month.

For my extended team, I also send out three “random rewards” which are little handmade gifts to three people chosen at random (the only qualification is that they have placed an order during the month).


This month I sent out these cute teabag holders, inspired by a gift from my downline Stampy Sue and shown on Monday in this post. Inside are three little envelopes, each containing an individually wrapped teabag - plastic-free of course!

But before I show you how to make these, here’s a close-up of the front. For the circle panel, I embossed using the clever leaf embossing dies from the Rooted in Nature bundle. Then I stamped on top using the Artisan Textures stamp set, for a rustic look. 


Here are the measurements... you should be able to see a larger image if you click on it.

Once you’ve made the outer, as shown above, you simply make three little envelopes using the Envelope Punch Board. I’m turning to inches for these as it’s easier... 

They are made from 5.5" squares
The first score line is at 2 3/4"
Then simply proceed as normal, turning the DSP 90º anticlockwise to make the envelope.

These are then stuck inside - onto the green M shape in the diagram above. 


Finally, decorate the front, making sure you leave the top section of your decorative panel without adhesive, so the front flap can slide in and out easily. 

Hope you like it - and have fun!

Friday, 15 June 2018

Varied Vases vibrant colours


I had lots of fun creaeting these vases of leaves and succulents using the new Varied Vases stamp set. The stamp set was inspired by Mary Fish, a US demonstrator who recently hit her $1m sales mark and was given the privilege of helping to design the stamp set.

So it seemed only natural to turn to the creator for inspiration for this project; I love Mary’s style anyway and CASEd the vase layout from her colour block card from this post.

I liked it so much that I adapted it for a set of Thank You cards (yet to be used, so look surprised if you receive one!)...


Naturally, when making this many of the same design, things are bound to go “different” at certain points. Can you spot the differences between the two cards below?


As for the colour combination, I turned to my charts for the perfect combo, but ended up changing it slightly to add the Shaded Spruce. I do love this combo, but feel it gives the card a slight “vegetable box” vibe. If I find the image I’m thinking of, I’ll let you know.


The small print

This is my personal blog and my sole responsibility as an independent creator and craft coach. All content including photographs, projects and text are © Helen Read, unless otherwise stated. Please feel free to copy my ideas for your personal use and inspiration. Please do not use my ideas for monetary gain, competitions or publication. The images on this blog - including blog buttons - should not be copied and used elsewhere on the internet or on electronic files for sale or otherwise.