Showing posts with label watercoloring. Show all posts

Tuesday, 25 June 2024

Three card ideas using Wildflower Designs from Stampin’ Up!®

 Stampin Up Wildflower Designs card ideas

I am always drawn to Stampin’ Up!® stamp sets featuring wildflowers, seed heads and big allium-style flowers, so it was inevitable that I would add Wildflower Designs to my craft stash.

This beautiful stamp set is part of the Wildly Flowering Suite. I thought I could get away with just purchasing the stamp set but no, I have since ordered the dies to complete the bundle at least.

If you’re on the hunt for quick and easy Stampin’ Up!® ideas, then look away now. But if you’re up for a big ole messy craft session featuring lots of ink splashing, then I am here for you!

Tuesday, 9 August 2022

Two fun watercolouring techniques using Dragonfly Garden

Dragonfly Garden Stampin Up watercolour card ideas

 
Do you like creating your own watercoloured backgrounds for your Stampin' Up!® cards? It's one of my favourite things to do and I have some fall-back techniques I return to, time after time.

I used two of these techniques to make some cards using the Dragonfly Garden stamp set recently.

Tuesday, 2 August 2022

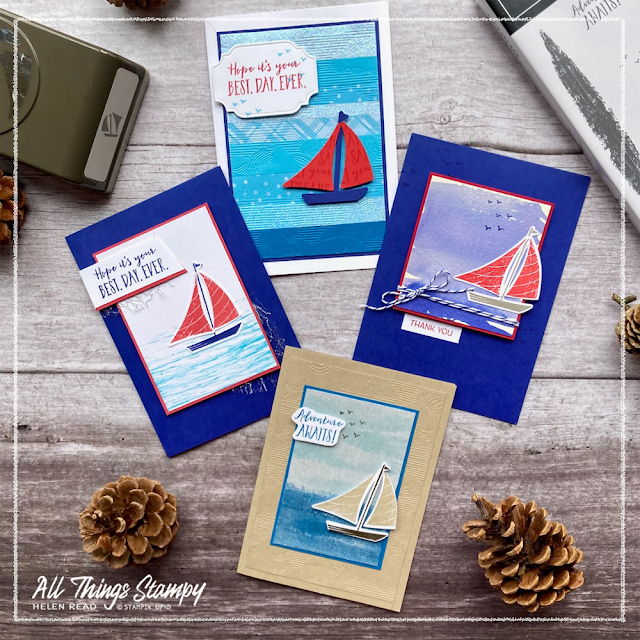
Four fun background techniques for Let's Set Sail from Stampin’ Up!®

Let's Set Sail stampin up card ideas
 

I love using my Stampin’ Up!® supplies to branch out into other techniques so have been having lots of fun creating cool backgrounds to go with the Let’s Set Sail bundle.

I’ve always been a fan of nautical and seaside-themed products so this stamp set with matching punch really floats my boat. (See what I did there?)

Here are four cards I made with the Let’s Set Sail bundle, each showcasing a different background technique. Best of all, most of them don’t require any special equipment.

Tuesday, 14 September 2021

Three fun ink techniques with the Harvest Meadow Suite

Harvest Meadow Stampin Up card UK demonstrator

Today I want to show you some fun effects you can create with ink. These cards are all created with the Harvest Meadow Suite and some simpe techniques.

The first card is heavily inspired by the one on page 54 of the current Stampin’ Up!® Mini Catalogue.

Harvest Meadow Stampin Up card UK demonstrator
 

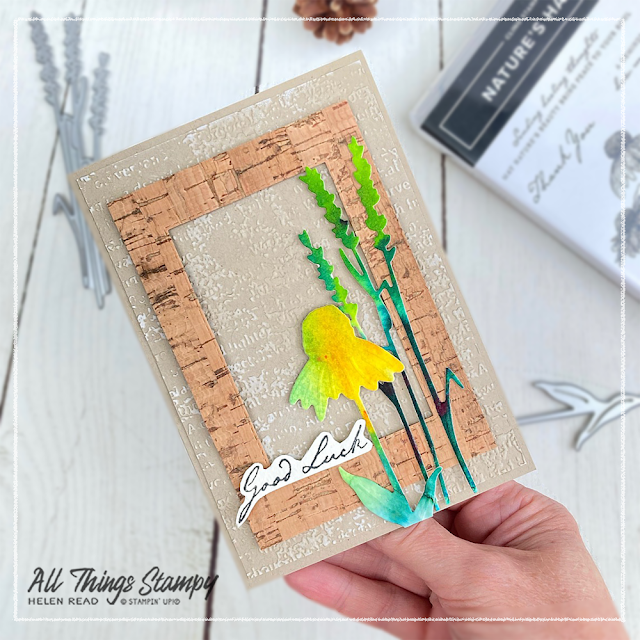
I love creating watercolour backgrounds and often get carried away, making more than I need. Sometimes they don’t look like I want them to so I store all of these extras for future craft sessions. It was in this stash that I found this colourful yellow piece with some lovely rich greens which I thought would be perfect for the project.

I mounted the flowers onto a border created with Stitched Rectangles Dies and the beautiful Cork Speciality Paper, which is absolutely gorgeous. It’s a little pricey at £7 for two 12x12 sheets but a little goes a long way – for instance, the piece I cut out of the centre here will give me accents for three or four more projects.

Harvest Meadow Stampin Up card UK demonstrator

The background of the card is embossed using the Timeworn Type 3D embossing folder, then swiped with Whisper White Craft Ink to make the embossed areas stand out a little more. I'm really happy with the way it turned out and if you'll forgive me blowing my own trumpet for a moment, I think I prefer my version to the one in the catalogue!

Harvest Meadow Stampin Up card UK demonstrator

Harvest Meadow Stampin Up card UK demonstrator

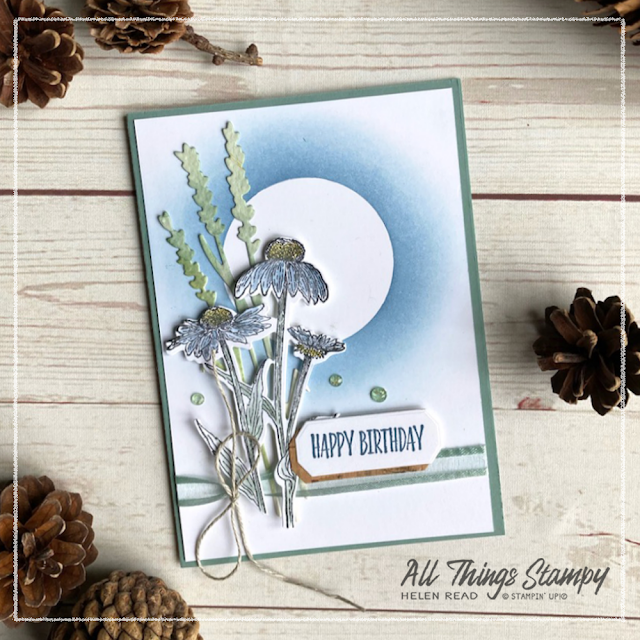
The next two cards are really simple to create using our lovely Blending Brushes. All I did was swirl the ink with the brush in the centre of the card, in a circular motion, to create this soft oval of colour. The trick here is to keep going – most people give up too early and end up with wishy-washy, uneven colour.


Harvest Meadow Stampin Up card UK demonstrator 

Once I was happy with the colour saturation, I splashed a little water over the top. This is one of my favourite techniques and I love how it turns out. Bigger drops equals bigger splashes (I know, who knew, right?) so start small if you're not feeling confident. 

 Harvest Meadow Stampin Up card UK demonstrator
These blended backgrounds provide a stunning backdrop for the crisp white die-cut flowers and grasses. 

You can cut your die-cut shapes up further. There are only two stems on the grasses on these cards because I trimmed one off to provide more balance.

Harvest Meadow Stampin Up card UK demonstrator

The final card combines some of the above techniques, with the addition of Nature’s Harvest stamps. I stamped and die-cut the flowers, colouring in using ink from ink pad lids, applied with a Blender Pen. The grasses are again created from a watercoloured piece; it had been coloured in Mint Macaron which goes perfectly with the Soft Succulent Ribbon.

The background here is again created with the Blending Brushes, with the addition of a circular mask to create a lovely moon effect. To do this, just die-cut (or draw round something if you don't have dies) a circle from thin paper. A sticky note is ideal but otherwise you can use some thin paper and some Tombow Multi-Purpose Glue; apply some tiny dots or a thin layer and allow it to dry clear to create a temporary adhesive. Then blend with your brushes as before, starting on the mask and working outwards. Avoid working towards the edges of the mask as you can disturb it and end up putting colour exactly where you don't want it.

Have you tried any of these techniques? Which is your favourite?

If you are in the UK and would like to order, please To order these or any other current Stampin’ Up!® products from my store, please shop using this link

Does your wish list come to more than £99? Please get in touch and I will help you get more for your money and unlock discounts all year round.  


Wednesday, 28 August 2019

Snow Front: with lovely lilacs

 
I have a confession: when I get a stash of new stamps, I tend to freak out a little and my mojo goes walkabout. I have no idea why – I’m brimming with ideas until the moment I open the box. This is why my first efforts with new products are invariably simple, CASEd or involved UFOs (unfinished object). This is the latter... with a leftover watercoloured background from this project.

I used the new Snow Front stamps which I know you're going to love as they are in the same vein as Waterfront... in fact you could use them together if you enjoy stamping scenes. They're available to customers from 4th September or to demonstrators now (you could always sign up, you know).

Get the dark black look of Stazon even when using Memento Tuxedo Black (which tends to come out slightly greyer) by stamping with the Stamparatus. Position your cardstock into the corner and stamp, inking and repeating until you're happy with the depth of colour. This works especially well on watercolour paper, which has a texture, and when your ink pads are drying out, too.

Monday, 20 May 2019

Sneak peek: Come Sail Away Suite


Here's your first sneak peek (from me) from the new catalogue - from the gorgeous Come Sail Away Suite. I loved this suite so much that I think I bought the whole lot!

Something you will want to stock up on now are the Happiness Blooms Memories & More Notecards and Envelopes as these are retiring but go fantastically well with the new Memories & More cards. 


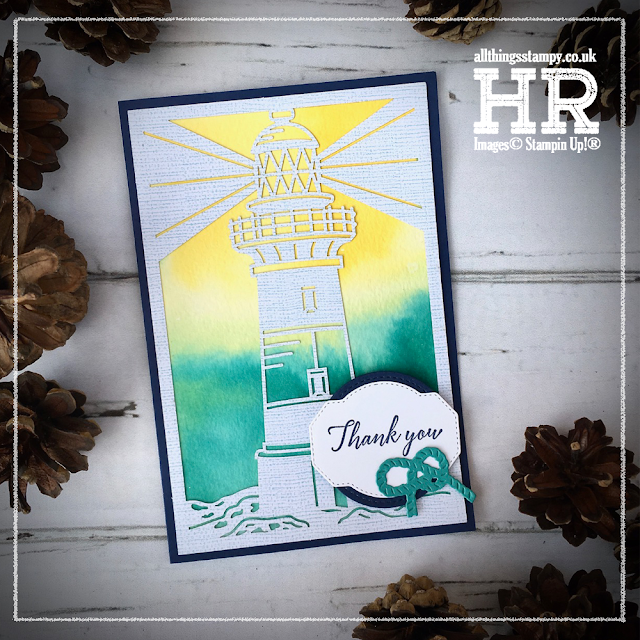
I asked the audience on Facebook and Instagram which watercolour backgrounds I should use out of my latest batch and they chose these. I'm still not sure about the lighthouse one but I love the one with the seaweeds and can't wait to add even more stamps to my seaside/nautical collection. 


Friday, 2 November 2018

Peaceful Place sympathy card


The problem with sympathy cards is that when you need them, you need them in a hurry. And I prefer to keep them simple rather than put the focus on the card. So I made this quickly from my UFO (unfinished objects) box, where I have a stash of these beautiful images already watercoloured. A bit of layering, a quick greeting and it was ready to go.

I do love this image from Peaceful Place; it’s very soothing to colour in and I think it looks fab. You can make it easier to colour, as I’ve done here but you can’t see from the photo, by embossing in black.

Monday, 13 August 2018

Blueberry dandelions


Let’s start the week with another Dandelion Wishes project - and why not? It’s proving to be the most popular stamp set from the 2018 Annual Catalogue so far!


I used the Stamparatus to stamp the image in Blueberry Bushel, then stamp again on top in Versamark so it could be embossed. Clearly some of the embossing missed the mark as the blue ink has spread when I watercoloured in Lovely Lipstick, but I don’t mind as the result is quite effective.


I know some people are resistant to the new In Colors, because they’re rather bright, but I think they are a great addition to our collection, and can be quite tasteful when separated from the crowd!

Monday, 16 July 2018

Tropical Chic week!


It’s time for another themed week, this time – in honour of our tropical weather – I am focussing on Tropical Chic.

This is a really fun and on-trend bundle of products. There’s a stamp set and dies, but you could easily work with one or the other. 


I had just the dies to work with for my OnStage display projects and had lots of fun. But the stamps went on my first catalogue order, to increase the project possibilities. 


This week I will be showcasing five projects using these products – but the possibilities don’t end there, far from it. My head is teeming with more ideas that I just haven’t had time to make just yet. I will be revisiting this bundle in the future, I promise. 


This project uses a totally tropical colour combo and involved splashing ink onto wet watercolour paper to create a pretty random effect. When it was dry, I cut it out using the square die you see in the photo above. And can you spot the Subtle Embossing Folder? It’s very well named but I promise you’ll love it. Lots of my customers have ordered this after seeing it on my sample projects – a photograph really can’t do it justice. Just trust me and buy it – you won’t regret it!


Wednesday, 19 July 2017

Glittery embossing on Happy Birthday Thinlits


How’s this for a different look with the same stamp set? For this project, I took inspiration from another Artisan Design Team demonstrator (aim high, that’s what I always say), Paula Dobson. It was her gift bag which inspired me to create this funky card; the black really makes the colours pop.

We made this card at last week’s Crafty Friday event, which is a really relaxed class where we often try different techniques. This was actually the only card we made in the session, because there were many steps.

For the greeting, we began by painting some watercolour paper with bright colours – I used Melon Mambo and Lemon Lime Twist. When this was dry, we die-cut it using the Happy Birthday Thinlits die. It looked pretty fab, and you could leave it there, but we were having too much fun to stop, so decided to do some glittery embossing  on top.


We Versamarked the whole piece and added a mix of embossing powder and Dazzling Diamonds glitter to create a shiny and sparkly effect. It looks really cool. If you do this, keep your mix made up ready – I use about 60% embossing powder, 40% glitter (roughly!) but be prepared to keep topping up with embossing powder, as the glitter will begin to take over.

The background is stamped in Craft Whisper White ink and, in the absence of ribbon, I added a flower which was stamped on the leftover piece of watercolour paper. Ooh, that would have looked nice embossed, too.

Wednesday, 29 March 2017

In The Meadow and Mixed Drinks: just what the doctor ordered!


Last Friday I held my first Stamp Doctor night, where guests were invited to bring along their ‘stamping maladies’ (products they’d purchased but struggled to use).  As this was my first time holding the clinic, I’d asked for advance warning of the stamp sets they were planning to bring. 

Only two people wanted to bring sets, and their problems turn out to be In The Meadow (one of my favourites!) and Mixed Drinks (which, fortunately, Kelly has). Between us we created the following projects for the ladies to make on the night. 

My projects incorporated watercolouring, as it’s one of my favourite techniques; also it’s very soothing, and therefore must be good for the health! 

The first project (above) I CASEd from Jennifer Frost; I love the way the mountains provide the perfect backdrop to the deer. 


The second was inspired by Connie Babbert. The masking really makes this card, in my opinion. But I also thought that some people love watercolouring as much as I do, so may prefer to spend more time on this technique. For those ladies, I created this project, CASEd from Michelle Zindorf, and which can be created from the same kit as the card above. 


Meanwhile, over at the Mixed Drinks table, Kelly had used clean and simple repeat stamping to make these fab samples. 


The kits were provided in bags with these fun labels, which I created in Canva and, even if nobody else appreciated the joke, they cracked me up so it was worth it. And no, I didn’t wear a lab coat… although I now have one on order for the next clinic! 


After a few hours of stamping and laughing, everyone went away happy, which just proves that crafting is the best medicine!
SaveSaveSaveSave

Monday, 27 March 2017

Mix It Up Monday: Window Shopping Bundle birthday card


I spent much of Mother’s Day happily crafting with the Window Box Thinlits. Other than making the projects for my All-Day Craftathon, I haven’t really given this bundle much attention, and yesterday I discovered just how versatile it really is. 

But more of that later. Today I want to show you this simple card, which uses the lovely candle die from the set. I simply painted a strip of watercolour paper in my three colours and laid it behind my die-cut piece of Very Vanilla.  It was a very easy way to meet the Mix It Up Monday challenge of creating a project using this colour combination from my In Color charts.


In other news, we are now on the final Sale-a-Bration countdown, so if you wish to: 
  1. Earn a FREE Sale-a-Bration item, by placing an order of £45 or more, or
  2. Join Stampin’ Up!® as a demonstrator and get TWO FREE additional stamp sets in your Starter Kit...
... you need to act fast, as SAB ends on 31st March. Please don’t leave it until the last minute as that is the path to internet connection failures and disappointment. 


Wednesday, 22 February 2017

Hexagons Dynamic Embossing Folder gets the ombre look


One of my favourite products from the Spring/Summer catalogue is the Hexagon Dynamic Embossing Folder, as it’s so versatile. It goes with masculine projects, can be used to create honeycomb for bee projects, chicken wire to go with everybody’s favourite Sale-a-Bration set, Hey Chick... and here I’ve used it on a more feminine project.


It was inspired by a project I saw by the hugely talented Kristina Werner and uses a favourite technique of mine; watercolouring.


I began by creating an ombre effect on the watercolour paper. This is really simple: I wet the paper, then loaded a brush with diluted ink (Emerald Envy, Flirty Flamingo, Peche Fraiche) and swiped across the width. Then, instead of adding more ink, I wet the brush with clear water. This dilutes the colour so you get a graduated effect as you work down the paper. Once it was almost dry, I embossed each piece, then turned them around so the darker colour was at the bottom to create these fun projects.


This last one also has a watercoloured ombre background behind the balloon. The dies come with three wide bands, which you can use to create a striped effect to your balloon. I used the darker stripe at the top, to make it stand out from the paler sky.

If you wish to purchase the whole bundle (stamps and dies) instead of just stamps, these are the codes you need:

Lift Me Up Bundle
Wood mount: 144711
Clear mount: 144712


Friday, 3 February 2017

Hey, Chick! It's Friday!


We couldn’t head into the weekend without another chicken card, could we? This was the Make & Take from my team meeting recently; I wanted to show the team the amazing versatility of the new Dynamic Hexagons embossing folder.


Yes, the chicken wire is made with the embossing folder - simply ink it up and press directly onto your cardstock. I love this embossing folder – it goes with everything! Masculine, feminine, chicken wire, honeycomb... if you don’t have it yet, it would be a valuable addition to your next order! Bump it up to £45 and you could choose this fabulous chicken stamp set as your free gift!

And if you fancy joining the fun and becoming a demonstrator, I’d love to welcome you into my team. There are so many advantages to being a demonstrator that I won’t even try to go into them here, but if you have any questions, please do drop me a line. And if you’re ready to take the plunge, just click the image below!


Wednesday, 18 January 2017

Hey Chick! Watercoloured and doodled...

Just a tiny card with a chicken on it. Watercoloured and doodled for maximum crafting fun. I do enjoy watercolouring and doodling; I find them both very relaxing, and I think this stamp set lends itself perfectly to both techniques.

The set, Hey Chick, is free during Sale-a-Bration with a £45 order. While I think it’s fabulous that we can earn such a gorgeous set for free, I kind of wish it was in the catalogue, so it would stick around longer. Because, after 31st March, this set will be gone forever! Don’t miss out!


Wednesday, 21 December 2016

Sneak Peek: Window Shopping


You are going to LOVE this bundle, I promise. This die and greeting stamp are just a very small part of a set which will prove to be incredibly versatile.

For now, take a look at this CASE of a catalogue project. I painted some colourful splodges on some watercolour paper. Honestly, they looked AWFUL and I considered not using them.

But when I taped them into position with some hidden washi tape and placed the die-cut piece on top (using the Window Box Thinlits dies), that’s when the magic happened. I finished both cards off with a greeting from the Window Shopping stamp set and some randomly scattered sequins. Job done.


The small print

This is my personal blog and my sole responsibility as an Independent Stampin' Up!® demonstrator. All images are © Stampin' Up!® All content including photographs, projects and text are © Helen Read, unless otherwise stated. Please feel free to copy my ideas for your personal use and inspiration - if you are a SU demonstrator you may use these ideas for your events but please give credit where it is due. Please do not use my ideas for monetary gain, competitions or publication. The images on this blog - including blog buttons - should not be copied and used elsewhere on the internet or on CDs.