Showing posts with label Seaside Spray. Show all posts

Tuesday, 1 December 2020

Winter Solstice Card for Holiday Blog Hop

Winter Woods Playful Alphabet Solstice Stampin Up

Christmas may get most of the attention but there are many more December celebrations around the world and it is these which are the theme of our international Holiday Blog Hop, which has been set up to promote #stampingdiversity.

Winter Woods Playful Alphabet Solstice Stampin Up

One of the oldest celebrations in the world is Winter Solstice, which has been around since long before Christianity. In fact, many Pagan traditions surrounding the Winter Solstice – cutting mistletoe, gift giving, decorating trees – were absorbed into Christmas celebrations and continue to this day.

Here in the Northern Hemisphere, the Winter Solstice is on 21st December; the shortest day and the longest night. I always welcome its arrival as it marks the turning point of the year and means the days will once again start to lengthen. 

Winter Woods Playful Alphabet Solstice Stampin Up

To celebrate, I made this card using a variety of products and – surprise, surprise – a whole lotta sponging. Actually, I used a brand new Stampin’ Up!® product from the upcoming January-June Mini Catalogue. It’s a set of three Blending Brushes which are just amazing for getting all the look of sponging with a lot less risk of smearing. For ease, I’m going to use the term ‘sponging’, even though I used the brushes.

To get the huge setting sun (or is it a rising moon?), I die-cut a large circle from a piece of scrap paper to leave the aperture template, then laid a separate curved hill on top. I gently sponged inside here using Daffodil Delight.

Next I used the circle of scrap paper to act as a mask on top of the yellow sun, so I could sponge around in Seaside Spray and Night of Navy to represent the sky.

Winter Woods Playful Alphabet Solstice Stampin Up


On top of this I stamped the row of trees from Winter Woods. Something was missing, though – you can’t have a huge sun/moon casting light over trees without some shadows. So I hand-cut a long, narrow triangle from another piece of scrap paper and used this as a mask to sponge with some more Seaside Spray. I didn't worry about creating shadows of the foliage as I knew my words would be covering this area.

I inked up part of the Season’s Greetings stamp from Peaceful Boughs with a Night of Navy marker and used this to stamp towards the bottom. 

Winter Woods Playful Alphabet Solstice Stampin Up

Next I used the Playful Alphabet Dies to cut out the word ‘solstice’ from some In Color Designer Series Paper in Seaside Spray (oops! This is the old design!) – first backing it with a foam adhesive sheet to give it dimension and make it easy to stick down. Spacing was something of an issue, as you can see, and there was only just enough room on my piece of cardstock. This wouldn’t be an issue in North America, as their card bases are slightly wider.

I finished off with some Seaside Spray Scalloped Linen Ribbon and some cut-out leaves using Beautiful Autumn, one of my favourite sets from the Aug-Dec Mini Catalogue. 

Winter Woods Playful Alphabet Solstice Stampin Up

Inside I echoed the DSP and leaves from the front and added a greeting from Peaceful Boughs, which seemed perfect for the occasion.

I hope you like my Winter Solstice card and it has inspired you to create a project for different holidays. Please now visit the rest of the blogs in the hop to see some amazing projects from talented Stampin’ Up!® Demonstrators around the world.


Winter Woods Playful Alphabet Solstice Stampin Up

If you would like to order any of the products shown here, please visit my online store and shop using the December host code SX4NGWRH.


Monday, 19 October 2020

Sponged trees with the Evergreen Forest 3D Embossing Folder

Evergreen Forest Embossing Folder Stampin Up

This Evergreen Forest 3D Embossing Folder delivers SO much more than it seems to at first glance. Yes, it looks great when used on green cardstock, and super-classy when used on crisp white cardstock but stop! Why not have a bit of fun with it?

I saw these beautiful designs by Barry and Jay at Mitosu Crafts and couldn’t resist having a go myself. It’s just a simple case of embossing then sponging on some colour. 

Evergreen Forest Embossing Folder Stampin Up

For the blue card, I used Seaside Spray, Misty Moonlight and just a hint of Night of Navy in the corners.

Evergreen Forest Embossing Folder Stampin Up

For the purple version, I used Highland Heather, Gorgeous Grape and just a hint of Blackberry Bliss in the corners and at the base. 

Evergreen Forest Embossing Folder Stampin Up

Next I took some diluted Whisper White Craft Ink (about 1:1) and, using a small paintbrush, spattered it across the sponged sections. And they’re finished off with some Adhesive-Backed Snowflakes which I absolutely adore.

Evergreen Forest Embossing Folder Stampin Up 
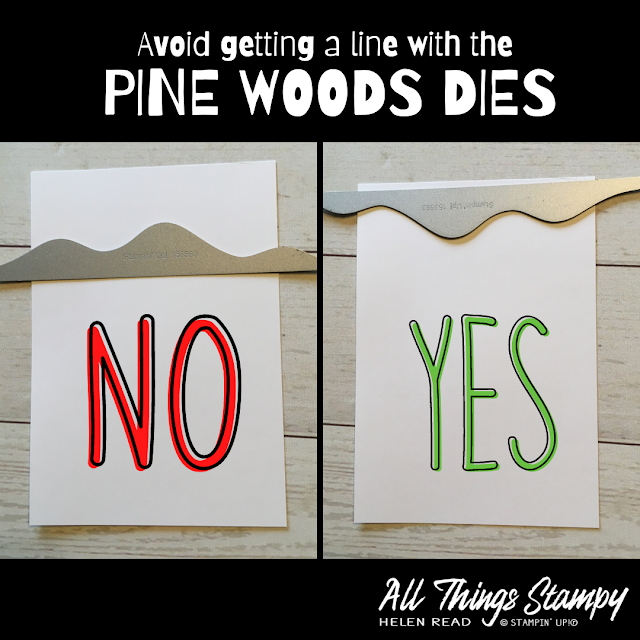
For the base of the cards, I used the Pine Woods Dies, which I LOVE, obviously, and I have two great tips for these dies, in case you decide to add them to your stash (which I highly recommend, obviously). 

Evergreen Forest Embossing Folder Stampin Up

The Foam Adhesive Sheets are ideal when die-cutting this tree. It may feel a bit fiddly to press out but that’s because the die may not have gone all the way through to the backing sheet, but if you peel the tree out carefully it will be perfectly fine. And it looks so much more professional without all those fiddly little bits of cut-up Stampin’ Dimensional on the back.

Pine Woods Dies Stampin Up tip

When I was cutting the snowy hill using these dies, I kept getting an unsightly embossed line where the edge of the die had been. Then I had a light-bulb moment and realised I was using them upside-down. Use them as I have done in the pic on the right, and the embossed line will be on the piece you discard (unless you wish to trim it off and have a smaller hill for another project).

So what do you think? Are you going to have a go at sponging this gorgeous embossing folder? Which colours do you prefer?


Saturday, 3 October 2020

Blog Hop: Celebrating my corner of the world for World Card Making Day

Yuletide Pasture Stacked Stone Stampin Up

Happy World Card Making Day! 

Today I’m excited to be taking part in another international blog hop. This time we are celebrating World Card Making Day by showcasing projects which represent our corner of the world. I can’t wait to see what demonstrators from all our different global markets have made.

Yuletide Pasture Stacked Stone Stampin Up

I live in Derbyshire, a beautiful county in the middle of England. We have rolling hills, lots of lovely green spaces and, in the north of the county, the Peak District National Park. 

Here’s a pic I took on a walk recently, with a dry stone wall in the foreground and view of Crich Stand, a war memorial, in the distance. From the top of the stand you can see eight counties, and in turn you can see this famous landmark from miles around, triggering a popular saying “you can see Crich Stand from here”. 

A more common saying is “Ey up!” and it is this I have chosen for my card. It’s a common greeting in Derbyshire, in common with many counties in the Midlands and north. It can be extended to “ey up mi duck” (hello my duck, ie friend) and you can also use it as an expression of surprise, as in “ey up, who’s eaten all the cobs?” Cobs: that’s what we call bread rolls. You can find many more expressions and dialect words in this excellent book, Ey Up Mi Duck.

I created the words in Misty Moonlight cardstock using the Playful Alphabet Dies. Seriously, if you only invest in one product used on this card, make it these dies. You will NOT regret it. 

Yuletide Pasture Stacked Stone Stampin Up

But make sure you order the Foam Adhesive Sheets at the same time as they are a real game-changer. They mean your letters come out of the die-cutting machine ready backed in foam adhesive, so no fiddly trimming of Stampin’ Dimensionals. 

Yuletide Pasture Stacked Stone Stampin Up

For my background, I’ve used the Stacked Stone stamp to represent the dry stone walls which are common in Derbyshire. I stamped it in Misty Moonlight onto Seaside Spray cardstock.
 
Yuletide Pasture Stacked Stone Stampin Up

A sheep from the Yuletide Pasture stamp set – we have a lots of sheep in Derbyshire – stands on a hill (Waterfront stamp set) to represent the rolling hills of Amber Valley where I live, as well as the Derbyshire Dales and the Peak District National Park. I stamped this in Memento Tuxedo Black and coloured it using Stampin’ Blends.
 
The sheep’s feet were floating around a little so I covered them up with some flowers from the Friendly Silhouettes Dies. As the card progressed, I began to wish I’d used some pine sprigs instead because, unfortunately, this sheep is dressed for Christmas.

Rather belatedly, I decided to shoehorn in a festive theme (you think my projects are planned? You must be thinking of somebody else). I didn’t have a small “Christmas” stamp because I foolishly didn’t order Itty Bitty Christmas in the sale last week, so scoured the sentiment sheet from Trimming the Town Designer Series Paper until I found suitable words to cut out.

Trimming the Town DSP Stampin Up

And there we have it; a Derbyshire-themed Christmas card. Now please make your way around the rest of the blog hop... and the world!

Yuletide Pasture Stacked Stone Stampin Up


Monday, 4 November 2019

Fox in a box... and on a box


It was my friend Donna who accidentally gave me the idea to put a shaker dome inside a pizza box lid, so it seemed only fitting that I should use this same idea to package her birthday gift. And, as her gift was a fox brooch (she loves foxes), this image from Nature’s Beauty was ideal. It’s coloured with Watercolour Pencils (Assortment 2) and blender pens.

The ribbon is actually four pieces, all held together with Glue Dots. Why make life difficult for yourself? I started with a loop, joined at the back. A second loop goes around the centre, again joined at the back. Then I cut two more pieces to poke out from beneath.


Wednesday, 23 October 2019

Nature's Beauty meets Feels Like Frost

If only real winters were as beautiful as the Feels Like Frost Designer Series Paper!

I've used this pack for loads of projects already and it still shows no signs of running out. The beauty of this pack is that you have lovely wintry views on one side, and white and silver foil designs on the other, which you can colour, brayer, sponge... you name it, you can do it.

This was the Make & Take for a party on Friday evening; guests could choose their piece of paper so all their cards were different.

Cut your Designer Series Paper slightly smaller than the white panel on the front of these Silver Foil-Edged Cards and you get the appearance of an extra layer without adding bulk or weight. 


Monday, 19 August 2019

Sneak Peek: Perfectly Plaid

The new Autumn/Winter catalogue is now available to demonstrators - and we get the perk of being able to order early. One of the first items on my order was the Perfectly Plaid bundle as these are the projects we'll be using at my All-Day Craft Event next month.


Everyone who attends will get this stamp set as part of the kit, and there is the option to upgrade to get the Pine Tree Punch at a special price, too.


This is the first project I've made with my new products; a simple Make & Take for a team garden party I hosted at the weekend, using a non-traditional colour combo of Cherry Cobbler and Seaside Spray.

Everyone brought some food to share and a project to make, and a lovely time was had by all. The sun even shone, which was a miracle after the wet week we've had!

Pop your tree up on Stampin’ Dimensionals before attempting to tie the linen thread around the trunk as this will make it more stable and easier to manage. Sounds simple but sometimes we can overlook the obvious!

Friday, 2 August 2019

Beautiful Friendship thank you cards


It’s Friendship Day on Sunday, apparently, and this Beautiful Friendship stamp set just keeps coming into its own. I love the hydrangeas stamped in Highland Heather, combined with the Seaside Spray. I've used the small stamp set, Magnolia Blooms for the words, as I needed a thank you stamp and this one fits the bill perfectly.

The images are stamped around the left edge and bottom of the white layer to draw the eye into that area. This uses the “rule of thirds” concept to create a simple but pleasing design. 


Wednesday, 31 July 2019

Offset mirrored seahorses using the Stamparatus


I have always loved seaside images, so the new Seaside Notions stamp set was always going to be high on my wish list. The fact that it comes with lovely and practical greetings is a bonus.

I demoed this card at my Launch Party and will be making this or something very similar at some of my events this month, too. It's a twist on the mirrored image idea and you can find all the instructions if you download the tutorial from here:


Get the offset look by moving the Stamparatus plate down one notch before stamping the second seahorse. And you can achieve two-tone seahorses by inking in Terracotta Tile then adding some Soft Suede with a sponge dauber. 
 

Friday, 19 July 2019

Beautiful Friendship flowerpot pocket card


It's all happening with the fancy cards this week, isn't it? Here's a flowerpot pocket card using Beautiful Friendship. 


The last time I made one of these was in June 2001 - a full decade ago! Check it out here – there's even a tutorial.
For a tutorial for this specific card, please follow this link

If you prefer your card to be free-standing, simply invert the card base. Instead of folding over the flower pot rim, cut these flaps off and set to one side. Shape your card so the widest part is at the fold, then cut a slit along the fold to allow the pocket section to be inserted.


Wednesday, 17 July 2019

"Wow" card - Beautiful Friendship floral pop-up card


I don't often tackle fancy folds but I loved the idea of making a pop-up card using the Beautiful Friendship stamp set. What's so lovely about pop-up cards is the element of surprise – it looks like a perfectly nice but simple card on the front, then you open it and bam! You're hit by an explosion of flowers.


 Here’s a better picture but I took it before adding the greeting...


While assembling the inner floral section, keep closing the card to check your flowers don’t spill out over the edges. Not only would this spoil the element of surprise, it would prevent your card from fitting in the envelope! 

Monday, 15 July 2019

Beautiful Friendship swap cards


I’m going to spend this week celebrating Beautiful Friendship, an oft-missed stamp set hiding on page 123 of the catalogue.  I've been using this gorgeous stamp set in all my events this month, so it was the obvious choice to use for a swap, too.

Swapping isn't usually for me but I thought I'd give it a go so I could show my customers a greater variety of project. The brief was to use at least two new In Colors, so I turned once again to Rococo Rose, Seaside Spray and Pretty Peacock and the Beautiful Friendship stamp set. 


When you need to make several of the same card, the Stamparatus really comes into its own. I set it up to stamp the background and the greeting on the stitched ovals, but stamped the foliage on the ovals freehand. 


The small print

This is my personal blog and my sole responsibility as an Independent Stampin' Up!® demonstrator. All images are © Stampin' Up!® All content including photographs, projects and text are © Helen Read, unless otherwise stated. Please feel free to copy my ideas for your personal use and inspiration - if you are a SU demonstrator you may use these ideas for your events but please give credit where it is due. Please do not use my ideas for monetary gain, competitions or publication. The images on this blog - including blog buttons - should not be copied and used elsewhere on the internet or on CDs.