Showing posts with label Stampin' Up! Demonstrator Derbyshire. Show all posts

Tuesday, 7 September 2021

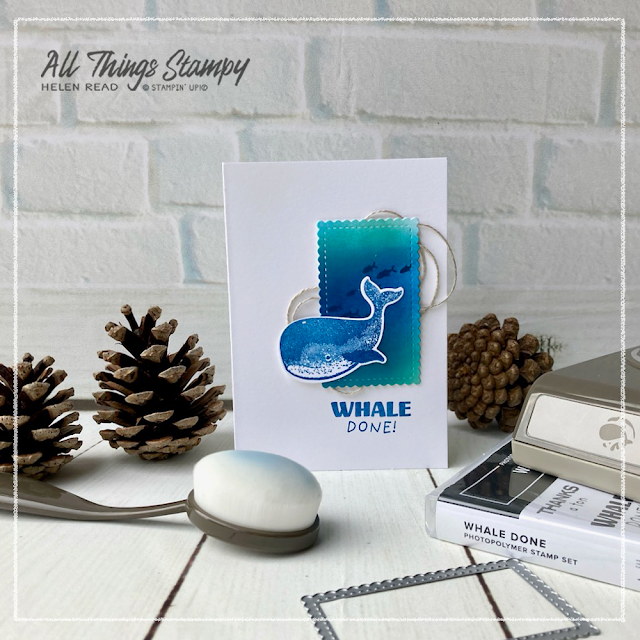
Whale Done 21st birthday card with blending brushes

Whale Done Stampin Up card ideas Demonstrator Derbyshire

It’s back to the Stampin' Up!® Annual Catalogue for today’s projects as I needed another 21st birthday card... this time for my “baby” boy. He seems to be creating some sort of Sealife centre in his room at the moment, with the arrival of a tropical fish tank plus a separate tank for Wallace the turtle. Wallace belongs to him and his girlfriend, but she can't take him/her (we’re not sure yet) with her to uni.

Whale Done Stampin Up card ideas Demonstrator Derbyshire 

It’s hard to create cards for 21-year-old males but the Whale Done stamp set was perfect for the occasion. I suspect it’s the wrong sort of turtle but it’s close enough, I’m sure.

Whale Done Stampin Up card ideas Demonstrator Derbyshire

I began by using my Blending Brushes to create a background of Pacific Point and Coastal Cabana. On top of this I stamped some Night of Navy fish, a few Whisper White bubbles and some Evening Evergreen weeds. This part of the card was heavily inspired by this card by US demonstrator Michelle Zindorf but then I went my own way.

Whale Done Stampin Up card ideas Demonstrator Derbyshire

I cut out the layer using the Stitched So Sweetly Dies, then realised I had enough of this background left to create a second panel for another card, so I cut this out with one of the smaller dies.

Whale Done Stampin Up card ideas Demonstrator Derbyshire
 

Wallace the turtle is stamped in Evening Evergreen but I tackled this in reverse by “colouring” the image in advance. I stamped some speckles in Bumblebee repeatedly onto some white cardstock, then stamped the Evening Evergreen turtle on top. This is as close as I can get to real-life Wallace. I fussy cut the image and popped it up on Stampin’ Dimensionals. 

Whale Done Stampin Up card ideas Demonstrator Derbyshire
 

For the greeting, I inked the stamp first in Coastal Cabana, then added Pacific Point to the bottom section, blurring the hard edge slightly with a Sponge Dauber.

I stuck some Coastal Cabana cardstock to a Foam Adhesive Sheet and cut out the 21 using Playful Alphabet Dies. I KNEW there was a figure 1 in there but couldn’t find it for Robin’s card last week!

The front of the card has a panel embossed with the Seashells 3D embossing folder which is really designed to be used portrait I think but looks fine here as the image panel covers most of it.

Whale Done Stampin Up card ideas Demonstrator Derbyshire

Confession: I hated this card and thought it was really unbalanced until I added the finishing touch of some linen thread. It’s funny how something so simple can make all the difference, isn’t it?
 
Whale Done Stampin Up card ideas Demonstrator Derbyshire

For the second card – which I don’t immediately need but thought I may as well make while I had the supplies out – I used the whale stamp and Whale Builder Punch as my focal point on top of the mini sponged panel that was left over from the birthday card. 
 
Whale Done Stampin Up card ideas Demonstrator Derbyshire
 
Aside from the sponging, it’s a very simple card, with a swirl of linen thread behind the panel and a greeting stamped directly onto the Basic White Notecard.

It was fun to dig out a stamp set that hadn’t seen ink for many months and reminded me of how much I love the Whale Done stamps and punch. 

Whale Done Stampin Up card ideas Demonstrator Derbyshire


Do you have a sealife-loving person in your life? To order these or any other current Stampin’ Up!® products from my store, please shop using this link

Does your wish list come to more than £99? Please get in touch and I will help you get more for your money and unlock discounts all year round.  


Tuesday, 10 August 2021

More ideas for the Nature’s Harvest bundle


Friday was supposed to be my first in-person Stampin' Up!® party since the start of the pandemic. Everyone was very excited to get together in a safe outdoor setting and actually enjoy some face-to-face chatting and crafting.

You know what’s coming, don’t you? Yep, COVID struck and the host had to isolate. Undeterred, we switched to a Zoom meeting and I did my best to make it fun for everyone who attended.


This project was supposed to be the Make & Take for the evening but of course that didn’t happen. Instead I will send all the ladies a kit to make a modified version with die-cut flowers and grasses instead of stamping with the Nature’s Harvest stamp set as I have done here.
 
 
I’d made two versions ahead of the event, showing how different the flowers could look when stamped onto white cardstock or Crumb Cake. I love the look of stamping onto Crumb Cake, especially with a flower of his type as it means you can colour the petals using the Chalk Marker.


For this version, I stamped in Memento Tuxedo Black and coloured using Stampin’ Blends in Calypso Coral, Mint Macaron and Mango Melody. I’ve added some stamping in Soft Succulent in the corner, too. 


On the night, I demonstrated this version, using the fun polling tool in Zoom to allow the guests to vote on how I made it. They chose this Bumblebee side of the Harvest Meadow Designer Series Paper, then chose a Soft Succulent layer over Calypso Coral and also chose for me to stamp onto Crumb Cake instead of white. 


When using delicate dies such as the grasses from the Harvest Dies shown here, it is a lot easier to stick them down if you use Adhesive Sheets. To use these, you will want to stick a rectangle of cardstock to the sheet before die-cutting. If you try to stick the pre-cut shape to the sheet, you'll just end up with a sticky mozzarella-style mess.  
 

If you love the Nature’s Harvest bundle of stamps and dies as much as I do, you’ll be delighted to know that if you purchase them together you will save 10% on the individual prices. If you're in the UK and buy them during August or September, you will also qualify for a free Sale-a-Bration gift.


Want it all? If you have a BIG wish list, please get in touch and I will help you get even more for your money.  


Tuesday, 3 August 2021

Introducing the new Stampin' Up!® Harvest Meadow Suite

Harvest Meadow Stampin Up card idea

Today the new Stampin’ Up!® July-December Mini Catalogue goes live (yes I know it’s August but hey, Covid!) and I’m excited to introduce you to the new Harvest Meadow Suite.

It’s not often I buy a whole suite of products from a Stampin’ Up!® catalogue but just sometimes it’s easier to type that single item code than wade my way through all those different numbers. This was the case with this gorgeous suite. 

Harvest Meadow Stampin Up card idea

I love everything in this suite; the Nature’s Harvest stamp set, the Harvest Dies, the Timeworn Type 3D Embossing Folder, the Diamond Weave Ribbon, the Brushed Metallic Adhesive-Backed Dots, the Cork Speciality Paper and of course the lovely Harvest Meadow Designer Series Paper.

Not all of those products are shown here but I had a pretty good stab at many of them to make these two cards. 

Harvest Meadow Stampin Up card idea

The first card here is based on the one on page 71 of the new Mini Catalogue. You often find extra card ideas at the back of the catalogue where the bundles are displayed. The colours of the card sample in the catalogue didn’t speak to me so I swapped the paper for this lovely Misty Moonlight design from the Harvest Meadow Designer Series Paper pack. 

Harvest Meadow Stampin Up card idea

I coloured the image using Stampin’ Blends; Calypso Coral for the petals, Mango Melody for the flower centres and Mint Macaron for the leaves and stems.

Die-cut leaves, stems and flowers provide a fitting backdrop for the coloured image. I cut these from Crumb Cake, Bumblebee and some lovely gold paper from the Gold & Rose Gold 6" X 6" Metallic Speciality Paper pack.

Harvest Meadow Stampin Up card idea

The greeting is stamped in black, cut out with the long die from the set and overlaid onto a piece of gorgeous cork, which I’ve hand cut (and which no matter how hard I tried, still looks wonky!).

It’s finished off with a linen thread bow and dotted around are Brushed Metallic Adhesive-Backed Dots.

Harvest Meadow Stampin Up card idea

For the second card I repeated the same greeting on cork motif, along with a similar arrangement of stamped and die-cut images, but laid these onto a white panel which is popped up on Stampin' Dimensionals to make it stand out from the Designer Series Paper background. I love this sheet of paper from the same Harvest Meadow Designer Series Paper pack; this pack really is very varied, while keeping with the colour theme. 

Harvest Meadow Stampin Up card idea
 

This time I’ve used a greeting stamp from another set – Artistically Inked – and added the dots either side of the words. This is a good way of making it look like your sentiment fits the die-cut panel perfectly!

Behind the greeting panel is a swirl of linen thread. I confess I always struggle with these. The trick seems to be to use double-sided tape directly onto your project, then just loop your thread around and stick it to the tape to hold it down as you go. 

I had a great time playing with this new suite and hope you like the projects and products as much as I do! 

Harvest Meadow Stampin Up card idea

Remember, not only has the Mini Catalogue gone live but Sale-a-Bration has started! If you are in the UK, buying this whole suite collection would earn you two Level 1 Sale-a-Bration freebies, or one Level 2.


Alternatively, you could spend £99 and upgrade to the Starter Kit which would grant you access to my Stampin’ Up!® team, along with ongoing discounts and sneak peeks. I’d love to have you on board so please message me via my website if you would like more details or if you’d like me to give you a call. 


Tuesday, 13 July 2021

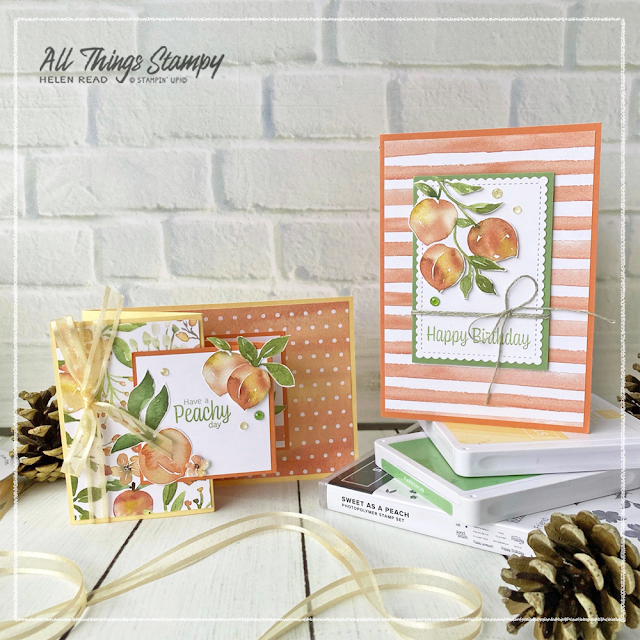
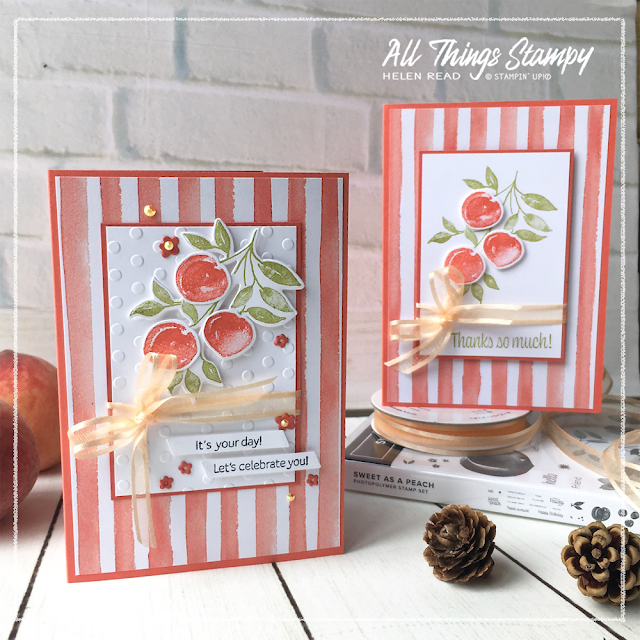
Flowers or peaches? Versatile projects with the You’re a Peach Suite

You're a Peach Suite Stampin Up Demonstrator Derbyshire
 
It’s a sign of my age that while making these projects I was humming Peaches by The Stranglers and not the entirely different song of the same name by Justin Bieber. (In fact, I'm only aware of the latter because I Googled the former to check I had my facts straight.)

We had a peachy old time at my Crafty Friday class last week, once again held over Zoom. Some of my customers had expressed doubts about Stampin’ Up!'s You're a Peach Suite and Designer Series Paper but I pointed out that only four of the designs actually feature peaches, so they were won over. 
 
And it was with this in mind that I decided to show different versions of the same two cards, using peaches and flowers cut out of the Designer Series Paper to provide options.
 

You're a Peach Suite Stampin Up Demonstrator Derbyshire
 
Then on the day itself, while they were busy fussy-cutting their images, I decided to stamp mine using the Sweet As a Peach stamp set, cutting them out using the Peach Dies. 
 
I ended up with three sets of cards, showing the versatility of this fabulous Suite. They show just how different the same design can look if you change the Designer Series Paper.


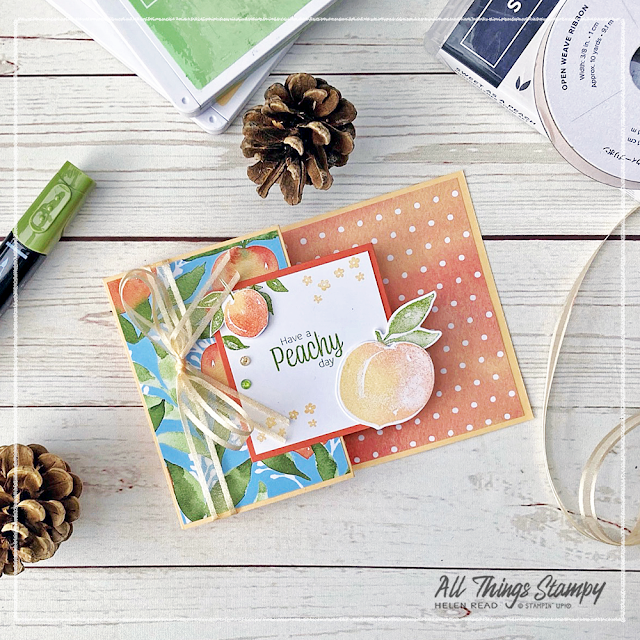
I love these Genial Gems from the Hand-Penned Suite and they go well with other suites, too. For instance, the Pale Papaya gems are perfect for this peachy project. The Mint Macaron is pale enough to work ok but why compromise when the solution is staring you in the face? 
 
I coloured the Mint Macaron gems with a Dark Old Olive Stampin’ Blend marker and achieved perfect coordination. I tried the Light but it wasn’t as effective. If you have Stampin’ Blends (alcohol markers not water-based), you can always use them to match your embellishments to your projects perfectly. 
 
You're a Peach Suite Stampin Up Demonstrator Derbyshire
 
Here are the floral cards – without the cheesy peachy sentiment, you’d never know that these came from the You’re a Peach Suite. I’ve fussy-cut all those flowers out of the Designer Series Paper; I will be so glad to get back to in-person classes where we can ditch the fussy cutting!
 
You're a Peach Suite Stampin Up Demonstrator Derbyshire
 
These cards use exactly the same pack of paper but I’ve chosen to cut out peach images instead. They’re much easier to cut out than the flowers!
 
You're a Peach Suite Stampin Up Demonstrator Derbyshire
These cards were made using the Sweet As a Peach bundle (stamps and Peach dies) to create the images; this makes it even easier, and I love the shades of Pale Papaya and Calypso Coral on the stamped peaches. 
 

The stamps are cleverly designed to give you different shades, with pale/white patches to give a more realistic image. To add even more shading to your peaches, ink first in Pale Papaya, then before stamping, add some Calypso Coral ink around the edges using a Sponge Dauber. 


You're a Peach Suite Stampin Up Demonstrator Derbyshire

As for the fancy fold, it’s a double Z-fold and far easier to make than it looks. Basically you just repeat the fold of the outer card and stick it on the inside in the same formation. That’s a rubbish description, so feel free to download the class instructions from here


If you are in the UK and would like to order, please visit my store and, if you use the current host code DQPJEQF9, I’ll send you a thank you gift in the following month.


Does your wish list come to more than £99? Please get in touch and I will help you get more for your money and unlock discounts all year round.  


Tuesday, 29 June 2021

You’re a Peach - three stages of stamping

Stampin Up! card using You’re a Peach Suite Sweet as a Peach stamp set

When you’ve been a Stampin’ Up!® demonstrator for a long time (13.5 years here!), you tend to have gathered a LOT of supplies and can lean towards cards which are rather complicated. This can result in beautiful projects which cost hundreds of pounds to be recreated by a crafter starting from scratch.

This is why Stampin’ Up!® developed the three stages of stamping, for three types of stamper – and here I have created a You’re a Peach Suite project for each one. 
 
Stampin Up! card using You’re a Peach Suite Sweet as a Peach stamp set

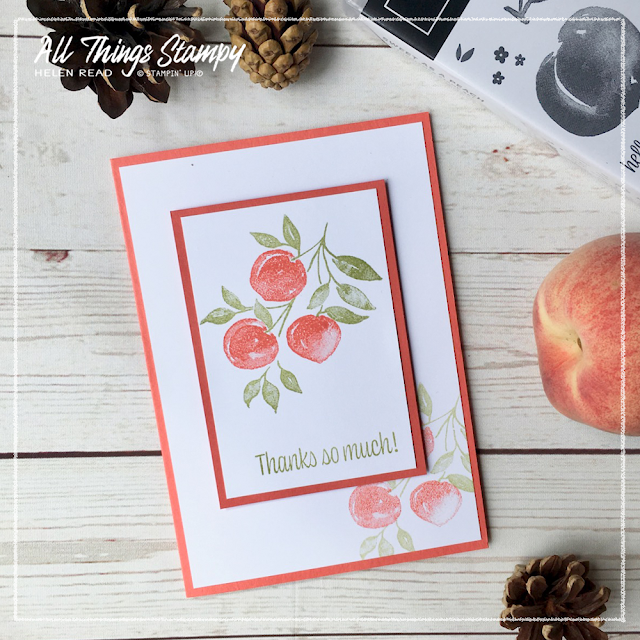
The first card takes stamping right back to basics, using just stamps, ink and paper for our New Crafters. Two ink pads – Calypso Coral and Pear Pizzazz – are used on the Sweet as a Peach stamp set, with some stamping off on the background layer to show how to get different shades from the same ink pad. It’s a basic design but very easy to recreate if you’re a new crafter, or even if you are just new to Stampin’ Up!® so don’t have all the bells and whistles yet!
 
Stampin Up! card using You’re a Peach Suite Sweet as a Peach stamp set

The second steps things up a little for our Casual Crafters with the addition of some Pale Papaya Open Weave Ribbon. I’ve cut out the peaches using the Peach Dies, and popped them up on Stampin’ Dimensionals, but a new crafter could just as easily use scissors to cut them out.

Stampin Up! card using You’re a Peach Suite Sweet as a Peach stamp set

I’ve also added some lovely stripey paper from the You’re a Peach Designer Series Paper Pack to give the background some interest. Simple touches which really lift a project to the next level. 
 
Stampin Up! card using You’re a Peach Suite Sweet as a Peach stamp set
 
Finally, this is the ‘bells and whistles’ project for our Avid Crafter friends. The one where it’s best not to add up the cost, although I did stay largely within the You’re a Peach Suite!

Stampin Up! card using You’re a Peach Suite Sweet as a Peach stamp set

I’ve used the same basic design, with the Designer Series Paper background and cut-out peaches, but this time I’ve also cut out the leaves and popped them up onto some Basic White cardstock which has been embossed using the Checks & Dots embossing folder. 
 
Stampin Up! card using You’re a Peach Suite Sweet as a Peach stamp set

I’ve die-cut some tiny Calypso Coral flowers and topped these with some 2021-2023 In Color Jewels... the Pale Papaya ones, to match the ribbon. The greeting here is stamped onto Basic White and cut out using the banner die from the Peach Dies set. 
 
Stampin Up! card using You’re a Peach Suite Sweet as a Peach stamp set
 
I’ve made this one into a birthday card to reflect the extra effort which has gone into it and even remembered to decorate the inside! 
 
Stampin Up! card using You’re a Peach Suite Sweet as a Peach stamp set
 

Seen a card you love but don’t have all the ‘bells and whistles’? Just as I started simple and worked my way up to a more product-heavy card, you can look at a complicated project and scale it back to something more simple. This is handy if you’re in a hurry – and essential when you’re just starting out and don’t have a room full of craft supplies!

What do you think of this Suite? If you love these peaches – or any Stampin’ Up!® products – you’ll be delighted to know that during July 2021, the You’re a Peach Designer Series Paper is available at 15% off. If you are in the UK and would like to order, please visit my store and, if you use the current host code DQPJEQF9, I’ll send you a thank you gift in the following month.


Does your wish list come to more than £99? Please get in touch and I will help you get more for your money and unlock discounts all year round.  


The small print

This is my personal blog and my sole responsibility as an Independent Stampin' Up!® demonstrator. All images are © Stampin' Up!® All content including photographs, projects and text are © Helen Read, unless otherwise stated. Please feel free to copy my ideas for your personal use and inspiration - if you are a SU demonstrator you may use these ideas for your events but please give credit where it is due. Please do not use my ideas for monetary gain, competitions or publication. The images on this blog - including blog buttons - should not be copied and used elsewhere on the internet or on CDs.