Showing posts with label Misty Moonlight. Show all posts

Tuesday, 21 September 2021

Peaceful Cabin with (largely) monochromatic Misty Moonlight

Stampin Up Peaceful Cabin Christmas gift wallet UK demonstrator

Stampin’ Up!® demonstrators are a fabulous source of inspiration and for some of today’s Peaceful Cabin projects I have been inspired by two US demonstrators; Candy Rattray and Anna Helman.

What I love about finding inspiration from other Stampin’ Up!® demonstrators is that it gives you the opportunity either to CASE (copy and share everything) something using products you have or, as in this case, to adapt projects to suit your own supplies.

I have been crafting with the gorgeous Peaceful Cabin bundle for my first in-person Stampin’ Up!® party for many, many months.

Stampin Up Peaceful Cabin Christmas gift wallet UK demonstrator

In these times of online shopping and growing offspring who don’t want big presents any more, the gift wallet has really come into its own.  

Candy Rattray’s beautiful wedding gift wallet.

Inside Candy’s gift wallet.

I found this fabulous design on Candy’s blog but I’m not one for measurements and I knew I’d have to convert them to fit our A4 cardstock anyway so just winged it.

My own version is made from:

  • Outer cardstock: 14.8cm x 26cm
  • Scored at 6cm and 16.5cm

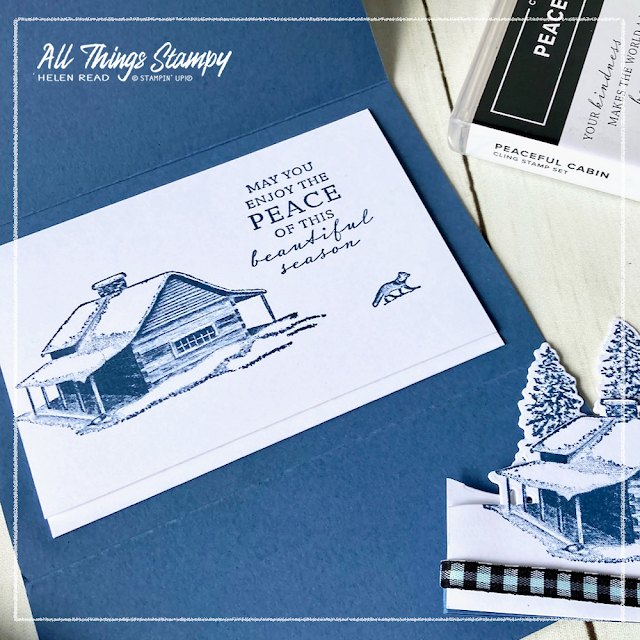
Stampin Up Peaceful Cabin Christmas gift wallet UK demonstrator

The inner is just a smaller card with a lip to hold money, a gift card or gift certificate, so I would make this to fit the contents instead of winging it, as I did. 

Stampin Up Peaceful Cabin Christmas gift wallet UK demonstrator

 
I stuck to a monochromatic colour palette of Misty Moonlight and white, with a hint of Pool Party on the black gingham ribbon as it was the only blue I have in Stampin’ Blends and I was too impatient to colour it in any other way. 

You can colour your ribbons in various ways, including Stampin’ Write (water-based) markers or sponging ink from an ink pad onto the ribbon. These both take quite a while to dry and if you don’t wait long enough the ink will transfer onto your project. It’s quicker to use Stampin’ Blends alcohol markers which dry quickly, although they can make your ribbon a little stiff. Weigh up the options and prepare ahead if necessary!

Stampin Up Peaceful Cabin bundle blending brushes UK demonstrator

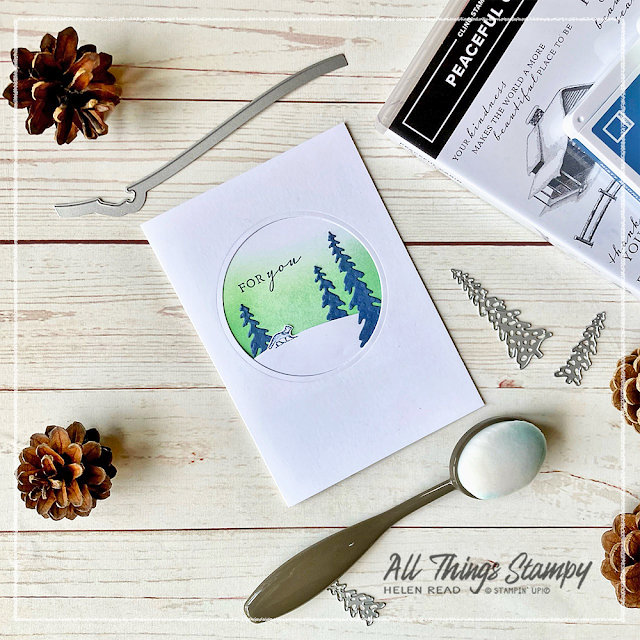
I found more inspiration on Anna’s blog for this simple circle aperture card. Anna’s project 
is actually a paper lantern which was inspired by the July Paper Pumpkin Kit which was available in the North American market. We occasionally get a global Paper Pumpkin Kit and I really wish we’d had this one as I love the colours and theme.

Anna Helman’s paper lantern, which was the inspiration for my card.

Stampin Up Peaceful Cabin bundle blending brushes UK demonstrator

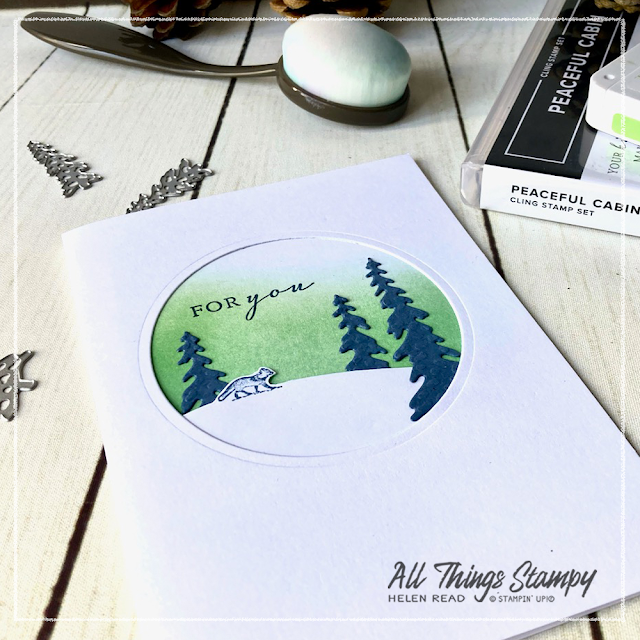
I tried to emulate the colours using Granny Apple Green. Well, I confess I just used what was on a dirty Blending Brush from an earlier craft session but I’m confident it was Granny Apple Green! I’m experimenting with not washing my brushes to see how that goes as they do take a long time to dry.

I used the cute fox stamp and dies from the Peaceful Cabin Bundle and some Misty Moonlight die-cut trees from the same set of Cabin Dies. I love that this could be a Christmas card or just a generic card for any occasion. 

Stampin Up Peaceful Cabin bundle blending brushes UK demonstrator
 

Stampin Up Peaceful Cabin bundle Evergreen embossing folder UK demonstrator


My Peaceful Cabin mojo was by now well and truly active so I carried on to create more projects, including this white scene (the photo has turned it grey) with an Evergreen embossed background. 

I am so happy we still have this Embossing Folder in the catalogue as it’s perfect for Christmas and for my favourite themes of woodlands.

Stampin Up Peaceful Cabin bundle Evergreen embossing folder UK demonstrator

Stampin Up Cabin Dies blending brushes UK demonstrator

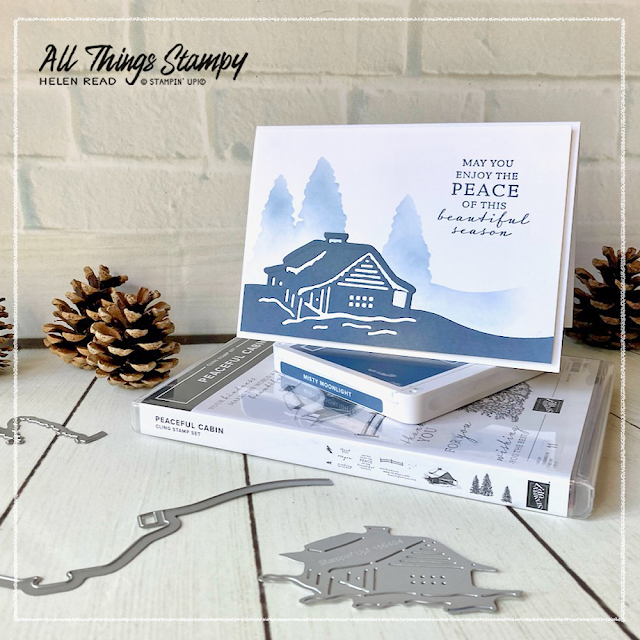
Finally I made this very simple card for the Make & Take for a Stampin’ Up!® party on Saturday. I used the tree die from Cabin Dies to create a simple stencil, which I then brushed around using Blending Brushes. It’s a really quick and easy way to make a stunning background for the die-cut cabin, and makes a Christmas card that isn’t too time-consuming to reproduce in bulk.

Stampin Up Cabin Dies blending brushes UK demonstrator

Stampin Up Cabin Dies blending brushes UK demonstrator

I hope you are inspired by my Peaceful Cabin projects and that you, too, will find inspiration from Candy and Anna’s blogs. I love to hear what you think, so please leave a comment below if you can.


Stampin Up Cabin Dies blending brushes UK demonstrator

If you are in the UK and would like to order, please To order these or any other current Stampin’ Up!® products from my store, please shop using this link

Does your wish list come to more than £99? Please get in touch and I will help you get more for your money and unlock discounts all year round.  


Monday, 9 November 2020

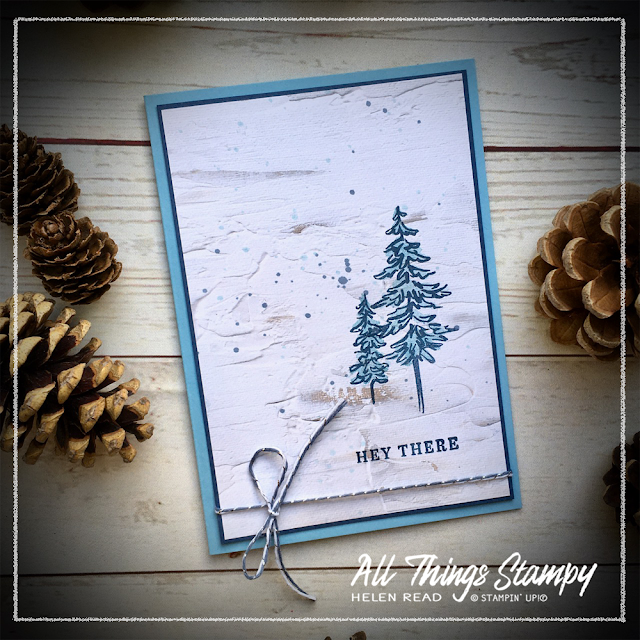
In the Pines stamped onto DSP

In The Pines Stampin Up

In The Pines is not just for Christmas! I used it recently to make a batch of cards for a variety of occasions.

The small cards are to thank customers who ordered from me at a party I held for a long-time customer, Mandy. Mandy has stuck with me for many years, for which I’m truly grateful. 

In The Pines Stampin Up

So how did I make them? The small cards are simply a standard card base cut in half. I stamped them using the Stamparatus for speed and accuracy, in Balmy Blue and Misty Moonlight ink. The “Thanks” comes from Waterfront – a must-have set which has been around a few years but remains as versatile and useful as ever – and the gorgeous Misty Moonlight twine is from the Flowers for Every Season Combo Pack.

In The Pines Stampin Up

The spattering is done with a paintbrush. I wet the brush and then picked up some Balmy Blue ink from the ink pad lid, then tapped the brush on top to spatter the ink across the project. Very simple but very effective.

In The Pines Stampin Up

In The Pines Stampin Up

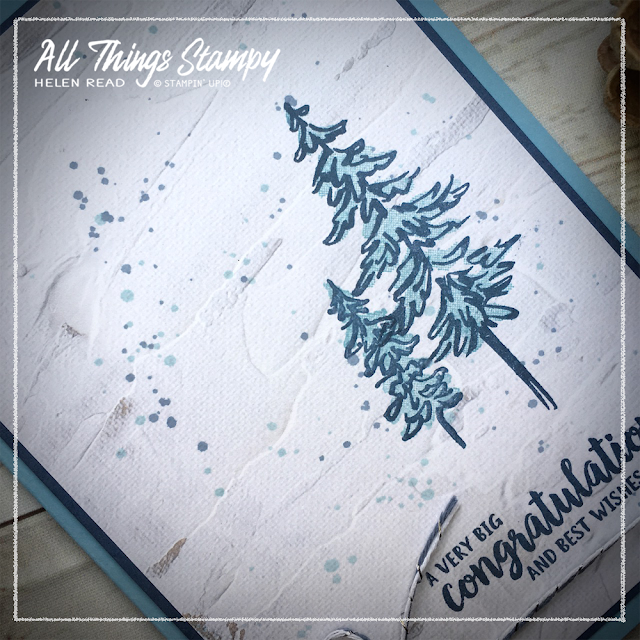
For the standard-sized cards, I stamped directly on to In Good Taste Designer Series Paper, which gives the card a look of texture without the bulk. Then I stamped as before, with larger stamps, using the Stamparatus and the same colours. I used various greetings; some from Beautiful Autumn and the congratulations sentiment is from Beautiful Friendship

The BIG celebration was my downline Sue, who celebrated her 10th anniversary as a Stampin' Up!® demonstrator. This is an amazing achievement but of course, she wouldn't have stuck around if it hadn’t been so much fun! 

In The Pines Stampin Up

On these cards, I spattered ink in both colours; Balmy Blue and Misty Moonlight. The water dilutes the colour for a soft effect.

I really enjoyed making these projects and it made a change from Christmas cards! I love how the trees look in blue and it just shows how In The Pines – which at appears at first glance to be a Christmas stamp set – offers so many more possibilities.

If you’d like to order this set – or anything else – please follow the link below and use the November 2020 host code RMK743TS if you’re spending less than £150. If you’re spending more than £150, please talk to me first and I will help you get the best value. 


Monday, 19 October 2020

Sponged trees with the Evergreen Forest 3D Embossing Folder

Evergreen Forest Embossing Folder Stampin Up

This Evergreen Forest 3D Embossing Folder delivers SO much more than it seems to at first glance. Yes, it looks great when used on green cardstock, and super-classy when used on crisp white cardstock but stop! Why not have a bit of fun with it?

I saw these beautiful designs by Barry and Jay at Mitosu Crafts and couldn’t resist having a go myself. It’s just a simple case of embossing then sponging on some colour. 

Evergreen Forest Embossing Folder Stampin Up

For the blue card, I used Seaside Spray, Misty Moonlight and just a hint of Night of Navy in the corners.

Evergreen Forest Embossing Folder Stampin Up

For the purple version, I used Highland Heather, Gorgeous Grape and just a hint of Blackberry Bliss in the corners and at the base. 

Evergreen Forest Embossing Folder Stampin Up

Next I took some diluted Whisper White Craft Ink (about 1:1) and, using a small paintbrush, spattered it across the sponged sections. And they’re finished off with some Adhesive-Backed Snowflakes which I absolutely adore.

Evergreen Forest Embossing Folder Stampin Up 
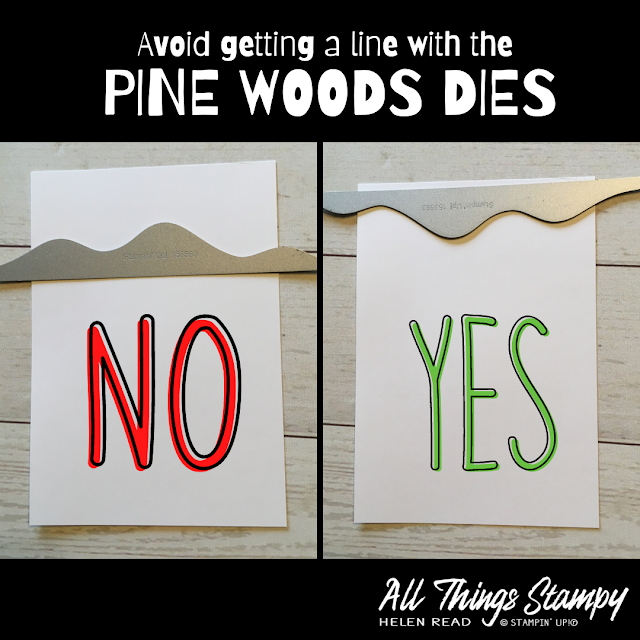
For the base of the cards, I used the Pine Woods Dies, which I LOVE, obviously, and I have two great tips for these dies, in case you decide to add them to your stash (which I highly recommend, obviously). 

Evergreen Forest Embossing Folder Stampin Up

The Foam Adhesive Sheets are ideal when die-cutting this tree. It may feel a bit fiddly to press out but that’s because the die may not have gone all the way through to the backing sheet, but if you peel the tree out carefully it will be perfectly fine. And it looks so much more professional without all those fiddly little bits of cut-up Stampin’ Dimensional on the back.

Pine Woods Dies Stampin Up tip

When I was cutting the snowy hill using these dies, I kept getting an unsightly embossed line where the edge of the die had been. Then I had a light-bulb moment and realised I was using them upside-down. Use them as I have done in the pic on the right, and the embossed line will be on the piece you discard (unless you wish to trim it off and have a smaller hill for another project).

So what do you think? Are you going to have a go at sponging this gorgeous embossing folder? Which colours do you prefer?


Saturday, 3 October 2020

Blog Hop: Celebrating my corner of the world for World Card Making Day

Yuletide Pasture Stacked Stone Stampin Up

Happy World Card Making Day! 

Today I’m excited to be taking part in another international blog hop. This time we are celebrating World Card Making Day by showcasing projects which represent our corner of the world. I can’t wait to see what demonstrators from all our different global markets have made.

Yuletide Pasture Stacked Stone Stampin Up

I live in Derbyshire, a beautiful county in the middle of England. We have rolling hills, lots of lovely green spaces and, in the north of the county, the Peak District National Park. 

Here’s a pic I took on a walk recently, with a dry stone wall in the foreground and view of Crich Stand, a war memorial, in the distance. From the top of the stand you can see eight counties, and in turn you can see this famous landmark from miles around, triggering a popular saying “you can see Crich Stand from here”. 

A more common saying is “Ey up!” and it is this I have chosen for my card. It’s a common greeting in Derbyshire, in common with many counties in the Midlands and north. It can be extended to “ey up mi duck” (hello my duck, ie friend) and you can also use it as an expression of surprise, as in “ey up, who’s eaten all the cobs?” Cobs: that’s what we call bread rolls. You can find many more expressions and dialect words in this excellent book, Ey Up Mi Duck.

I created the words in Misty Moonlight cardstock using the Playful Alphabet Dies. Seriously, if you only invest in one product used on this card, make it these dies. You will NOT regret it. 

Yuletide Pasture Stacked Stone Stampin Up

But make sure you order the Foam Adhesive Sheets at the same time as they are a real game-changer. They mean your letters come out of the die-cutting machine ready backed in foam adhesive, so no fiddly trimming of Stampin’ Dimensionals. 

Yuletide Pasture Stacked Stone Stampin Up

For my background, I’ve used the Stacked Stone stamp to represent the dry stone walls which are common in Derbyshire. I stamped it in Misty Moonlight onto Seaside Spray cardstock.
 
Yuletide Pasture Stacked Stone Stampin Up

A sheep from the Yuletide Pasture stamp set – we have a lots of sheep in Derbyshire – stands on a hill (Waterfront stamp set) to represent the rolling hills of Amber Valley where I live, as well as the Derbyshire Dales and the Peak District National Park. I stamped this in Memento Tuxedo Black and coloured it using Stampin’ Blends.
 
The sheep’s feet were floating around a little so I covered them up with some flowers from the Friendly Silhouettes Dies. As the card progressed, I began to wish I’d used some pine sprigs instead because, unfortunately, this sheep is dressed for Christmas.

Rather belatedly, I decided to shoehorn in a festive theme (you think my projects are planned? You must be thinking of somebody else). I didn’t have a small “Christmas” stamp because I foolishly didn’t order Itty Bitty Christmas in the sale last week, so scoured the sentiment sheet from Trimming the Town Designer Series Paper until I found suitable words to cut out.

Trimming the Town DSP Stampin Up

And there we have it; a Derbyshire-themed Christmas card. Now please make your way around the rest of the blog hop... and the world!

Yuletide Pasture Stacked Stone Stampin Up


Monday, 31 August 2020

Masculine cards with World of Good Designer Series Paper

World of Good masculine stampin up helen read allthingsstampy

I’ve had the World of Good Designer Series Paper since pre-order back in May and *gasp* had never used it! Enough was enough, so I finally cracked it open.

The only issue is... I didn’t buy the Beautiful World stamp set to go with it, so would I be able to create anything without the benefit of Stampin’ Up!®’s amazing coordination? Of course I could! And it’s PERFECT for masculine cards – something I know many people struggle with.

World of Good masculine stampin up helen read allthingsstampy

For starters, that old favourite from last year, Sailing Home, goes perfectly. Here are two cards which tap into the nautical theme in traditional blues. 

World of Good masculine stampin up helen read allthingsstampy

World of Good masculine stampin up helen read allthingsstampy

I love how Sailing Home and the Smooth Sailing Dies are given a refresh with our new colour, Misty Moonlight. Die-cutting from Brass Foil sheets picks up the foiled accents from the DSP. 

allthingsstampy helen read card sketch stampin up

They are product-heavy projects but if you have it, use it! I was also following this sketch – which is based on the card on page 87 of the current Annual Catalogue – for these projects, after setting my customers a challenge to do the same. 

World of Good masculine stampin up helen read allthingsstampy

And of course, Designer Series Paper on its own can help you make fabulous cards, too. Mixing things up a little, I made two more cards using the browns from the pack. This is where Cinnamon Cider cardstock and ribbon comes into play. The 21st birthday card is a total CASE from Ellen Woodbridge’s fabulous 50th birthday card.

I used the Playful Alphabet dies (an absolute must-have, in my opinion) and the equally essential Foam Adhesive Sheets. The greeting from Whale Done is just the job for a 21st birthday card, and the map design reflects the recipient’s love of travel. 

World of Good masculine stampin up helen read allthingsstampy


The final card showcases one of my favourite greeting stamps of all time, from Happiest of Birthdays. I sliced off half of the front of the card, then decorated the front panel and the inside with contrasting designs of World of Good Designer Series Paper. It’s finished off with Gilded Gems.

World of Good masculine stampin up helen read allthingsstampy

To get the shadow effect you see on the Happiest of Birthdays card, use the Stamparatus. Position your cardstock in the corner, then move it a hair’s breadth down and towards the centre (left or right, depending on how you use your Stamparatus). Hold it down with a magnet and stamp in your dark colour.

Then move the cardstock into the corner and repeat. You can do this with the same colour without reinking, to get a paler shade, or clean off the stamp and use a different shade, as I’ve done here. I used Early Espresso and Cinnamon Cider

World of Good masculine stampin up helen read allthingsstampy


The small print

This is my personal blog and my sole responsibility as an Independent Stampin' Up!® demonstrator. All images are © Stampin' Up!® All content including photographs, projects and text are © Helen Read, unless otherwise stated. Please feel free to copy my ideas for your personal use and inspiration - if you are a SU demonstrator you may use these ideas for your events but please give credit where it is due. Please do not use my ideas for monetary gain, competitions or publication. The images on this blog - including blog buttons - should not be copied and used elsewhere on the internet or on CDs.