Showing posts with label Evergreen Forest 3D Embossing Folder. Show all posts

Tuesday, 5 October 2021

Kraft gift box with Peaceful Cabin bundle


Peaceful Cabin Stampin Up Demonstrator UK

Do you like to escape to the wop-wops? I learned this wonderful new word the other week, courtesy of New Zealand demonstrator Julie Burt, who commented on my previous Peaceful Cabin projects and explained that it means "the middle of nowhere".

The Peaceful Cabin bundle from Stampin' Up!® Mini Catalogue is one of my favourites – I know, big surprise, eh? You may have gathered from the pine cones that appear in all of my photos that I love woodlands and escaping to the wop-wops in general, although these days a café and a toilet nearby are always welcomed.
 
Peaceful Cabin Stampin Up Demonstrator UK

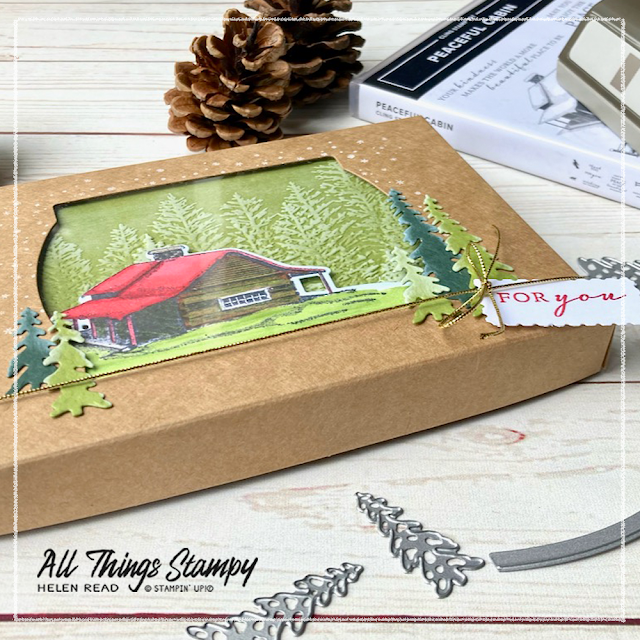
I also love the look of Kraft cardstock – which again appeals to my love of all things natural – so these Kraft gift boxes went straight onto my order from the Mini Catalogue. They are food safe so good for biscuits or cookies, and could also be used for a couple of pairs of socks, some jewellery, chocolate or other small gifts. 
 
Peaceful Cabin Stampin Up Demonstrator UK

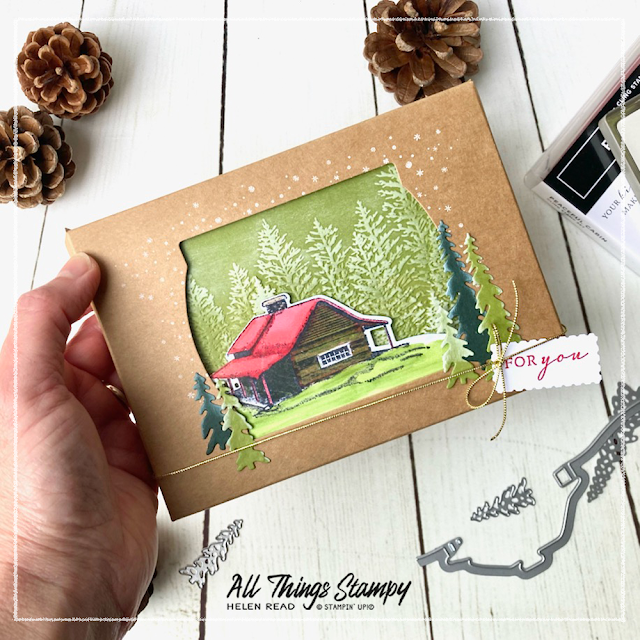
The window aperture allows you to see the contents but I liked the idea of creating a window onto the woods, so stamped this serene scene using the Peaceful Cabin stamp set and the coordinating Cabin Dies. 

Peaceful Cabin Stampin Up Demonstrator UK

I began by embossing a piece of Old Olive cardstock with the Evergreen Forest 3D Embossing Folder, then swiping over the trees with a Whisper White ink pad. 
 
I coloured the cabin using Stampin’ Blends, giving the wood a greenish hue using a mix of brown and green markers, and a bright red roof. This reminds me of a lovely cottage I saw in Nethy Bridge in the Cairngorms in Scotland. There’s a Scandinavian vibe to parts of the village and I wanted to echo this in my project. I mounted the die-cut cabin onto the embossed Old Olive panel and positioned them behind the window.

Whisper White ink is craft ink, so sits on the surface of the cardstock instead of soaking in which allows the white to show up but also means it takes a while to dry. Therefore, I used Stampin’ Dimensionals to distance it from the window sheet and minimise the chance of it rubbing off onto the acetate. 

 Peaceful Cabin Stampin Up Demonstrator UK
Around the window I stamped some tiny snowflakes in Whisper White, using a sticky note as a mask. On the top, on the outside of the window panel, I stuck some die-cut trees, which I swiped with white ink.

Peaceful Cabin Stampin Up Demonstrator UK

To finish off I tied up the box using some gold Simply Elegant Trim and a small greeting label stamped in Real Red. This label is created with the Rectangular Postage stamp punch. To make it smaller, I simply mounted my punched rectangle onto a sticky note to make it big enough to handle, then punched again to fit the greeting.

What do you think? Do you want to escape to the wop-wops in a cabin like this?
 
Peaceful Cabin Stampin Up Demonstrator UK
 

If you are in the UK and would like to order, please visit my store and, if you use the October host code ZKTV7U4Z, I’ll send you a thank you gift next month. To make it easy, please shop using this link


Does your wish list come to more than £99? Please get in touch and I will help you get more for your money and unlock discounts all year round.  


Monday, 19 October 2020

Sponged trees with the Evergreen Forest 3D Embossing Folder

Evergreen Forest Embossing Folder Stampin Up

This Evergreen Forest 3D Embossing Folder delivers SO much more than it seems to at first glance. Yes, it looks great when used on green cardstock, and super-classy when used on crisp white cardstock but stop! Why not have a bit of fun with it?

I saw these beautiful designs by Barry and Jay at Mitosu Crafts and couldn’t resist having a go myself. It’s just a simple case of embossing then sponging on some colour. 

Evergreen Forest Embossing Folder Stampin Up

For the blue card, I used Seaside Spray, Misty Moonlight and just a hint of Night of Navy in the corners.

Evergreen Forest Embossing Folder Stampin Up

For the purple version, I used Highland Heather, Gorgeous Grape and just a hint of Blackberry Bliss in the corners and at the base. 

Evergreen Forest Embossing Folder Stampin Up

Next I took some diluted Whisper White Craft Ink (about 1:1) and, using a small paintbrush, spattered it across the sponged sections. And they’re finished off with some Adhesive-Backed Snowflakes which I absolutely adore.

Evergreen Forest Embossing Folder Stampin Up 
For the base of the cards, I used the Pine Woods Dies, which I LOVE, obviously, and I have two great tips for these dies, in case you decide to add them to your stash (which I highly recommend, obviously). 

Evergreen Forest Embossing Folder Stampin Up

The Foam Adhesive Sheets are ideal when die-cutting this tree. It may feel a bit fiddly to press out but that’s because the die may not have gone all the way through to the backing sheet, but if you peel the tree out carefully it will be perfectly fine. And it looks so much more professional without all those fiddly little bits of cut-up Stampin’ Dimensional on the back.

Pine Woods Dies Stampin Up tip

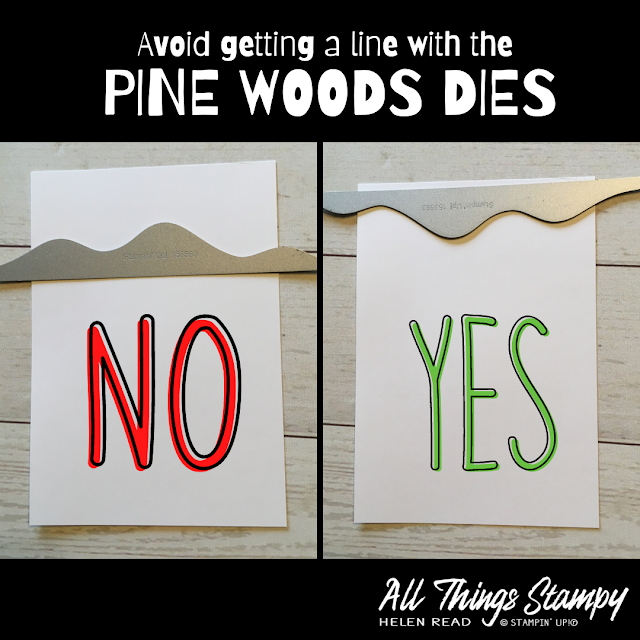
When I was cutting the snowy hill using these dies, I kept getting an unsightly embossed line where the edge of the die had been. Then I had a light-bulb moment and realised I was using them upside-down. Use them as I have done in the pic on the right, and the embossed line will be on the piece you discard (unless you wish to trim it off and have a smaller hill for another project).

So what do you think? Are you going to have a go at sponging this gorgeous embossing folder? Which colours do you prefer?


Monday, 12 October 2020

In The Pines distressed texture card

In The Pines Stampin Up
 
It’s all about trees for me at the moment and I have been having LOTS of fun with the In The Pines Bundle recently.

Today I would like to show you this very out-of-character project. Why out of character? Because it uses GREY. I don’t get the whole grey craze – grey walls, grey décor, grey clothes, grey cards. We have enough grey skies in this country without adding to the gloom!

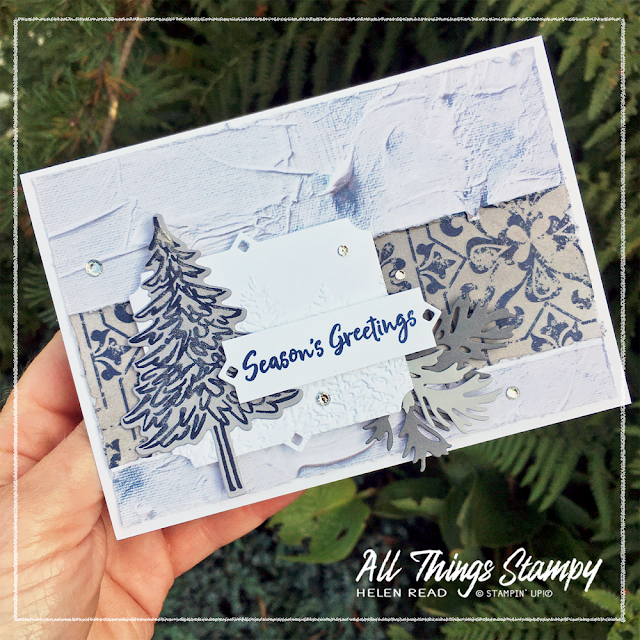
But I pushed myself to use a little bit of Smoky Slate AND Basic Grey on this card, throwing in lots of texture to make it more “me”. 

In The Pines Stampin Up

As my backdrop, I have used the In Good Taste Designer Series Paper, which is SO versatile and even better, currently available at a 15% discount (until 31st October). 

In The Pines Stampin Up
 
I love this pack, which includes lots of lovely designs which give you the look of texture without the bulk. I mean, doesn’t that background look exactly like it’s been create with texture paste? Well it’s not – it’s printed paper and perfectly flat. For a change, and a blast from the past, I distressed the edges using the side of my Stampin’ Snips.

In The Pines Stampin Up
The patterned strip is from the same pack but I wanted it darker so I brayered on top of the design with some Smoky Slate ink. This is a great way of getting more mileage out of your Designer Series Paper. Brayer it, sponge it, stamp on it, colour in the images... these are all ways you can change the colour to make it fit your project.

In The Pines Stampin Up

As I’d already committed to using two sets of dies –  the Pine Woods Dies and Beautiful Boughs, I stuck with the latter for my labels. The greeting label uses the same die as the white panel behind it; it’s just trimmed down.

And the white panel behind is embossed using the Evergreen Forest 3D Embossing Folder. This was the first time I’d used this amazing folder but you’ll be seeing a lot more of it here next week.

The tree is stamped in Night of Navy onto Smoky Slate and die-cut. I’ve also painted over it using Wink of Stella to add some shine, but I’m not sure that comes out in the photo. Finally, some bling gives it another lift.
 
Hope you like it! Please come back on Thursday for another blog hop and some more trees! And if you are in the UK and are looking for a demonstrator, please get in touch or shop at my store using the link below. This month’s host code is ET479TKQ and if you use this when spending between £25 and £149, I’ll send you a thank you gift. (If you order over £150, don’t use the code as you will get your own Stampin’ Rewards.)


The small print

This is my personal blog and my sole responsibility as an Independent Stampin' Up!® demonstrator. All images are © Stampin' Up!® All content including photographs, projects and text are © Helen Read, unless otherwise stated. Please feel free to copy my ideas for your personal use and inspiration - if you are a SU demonstrator you may use these ideas for your events but please give credit where it is due. Please do not use my ideas for monetary gain, competitions or publication. The images on this blog - including blog buttons - should not be copied and used elsewhere on the internet or on CDs.