Showing posts with label Pine Woods Dies. Show all posts

Monday, 23 November 2020

Starburst Christmas card with Pine Woods Dies

Pine Woods Stampin Up

Crafty Friday finally happened! We had to postpone for a week because some of the kits took SO LONG to arrive. In fact we gave up on one of them and my husband drove another one over to the lady's house; inevitably, the first kit arrived in the post the next day! It had taken nine days to arrive.

I’ll only show you one of the cards we made here as the other one was a direct copy of this

Yes, we were sponging again and I thought it was a good opportunity to have a go at the Starburst technique. We all began by making our templates. I always take a pretty rough and ready approach to crafting, winging it as I go. One lady, however, measured all her angles using a protractor! It was to be expected, I suppose, as she is a retired maths teacher.

Starburst technique Stampin Up

These are the three stages of template making. Others have suggested making these out of window sheets or other acetate but I’m not convinced; I think that would allow ink to pool and make it more likely to smudge and blob.

We sponged on to the Pretty Peacock cardstock in whatever colour ink we had to hand. I had Pretty Peacock, of course (to me, ink pads are like Pokemon; gotta catch ’em all!)  but others achieved good results with Just Jade and the now retired Island Indigo. I really like this colour combination; Pretty Peacock, Just Jade and just a splash of red. 
 
Pine Woods Stampin Up

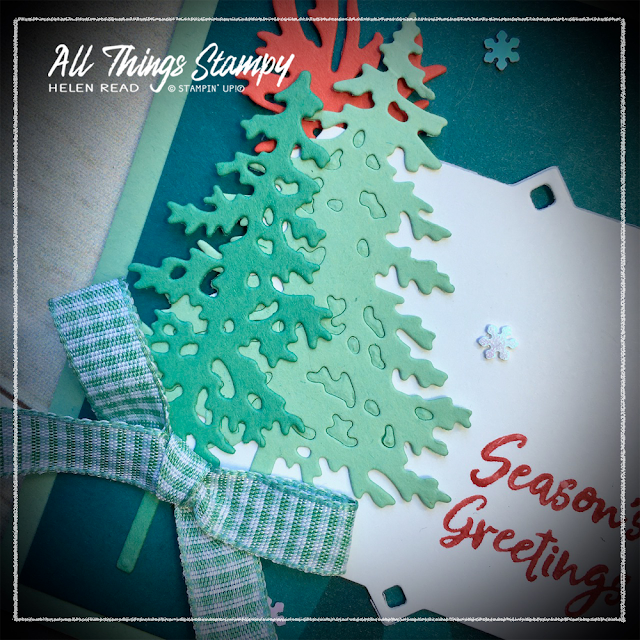
The greeting panel is from the same die set as the sprigs of evergreen; the Beautiful Boughs dies, which was released last year but never goes out of style. 

I ran out of the red ribbon from the All The Trimmings Ribbon Combo Pack which I’d used for the samples as I’d had to donate my prepared kit due to the postal issues. Therefore, during the actual session, I used this gorgeous Just Jade gingham from the Flowers For Every Season Ribbon Combo Pack instead.

Pine Woods Stampin Up

These Pine Woods Dies are one of my favourite products ever. Both of these trees have open foliage which pops out but, as you can see, the back one, in Mint Macaron, has retained these pieces. That’s because I was lazy and didn’t clean out the die. But you know what? I like the effect!
 
To get the greeting, from In The Pines, onto two separate lines, you have severa; options. The stamp set is photopolymer, so cutting it up is really easy. But that felt a bit drastic for one card. Another option is to mask each section off using tape or a sticky note, but that is fraught with danger. Instead, I inked and stamped each word separately using a Stampin’ Write Marker, cleaning the stamp very thoroughly in between. 
 
Pine Woods Stampin Up

If you’d like to order anything you see here, please visit my store and, if shopping in November 2020, please use the host code RMK743TS. The host code allows me to earn Stampin’ Rewards which I use to order thank you gifts for my online customers.


Friday, 23 October 2020

Create beautiful sponged skies for In The Pines

In The Pines Northern Lights Stampin Up

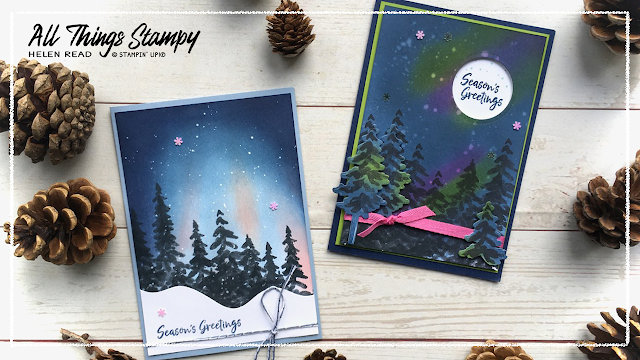
I do love a sponging technique. And these cards take sponging to the max, with one of my favourites: the Northern Lights technique.

I’ve never been lucky enough to see the Northern Lights (although to be honest that’s no surprise as I’ve never gone out of my way to find them) but I really do enjoy creating the effect on a card.

And all you need are a few ink pads and some sponges.

In The Pines Northern Lights Stampin Up
 
I demoed this card and the In The Pines Bundle at a Stampin’ Up!® party recently (online, via Zoom, of course). It’s a lovely atmospheric effect which uses Blushing Bride, Seaside Spray, Misty Moonlight and Night of Navy ink pads.

In The Pines Northern Lights Stampin Up
The key with sponging, as I keep telling my customers, is to keep going. So many people give up too soon and are dissatisfied with the results. It will look horrible partway through, so plough on until you reach full colour saturation.

In The Pines Northern Lights Stampin Up
 
For this card, I dragged some Blushing Bride ink up from the bottom of the image, not worrying too much about blotches at the bottom as I knew I would be covering them with the trees. Then I blended in some Seaside Spray around them and across the whole of the centre of the card.

Working from the edges, I added some Misty Moonlight in an arc. Then finally, working from the top two corners, I added some depth with Night of Navy.
 
In The Pines Northern Lights Stampin Up

The trees are from the In The Pines stamp set but you may notice they are tall and thin. This is really easy to recreate. I just used the “background” stamps, not the detailed images, and stamped in Memento Tuxedo Black. I stamped the big trees then took the small slim tree and stamped on top to extend the trunk. Very simple and very effective.

To add the stars in the sky, I simply took some Craft Whisper White ink, diluted with water (1:1 ratio) and splattered this over the card using a fine paintbrush. I keep this diluted ink in an old embellishment pot so I can use it over and over again. A very little goes a LONG way!
 
In The Pines Northern Lights Stampin Up

The second card is a fine example of what you can make with those practice sheets, the bits that go “wrong” and a lesson in adaptability.

I had some earlier Northern Lights sheets which I hadn’t loved. In fact, I’d sponged the top, not loved it, turned it round and sponged the other end until I had a full sheet. Neither was quite what I was after so I played around and stamped black trees on top. Another practice sheet was used for more trees, which I die-cut using the Pine Woods Dies and popped up. Finally I felt I was getting somewhere, but REALLY wished I’d masked off a white moon. 
 
In The Pines Northern Lights Stampin Up

No problem! I simply die-cut a circle to represent the moon, and stamped my greeting inside. I did this by inking the one word of the greeting stamp at a time, using a Night of Navy Stampin’ Write Marker and cleaning thoroughly in between. 
 
It’s finished off with a slightly different splattering technique; this time I just used plain water, which soaks up some ink and leaves a more subtle snowy look in the sky. Finally, some Magenta Madness ribbon picks up the pink in the sky. 

In The Pines Northern Lights Stampin Up


In The Pines Northern Lights Stampin Up

Do you have trouble fitting your dies back into the pack? I nearly always do so was inspired to create a printed backing sheet, just like the one which comes with the Playful Alphabet dies. All I did was leave the dies in place and draw round them with a Journalling Pen. Now I not only don’t have to fiddle around to fit all the dies in, but I can see at a glance if one is missing. 


Monday, 19 October 2020

Sponged trees with the Evergreen Forest 3D Embossing Folder

Evergreen Forest Embossing Folder Stampin Up

This Evergreen Forest 3D Embossing Folder delivers SO much more than it seems to at first glance. Yes, it looks great when used on green cardstock, and super-classy when used on crisp white cardstock but stop! Why not have a bit of fun with it?

I saw these beautiful designs by Barry and Jay at Mitosu Crafts and couldn’t resist having a go myself. It’s just a simple case of embossing then sponging on some colour. 

Evergreen Forest Embossing Folder Stampin Up

For the blue card, I used Seaside Spray, Misty Moonlight and just a hint of Night of Navy in the corners.

Evergreen Forest Embossing Folder Stampin Up

For the purple version, I used Highland Heather, Gorgeous Grape and just a hint of Blackberry Bliss in the corners and at the base. 

Evergreen Forest Embossing Folder Stampin Up

Next I took some diluted Whisper White Craft Ink (about 1:1) and, using a small paintbrush, spattered it across the sponged sections. And they’re finished off with some Adhesive-Backed Snowflakes which I absolutely adore.

Evergreen Forest Embossing Folder Stampin Up 
For the base of the cards, I used the Pine Woods Dies, which I LOVE, obviously, and I have two great tips for these dies, in case you decide to add them to your stash (which I highly recommend, obviously). 

Evergreen Forest Embossing Folder Stampin Up

The Foam Adhesive Sheets are ideal when die-cutting this tree. It may feel a bit fiddly to press out but that’s because the die may not have gone all the way through to the backing sheet, but if you peel the tree out carefully it will be perfectly fine. And it looks so much more professional without all those fiddly little bits of cut-up Stampin’ Dimensional on the back.

Pine Woods Dies Stampin Up tip

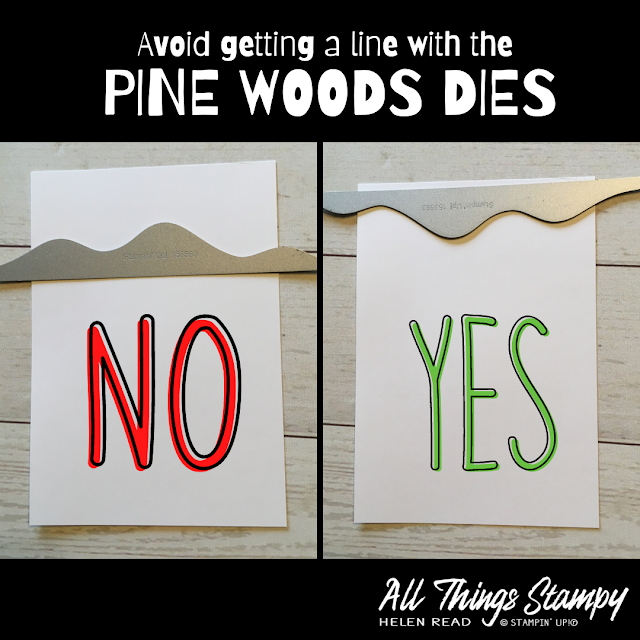
When I was cutting the snowy hill using these dies, I kept getting an unsightly embossed line where the edge of the die had been. Then I had a light-bulb moment and realised I was using them upside-down. Use them as I have done in the pic on the right, and the embossed line will be on the piece you discard (unless you wish to trim it off and have a smaller hill for another project).

So what do you think? Are you going to have a go at sponging this gorgeous embossing folder? Which colours do you prefer?


Wednesday, 30 September 2020

In The Pines meets Pinewood Planks for Christmas

 In the Pines stampin up
I promised you more In The Pines bundle projects and here they are... this time with a Crumb Cake and Pinewood Planks vibe.

The stars of the show here are the Pine Woods Dies; in fact, the only stamps I've used from the In The Pines stamp set are the very handy Season’s Greetings and the tiny snow stamp.

In the Pines stampin up

For the landscape card, I die-cut some “hills” and three trees using the Pine Woods Dies. The small pine cones come from the Winter Woods stamp set. Unfortunately, I don’t have the coordinating In The Woods dies so had to fussy-cut them out. My fussy-cutting isn’t the most precise, as you can see!

The two Crumb Cake trees were sponged lightly with Crumb Cake ink to make them stand out a little more from the background.


In the Pines stampin up

For the portrait card, I slipped some In Good Taste Designer Series Paper behind the tree. It’s a little lost in the photo but I like the effect so plan to return to this design using a stronger contrast. I didn’t have any of those lovely Red Rhinestone Basic Jewels, but I am a crafter so I compromised... I used our standard Rhinestones and coloured them using a Poppy Parade Stampin’ Blend alcohol marker.

In the Pines stampin up

If you want to cut an aperture and emboss your cardstock, make sure you do the cutting first. If you do it the other way round, the act of cutting will squash your embossing.

That’s all for today but please come back on Saturday at 4pm for a World Card Making Day blog hop!


Monday, 28 September 2020

Forest bathing with In The Pines

In The Pines Stampin Up ideas

In The Pines is a bundle with my name all over it. There are few places I’d rather be than among trees.

In Japan, shinrin yoku is the art of forest bathing and recognised for its benefits on people’s physical and mental health. This isn't new-age nonsense; far from it. There are very good reasons behind it, so are you ready for some science?

Studies have shown that being among trees can not only improve your concentration and memory, but reduce your blood pressure and lower levels of cortisol, the stress hormone. On top of this, trees and plants emit phytoncides, which have antibacterial and anti-fungal properties, helping us to fight disease.

If those aren’t good enough reasons to get out into the woods, then I don’t know what is. I love to go for countryside walks but am always drawn to the trees; in lockdown, when we weren't supposed to drive anywhere for leisure, I managed to work out a four-mile walk which took me through little woodlands, although they were no substitute for ancient woodlands and my favourite Scottish pine forests. 

The pine forests of Scotland – particularly Abernethy Forest in the Cairngorms – were the inspiration for these projects using In The Pines stamp set and the Pine Woods Dies. Expect more where these came from...

In The Pines Stampin Up ideas

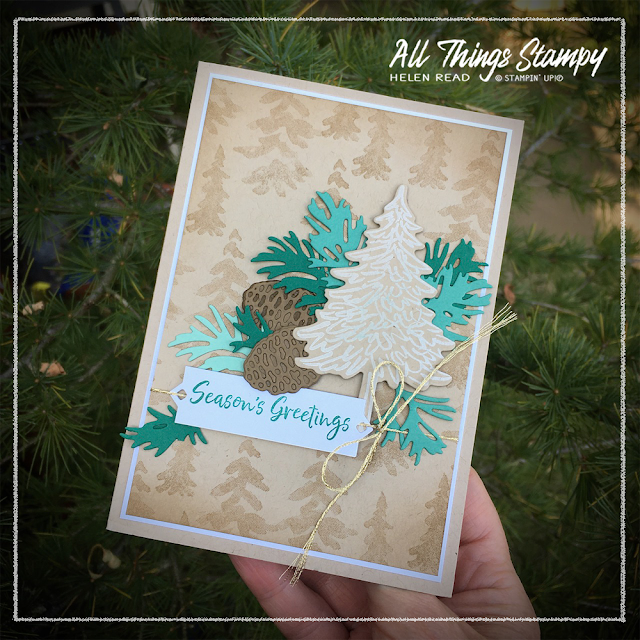
This project uses the Beautiful Boughs dies, too. As you can imagine, I have a whole section of craft room dedicated to tree-themed products! The back pine cone was sponged in Soft Suede before the top layer was stuck on. I’d already made the first one so went with it. I like how only some of the “bits” have come out; I like the look of some still remaining so left them there. Easier, too!

In The Pines Stampin Up ideas

I stamped the main tree image in Whisper White Craft ink onto Crumb Cake and cut it out using the Pine Woods Dies. To make the label, I cut it using the Beautiful Boughs dies then trimmed it down to make it slimmer. The gold trim is from the Forever Greenery Suite.

In The Pines Stampin Up ideas

This is a simpler card which uses just the In The Pines stamp set, along with the Tasteful Labels dies, although any label dies or a punch would do a similar job.  The trees felt a little lost on the stark white background, so I gave it some depth by sponging around the top and bottom using Mint Macaron and just a hint of Pretty Peacock. 

In The Pines Stampin Up ideas

In The Pines Stampin Up ideas

This card is actually not inspired by Scotland but by Lea Wood nature reserve near Cromford. There's a little patch of Scots Pines at the top; if you stand in the centre and look up, you see this effect. This is a fascinating phenomenon called ‘crown shyness’ where trees avoid their branches touching each other. Not all trees do it and nobody really knows why. But don’t say I never tell you anything!

In The Pines Stampin Up ideas


The small print

This is my personal blog and my sole responsibility as an Independent Stampin' Up!® demonstrator. All images are © Stampin' Up!® All content including photographs, projects and text are © Helen Read, unless otherwise stated. Please feel free to copy my ideas for your personal use and inspiration - if you are a SU demonstrator you may use these ideas for your events but please give credit where it is due. Please do not use my ideas for monetary gain, competitions or publication. The images on this blog - including blog buttons - should not be copied and used elsewhere on the internet or on CDs.