Showing posts with label Stitched So Sweetly Dies. Show all posts

Tuesday, 8 March 2022

In the Moment meets Waves of the Ocean for International Women’s Day

Stampin Up UK In the Moment stamp set Waves of the Ocean patterned paper

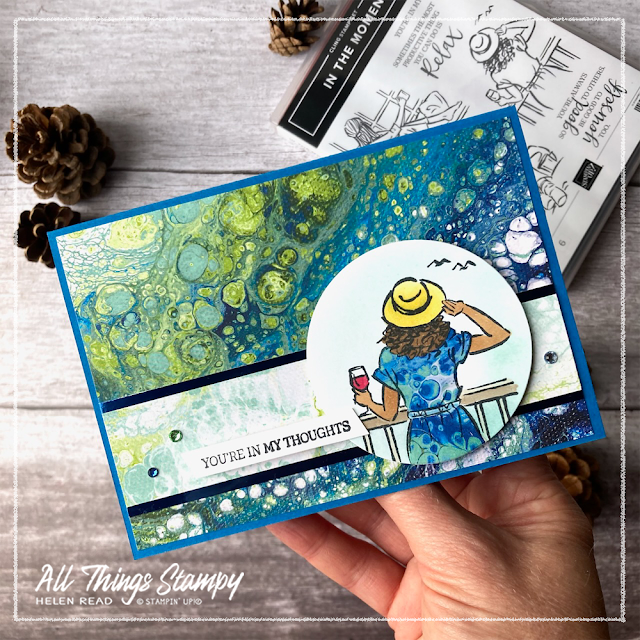
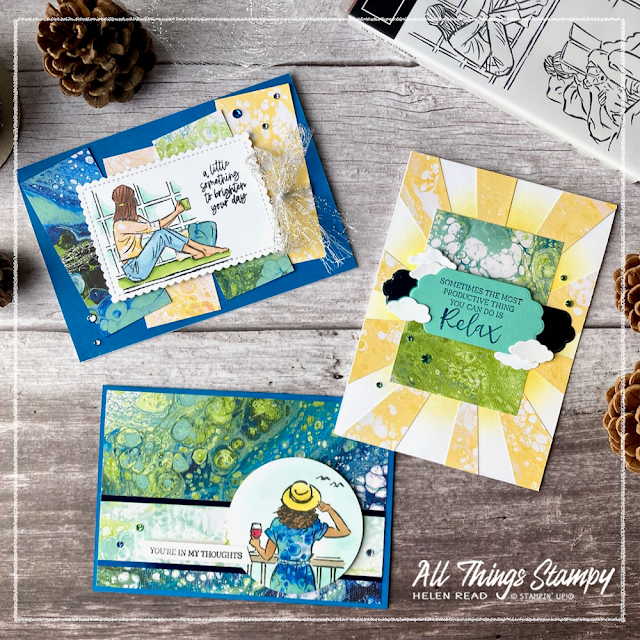
When you planned to use the In the Moment stamp set to celebrate International Women’s Day but you also want to show off your new Waves of the Ocean Designer Series Paper... THIS is what you come up with. 


Stampin Up UK In the Moment stamp set Waves of the Ocean patterned paper

I love the marble patterns of this gorgeous paper in its rich blues on one side and tropical pastels on the reverse. Naturally, as someone who frequently shuns pastel shades, I am drawn to the richer colours so used this stunning green and blue piece as the background to this card. 


Stampin Up UK In the Moment stamp set Waves of the Ocean patterned paper

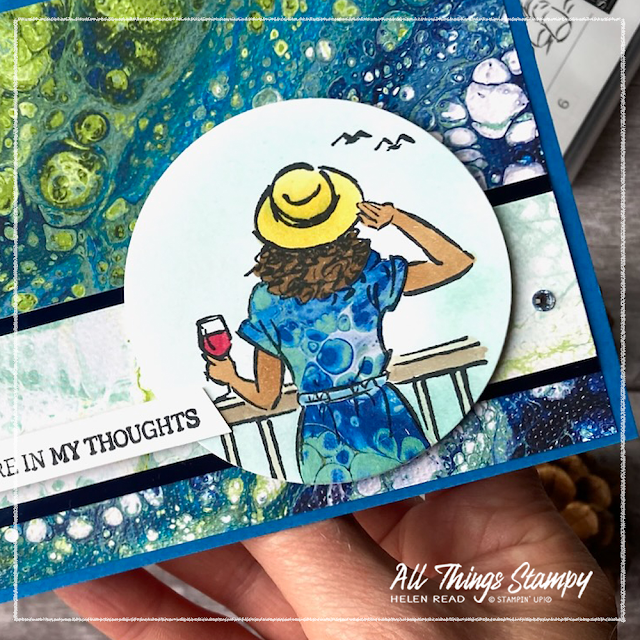
Rich Blue Foils (another new product only available while supplies last) add some shine to the horizontal strip and the image is cut out using Layering Circle Dies to break up the hard lines. 

Stampin Up UK In the Moment stamp set Waves of the Ocean patterned paper

I’ve coloured the image using a combination of Stampin’ Blends, including some of our new Natural Tones, and paper piecing. This is a simple technique which means you stamp the image again on to Designer Series Paper and cut out the shapes. Here I’ve cut out the shape of the dress and overlaid it onto the first stamped image; I love how this gives the dress a really natural look of printed fabric.

This is one of three images of women in relaxed poses in the beautiful In The Moment stamp set, available to Stampin' Up!® UK customers in the current Jan-June Mini Catalogue, is perfect for creating cards for all the fabulous women in your life. 


Stampin Up UK In the Moment stamp set Waves of the Ocean patterned paper


Waves of the Ocean is a new pack of Designer Series Paper which is only available while supplies last. The designs were created by Stampin’ Up!® artists who look like they’re having lots of fun in this video. This beautiful patterned paper is designed to coordinate with our new Waves of Inspiration stamp set and die bundle which is an early release ahead of the upcoming Stampin’ Up!® Annual Catalogue. However, it is versatile enough to work well with lots of other stamp sets, such as In the Moment as I’ve used here. 


Stampin Up UK In the Moment stamp set Waves of the Ocean patterned paper
  

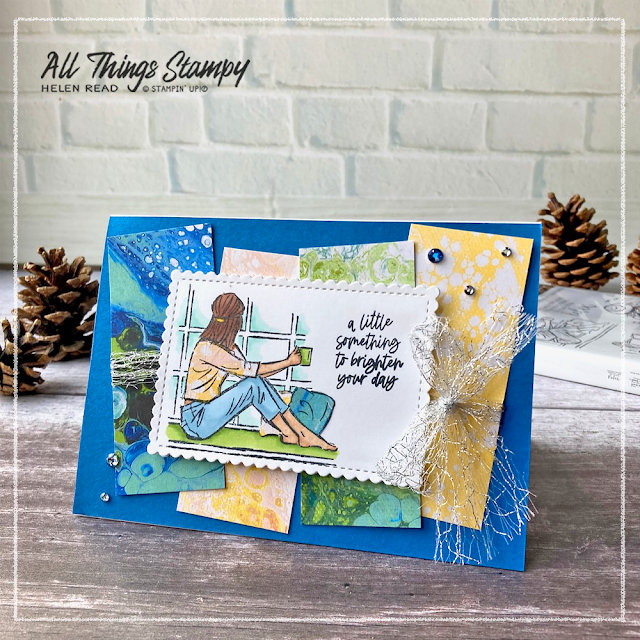
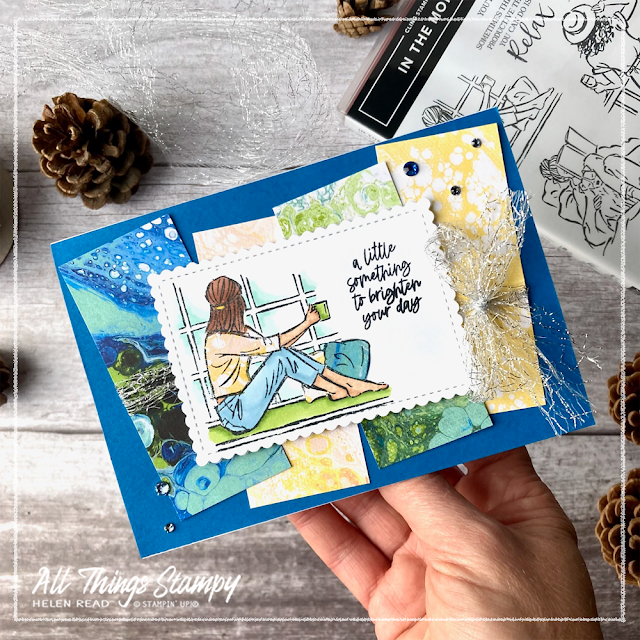
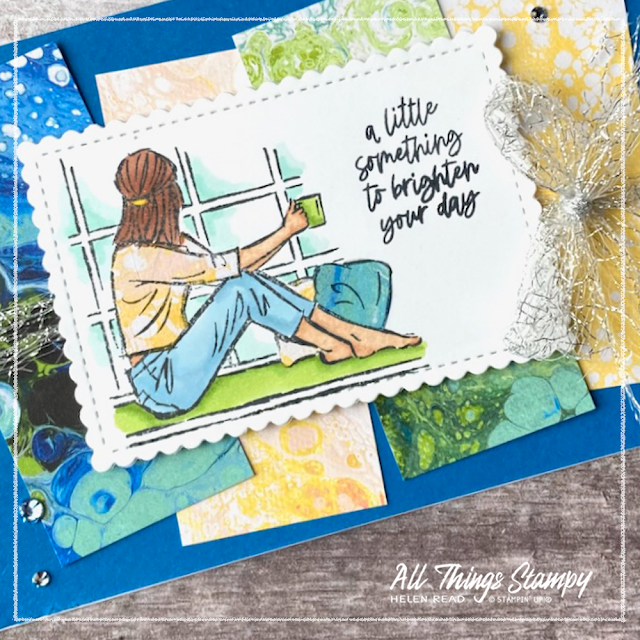
For my second card I used the image from In the Moment of the lady sitting on the window seat enjoying a cuppa and a look at the view. I’ve cut this one out using Stitched So Sweetly Dies, which left the perfect space for this sentiment from the Rainbow of Happiness stamp set.  


Stampin Up UK In the Moment stamp set Waves of the Ocean patterned paper

To show off as several designs of patterned paper from Waves of the Ocean, I cut strips and overlapped them at jaunty angles. I finished off with some silver Metallic Mesh Ribbon and Rhinestone Waves Basic Jewels (trust me, there’s nothing basic about these!). 


Stampin Up UK In the Moment stamp set Waves of the Ocean patterned paper

Stampin Up UK In the Moment stamp set Waves of the Ocean patterned paper

I’ve used the paper piecing technique again here, adding pattern to the T-shirt and cushions to link the main image to the background designs. 

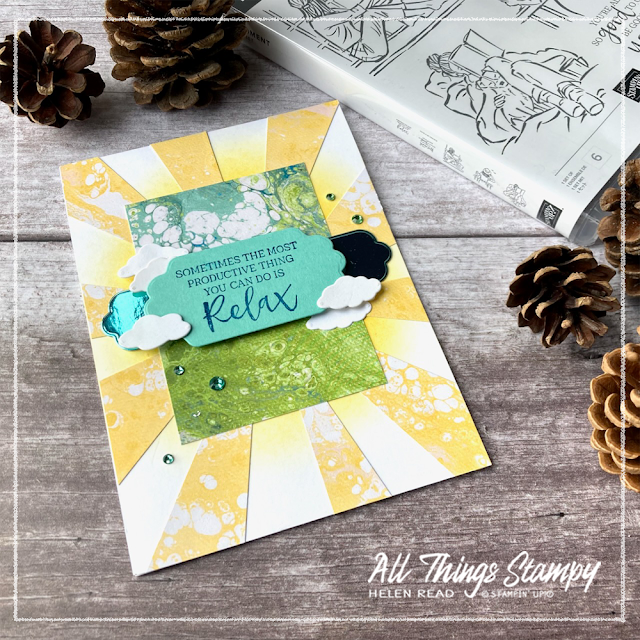
If you want to know where all those tiny pieces of Waves of the Ocean Designer Series Paper came from for the paper piecing, take a look at this card, which goes in a very different direction...

Stampin Up UK In the Moment stamp set Waves of the Ocean patterned paper

It’s a variation on the card on the Stampin’ Up!® website, which looks like this:


Stampin Up UK Waves of the Ocean patterned paper
 
Stampin Up UK In the Moment stamp set Waves of the Ocean patterned paper


My version uses the same paper pattern, with the blending brush behind, but I don’t have the Waves of Inspiration bundle so I compromised by using Seasonal Labels dies and the small clouds from the Brilliant Rainbow dies. The greeting comes from In The Moment.  

The starburst pattern is created by making a starburst mask (or drawing lightly in pencil directly onto your patterned paper if you’re feeling brave). I explain how to do this in this blog post. 

This created lots of scraps of paper which I retained for the paper piecing you see above, to reduce waste. 

Stampin Up UK In the Moment stamp set Waves of the Ocean patterned paper


I hope you like my In the Moment/Waves of the Ocean cards for International Women’s Day and are inspired to create your own. If you are a crafter in the UK and would like to order any of the products you see here, you can order at any time, day or night, via my Stampin’ Up! store. If you do this and use the March host code UDVDUXFH I will send you a thank you gift next month. Plus I will donate 10% of the purchase price (excluding shipping) to the British Red Cross Ukrainian Crisis Fund.

Does your wish list come to more than £99? Please get in touch and I will help you get more for your money and unlock discounts all year round.  


Monday, 21 February 2022

Zero Waste Friends of the Forest project – and tips for reducing waste

Stampin up uk Friends of the Forest

Reducing waste and minimising our impact on the planet is a big passion of mine and my Stampin’ Up! UK customers – so I thought I’d make a theme of it for my social media posts this week with projects and tips all week long. Please visit my Facebook page or Instagram to get the full experience!

The starting point for this themed week is my very first Instagram Hop, on the theme of Zero Waste. Please visit my Instagram page to find the others in the hop. 

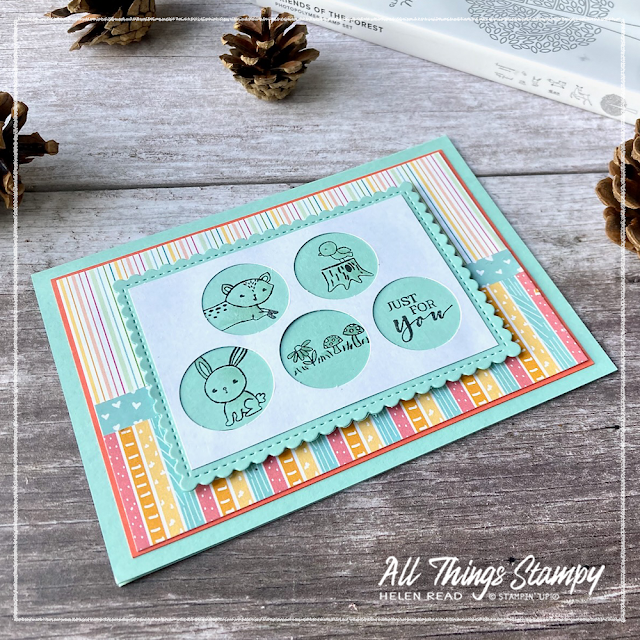
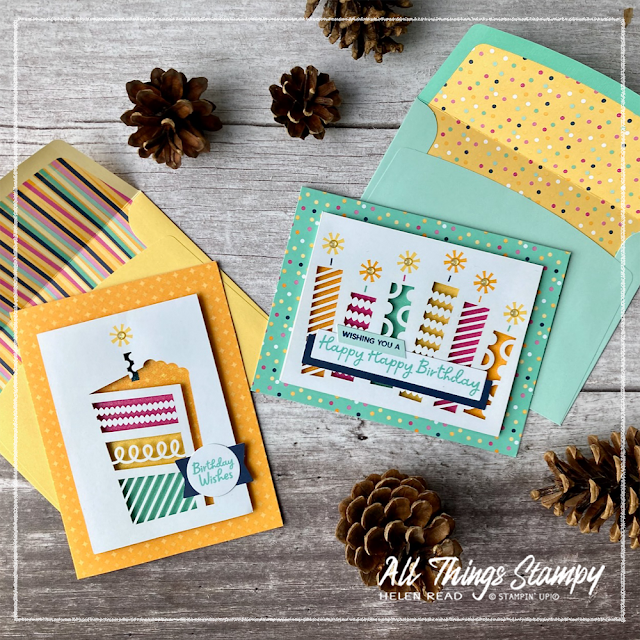
There’s a bit of a back story to my hop project. I went away last weekend and took the Light the Candles Kit with me for some relaxing crafting. I love these kits as you don’t have to think! And everything gets used, with very little waste. 


Stampin up uk Light the Candles card kit
 

However, there was a small amount of paper waste left over once I’d completed the kit and just as I was about to put it into the recycling bag, I had an idea for this Zero Waste project. 

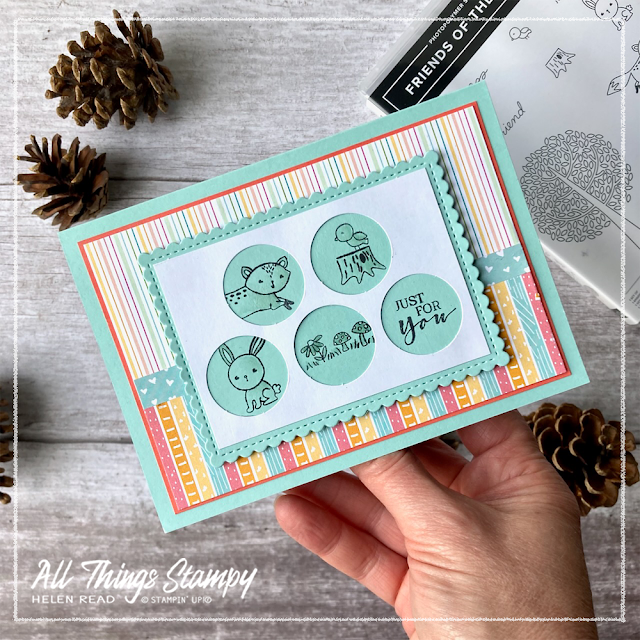
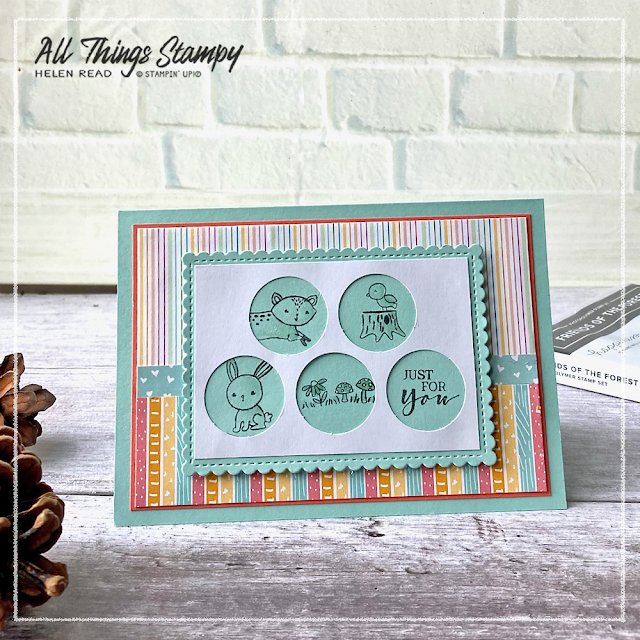
I searched through my stamp collection to find Friends of the Forest; the little creatures are just the right size to peep through the circles. 


Stampin up uk Friends of the Forest 

I didn’t want to stamp them onto white as I knew the white wouldn’t match the paper from the kit but I thought Pool Party (one of my favourite colours) was a nice compromise here and goes well with Sunshine & Rainbows Designer Series Paper, a Sale-a-Bration product which is free with a £45 order until the end of February.

Originally I had planned to stamp the images directly onto the back panel but that was never going to work as they would overlap. To save making more waste by trying this several times, I stamped each animal onto a small piece of Pool Party card so it could be positioned accurately with no overlapping ink. However, these were all taken from my scraps box. 


Stampin up uk Friends of the Forest 

I also used scraps of Sunshine & Rainbows Designer Series Paper for the background. I managed to find pieces which were almost the right size so hardly had to trim these at all. In another attempt to reduce waste, I mounted these onto the backing piece from the DSP pack, then cut it to size before adding to the card. 


Stampin up uk Friends of the Forest

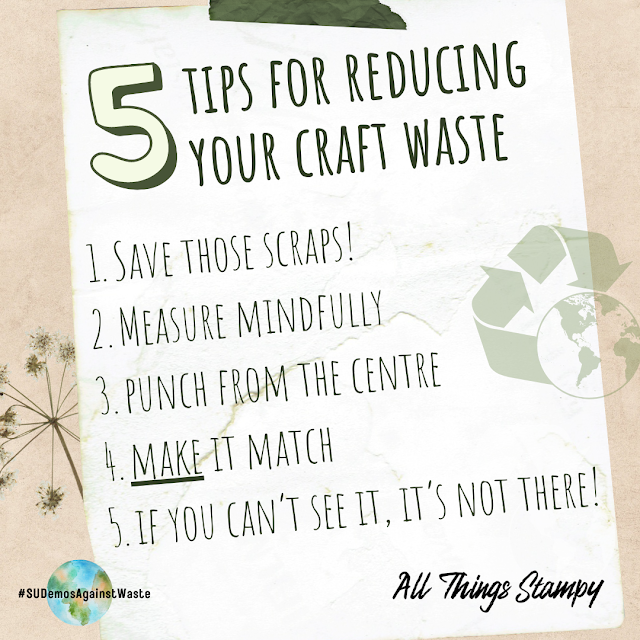
Here are some great tips for reducing waste when you craft:

1. Save those scraps! Narrow strips are good for stamping greetings. Smaller scraps can be used to make tiny punched shapes for confetti or embellishments.
2. Measure mindfully. When creating multiples of a project, think how you can cut your cardstock up into equal pieces to avoid waste. With A4 cardstock, this could be 7cm x 9.9cm layers which mean you get nine equal shapes from one sheet.

3. It’s in our nature to die-cut and punch shapes up to the edge of a piece of cardstock to avoid waste... but you can actually avoid waste by cutting from the centre, as this means you can use the leftover piece as a layer.

4. Have Designer Series Paper you don’t love, or which doesn’t go with your project? Stamp on it, sponge it, colour it – you can MAKE it match.

5. Finally, remember: if you can’t see it, it’s not there. Cut out centres of cardstock layers and use on another project. Don’t wrap ribbon all the way around layers or cards; just tape it behind where you can’t see. 

Stampin up uk tips for reducing waste
 

If you love any of the products you see here and are in the UK, please consider shopping at my online store as every order helps to support my small business. As a thank you, if you use the February 2022 host code 2FYQAK7T, I’ll send you a thank you gift in the following month.


Does your wish list come to more than £99? Please get in touch and I will help you get more for your money and unlock discounts all year round.  


Tuesday, 21 December 2021

Sneak peek: Grassy Grove bundle

 
My final Christmas project of the year is this set of simple cards, which blend Stampin’ Up!® products old and new. I have used the absolutely gorgeous Blackberry Beauty Designer Series Paper which is retiring soon... in fact in Europe I believe it has now sold out.

But I couldn’t pack it away without giving it one last outing so used it to make these Christmas cards, combined with the brand new Grassy Grove bundle which is coming in the new Mini Catalogue on 4th January.

This new Mini Catalogue has lots of products which are out of my comfort zone, so I have been having fun with some of those to challenge myself – but it also has many which are right up my street so I bought some of those as well, to satisfy my cravings for projects themed around wildlife and trees. 
 

For these cards I began my creating a background using Blackberry Beauty Designer Series Paper, as many designs have quite a festive feel. The design on the left in this image even features holly, albeit in Blackberry Bliss on Rich Razzleberry. 
 

I used a panel created with the Stitched So Sweetly Dies, which are among my most-used dies, especially since I lost my favourite die from the Stitched Rectangles set! Some are cut from Basic White and some from Very Vanilla – with this Designer Series Paper it really doesn’t matter which you use and I am trying to use more vanilla because it’s so soft and lovely... plus it doesn’t go on back order quite as often as Basic White!


I stamped the trees in Rich Razzleberry, the greeting in Blackberry Bliss and the deer in Cinnamon Cider. I used the Stamparatus for this as it meant I could get the trees and greeting in the correct position each time, and also that I could die-cut the deer in advance then just stamp straight onto them, maximising my use of cardstock and saving time. 
 

For the ground, I experimented with blender pens but didn’t like the look, so eventually settled on one of the cloud images from the stamp set that comes with the No Matter The Weather Kit. Many of these kits come with really useful little stamp sets which are well worth hanging on to once your kit is completed. I stamped this in Cinnamon Cider, stamping off onto scrap paper first. 
 
 
In fact, the greeting – along with the one inside – comes from the Christmas Whimsy Card Kit – this is a stamp set I have probably used more than any other this Christmas, as the greetings are so useful. 

Finally I tied a piece of Elegant Trim around the whole card to finish it off. 


This Designer Series Paper may have sold out but there are still some amazing products on the Last Chance List and Clearance Rack. If you are in the UK and would like to order, please visit my store and, if you use the current host code TFBG2JJB, I’ll send you a thank you gift in the following month.


Does your wish list come to more than £99? Please get in touch and I will help you get more for your money and unlock discounts all year round.  


Tuesday, 26 October 2021

Sweet Stockings Designer Series Paper projects

Sweet Stockings Stampin Up Christmas Cards UK demonstrator
 
Do you love cats and dogs as much as I do? If so you won’t want to miss the beautiful Sweet Stockings Suite from Stampin’ Up!®. For my October kit of the month I used the Sweet Stockings Designer Series Paper and put together a selection of coordinating products. These are a really economical way to get your hands on everything you need to make fully coordinated projects and are idea if you find you don’t always manage to get through full packs.

Everyone who buys the kit from me gets access to an exclusive PDF of project ideas, with measurements, for them to copy or take inspiration from. I love that some of my customers then get together on Zoom to make the projects while they chat. 
 
Sweet Stockings Stampin Up Christmas Card UK demonstrator

These are some of the projects I shared with them this month. This is a Kraft Gift Box decorated with a fun tag made using the Seasonal Labels Dies and beautiful Pool Party striped ribbon. 

Sweet Stockings Stampin Up Christmas Card UK demonstrator
 
Isn’t that dog cute? And there are plenty more where that came from. To stamp the greeting, I used the little set that comes with the Christmas Whimsy Card Kit. It’s so useful.
 
Sweet Stockings Stampin Up Christmas Card UK demonstrator
 
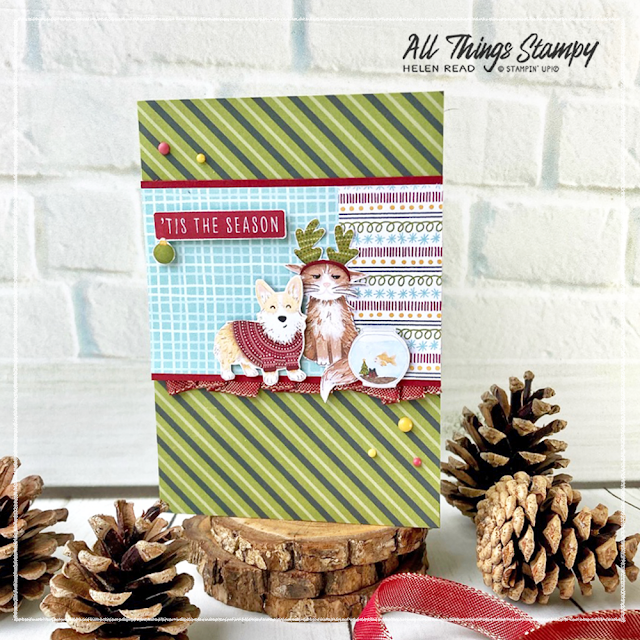
Here are some more of the cut animals cut out from the Sweet Stockings Designer Series Paper. I love how grumpy the cat looks with his seasonal antlers on. All the greetings for the rest of the projects came from the Christmas to Remember stamp set – I particularly love this ’Tis the Season stamp as it gives you white on a colour without the hassle of embossing.
 
Sweet Stockings Stampin Up Christmas Card UK demonstrator
 
Behind the bottom edge of the Designer Series Paper layer, I have pleated the ribbon, which is one of my favourite ribbon techniques. Simply lay a strip of double-sided tape along the edge of the paper or cardstock then pleat the ribbon onto it, and lay a second strip of tape on top to hold it in place.
 

 When using double-sided table, always stick to the firmer surface first. So if you are using paper and cardstock, stick it to the cardstock. If using ribbon, stick to the paper or cardstock, then add the ribbon on top. Otherwise you’ll be there all day trying to peel off the backing.
 
 
Sweet Stockings Stampin Up Christmas Card UK demonstrator

This card uses the lovely Kraft cardstock which is something I have longed to see back in the catalogue for many years. It makes a beautiful warm neutral backdrop for this festive dog with his wreath collar. 
 
Sweet Stockings Stampin Up Christmas Card UK demonstrator

November’s Kit By Mail uses the brand new Eden’s Garden products – I am only taking orders for this kit until midnight on 31st October so I can order first thing on 1st November when these products go live to customers. This is because the Designer Series Paper, speciality cotton paper and Garden Gems are all only available while supplies last, and I would hate for anyone to miss out. 
 
Eden's Garden kit stampin up uk demonstrator
 
 
Please click here to order your kit today – I can post them out to anywhere in the UK.

Does your wish list come to more than £99? Please get in touch and I will help you get more for your money and unlock discounts all year round.  
 

Tuesday, 12 October 2021

Pretty cards with Whimsy & Wonder Designer Series Paper

Stampin' Up Whimsy & Wonder card ideas

We are well into October so no apology needed for Christmas cards now. I have been creating with Stampin’ Up!'s Whimsy & Wonder Designer Series Paper for my monthly Crafty Friday class.

As these events are still partially on Zoom (I offer limited in-person places with the rest working remotely), we are sticking with the challenges of cutting out images from Designer Series Paper. Fortunately this Whimsy & Wonder Designer Series Paper has some perfect designs for doing this, so I was able to offer the ladies a choice of two cards to make with their kit. 

Stampin' Up Whimsy & Wonder card ideas

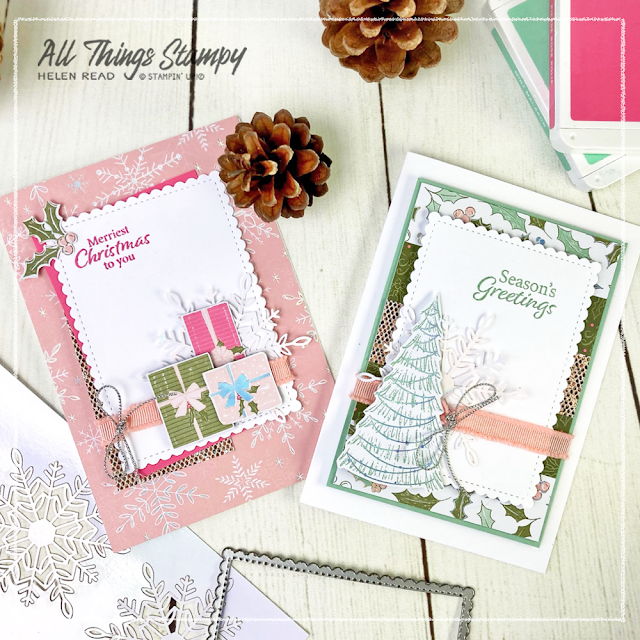
Version one really taps into the pink theme of the Whimsy & Wonder Suite, with a snowflake background covering the entire front of the card. The main focal point is a stack of presents, all cut out of the Whimsy & Wonder Designer Series Paper and overlaid onto one of the Wonderful Snowflakes. 

 
Stampin' Up Whimsy & Wonder card ideas

These snowflake elements are excellent, especially if you don’t have a die-cutting machine or simply want to save time when making your Christmas cards. The beautiful iridescent snowflakes come pre-cut, ready to be popped out of their backing paper. I attached them to the project using a single Glue Dot in the centre.

I’ve mounted the presents onto a panel cut with the Stitched So Sweetly Dies, which has a hint of Polished Pink peeping out behind it, as well as a hint of Be Dazzling Speciality Paper which I had left over from Sale-a-Bration.

Stampin' Up Whimsy & Wonder card ideas

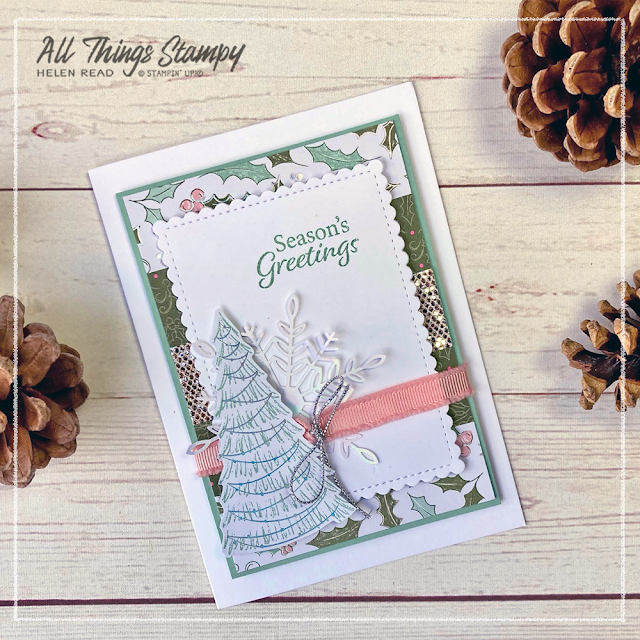
For the alternative version, I used some strips of Whimsy & Wonder Designer Series Paper to create a panel mounted onto some Mint Macaron cardstock. Then the basic design is roughly the same, with a Christmas tree instead of a stack of presents. 

Stampin' Up Whimsy & Wonder card ideas
 
Stampin' Up Whimsy & Wonder card ideas
 

As I seem to have found myself short of greetings, both of these come from the new Christmas Whimsy Card Kit, which is excellent value, a great introduction to cardmaking and also ideal for seasoned crafters who want a relaxed and productive session. What these kits are also excellent for is building up your greeting stamps collection – these are both really useful sentiments which appeal to our understated British tastes and a nice neat size, too.

Stampin' Up Whimsy & Wonder card ideas

Stampin' Up colour color combination Polished Pink Mint Macaron Blushing Bride Mossy Meadow

If you are in the UK and would like to order any of these products, please visit my store and, if you use the October host code ZKTV7U4Z, I’ll send you a thank you gift next month. To make it easy, please shop using this link


Does your wish list come to more than £99? Please get in touch and I will help you get more for your money and unlock discounts all year round.  


Tuesday, 28 September 2021

Scrappy strip technique - and mosaic technique

Stampin Up scrappystriptechnique scrappy strips
 

Have you heard of the Scrappy Strips technique developed by Aussie Stampin’ Up!® demonstrators Kylie and Bruno Bertucci? It’s brilliant for using up little scraps of cardstock and DSP and you can mix and match to your heart’s content.

It’s a simple 4-step technique:

1. Cut a panel to fit your card (I make my 5mm smaller than my card front, so if you’re using A4 cardstock that’s 10cm x 14.3cm)
2. Prepare four pieces of cardstock or Designer Series Paper – I cut these to 10.5cm x 14.8cm, so a quarter sheet of A4.
3. Cut these into 2cm wide (or 1") strips (along the length or width, it doesn’t matter), then cut each strip on the diagonal, roughly, without measuring.
4. Assemble these strips onto your panel and trim off the excess.

That’s it. You now have a fun panel to add to your card front and finish off with a greeting label. 

Stampin Up scrappystriptechnique scrappy strips
 

Oh and best of all, if you start off with four different colours/designs on the equivalent of four card fronts, you should have enough strips to create four cards as I did here. 


Stampin Up scrappystriptechnique scrappy strips


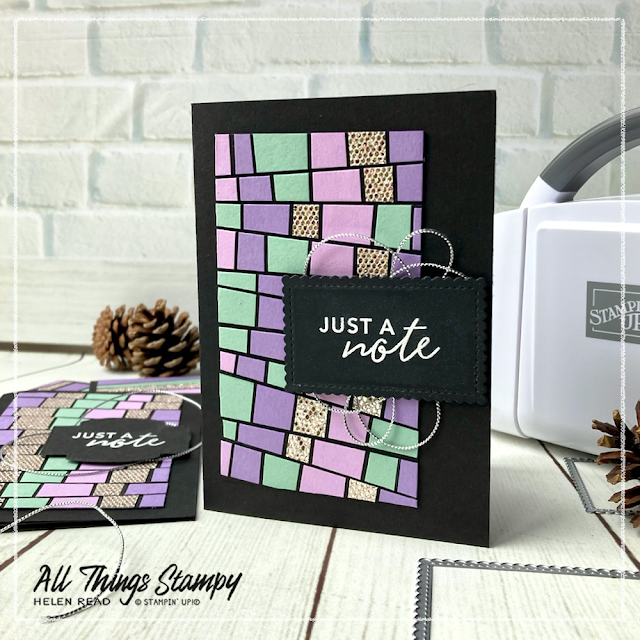
I used a subtle colour combination of Highland Heather, Mint Macaron and Fresh Freesia against striking Basic Black, because I don’t do well with pale colours normally.
I like the idea of including a metallic finish in the design, although this lovely Be Dazzling Speciality Paper from the Sale-a-Bration collection is quite thick, so make sure you stick it down firmly and be careful when you cut it up. 

Remember, Sale-a-Bration ends on Thursday so if you want Be Dazzling paper or any of the free items, or want to join my team and get yourself a free bundle, please act VERY fast. Don’t leave it until Thursday evening as the SU office will be closed so no tech help will be available. 


Stampin Up colour combination Fresh Freesia Highland Heather Mint Macaron

I have used this technique a few times without thinking much about its origin but last week I saw a card which took it to the next level and discovered that it had been developed by a demonstrator called Linda Driggs and again showcased by Kylie Bertucci.

Stampin Up scrappystriptechnique scrappy strips

This turns your scrappy strips into a wonderful mosaic pattern. What you do is complete steps 1-4 as above, then cut your finished panel up again into further strips. I learned after making my version that simple strips would suffice, but I went off-piste and cut my strips on the diagonal again. This results in a slightly eye-boggling finished card but I still quite like it. 

Stampin Up scrappystriptechnique scrappy strips

I mounted my panels onto black cardstock as I think that makes them extra striking, and finished off with an embossed greeting in white on black. However, I’m afraid I’ve broken my own rule here and used a retired greeting; Just a Note comes from the retired Simply Citrus Card Kit, but it’s such a useful sentiment and size of stamp that I hung onto it. I didn’t realise my error until I was taking photos of the projects. Oops.

Have you tried the scrappy strip technique? Why not give it a go this week? Honestly, if you get hooked on this technique you will never throw any scraps of cardstock of DSP away again. 

Stampin Up scrappystriptechnique scrappy strips

 If you are in the UK and would like to order, please To order these or any other current Stampin’ Up!® products from my store, please shop using this link

Does your wish list come to more than £99? Please get in touch and I will help you get more for your money and unlock discounts all year round.  


The small print

This is my personal blog and my sole responsibility as an Independent Stampin' Up!® demonstrator. All images are © Stampin' Up!® All content including photographs, projects and text are © Helen Read, unless otherwise stated. Please feel free to copy my ideas for your personal use and inspiration - if you are a SU demonstrator you may use these ideas for your events but please give credit where it is due. Please do not use my ideas for monetary gain, competitions or publication. The images on this blog - including blog buttons - should not be copied and used elsewhere on the internet or on CDs.