Showing posts with label Stampin Up card ideas. Show all posts

Tuesday, 26 October 2021

Sweet Stockings Designer Series Paper projects

Sweet Stockings Stampin Up Christmas Cards UK demonstrator
 
Do you love cats and dogs as much as I do? If so you won’t want to miss the beautiful Sweet Stockings Suite from Stampin’ Up!®. For my October kit of the month I used the Sweet Stockings Designer Series Paper and put together a selection of coordinating products. These are a really economical way to get your hands on everything you need to make fully coordinated projects and are idea if you find you don’t always manage to get through full packs.

Everyone who buys the kit from me gets access to an exclusive PDF of project ideas, with measurements, for them to copy or take inspiration from. I love that some of my customers then get together on Zoom to make the projects while they chat. 
 
Sweet Stockings Stampin Up Christmas Card UK demonstrator

These are some of the projects I shared with them this month. This is a Kraft Gift Box decorated with a fun tag made using the Seasonal Labels Dies and beautiful Pool Party striped ribbon. 

Sweet Stockings Stampin Up Christmas Card UK demonstrator
 
Isn’t that dog cute? And there are plenty more where that came from. To stamp the greeting, I used the little set that comes with the Christmas Whimsy Card Kit. It’s so useful.
 
Sweet Stockings Stampin Up Christmas Card UK demonstrator
 
Here are some more of the cut animals cut out from the Sweet Stockings Designer Series Paper. I love how grumpy the cat looks with his seasonal antlers on. All the greetings for the rest of the projects came from the Christmas to Remember stamp set – I particularly love this ’Tis the Season stamp as it gives you white on a colour without the hassle of embossing.
 
Sweet Stockings Stampin Up Christmas Card UK demonstrator
 
Behind the bottom edge of the Designer Series Paper layer, I have pleated the ribbon, which is one of my favourite ribbon techniques. Simply lay a strip of double-sided tape along the edge of the paper or cardstock then pleat the ribbon onto it, and lay a second strip of tape on top to hold it in place.
 

 When using double-sided table, always stick to the firmer surface first. So if you are using paper and cardstock, stick it to the cardstock. If using ribbon, stick to the paper or cardstock, then add the ribbon on top. Otherwise you’ll be there all day trying to peel off the backing.
 
 
Sweet Stockings Stampin Up Christmas Card UK demonstrator

This card uses the lovely Kraft cardstock which is something I have longed to see back in the catalogue for many years. It makes a beautiful warm neutral backdrop for this festive dog with his wreath collar. 
 
Sweet Stockings Stampin Up Christmas Card UK demonstrator

November’s Kit By Mail uses the brand new Eden’s Garden products – I am only taking orders for this kit until midnight on 31st October so I can order first thing on 1st November when these products go live to customers. This is because the Designer Series Paper, speciality cotton paper and Garden Gems are all only available while supplies last, and I would hate for anyone to miss out. 
 
Eden's Garden kit stampin up uk demonstrator
 
 
Please click here to order your kit today – I can post them out to anywhere in the UK.

Does your wish list come to more than £99? Please get in touch and I will help you get more for your money and unlock discounts all year round.  
 

Tuesday, 7 September 2021

Whale Done 21st birthday card with blending brushes

Whale Done Stampin Up card ideas Demonstrator Derbyshire

It’s back to the Stampin' Up!® Annual Catalogue for today’s projects as I needed another 21st birthday card... this time for my “baby” boy. He seems to be creating some sort of Sealife centre in his room at the moment, with the arrival of a tropical fish tank plus a separate tank for Wallace the turtle. Wallace belongs to him and his girlfriend, but she can't take him/her (we’re not sure yet) with her to uni.

Whale Done Stampin Up card ideas Demonstrator Derbyshire 

It’s hard to create cards for 21-year-old males but the Whale Done stamp set was perfect for the occasion. I suspect it’s the wrong sort of turtle but it’s close enough, I’m sure.

Whale Done Stampin Up card ideas Demonstrator Derbyshire

I began by using my Blending Brushes to create a background of Pacific Point and Coastal Cabana. On top of this I stamped some Night of Navy fish, a few Whisper White bubbles and some Evening Evergreen weeds. This part of the card was heavily inspired by this card by US demonstrator Michelle Zindorf but then I went my own way.

Whale Done Stampin Up card ideas Demonstrator Derbyshire

I cut out the layer using the Stitched So Sweetly Dies, then realised I had enough of this background left to create a second panel for another card, so I cut this out with one of the smaller dies.

Whale Done Stampin Up card ideas Demonstrator Derbyshire
 

Wallace the turtle is stamped in Evening Evergreen but I tackled this in reverse by “colouring” the image in advance. I stamped some speckles in Bumblebee repeatedly onto some white cardstock, then stamped the Evening Evergreen turtle on top. This is as close as I can get to real-life Wallace. I fussy cut the image and popped it up on Stampin’ Dimensionals. 

Whale Done Stampin Up card ideas Demonstrator Derbyshire
 

For the greeting, I inked the stamp first in Coastal Cabana, then added Pacific Point to the bottom section, blurring the hard edge slightly with a Sponge Dauber.

I stuck some Coastal Cabana cardstock to a Foam Adhesive Sheet and cut out the 21 using Playful Alphabet Dies. I KNEW there was a figure 1 in there but couldn’t find it for Robin’s card last week!

The front of the card has a panel embossed with the Seashells 3D embossing folder which is really designed to be used portrait I think but looks fine here as the image panel covers most of it.

Whale Done Stampin Up card ideas Demonstrator Derbyshire

Confession: I hated this card and thought it was really unbalanced until I added the finishing touch of some linen thread. It’s funny how something so simple can make all the difference, isn’t it?
 
Whale Done Stampin Up card ideas Demonstrator Derbyshire

For the second card – which I don’t immediately need but thought I may as well make while I had the supplies out – I used the whale stamp and Whale Builder Punch as my focal point on top of the mini sponged panel that was left over from the birthday card. 
 
Whale Done Stampin Up card ideas Demonstrator Derbyshire
 
Aside from the sponging, it’s a very simple card, with a swirl of linen thread behind the panel and a greeting stamped directly onto the Basic White Notecard.

It was fun to dig out a stamp set that hadn’t seen ink for many months and reminded me of how much I love the Whale Done stamps and punch. 

Whale Done Stampin Up card ideas Demonstrator Derbyshire


Do you have a sealife-loving person in your life? To order these or any other current Stampin’ Up!® products from my store, please shop using this link

Does your wish list come to more than £99? Please get in touch and I will help you get more for your money and unlock discounts all year round.  


Tuesday, 10 August 2021

More ideas for the Nature’s Harvest bundle


Friday was supposed to be my first in-person Stampin' Up!® party since the start of the pandemic. Everyone was very excited to get together in a safe outdoor setting and actually enjoy some face-to-face chatting and crafting.

You know what’s coming, don’t you? Yep, COVID struck and the host had to isolate. Undeterred, we switched to a Zoom meeting and I did my best to make it fun for everyone who attended.


This project was supposed to be the Make & Take for the evening but of course that didn’t happen. Instead I will send all the ladies a kit to make a modified version with die-cut flowers and grasses instead of stamping with the Nature’s Harvest stamp set as I have done here.
 
 
I’d made two versions ahead of the event, showing how different the flowers could look when stamped onto white cardstock or Crumb Cake. I love the look of stamping onto Crumb Cake, especially with a flower of his type as it means you can colour the petals using the Chalk Marker.


For this version, I stamped in Memento Tuxedo Black and coloured using Stampin’ Blends in Calypso Coral, Mint Macaron and Mango Melody. I’ve added some stamping in Soft Succulent in the corner, too. 


On the night, I demonstrated this version, using the fun polling tool in Zoom to allow the guests to vote on how I made it. They chose this Bumblebee side of the Harvest Meadow Designer Series Paper, then chose a Soft Succulent layer over Calypso Coral and also chose for me to stamp onto Crumb Cake instead of white. 


When using delicate dies such as the grasses from the Harvest Dies shown here, it is a lot easier to stick them down if you use Adhesive Sheets. To use these, you will want to stick a rectangle of cardstock to the sheet before die-cutting. If you try to stick the pre-cut shape to the sheet, you'll just end up with a sticky mozzarella-style mess.  
 

If you love the Nature’s Harvest bundle of stamps and dies as much as I do, you’ll be delighted to know that if you purchase them together you will save 10% on the individual prices. If you're in the UK and buy them during August or September, you will also qualify for a free Sale-a-Bration gift.


Want it all? If you have a BIG wish list, please get in touch and I will help you get even more for your money.  


Tuesday, 27 July 2021

Sneak Peek: Blackberry Beauty Suite

Stampin Up sneak peek Blackberry Beauty

Oh my! The new Blackberry Beauty Suite in the latest Stampin’ Up!® Mini Catalogue is going to Blow. Your. Mind. It’s SO rich and gorgeous, with some lovely shiny autumnal elements, too.

I love the combination of Rich Razzleberry, Blackberry Bliss and Cinnamon Cider – that’s a combination I would never have come up with but it works so well. And, I have to admit it, I quite like Polished Pink in this context too – it provides a splash of brightness that really lifts the projects. 

Customers cannot order these products until 3rd August but I will be using this Suite for my August Kit of the Month, which I just know is going to be hugely popular. I had a lovely day playing with the elements of this kit, which I have hand selected for perfect coordination. 

Take a look at some of the projects I made using. My kits don’t include any stamp sets (although there is the option to add them) so I added my own greeting stamps from my existing stash. All the main images you see are from the Blackberry Beauty Ephemera Pack, which features 40 pre-cut elements to make crafting really easy. 

 
Stampin Up sneak peek Blackberry Beauty

This gorgeous owl is my favourite piece from the Ephemera Pack and I took inspiration for this card from the sample you can find on page 44 of the new Stampin’ Up!® Mini Catalogue. 
 
 Stampin Up sneak peek Blackberry Beauty
 
The Stampin’ Up!® artist has made a simple tag, so I’ve recreated this tag (more or less) and turned it into a card instead. This gave me chance to show off more of the lovely Designer Series Paper. 
 
Stampin Up sneak peek Blackberry Beauty
 
I’ve used Polished Pink Open Weave Ribbon, as this will be part of my kit of the month, and it picks up the colour from the Designer Series Paper nicely, too. My Best Wishes stamp is from the Artistically Inked stamp set.

Stampin Up sneak peek Blackberry Beauty

I took inspiration from the July-December Mini Catalogue for this card, too, creating a card based on the “I’m here for you” card on page 44, using a thank you stamp from Timeless Tropical instead. I can never have enough thank you cards. I’ve always been a sucker for a seed head image, so this sheet of Designer Series Paper is a favourite of mine from the pack. 
 
Stampin Up sneak peek Blackberry Beauty

Here you can see the lovely new Gold Shimmer Ribbon clearly; in the kit pic below I used the wrong one! This one, from the new Stampin’ Up!® Jul-Dec Mini Catalogue, is even more shimmery and ideal for both autumnal and festive projects.
 
Stampin Up sneak peek Blackberry Beauty

My third card is a celebration of Cinnamon Cider, using one of the Ephemera Pack frames, popped up over a piece of white cardstock stamped using the Timeless Tropical stamp set. It shows just how well the rich purples of Rich Razzleberry and Blackberry Bliss go with Cinnamon Cider.

Stampin Up sneak peek Blackberry Beauty

You can also see a hint of Gold Shimmer Vellum; another new product which is part of this spectacular suite. The flower image is another pre-cut piece from the Ephemera Pack; you get loads in this pack – two of everything which makes it easy for me to split them for the kits. 

Stampin Up sneak peek Blackberry Beauty
 
My final project for today uses the stunning oak and acorns piece from the Ephemera Pack as its main image. I’ve popped this onto a shiny frame, with a piece of coordinating Blackberry Beauty Designer Series Paper inside. Happy Birthday is stamped using the Artistically Inked stamp set, in Cinnamon Cider. 
 
Stampin Up sneak peek Blackberry Beauty

When I first opened this gorgeous pack of patterned paper, I thought I’d never use the “boring backs” with the less glamorous designs, but this zig-zag pattern provides the perfect semi-neutral background for the more vibrant design and oak leaf. Even with the Blackberry Bliss in there and the glitzy bow, I think this card could fall into the masculine category. I would send it to a man, anyway! 
 
Here’s the contents of the kit spread out so you can see what you get (more or less; remember I used the wrong ribbon for the pic!).

Stampin Up sneak peek Blackberry Beauty

Everyone who orders this kit from me will also receive a PDF of projects with measurements, so they can make their own at home, or simply use them as inspiration. The kit costs just £20 delivered to anywhere in the UK. There’s no limit to the number of kits I can make but I am only taking orders for this kit until Tuesday 3rd August when the new Mini catalogue goes live. Please don’t miss it as I know you’ll love it.

 If you are in the UK and would like to order this gorgeous kit, please click/tap here

Does your wish list come to more than £99? Please get in touch and I will help you get more for your money and unlock discounts all year round.  


Tuesday, 20 July 2021

In The Wild Suite - three very different looks

Stampin Up In The Wild Suite card ideas
 

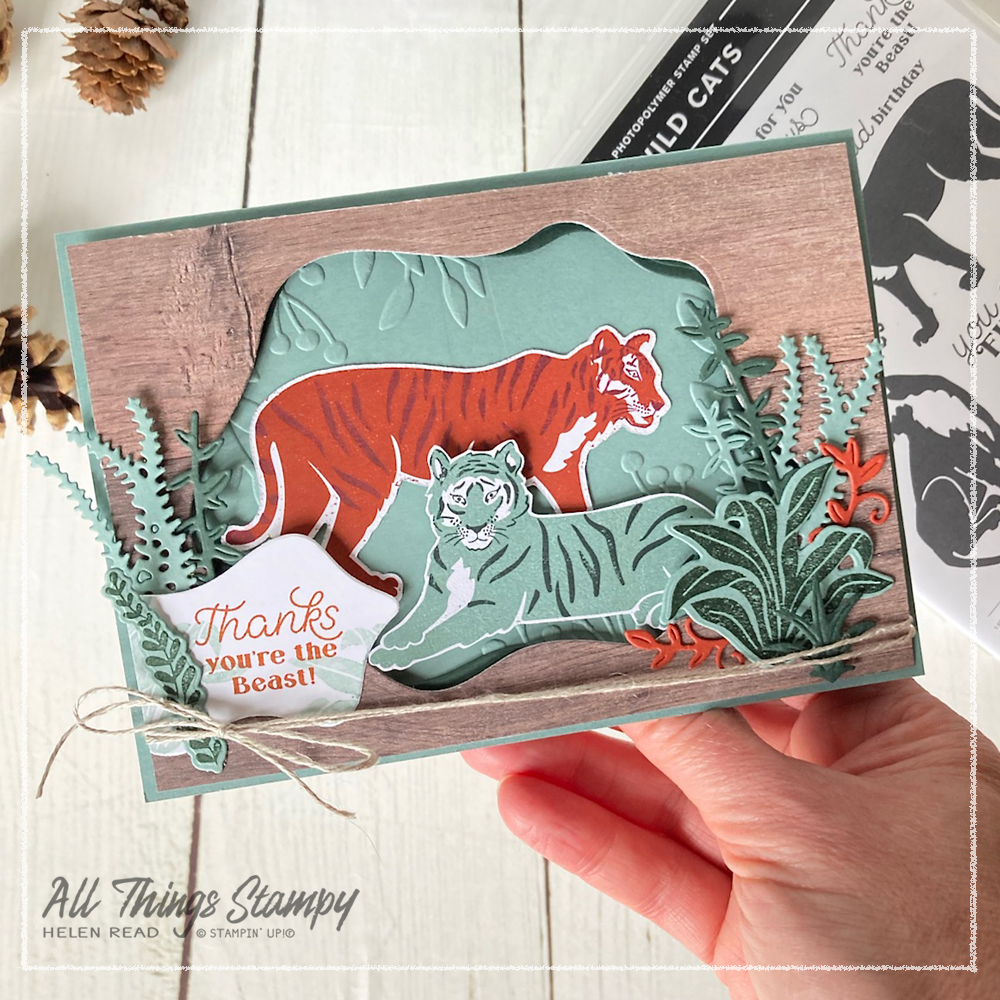
I have some more wild projects for you today, featuring one of my favourite suites in the Stampin’ Up!® Annual Catalogue, In The Wild. I had a lovely afternoon playing with this Suite, using stamped images and those cut out from the Designer Series Paper. The result was three very different projects.

The first one is one for the avid crafters, with lots of products to create a time-heavy card. Fun to make and, I hope, fun to receive.

I cut the cats out from the In The Wild Designer Series Paper – the sitting tiger was done by hand, but there’s a die for the standing cat. But wait... the die is the wrong way round!


Stampin Up stamping craft tip
 
If your die fits but the image is reversed, simply hold up the paper to a window or other light source and tape the die in place using washi or masking tape.

 
Stampin Up In The Wild Suite card ideas

The tigers are set against a Soft Succulent background which I have embossed using one of the Greenery Embossing Folders. I ran the cardstock through twice to get the foliage in different areas – if you look closely you’ll see a faint line from the edge of the embossing folder. But I work on the theory that if anyone looks that closely at a handmade card, they don’t deserve a card!

Stampin Up In The Wild Suite card ideas

The tigers are framed by the very wonderful Diorama Dies. These are brilliant and, while they instantly conjure up seascapes, they provide an unusual frame for all kinds of images. There’s just a hint of Evening Evergreen showing to give it depth, then the top layer was created using the In Good Taste Designer Series Paper, a favourite of mine as it has lots of really useful neutral designs. Psst, it’s also 15% until 2nd August!

I’ve even used the smallest Diorama Die to create an unusual layer for the sentiment – you don’t just have to use the outer piece, the inners are useful, too. 
 
Stampin Up In The Wild Suite card ideas

My second card is much simpler and showcases one of my favourite sheets of In The Wild Designer Series Paper (also 15% off until 2nd August!). I’ve used the Stitched Rectangle Dies to create a frame, although if you don’t have anything similar you could cut a Very Vanilla layer and lay it on top of the Designer Series Paper instead. 
 
Stampin Up In The Wild Suite card ideas

The tiger is stamped in Crushed Curry and Cinnamon Cider; it’s very easy to line up. Then the foliage is stamped and/or die-cut from Soft Succulent and Evening Evergreen, two of my favourite new In Colors. 
 
Stampin Up In The Wild Suite card ideas
 
Finally I wanted to try something very different and wondered if I could create a snow leopard using this amazing Wild Cats stamp set. For the body of the cat, I used Smoky Slate, but soon discovered that I would have to stamp off (onto scrap paper first) not once but twice to get the pale image I was looking for. On top of that I stamped in Gray Granite. 
 
Stampin Up In The Wild Suite card ideas

I used the lovely Tasteful Label dies for my greeting, which I stamped using Biggest Wish.

The strips are created using the Animal Print embossing folder; I just ran it through once and sliced it into three. Alternatively, you could cut your strips then run them all through at the same time, as they fit in the embossing folder. 
 
I hope you love the In The Wild Suite as much as I do and, even if you don’t, I hope these projects have warmed you to it a little. Which one is your favourite? I had lots of fun creating them and hope to have time to play with again sometime soon... although my new pre-order products beckon!

Stampin Up In The Wild Suite card ideas

If you are in the UK and would like to order, please visit my store.


Does your wish list come to more than £99? Please get in touch and I will help you get more for your money and unlock discounts all year round.  


The small print

This is my personal blog and my sole responsibility as an independent creator and craft coach. All content including photographs, projects and text are © Helen Read, unless otherwise stated. Please feel free to copy my ideas for your personal use and inspiration. Please do not use my ideas for monetary gain, competitions or publication. The images on this blog - including blog buttons - should not be copied and used elsewhere on the internet or on electronic files for sale or otherwise.