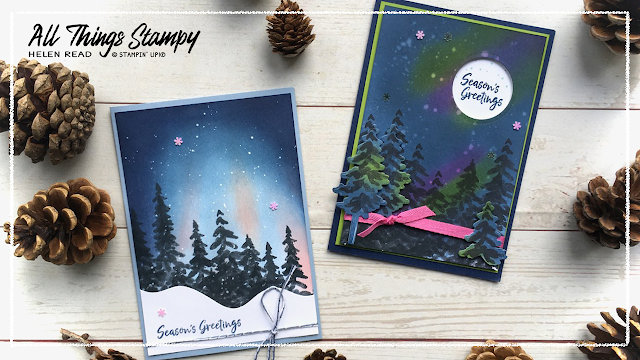
I do love a sponging technique. And these cards take sponging to the max, with one of my favourites: the Northern Lights technique.
I’ve never been lucky enough to see the Northern Lights (although to be honest that’s no surprise as I’ve never gone out of my way to find them) but I really do enjoy creating the effect on a card.
And all you need are a few ink pads and some sponges.
I demoed this card and the In The Pines Bundle at a Stampin’ Up!® party recently (online, via Zoom, of course). It’s a lovely atmospheric effect which uses Blushing Bride, Seaside Spray, Misty Moonlight and Night of Navy ink pads.
The key with sponging, as I keep telling my customers, is to keep going. So many people give up too soon and are dissatisfied with the results. It will look horrible partway through, so plough on until you reach full colour saturation.
For this card, I dragged some Blushing Bride ink up from the bottom of the image, not worrying too much about blotches at the bottom as I knew I would be covering them with the trees. Then I blended in some Seaside Spray around them and across the whole of the centre of the card.
Working from the edges, I added some Misty Moonlight in an arc. Then finally, working from the top two corners, I added some depth with Night of Navy.
The trees are from the In The Pines stamp set but you may notice
they are tall and thin. This is really easy to recreate. I just used the
“background” stamps, not the detailed images, and stamped in Memento Tuxedo Black. I stamped the big trees then took the small slim tree and
stamped on top to extend the trunk. Very simple and very effective.
To add the stars in the sky, I simply took some Craft Whisper White ink, diluted with water (1:1 ratio) and splattered this over the card using a fine paintbrush. I keep this diluted ink in an old embellishment pot so I can use it over and over again. A very little goes a LONG way!
The second card is a fine example of what you can make with those
practice sheets, the bits that go “wrong” and a lesson in adaptability.
I had some earlier Northern Lights sheets which I hadn’t loved. In fact, I’d sponged the top, not loved it, turned it round and sponged the other end until I had a full sheet. Neither was quite what I was after so I played around and stamped black trees on top. Another practice sheet was used for more trees, which I die-cut using the Pine Woods Dies and popped up. Finally I felt I was getting somewhere, but REALLY wished I’d masked off a white moon.
No problem! I simply die-cut a circle to represent the moon, and stamped my greeting inside. I did this by inking the one word of the greeting stamp at a time, using a Night of Navy Stampin’ Write Marker and cleaning thoroughly in between.
It’s finished off with a slightly different splattering technique; this time I just used plain water, which soaks up some ink and leaves a more subtle snowy look in the sky. Finally, some Magenta Madness ribbon picks up the pink in the sky.
Do you have trouble fitting your dies back into the pack? I nearly
always do so was inspired to create a printed backing sheet, just like
the one which comes with the Playful Alphabet dies. All I did was leave
the dies in place and draw round them with a Journalling Pen. Now I not
only don’t have to fiddle around to fit all the dies in, but I can see
at a glance if one is missing.


Beautiful cards!!
ReplyDelete