Showing posts with label Cinnamon Cider. Show all posts

Tuesday, 25 May 2021

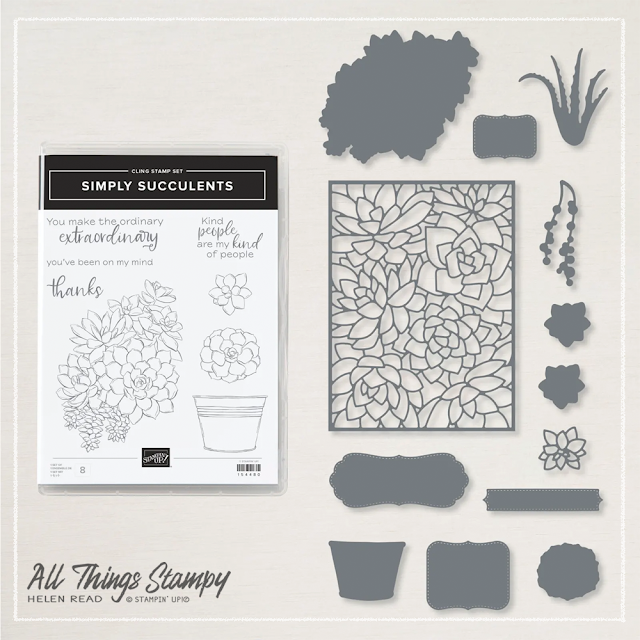
Five projects with the Simply Succulents bundle

Simply Succulents card ideas Stampin Up
 
I’m a day late with this blog post but you know what? I think I am going to switch to Tuesdays as it will give me my weekends back. It’s obvious when you think about it really.

Anyway, I’ve had a really busy weekend with my BOGOF sale for customers and an actual outing to meet friends for a socially distanced dog walk and picnic, which was lovely. This is why I’m a day behind, but now I am here, I want to show you this gorgeous Simply Succulents bundle, which is very enticing – I keep seeing more and more gorgeous projects with them.

They are in the Jan-June Mini Catalogue from Stampin' Up!® but I'm pleased to say that both elements carry over into the new Annual Catalogue. 
 
Simply Succulents bundle Stampin Up
 
However, I must warn you that they are only available as a bundle for the duration of the Mini catalogue so hurry along if you want to save 10% by buying them together. 
 
Simply Succulents card ideas Stampin Up
 
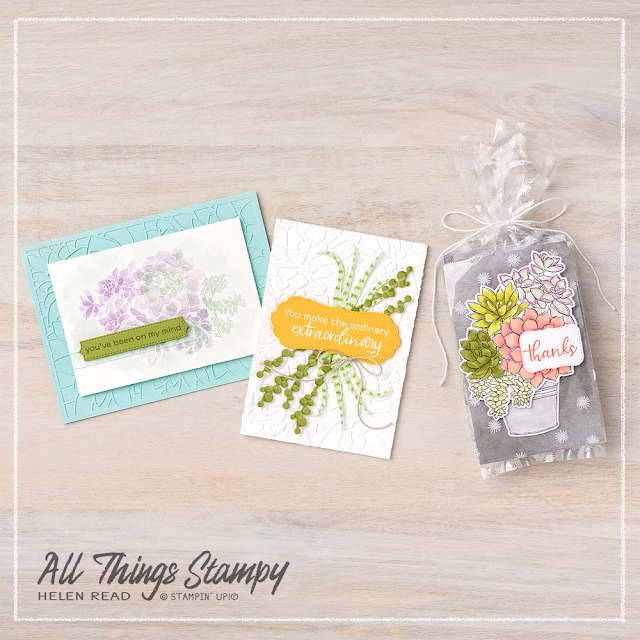
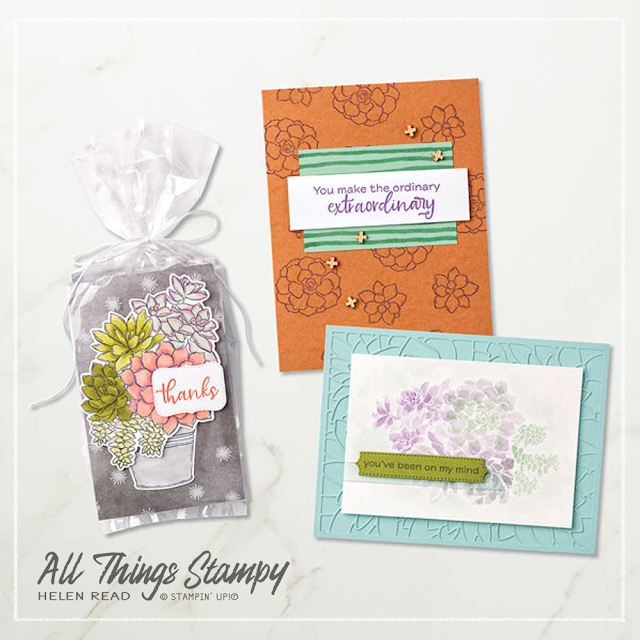
This card uses a fun technique which gets extra mileage out of your dies. Die-cut the large pattern using any cardstock, then use it as a mask for embossing paste. Remove the mask and allow the paste to dry to create this interesting textured effect. 

The foliage behind the greeting label is created with dies, too – they are coloured with watercolour pencils to make them stand out. The greeting is stamped and embossed in white onto Bumblebee cardstock (one of my favourite colours!).

Simply Succulents card ideas Stampin Up
 
This project, too, uses white embossing for this stunning watercolour effect. Begin by embossing the image with white embossing powder, then heat set. Now it can be coloured using ink and Water Painters (or a wet paintbrush); just make sure you allow each colour to dry before switching to the next one. This is coloured using Old Olive, Mint Macaron, Highland Heather and Pool Party. 
 
Simply Succulents card ideas Stampin Up
 
This treat bag is decorated with a cut-out image of succulents and tied with Baker’s Twine. The image is stamped in Memento Black and coloured with Stampin’ Blends in Calypso Coral, Soft Sea Foam, Daffodil Delight, Old Olive and Smoky Slate. 

 
Simply Succulents card ideas Stampin Up
 
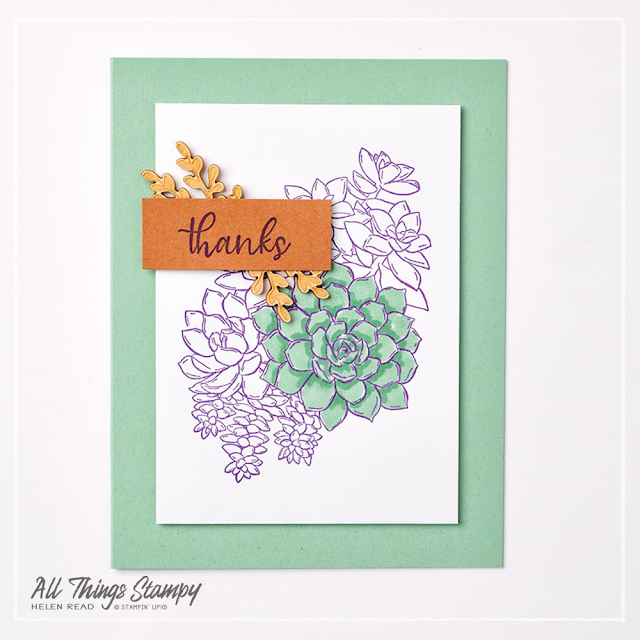
This is a much simpler project, but no less effective. It uses a rich Cinnamon Cider card base stamped on top using Gorgeous Grape ink, which sounds radical but works really well. 
 
See that cool striped Designer Series Paper behind the greeting? That’s just a piece of Mint Macaron cardstock with some hand-drawn lines using a Dark Just Jade Stampin’ Blends Marker. Be brave and you too can make hand-drawn patterned paper for your projects!
 

Simply Succulents card ideas Stampin Up

Sticking with the same colour scheme, this is a Mint Macaron card base with the image stamped in Gorgeous Grape and coloured with Light and Dark Just Jade Stampin’ Blends. You can use Stampin’ Blends with any water-based ink pad, so they are ideal for colouring images stamped in any of our core colours.

Simply Succulents card ideas Stampin Up


Does your wish list come to more than £99? 
 
There’s a fabulous deal at the moment which gets you LOTS of lovely craft supplies of your choice. Please get in touch and I will help you get more for your money and unlock discounts all year round.  


Monday, 31 August 2020

Masculine cards with World of Good Designer Series Paper

World of Good masculine stampin up helen read allthingsstampy

I’ve had the World of Good Designer Series Paper since pre-order back in May and *gasp* had never used it! Enough was enough, so I finally cracked it open.

The only issue is... I didn’t buy the Beautiful World stamp set to go with it, so would I be able to create anything without the benefit of Stampin’ Up!®’s amazing coordination? Of course I could! And it’s PERFECT for masculine cards – something I know many people struggle with.

World of Good masculine stampin up helen read allthingsstampy

For starters, that old favourite from last year, Sailing Home, goes perfectly. Here are two cards which tap into the nautical theme in traditional blues. 

World of Good masculine stampin up helen read allthingsstampy

World of Good masculine stampin up helen read allthingsstampy

I love how Sailing Home and the Smooth Sailing Dies are given a refresh with our new colour, Misty Moonlight. Die-cutting from Brass Foil sheets picks up the foiled accents from the DSP. 

allthingsstampy helen read card sketch stampin up

They are product-heavy projects but if you have it, use it! I was also following this sketch – which is based on the card on page 87 of the current Annual Catalogue – for these projects, after setting my customers a challenge to do the same. 

World of Good masculine stampin up helen read allthingsstampy

And of course, Designer Series Paper on its own can help you make fabulous cards, too. Mixing things up a little, I made two more cards using the browns from the pack. This is where Cinnamon Cider cardstock and ribbon comes into play. The 21st birthday card is a total CASE from Ellen Woodbridge’s fabulous 50th birthday card.

I used the Playful Alphabet dies (an absolute must-have, in my opinion) and the equally essential Foam Adhesive Sheets. The greeting from Whale Done is just the job for a 21st birthday card, and the map design reflects the recipient’s love of travel. 

World of Good masculine stampin up helen read allthingsstampy


The final card showcases one of my favourite greeting stamps of all time, from Happiest of Birthdays. I sliced off half of the front of the card, then decorated the front panel and the inside with contrasting designs of World of Good Designer Series Paper. It’s finished off with Gilded Gems.

World of Good masculine stampin up helen read allthingsstampy

To get the shadow effect you see on the Happiest of Birthdays card, use the Stamparatus. Position your cardstock in the corner, then move it a hair’s breadth down and towards the centre (left or right, depending on how you use your Stamparatus). Hold it down with a magnet and stamp in your dark colour.

Then move the cardstock into the corner and repeat. You can do this with the same colour without reinking, to get a paler shade, or clean off the stamp and use a different shade, as I’ve done here. I used Early Espresso and Cinnamon Cider

World of Good masculine stampin up helen read allthingsstampy


Thursday, 13 August 2020

Artist Appreciation Blog Hop: Warhol-inspired Yuletide Pasture card


Yuletide Pasture Allthingsstampy Helen Read Stampin Up


Everything around us can inspire us to create fabulous projects, and particularly the “proper” artists! For this reason, I was excited to take part in an Artist Appreciation Blog Hop.

Yuletide Pasture Allthingsstampy Helen Read Stampin Up

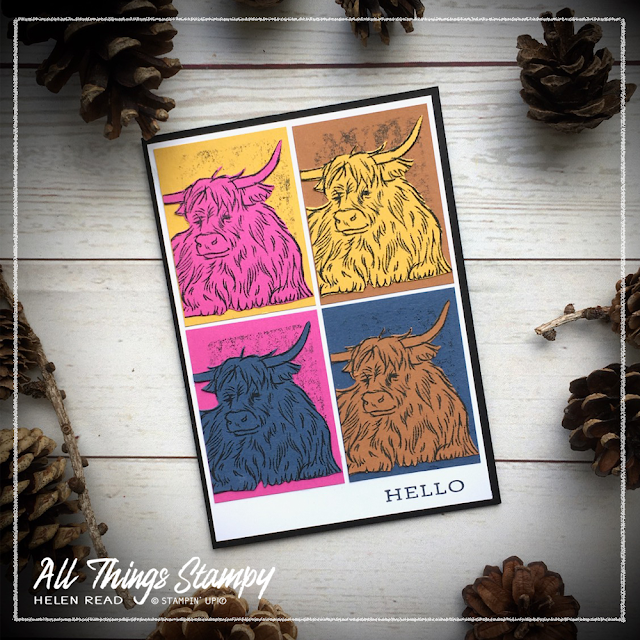
The challenge was to create a project inspired by a favourite artist. I have to say this is easier said than done but, after an aborted attempt to recreate a David Hockney in stamps, I came up with this colourful Andy Warhol-inspired Highland Cow card.
Careful fussy-cutting turned this Christmas image into an all-occasion bovine. I simply trimmed off the baubles from the cow's horns. How now, brown, yellow, pink and blue cow?
Yuletide Pasture Allthingsstampy Helen Read Stampin Up
 
Yuletide Pasture Allthingsstampy Helen Read Stampin Up

I can’t lay claim to this being a particularly unique colour combo as it’s just four of our five new In Colors! It’s not often you’ll see me voluntarily using Magenta Madness, so don’t get used to it. 

Yuletide Pasture Allthingsstampy Helen Read Stampin Up
To create a background reminiscent of Warhol’s original pieces, I used a small clear block as a stamp, inking with Memento Tuxedo Black. As this is a linen pad, it transferred the linen pattern to the block and, in turn, to the cardstock.

Yuletide Pasture Allthingsstampy Helen Read Stampin Up

Please check out the other projects in the hop! Head around the world for some more artist inspiration.


Monday, 20 July 2020

10 quick cards using Flowers for Every Season Memories & More Cards

Flowers for Every Season Quick Cards allthingsstampy Helen Read Memories & More


Socially distant crafty get-togethers have been a bit of a life-saver during lockdown; it’s so lovely to meet up with other crafters via Zoom to create our projects.

For the past five weeks I have been running a One O’Clock Club on Tuesdays, where we make two quick cards at each session. These quick cards are easy to recreate at home with Stampin’ Up!®’s Flowers for Every Season Memories & More cards.

My first One O’Clock Club series comes to an end this week but I will be starting another round soon using the Whale of a Time Suite – please get in touch ASAP if you’d like to join in. This time the projects will be repeated in a Saturday session, so you can hop in and out of Tuesdays and the Saturday to fit around your other plans.

Check out the projects we made...

Flowers for Every Season Quick Cards allthingsstampy Helen Read Memories & More

We’ve been using the Flowers for Every Season Memories & More cards from Stampin’ Up!®, along with the Flowers for Every Season Memories & More cards and envelopes, with guests using their own greeting stamps and ink pads. Week 1 saw us use Bumblebee and Cinnamon Cider – two great new In Colors™ which work really well together.

One of the great things about these Memories & More Cards – from the Flowers for Every Season Suite – is that they use the new In Colors™, so many of the people who took part in my In Color Shares had their new ink pads to play with.

Flowers for Every Season Quick Cards allthingsstampy Helen Read Memories & More

For this project, we used ‘Feeling’ from the sticker sheet and cut out word strips from one of the Memories & More cards. The flowers and leaves are white stickers which we sponged using yellow and green inks.

Flowers for Every Season Quick Cards allthingsstampy Helen Read Memories & More

It’s no secret that Magenta Madness is my least favourite new In Color™ – I’m just not a pink fan at all. But I have to say I am warming to it, and think it packs a certain punch when used in small doses. No small doses for this project though! It’s a bit more subtle in this one...

Flowers for Every Season Quick Cards allthingsstampy Helen Read Memories & More

Flowers for Every Season Quick Cards allthingsstampy Helen Read Memories & More

It was all about the blues in Week 3, when we focused on Misty Moonlight. The Memories & More card does all the work here, with just a simple greeting stamped onto one of the stickers from the sheet which comes in the pack.

Flowers for Every Season Quick Cards allthingsstampy Helen Read Memories & More

I really love the sunflower pattern on this card. The greeting comes on the sticker sheet and we stuck it to some Misty Moonlight cardstock, then cut freehand around it to create an on-trend border.

Flowers for Every Season Quick Cards allthingsstampy Helen Read Memories & More

The colour combo is simple here: just the Poppy Parade of the Memories & More card, with white and the silver edged card base. The Tasteful Labels dies do a lot of the work here. Don’t have those yet? Trust me, you really need them!  

Flowers for Every Season Quick Cards allthingsstampy Helen Read Memories & More

You have have already noticed that once again I broke my personal rule not to use retired products. However, in these unprecedented times (aren’t you just SICK of hearing that?), I thought it would be ok to take advantage of the foil-edged cards and envelopes being heavily discounted at retiring time, so I could keep costs down for the guests. I stocked up big time but have completely run out now!

Flowers for Every Season Quick Cards allthingsstampy Helen Read Memories & More

It’s our last session tomorrow and we’re finishing off with two Just Jade cards. The sunflowers get another outing; they’re fussy-cut from two different Memories & More cards and the big greeting is from Rooted in Nature.

Flowers for Every Season Quick Cards allthingsstampy Helen Read Memories & More

It’s another appearance for the monochromatic look, too – this time in mellow Just Jade with a flower sticker to finish off. The Stitched Nested Labels dies provide layers to house the greeting, from the Tasteful Touches stamp set.

If you’re in the UK you are more than welcome to join my Zoom sessions – because with Zoom, location is no barrier. I’ve had several new ladies join me who can’t normally come to my events due to transport issues. 

And if you’re already a demonstrator, I hope this post has inspired you to try your own distance classes and workshops. Every guest received half a pack of Memories & More cards, half a pack of Memories & More cards and envelopes, plus card bases, cardstock, ribbon and embellishments. I did all the die-cutting in advance so the projects were really speedy – just right for a lunch break for those homeworkers out there!


Monday, 22 June 2020

Video: One-sheet wonder with Forever Fern


The one-sheet wonder technique never goes out of style! Simply update it by using the latest stamp sets. Here I've used Forever Fern with one of my In Color combinations. This combo really stood out to me as I loved the retro feel.

As always, my tips for a OSW are the same: Start with the largest stamp in the lightest colour and work your way through to the smallest stamp in the darkest colour. Of course, rules are made to be broken, so feel free to play around and see what you come up with.

When you have cut up your sheet into smaller pieces to make a card or other project, you may find you have some white edges but these can be filled in with a little more stamping. But if you've kept your images close together and overlapping to start with, this shouldn't be necessary.


These are all going out to my new team members who have joined me in June. The four ladies receiving these felt it was an offer they couldn't refuse; around £170 of products for just £99 (and free shipping). Want to find out more? Please get in touch.


Monday, 1 June 2020

In Color™ Shares - and a time-saving tip for the Lovely Labels Pick a Punch

In Color bookmark Lovely Labels Pick a Punch Stampin Up

These bookmarks show off the new In Colors™ well and are inspired by the project on page 140 of the new Annual Catalogue. I don’t have the new ink pads yet as they weren’t available to pre-order but I got a similar look using Versamark; a must-have ink pad which creates a watermark effect.

I am very much loving the new In Colors™ and was excited to present my 50 new colour combinations to the world at the weekend. You can find them here.

2020-2022 In Color colour combinations Stampin Up

 
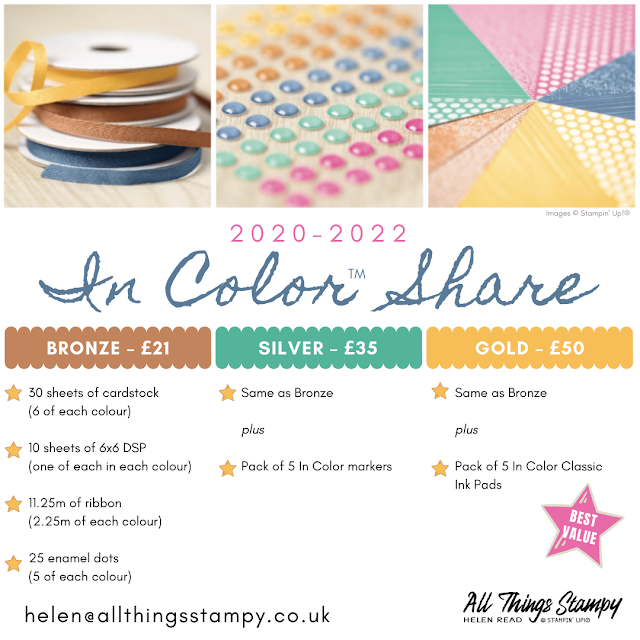
I am also excited to present my annual In Color™ shares, with three fabulous options to get your hands on the brand new products. I will be ordering soon, so please get in touch if you’re in the UK and would like one.

Stampin Up In Color Shares 2020-2022 Helen Read

 
The new Lovely Labels Pick a Punch got some heavy use for these bookmarks (I made way more than you see here!). This clever punch works with three widths and produces two different label ends. So a great time-saving tip is to punch two strips at the same time.


The small print

This is my personal blog and my sole responsibility as an Independent Stampin' Up!® demonstrator. All images are © Stampin' Up!® All content including photographs, projects and text are © Helen Read, unless otherwise stated. Please feel free to copy my ideas for your personal use and inspiration - if you are a SU demonstrator you may use these ideas for your events but please give credit where it is due. Please do not use my ideas for monetary gain, competitions or publication. The images on this blog - including blog buttons - should not be copied and used elsewhere on the internet or on CDs.