Showing posts with label watercolor pencils. Show all posts

Tuesday, 26 March 2024

Two spring cards made with Garden Meadow Stampin’ Up!® stamp set

Garden Meadow Stampin Up card ideas

Have you seen the Garden Meadow stamps and dies in the Stampin’ Up!® Online Exclusives? This is a really beautiful bundle and perfect for this time of year.

Here in Derbyshire, spring keeps tantalising us then going away again! But that didn’t stop me making two spring-themed projects with the WI ladies the other week.

These ladies love to colour, so I knew the Garden Meadow stamp set would be popular with them.

Tuesday, 25 January 2022

How to add colour to Awesome Otters using Watercolour Pencils, Blender Pens and Blending Brushes

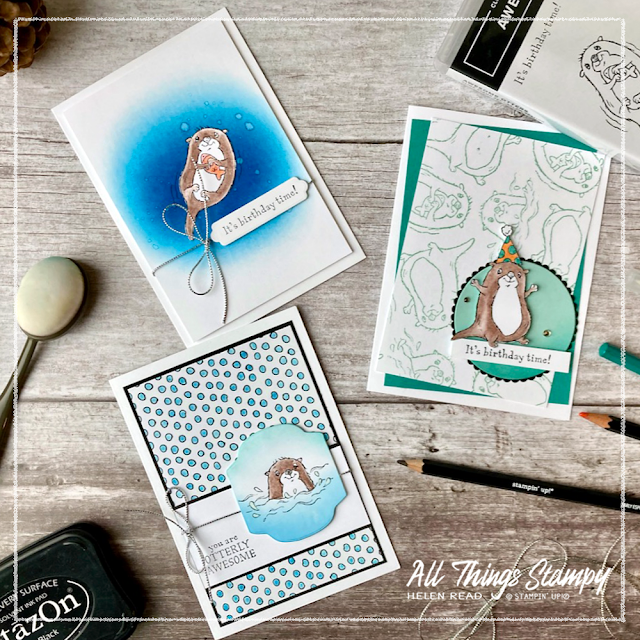
Stampin Up UK Awesome Otters

Stampin’ Up!® is really good at creating cute stamp sets that everyone wants to own – and Awesome Otters, the new Sale-a-Bration stamp set, is a prime example. It’s been really popular with my customers here in the UK, as many of them love wildlife as much as I do. We do have otters here in Derbyshire but they are very elusive – maybe 2022 will be the year that I see one?
 
Stampin Up UK Awesome Otters

This stamp set, which is free with a £45 order, is perfect for new crafters or those who are new to Stampin’ Up!® and want to start building up their collection as it features both greetings and images; three fun otters which can be used separately or together.
 
Stampin Up UK Awesome Otters
 
I’ve made a card with each of the otter images to add to my very depleted birthday card stash. I think these cards could be sent to anyone – men, women and children – and I would be more than happy to receive an otter birthday card myself. 
 
These cards show you how to add colour to your images using watercolour pencils with blender pens, and also how to add depth using Blending Brushes. 

All the images on my cards are stamped in Stazon and coloured with watercolour pencils and Stampin’ Up!® Blender Pens. When I say Blender Pens I mean the clear markers that you use with ink or pencils and not Stampin’ Blends, which are coloured alcohol markers. I know there is often some confusion because of the very similar product names.

When using Blender Pens (the clear ones), ideally use a permanent ink such as Stazon, although you can get away with a water-based ink such as Memento Tuxedo Black if you allow it to dry fully and work sparingly. 
 
Colour with your pencils, concentrating on the areas where you want darker colour to appear. Make sure you have enough colour on before you start blending as it’s difficult to add extra colour with the pencils once you have used the Blender Pens. When you are happy with the level of colour, gently blend it with your Blender Pens, working towards the uncoloured areas to create a soft graduated look.

Stampin Up UK Awesome Otters

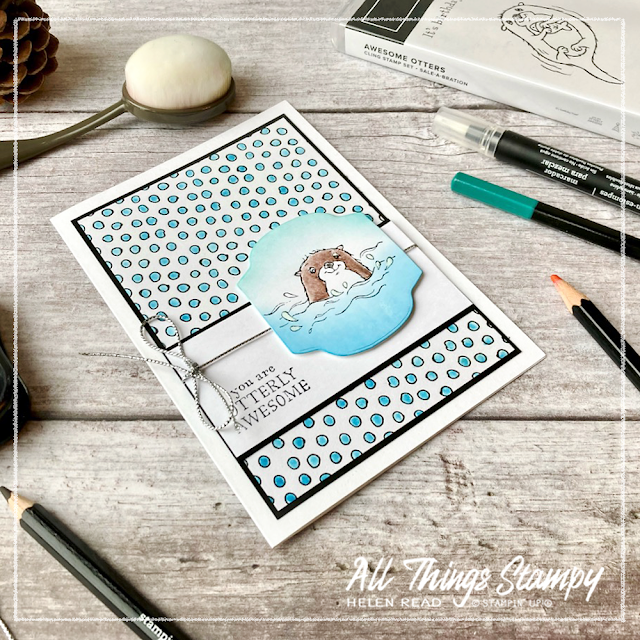
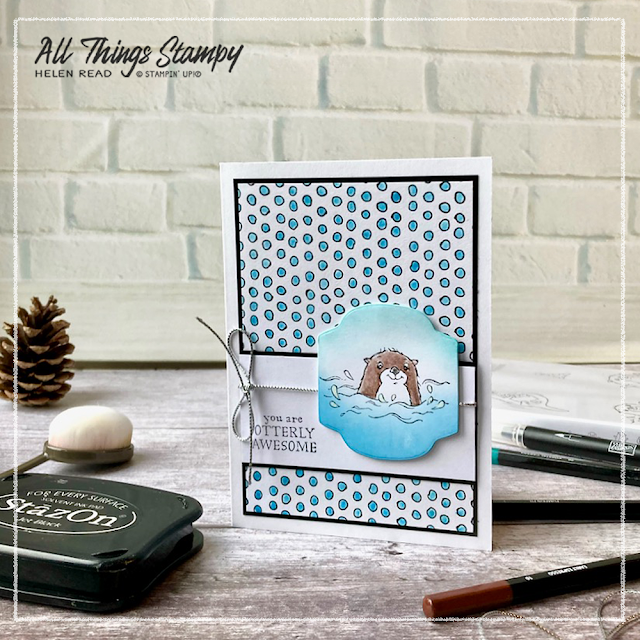
For my first card, I have created a background panel using patterned paper from the Pattern Party Designer Series Paper Pack, which is one of the host products in the Stampin’ Rewards section of the Stampin’ Up!® catalogue. This means you cannot buy it, but you can earn it free when you host a party with a workshop total of £150 or more or place your own order to this amount. The paper has bright colours one one side and black and white designs on the reverse; I’ve used one of these to create a blue spotty panel, adding the colour using my Pacific Point ink pad and a Blender Pen.

Stampin Up UK Awesome Otters

For my main element, I stamped the partially submerged otter onto a label die-cut using Seasonal Labels Dies. These dies were in the July-December Mini Catalogue but have carried over into the first part of 2022. I coloured the image using an Early Espresso watercolour pencil, then added extra colour using Stampin’ Up!® Blending Brushes; a hint of Pool Party at the top and some Pacific Point at the bottom. Blending brushes are an excellent way to add colour and depth to an element. 
 
Stampin Up UK Awesome Otters
 
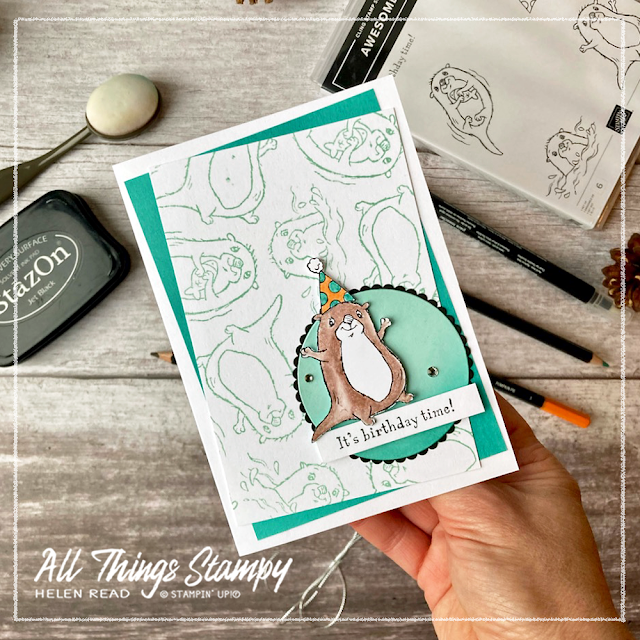
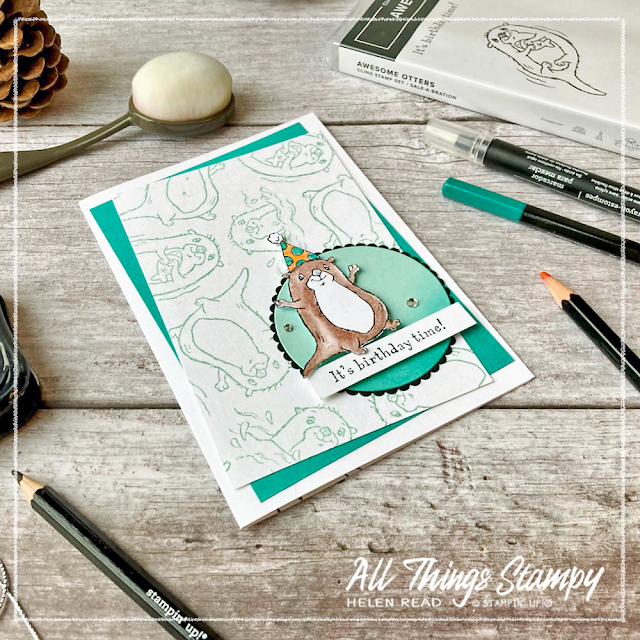
I’ve used a Blending Brush on this second card, too, to add a little depth to the Pool Party circle. The Pool Party theme is continued on the background, where I’ve stamped all the different otters at random, as close together as possible. This is a quick and easy way to make your own patterned paper to match your project perfectly.

Stampin Up UK Awesome Otters
 
The main otter image is stamped and cut out freehand, with a little party hat cut out and added on top. I’ve popped him up onto the Pool Party circle using Stampin’ Dimensionals, just resting his little foot and tail to overlap onto the greeting banner.
 
Stampin Up UK Awesome Otters
 
By positioning the stamped panel and the Bermuda Bay panel behind it at jaunty angles, this emphasises the fun feel of the card. It’s not necessarily something I would do for a more serious occasion, such as a sympathy card. 
 
Stampin Up UK Awesome Otters

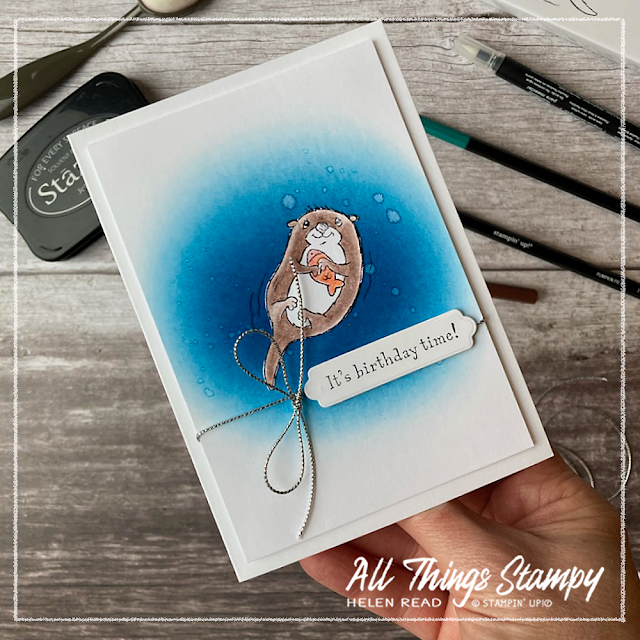
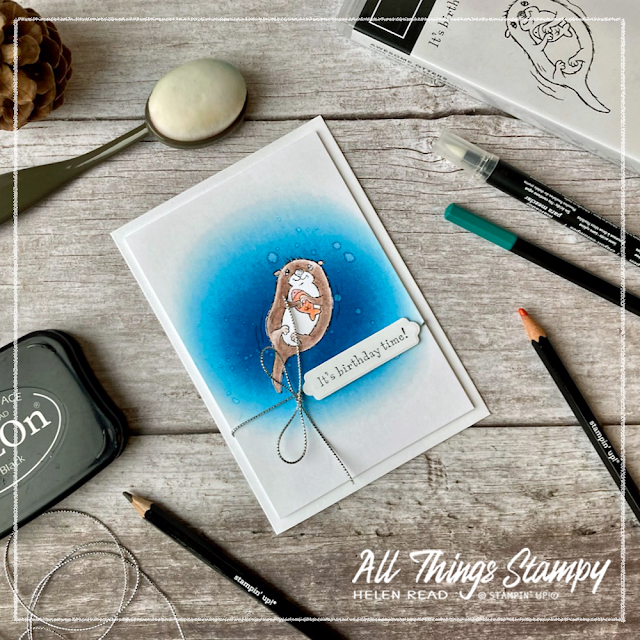
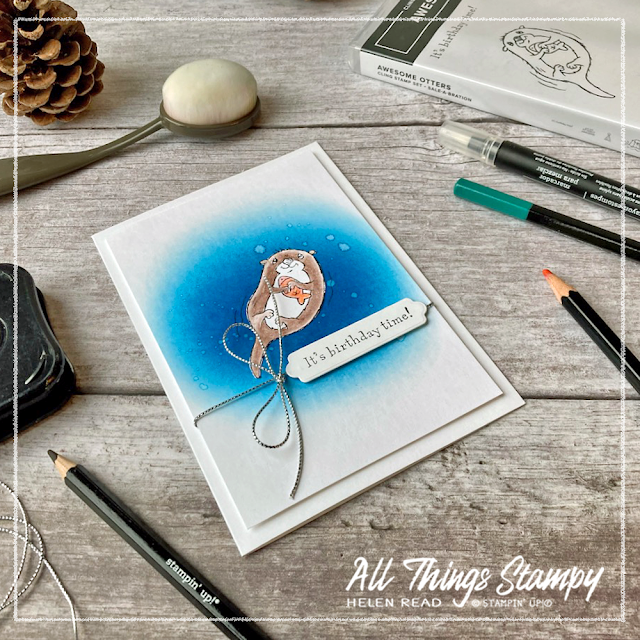
My third card really makes use of the Blending Brush by creating a dark pool of blue water in the centre of the card with the bright otter standing out from the background. I did this by stamping the otter onto a separate piece of Basic White cardstock and cutting it out closely. 
 
Stampin Up UK Awesome Otters

For the background, I applied Pacific Point ink with a Blending Brush in a circular motion, which creates much darker colour in the centre, graduating out to paler blue towards the edge of the cardstock layer. I stamped the otter directly on top of this blue ink, which meant I retained the finer details such as the movement lines. 
 
Stampin Up UK Awesome Otters

After I did this, I flicked some clear tap water onto the blue ink and allowed it to dry. This soaks up some of the ink to create pale splashes and is one of my very favourite techniques. Next I stuck the cut-out otter on top of the stamped blue layer, matching up the images perfectly. This is a great tip if you have fine details, such as whiskers or hair, that you really can’t fussy cut successfully.

The banner on this card, too, is cut out with Seasonal Labels Dies, and fits the “It’s birthday time!” greeting perfectly. It’s finished off with some Elegant Trim from the Stampin’ Up!® Annual Catalogue, for quite a clean and simple card. 
 
Stampin Up UK Awesome Otters
 
What I love about these projects is that they are largely created with white cardstock, which means you can adapt them to suit the ink pads you have. Any blue will do for this final card, although I love the richness and depth of Pacific Point. 
 
Stampin Up UK Awesome Otters
 
The fun birthday card could use any colours which can be picked up in the party hat and the background layer could be swapped to match.

Stampin Up UK Awesome Otters
 
And the Pattern Party Designer Series Paper, with its black and white designs, can be coloured in any colour – or none! – depending on what supplies you already own. These designs would also work with other animal images. 
 
It just shows you don’t have to own everything to make great projects; you can often work with what you have.
 
I hope you enjoyed my Awesome Otter projects and will consider adding this fabulous stamp set to your order next time. If you are in the UK and would like to order, please visit my store and, if you use the current host code RNU3JCR9, I’ll send you a thank you gift next month month. 


Does your wish list come to more than £99? Please get in touch and I will help you get more for your money and unlock discounts all year round.  


Tuesday, 28 January 2020

Sale-a-Bration Week: Happy Birthday to You


My customers are nothing if not honest – and excellent at bursting your pride. A few weeks ago I showed this to a flower-loving customer, fully expecting her to love it. She quickly cast it aside and said “it’s a bit old ladyish”.

Well call me an old lady but I quite like it – and so did several of the guests at my Stampy Buffet on Saturday! It just shows how everyone has different tastes and how you just can’t predict what people will like.


It uses the Happy Birthday to You Sale-a-Bration stamp set, which is simply coloured with Watercolour Pencils and – less simply – fussy cut with scissors. Wait until 3rd Feb and you will be able to order dies which will do all the hard work for you!

Stamp your greeting before running the white layer through the Subtle Embossing Folder. I always think this gives your cards a really professional edge. Bonus tip: the border is simply a  line doodled with a marker. Don’t worry about accuracy – the wobblier the better!


Monday, 4 November 2019

Fox in a box... and on a box


It was my friend Donna who accidentally gave me the idea to put a shaker dome inside a pizza box lid, so it seemed only fitting that I should use this same idea to package her birthday gift. And, as her gift was a fox brooch (she loves foxes), this image from Nature’s Beauty was ideal. It’s coloured with Watercolour Pencils (Assortment 2) and blender pens.

The ribbon is actually four pieces, all held together with Glue Dots. Why make life difficult for yourself? I started with a loop, joined at the back. A second loop goes around the centre, again joined at the back. Then I cut two more pieces to poke out from beneath.


Wednesday, 18 September 2019

Simple Stamping with Nature’s Beauty


Simple stamping is perfect for new crafters and those in a hurry. I only have a one-hour session for my Cuppa & Cards and never know how many will turn up, so I keep the projects really simple with minimal preparation.

That doesn't mean the projects are dull; far from it. I love the look of these cute note cards using Nature’s Beauty.

Simply stamping the animal on a separate piece of Whisper White cardstock and popping it up on Dimensionals gives these projects a lift in more ways than one. It also saves you having to create a mask.

Monday, 16 September 2019

Nature's Beauty deer in the silver birches


Third Monday of the month is Make-It Monday with the local WI ladies. They have very particular requirements and are not afraid to tell me about them! I know they enjoy masculine cards so this is one of today's projects. I hope they like it!

For this sample, I stamped the deer onto Crumb Cake cardstock before colouring with watercolour pencils and Blender Pens. It gives the image much more depth and allows it to stand out from the background.


Thursday, 21 March 2019

By the Bay Week: Eclipse card


This is one of my favourite projects from my By the Bay Week celebration... it’s an eclipse card, although I admit my photo doesn’t show this off to its best advantage.

All that means is that the main image is popped out on dimensionals, with a Night of Navy layer beneath, to give it extra shadow.

The image is coloured with Watercolour Pencils and Blender Pens and it’s embellished with some Wooden Elements, one of which is coloured using a Real Red Stampin’ Write Marker.

I covered the front of the card base using some Wood Textures Designer Series Paper, which I really love and suspect will retire this year, as it has served for two whole catalogue periods now, which is most unusual for Designer Series Paper. In other words... get it now, while you can!


http://helenread.stampinup.net

Wednesday, 20 March 2019

By the Bay Week: Masked and sponged image


I was having so much fun sponging for Monday’s project that I simply couldn’t stop. For this project, inspired by the sample in the Sale-a-Bration brochure, I coloured the image using Watercolour Pencils and blender pens, then masked off the cottage and masked a frame using sticky notes, before sponging with a mix of Pacific Point and Nigh of Navy, leaving a lighter patch to give the impression of the moon.

Leaving the masks in place, I spattered the image using Frost White Shimmer Paint, which is one of my favourite products and, I’m happy to say, currently still available as a carryover item from the Autumn/Winter catalogue.


http://helenread.stampinup.net

Friday, 15 March 2019

Awesome Accented Blooms


Accented Blooms is the name of this stamp set, and it's a great one for adding a greeting to, with its perfectly shaped slot for the Tailored Tag Punch. I mixed things up a little here by stamping onto a piece of Wood Textures Designer Series Paper and then colouring it with Watercolour Pencils. This paper is absolutely gorgeous and so versatile for so many occasions - it's stuck around for TWO whole catalogues which can surely only mean one thing, right?* DSP usually only stays for one catalogue period, so I highly recommend that you stock up now! *I have no inside knowledge, just 11 years of experience as a demonstrator!


Monday, 26 November 2018

Keeping it simple with Accented Blooms


There’s a theme to this week’s blog posts, which wouldn’t necessarily be obvious at first glance.  I’m using three different stamp sets, three different colours schemes and the cards are for three different occasions. So what’s the theme?

The theme is ... #simplestamping.

We demonstrators have realised that we get so into our craft that we sometimes neglect the new stamper. We are so keen to throw everything at our projects – purely because we can – that we forget that some people are starting out with limited supplies.

This project, then, takes things back to basics. One ink pad, one stamp set, one colour cardstock, one punch and one pack of embellishments. Perfect for the new stamper... or the experienced stamper in a hurry.

Friday, 24 March 2017

Dragonflies on watercoloured background


This was the Make & Take at a Stampin’ Up!® party I did last week. The host, Pat, is a big fan of brights, so Melon Mambo was the order of the day... not exactly my comfort zone!

The fab background was created in the same was as for this dragonfly egg box; you just scribble with watercolour pencils and then go over it with a wet paintbrush or Aquapainter. It’s a lovely technique, which works best on watercolour paper.

Wednesday, 22 March 2017

Grown-up mini egg carton project


I do love these egg boxes, they’re so cute... even more so if you take the time to colour them. How? With a small amount of ISO Propanol (rubbing alcohol) mixed with reinker. Here I’ve used Sweet Sugarplum to match this fabulous Glimmer Paper (SAB item only available while stocks last or until 31st March!).

The panel beneath the dragonfly (Detailed Dragonfly Thinlits) was created by scribbling with watercolour pencils with a few colours onto watercolour paper, then swishing it around with a wet paintbrush. You could use an aqua painter, but I’m a purist and prefer a paintbrush.

And it’s all tied together with some gorgeous metallic ribbon, another SAB item which is only available until 31st March, or while supplies last.

We’re on the Sale-a-Bration countdown now, and yesterday a new group of items were added. These are catalogue items which you can earn FREE between now and the end of March with a £45 order. There are some gorgeous products on this list, so do take a look.

Oh, and inside are four hollow chocolate eggs, wrapped in Sweet Sugarplum foil. Sainsbury’s do a pack of 25 which just happen to be wrapped in Sweet Sugarplum, Bermuda Bay and Crushed Curry. Wish I’d found those before my all-day event!


SaveSave

Friday, 10 March 2017

And the most popular Sale-a-Bration product is...


Bit of a daft question as the answer is staring you in the face but do you know what the most popular Sale-a-Bration product is BY FAR? Yup, it’s Hey, Chick, which comes as no surprise to me as I was so excited when I first clapped eyes on it way back in November.

It’s such a fun stamp set and was inspired by the artist’s experiences on a friend’s farm. The illustrator, Loris Sume, said:
"When I was a child growing up in Canada, I remember some family friends who had little chickens that I thought were so cute. A couple of summers ago here in Utah, I stopped at a friend’s ranch and saw all their cute animals including their chickens. They had typical chickens but also another kind called Polish Frizzle Bantam White Chickens. I think they are so funny with all those feathers flopping around on the top of their heads and how they like to stare straight at you and cock their heads.
"So when I was assigned to create the Hey, Chick Stamp Set, I was so excited. I wanted to exaggerate the rounder chickens and really make them round, and I also really wanted to draw one of those funny chickens I saw at my friend’s ranch. It was a really fun set to create."

Time is running out to earn this stamp set, if you haven’t already done so. There are just THREE WEEKS of Sale-a-Bration left, so don’t delay if you must have chickens in your life!


Wednesday, 8 March 2017

Tasty Trucks... speeding away


This fab Tasty Trucks card was designed by my friend and helper, Kelly, for a colouring class. I love the clever use of Gorgeous Grunge inside to represent the speeding van... and the way the cakes are tumbling out of the back.


You can tell this project didn’t come out of my head because of the bright colours used! But I have to concede that they suit this stamp set perfectly. The image is coloured with our lovely new watercolour pencils... which just happen to be the most popular item from the Spring/Summer catalogue with my customers.

Friday, 27 January 2017

Hey Chick, with watercolour pencils


Some of the most popular new products are showcased here: Hey Chick, the gorgeous Sale-aBration set, the Dynamic Hexagons embossing folder (which goes with EVERYTHING) and the Watercolour Pencils, which are causing big ripples of excitement.

We’ll be using these pencils tonight at my February Hygge Night - the focus is on colouring.


And this DSP - Affectionately Yours - features the same colours as the SAB paper, Carried Away, which means you can use the same pack of cardstock!


Friday, 20 January 2017

Tasty Trucks Sale-a-Bration set


There’s a new product in town that I know lots of you are going to love: watercolour pencils. This is something many people have been requesting for a long time so it's very exciting that they are in the Spring/Summer catalogue.

I’ve used them on this project to colour the cute little van from Tasty Trucks. I coloured the image, then blended with a blender pen. You can also use them with aquapainters or a paintbrush, or simply leave them as they are.


You get 13 pencils in Stampin’ Up!® colours. But blink and you’ll miss them in the catalogue – many people have! Look out for them on page 24.


The small print

This is my personal blog and my sole responsibility as an Independent Stampin' Up!® demonstrator. All images are © Stampin' Up!® All content including photographs, projects and text are © Helen Read, unless otherwise stated. Please feel free to copy my ideas for your personal use and inspiration - if you are a SU demonstrator you may use these ideas for your events but please give credit where it is due. Please do not use my ideas for monetary gain, competitions or publication. The images on this blog - including blog buttons - should not be copied and used elsewhere on the internet or on CDs.