Showing posts with label Bumblebee. Show all posts

Monday, 25 January 2021

Tutorials: Double Dutch Door Fold and Desk Calendar


Our first Crafty Friday of the year saw us use this gorgeous Flower & Field DSP from the Sale-a-Bration brochure. This beautiful paper is free with a £45 order during January and February.
 
 
During the morning, we made two projects using just two 6x6 pieces of paper (cut from 12x12 sheets). A I only had one pack to play with, not everybody received the same designs, which is quite nice as we get to see lots of variations on the different projects. 
 

We began with this fun Double Dutch Door Fold. And question of the day was “what is a double Dutch door?” Turns out a Dutch door is what we in the UK know as a stable door... and suddenly the card design makes sense!
 

I don’t do complicated fancy folds so this one was right up my street. You begin by cutting a standard piece of cardstock (A4 in most countries) and cutting it in half lengthways to create a card base. Slice off a section of the front then create the bottom doors from a separate, wrap-around piece.


As this was a remote class, guests were using their own greeting stamps to complete the card. Therefore I sent them a selection of die-cut and punched pieces for decoration. I used Nature’s Roots Dies to create these pretty Granny Apple Green leaves and the Small Bloom Punch for some Bumblebee flowers. The mini flower accents are created using the Confetti Flowers Border Punch. I have to say, punching lots of flowers is easier than die-cutting lots of leaves!

 
Use the piece you slice off the front of the card to create a layer for your main greeting/image panel. Waste not, want not.


Our second project was this cute desk calendar. I have to thank my downline Tracey for the inspiration for this as she made one for me for Christmas. 
 

Again this starts with a simple card base, created by cutting a sheet of cardstock in half lengthways. A second piece of cardstock creates a supporting piece and a third creates a simple box on the front for a sticky note pad and pen or pencil. You could decorate it further if you wish, but I like to let the DSP do all the hard work here. 


This side view shows how the supporting piece works. Simple but effective, and stops the weight of the pad making the card fall open. 

You can earn this gorgeous Designer Series Paper FREE during Sale-a-Bration, which runs to the end of Feburary. This is one of your choices when you place a £45 order. If you are in the UK and would like to order, please visit my store and, if you use the host code YK2NNMYW, I’ll send you a little thank you gift in February!

To make it easy for you, please shop using this link (opens in new window)

Does your wish list come to more than £99? Please get in touch and I will help you get more for your money and unlock discounts all year round.  Please message me via my website.
 
NB: Please note orders are currently taking longer than usual to arrive, due to a combination of extra paperwork required following Brexit, lower staffing levels due to the pandemic, and an influx of orders as a result of both lockdown and Sale-a-Bration. Please ask if you require more information.  


Monday, 11 January 2021

Sale-a-Bration 2021: Darling Donkeys and Flower & Field Designer Series Paper

Darling Donkeys Flowers Field Stampin Up

Sale-a-Bration is now well under way and, as predicted, this Darling Donkeys stamp set is proving to be a winner. Who could resist these cute images? And you know me, I don’t normally fall for cute stamp images. 

Darling Donkeys Flowers Field Stampin Up

I showed off this project at my Twixmas Party in an interactive demonstration. Guests could vote via the Zoom polling feature on which image I should stamp, which DSP I should use and which cardstock. The above card was the result, with a Bumblebee cardstock layer and a frame created with the Layering Circles Dies

Darling Donkeys Flowers Field Stampin Up

However, I had this one ready made to show them how the card could have looked if they had made different choices, such as a Granny Apple Green cardstock layer. This image fits better in the Layering Ovals Dies, which I had cut in advance. Yes, I guessed what they’d choose and made the opposite – seems that I do know them quite well!

I can’t lay claim to the project idea, which was originally created by Diana Gibbs. It's such a lovely design that I just had to CASE (Copy And Share Everything) it. I particularly I love the use of the In Good Taste DSP with the Flower & Field DSP.

Darling Donkeys Flowers Field Stampin Up

I coloured the images using Stampin’ Blends after falling in love with these all over again recently. Crumb Cake for the body, Smoky Slate for the hooves, Granny Apple Green for the grass and Pool Party for the sky.

The “hee haw” greeting is hand cut from cardstock, simply following the lines of the curvy image. 

Darling Donkeys Flowers Field Stampin Up

The Darling Donkeys stamp set is one of six stamp sets you can choose as your FREE Sale-a-Bration item when you place a qualifying order during January and February 2021. Darling Donkeys can be earned with a £45 order.

The Flower & Field Designer Series Paper is one of four packs of paper in the brochure and that, too, can be earned with a £45 order. I love the bright colours on the dark backgrounds; some of them remind me a little of traditional canal art, while others remind me of mille-fleurs tapestries.

It’s gorgeous paper and I will be using it at my Crafty Friday Zoom class this week, when we make a fancy fold card and a mini desk calendar.

Want to earn your own Darling Donkeys stamp set or Flower & Field Designer Series Paper? Or do you have your eye on something else from the Sale-a-Bration brochure? Please head on over to my store and, if you use the host code YK2NNMYW, I’ll send you a little thank you gift in February!


Friday, 21 August 2020

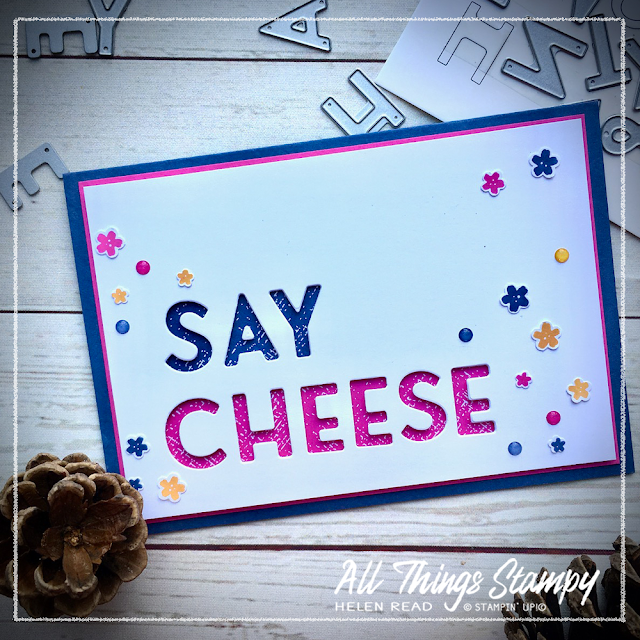
Say cheese with the Playful Alphabet Dies

Playful Alphabet Dies Stampin Up allthingsstampy Helen Read

With the Playful Alphabet Dies you can spell literally anything you like, which somehow makes it harder to decide. Too much choice!

I thought long and hard before making this card for a friend. She’s a professional photographer and, as a gift I’d bought her a camera-shaped cookie cutter. The greeting was almost staring me straight in the face: Say cheese!

Playful Alphabet Dies Stampin Up allthingsstampy Helen Read

I cut the letters out, placed my In Color Designer Series Paper behind, then was stumped. I added some In Color Enamel Dots. Still a bit boring, but it was too late to stamp on top so I had another think an eventually settled on these little flowers from Field of Flowers, punched out using the Confetti Flowers Border Punch. Just a little insight into the not-always-so-streamlined creative process, there!

 
Playful Alphabet Dies Stampin Up allthingsstampy Helen Read

Playful Alphabet Dies Stampin Up allthingsstampy Helen Read

You CAN cut your whole word out in one go if the letters don’t repeat (I think there are two Es in the set), but I prefer to do a few at a time. If you letters don’t repeat and you’re feeling brave, you can line them up nicely with a straight edge such as a ruler; just use it to push the dies up from the bottom edge so they all sit neatly at the same level.


Wednesday, 19 August 2020

#Sharesunshine with Mini Paper Pumpkin Boxes

Mini Paper Pumpkin Boxes Allthingsstampy Helen Read Stampin Up

I talked last week about sharing sunshine through the new Box of Sunshine Paper Pumpkin Kit, which is an exclusive kit currently available while supplies last.

There are many ways we can #sharesunshine and one is through the Mini Paper Pumpkin Boxes which are sized to fit our Notecards & Envelopes and ideal for little gifts. 

Mini Paper Pumpkin Boxes Allthingsstampy Helen Read Stampin Up

I wanted to thank my customers who had shown incredible commitment during lockdown to complete the 12 craft challenges I set them. They had from the start of lockdown until the end of June to complete the challenges and could do them in any order. One lady did them all in the first week, others tackled them methodically and went right up to the wire.

Mini Paper Pumpkin Boxes Allthingsstampy Helen Read Stampin Up

Somewhat conveniently, 10 ladies completed all 12 challenges, so I use one full pack of Mini Paper Pumpkin Boxes to hold their gifts of Rainbow Glimmer Paper, mini note cards and... I think there was some yellow ribbon in there, too. To be honest, these gifts went out a while ago, I just haven’t got round to posting them here.

Rainbow Glimmer Paper Allthingsstampy Helen Read Stampin Up

I tried to stick with the sunshine theme and decorated the lids using Bumblebee cardstock, with some stamping and die-cutting from the Forever Fern Bundle from the Forever Greenery Suite and label made with the Tasteful Labels dies. They were all tied with different ribbons because I thought I had purchased some specially but couldn’t find it in the chaos of my craft room!

Mini Paper Pumpkin Boxes Allthingsstampy Helen Read Stampin Up

The greeting is from Rooted in Nature and felt perfect for the occasion. 

My ladies are now working on weekly challenges via my private Facebook group. This is open to my customers and class-goers so if you fit into this category, please let me know so I can add you. 

Mini Paper Pumpkin Boxes Allthingsstampy Helen Read Stampin Up

Pop up the label using Stampin’ Dimensionals, keeping the centre clear so the ribbon slides through freely. This will enable the recipient to untie the ribbon and open the box without destroying the décor.

Bonus tip: If you’re in the UK and plan to mail out these boxes, be warned that they’re just a little too deep to go as a Large Letter and will incur the Small Parcel rate.


Thursday, 13 August 2020

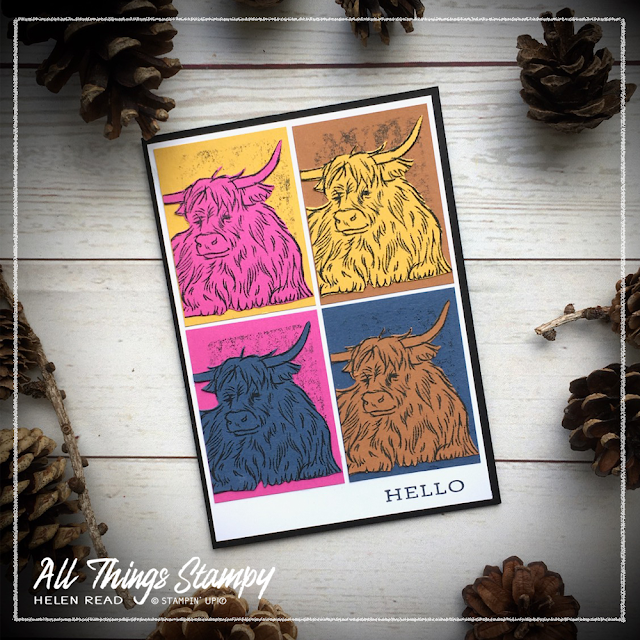
Artist Appreciation Blog Hop: Warhol-inspired Yuletide Pasture card


Yuletide Pasture Allthingsstampy Helen Read Stampin Up


Everything around us can inspire us to create fabulous projects, and particularly the “proper” artists! For this reason, I was excited to take part in an Artist Appreciation Blog Hop.

Yuletide Pasture Allthingsstampy Helen Read Stampin Up

The challenge was to create a project inspired by a favourite artist. I have to say this is easier said than done but, after an aborted attempt to recreate a David Hockney in stamps, I came up with this colourful Andy Warhol-inspired Highland Cow card.
Careful fussy-cutting turned this Christmas image into an all-occasion bovine. I simply trimmed off the baubles from the cow's horns. How now, brown, yellow, pink and blue cow?
Yuletide Pasture Allthingsstampy Helen Read Stampin Up
 
Yuletide Pasture Allthingsstampy Helen Read Stampin Up

I can’t lay claim to this being a particularly unique colour combo as it’s just four of our five new In Colors! It’s not often you’ll see me voluntarily using Magenta Madness, so don’t get used to it. 

Yuletide Pasture Allthingsstampy Helen Read Stampin Up
To create a background reminiscent of Warhol’s original pieces, I used a small clear block as a stamp, inking with Memento Tuxedo Black. As this is a linen pad, it transferred the linen pattern to the block and, in turn, to the cardstock.

Yuletide Pasture Allthingsstampy Helen Read Stampin Up

Please check out the other projects in the hop! Head around the world for some more artist inspiration.


Monday, 20 July 2020

10 quick cards using Flowers for Every Season Memories & More Cards

Flowers for Every Season Quick Cards allthingsstampy Helen Read Memories & More


Socially distant crafty get-togethers have been a bit of a life-saver during lockdown; it’s so lovely to meet up with other crafters via Zoom to create our projects.

For the past five weeks I have been running a One O’Clock Club on Tuesdays, where we make two quick cards at each session. These quick cards are easy to recreate at home with Stampin’ Up!®’s Flowers for Every Season Memories & More cards.

My first One O’Clock Club series comes to an end this week but I will be starting another round soon using the Whale of a Time Suite – please get in touch ASAP if you’d like to join in. This time the projects will be repeated in a Saturday session, so you can hop in and out of Tuesdays and the Saturday to fit around your other plans.

Check out the projects we made...

Flowers for Every Season Quick Cards allthingsstampy Helen Read Memories & More

We’ve been using the Flowers for Every Season Memories & More cards from Stampin’ Up!®, along with the Flowers for Every Season Memories & More cards and envelopes, with guests using their own greeting stamps and ink pads. Week 1 saw us use Bumblebee and Cinnamon Cider – two great new In Colors™ which work really well together.

One of the great things about these Memories & More Cards – from the Flowers for Every Season Suite – is that they use the new In Colors™, so many of the people who took part in my In Color Shares had their new ink pads to play with.

Flowers for Every Season Quick Cards allthingsstampy Helen Read Memories & More

For this project, we used ‘Feeling’ from the sticker sheet and cut out word strips from one of the Memories & More cards. The flowers and leaves are white stickers which we sponged using yellow and green inks.

Flowers for Every Season Quick Cards allthingsstampy Helen Read Memories & More

It’s no secret that Magenta Madness is my least favourite new In Color™ – I’m just not a pink fan at all. But I have to say I am warming to it, and think it packs a certain punch when used in small doses. No small doses for this project though! It’s a bit more subtle in this one...

Flowers for Every Season Quick Cards allthingsstampy Helen Read Memories & More

Flowers for Every Season Quick Cards allthingsstampy Helen Read Memories & More

It was all about the blues in Week 3, when we focused on Misty Moonlight. The Memories & More card does all the work here, with just a simple greeting stamped onto one of the stickers from the sheet which comes in the pack.

Flowers for Every Season Quick Cards allthingsstampy Helen Read Memories & More

I really love the sunflower pattern on this card. The greeting comes on the sticker sheet and we stuck it to some Misty Moonlight cardstock, then cut freehand around it to create an on-trend border.

Flowers for Every Season Quick Cards allthingsstampy Helen Read Memories & More

The colour combo is simple here: just the Poppy Parade of the Memories & More card, with white and the silver edged card base. The Tasteful Labels dies do a lot of the work here. Don’t have those yet? Trust me, you really need them!  

Flowers for Every Season Quick Cards allthingsstampy Helen Read Memories & More

You have have already noticed that once again I broke my personal rule not to use retired products. However, in these unprecedented times (aren’t you just SICK of hearing that?), I thought it would be ok to take advantage of the foil-edged cards and envelopes being heavily discounted at retiring time, so I could keep costs down for the guests. I stocked up big time but have completely run out now!

Flowers for Every Season Quick Cards allthingsstampy Helen Read Memories & More

It’s our last session tomorrow and we’re finishing off with two Just Jade cards. The sunflowers get another outing; they’re fussy-cut from two different Memories & More cards and the big greeting is from Rooted in Nature.

Flowers for Every Season Quick Cards allthingsstampy Helen Read Memories & More

It’s another appearance for the monochromatic look, too – this time in mellow Just Jade with a flower sticker to finish off. The Stitched Nested Labels dies provide layers to house the greeting, from the Tasteful Touches stamp set.

If you’re in the UK you are more than welcome to join my Zoom sessions – because with Zoom, location is no barrier. I’ve had several new ladies join me who can’t normally come to my events due to transport issues. 

And if you’re already a demonstrator, I hope this post has inspired you to try your own distance classes and workshops. Every guest received half a pack of Memories & More cards, half a pack of Memories & More cards and envelopes, plus card bases, cardstock, ribbon and embellishments. I did all the die-cutting in advance so the projects were really speedy – just right for a lunch break for those homeworkers out there!


Monday, 13 July 2020

8+ card ideas using Stampin' Up!®'s Field of Flowers

Stampin up Field of Flowers card ideas allthingsstampy helen read

Following my cardmaking class on Saturday, using the Stampin' Up!® stamp set Field of Flowers, I have a mega post for you today.

Due to an absence of commonsense, I ended up offering eight cards in two hours, which was stretching the bounds of possibility a little but I think most people managed almost all of the cards in what turned into a three-hour session.

This was all held remotely via Zoom so we could keep safe, and everyone had their own Field of Flowers stamp set to play with, and stamp in their chosen colours. The Confetti Flowers Border Punch was offered as an optional extra.

As the elderly members of my family are running out of birthday cards and have been threatened with Dire Consequences if they go shopping, I decided to switch up the greetings for the cards I made during the session, so I can replenish their supplies.

You’ll notice I've used the silver foil-edged cards for this session; I don’t usually use retired Stampin' Up!® products but I these were such a bargain in May that I couldn't resist stocking up to keep class costs down. However, maybe I should have stocked up more because the class proved so popular that I ended up leaving myself short!

Stampin up Field of Flowers card ideas allthingsstampy helen read

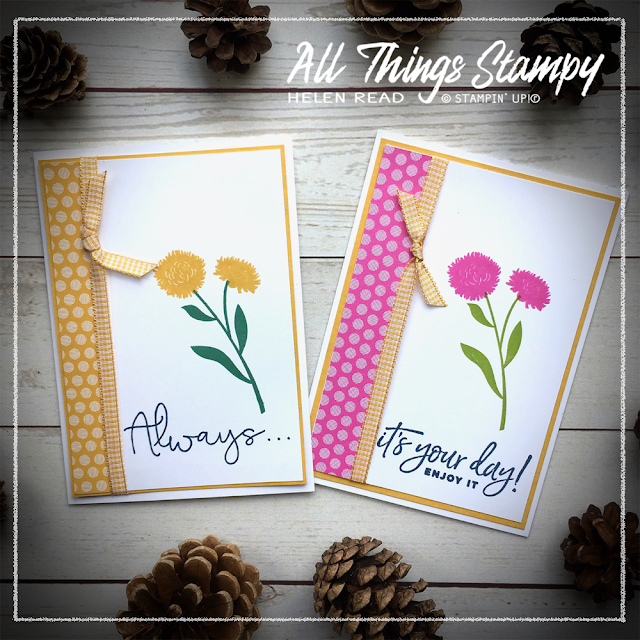
I kept the card layers largely neutral – Misty Moonlight, Night of Navy and a splash of Bumblebee – so people could add their own inks without clashing. While I made the initial samples in a wide variety of colours to show people different options, my personal choice of colours for the session was Granny Apple Green, Magenta Madness, Misty Moonlight, Bumblebee and Coastal Cabana. Bright and cheerful!

Stampin up Field of Flowers card ideas allthingsstampy helen read

First card of the day was this one – as it was the most complicated. It uses a piece of the gorgeous
In Good Taste Designer Series Paper which goes with everything. I showed the project using the flowers punched out separately but not all guests had this option as the Confettie Flowers Border Punch was an add-on to the class.
If you don't have the Confetti Flowers Border Punch, when you’re stamping with Field of Flowers I suggest you use a paler green such as Pear Pizzazz, Mint Macaron or Soft Sea Foam for the grass and leaves. Then use a stronger colour for your flowers so they stand out. If you're using the punch, then anything goes!
 
 Stampin up Field of Flowers card ideas allthingsstampy helen read

Just changing one colour can give your project a whole new look. This is created using the One-Sheet Wonder technique but I swapped out the Misty Moonlight from my original sample on the left to use Coastal Cabana during the class. I think I prefer the darker version though, what about you?

Stampin up Field of Flowers card ideas allthingsstampy helen read

A simpler version of this same card is to stick to just one colour – Magenta Madness – to stamp tiny flowers all over your background. Because there are several flowers on one stamp, this is really quick to make.

Stampin up Field of Flowers card ideas allthingsstampy helen read

Another card I changed during the class was this one. I couldn’t find my strip of Bumblebee Designer Series Paper so thought (wrongly, as it happened) I must have run out and changed it to Magenta Madness. I hardly dare admit this but Magenta Madness is beginning to grow on me...

Stampin up Field of Flowers card ideas allthingsstampy helen read

A classic triptych design. You can do this in one of two ways; stamp the whole piece and cut it into three. Or cut it up first and stamp afterwards. I tried both and decided that the best route would be to stamp the grass and flowers while it's still in one piece (a bit of careful lining up is required), then add dragonflies once it's sliced up. Can you spot the not-so-deliberate ‘mistake’? I added an afterthought dragonfly in the wrong colour!

Need a small piece of cardstock but don't have the right shade? I created this Coastal Cabana strip by pressing a piece of Whisper White into an ink pad.

Stampin up Field of Flowers card ideas allthingsstampy helen read

When you’re making eight cards in a morning, you need at least one Simple Stamping project! And this one could hardly be simpler; just stamps, ink and one of our fabulous Whisper White Notecards & Envelopes. I use these All The Time, they’re just so handy to have.

Stampin up Field of Flowers card ideas allthingsstampy helen read

Field of Flowers is such a versatile stamp set. You can make subtle, tasteful, classy cards with it... or embrace the Brights! I've used Magenta Madness, Granny Apple Green, Bumblebee and Bermuda Bay and popped up a single flower to add interest.

Stampin up Field of Flowers card ideas allthingsstampy helen read

And finally, here’s the original version of the Bumblebee card you see in the first picture. Just a simple strip stamped with grass and flowers, to show someone you’re thinking of them.

I hope you’ve enjoyed this foray in to a Field of Flowers and will consider adding this beautiful set to your shopping list. You can buy the set from my website here. And if you add the Confetti Flowers Border Punch on, too, you’ll save 10%!


The small print

This is my personal blog and my sole responsibility as an Independent Stampin' Up!® demonstrator. All images are © Stampin' Up!® All content including photographs, projects and text are © Helen Read, unless otherwise stated. Please feel free to copy my ideas for your personal use and inspiration - if you are a SU demonstrator you may use these ideas for your events but please give credit where it is due. Please do not use my ideas for monetary gain, competitions or publication. The images on this blog - including blog buttons - should not be copied and used elsewhere on the internet or on CDs.