Showing posts with label Autumn projects. Show all posts

Tuesday, 29 October 2024

10 fabulous Stampin’ Up!® colour combinations for autumn

Stampin Up colour combinations for autumn

Do you struggle to put Stampin’ Up!® colours together? Do you wish you could find new and exciting colour combinations? I know some people don't feel confident putting different Stampin’ Up!® colours together, so as I’m having a week off from crafting, here are some tips – and 10 fabulous autumn colour combinations using your favourite Stampin’ Up!® colours. 

Tuesday, 22 October 2024

Not just for scrapbooking! Easy card ideas using Autumn to Remember

Stampin Up Autumn to Remember easy card ideas

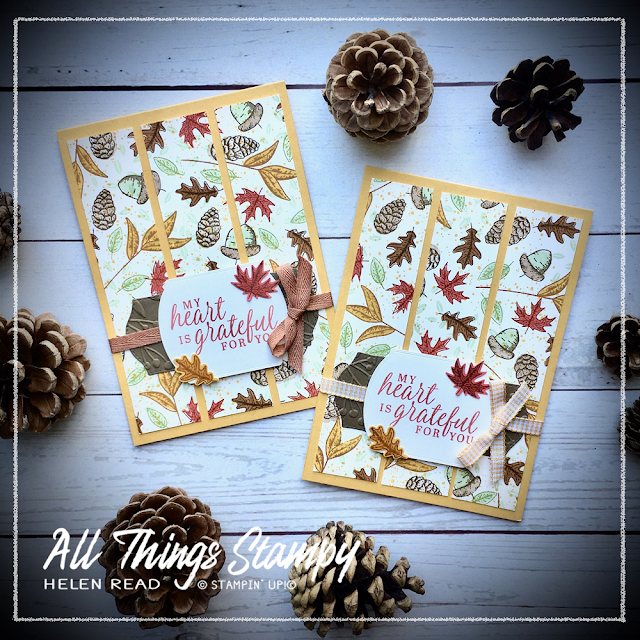
I love trees, and I love the colours of autumn, so needed no further excuse to make these cards using Stampin’ Up!®’s Autumn to Remember stamp set. 

Tuesday, 8 October 2024

Eight 12x12 scrapbook pages using Autumn to Remember Kit from Stampin’ Up!®

Autumn to Remember Scrapbooking Stampin Up

Have you tried one of the new Stampin’ Up!® scrapbooking workshop kits yet?

I dipped my toe in by ordering the Autumn to Remember Scrapbooking Workshop Kit (166502). I have never scrapbooked in this way, with kits and instructions, so I wanted to see how it works.

I was impressed! The Autumn to Remember Scrapbooking Workshop Kit makes six pages – three double-page spreads – with lots of leftover elements. Cutting instructions are really clear, so you know which way to cut and which way the pattern should go. There are clear photos of the finished projects, as well as paler versions of the projects with each piece clearly labelled (1A, 1B, etc) so you know which goes where.

In case you don’t have your photos ready – as I didn’t for most of these pages – there are photo place holders which are brilliant for getting your projects moving. I know I always used to get stuck by not having my photos ready.

The sheets of pop-out die-cuts are all labelled on the back, too, with the number of the relevant project. This is a really good detail if you like to stick closely to the instructions.

So did I stick closely to the instructions in the Autumn to Remember Scrapbooking Workshop Kit? What do you think?

Tuesday, 17 September 2024

Four simple cards in one using Autumn to Remember Stampin’ Up!® stamp set

Stampin Up Autumn to Remember simple cardmaking one sheet wonder

Sometimes life demands you keep things simple – and these cards made with the Stampin’ Up!® stamp set Autumn to Remember definitely fall into the simple category.

All I have used is the Autumn to Remember stamp set from the new Stampin’ Up!® Scrapbooking Brochure, four ink pads and some cardstock. 

Tuesday, 27 September 2022

Autumn is here! Aspen Tree Dies sponged card

Stampin Up Aspen Tree Dies

 
Autumn is upon us here in the UK so what better time to bring out the gorgeous Stampin’ Up!® Aspen Tree Dies?

Regular readers will know I am a little obsessed with tree-themed products – a love affair which no doubt began with Stampin’ Up!’s much-loved Lovely As A Tree stamp set. I know that set is much missed by many but there are plenty of other gorgeous tree-themed products available now which more than make up for the loss.

This obsession with trees makes autumn is one of my favourite seasons; we get to see stunning rich colours as the trees change, fascinating fungi growing in the woods and, best of all, it means no more heatwaves!

Thursday, 17 September 2020

Blog hop: Gilded Autumn projects


Would I like to take part in a blog hop showcasing the Gilded Autumn Suite? Yes please! This is my favourite suite from the August-December Mini Catalogue; I love autumn and love woodlands so both the colours and the images speak to me. And what were they saying? “Buy me!” of course.
 
 
These projects were made for my Crafty Friday event this month – waste not, want not! We made two cards; a W-fold card and an aperture card.

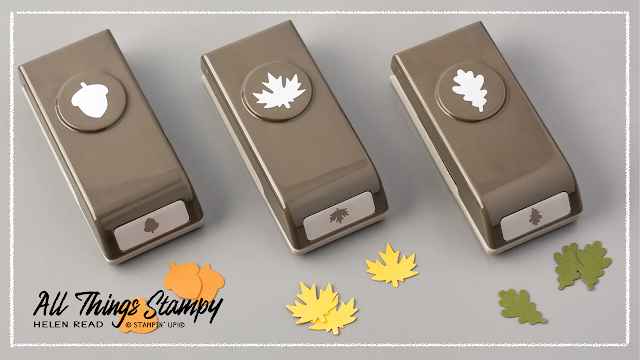
My classes are still taking place via Zoom so I’m having to provide creative ways of supplying kits which guests can add to with their own stamp sets. This time I was tardy so didn’t have time to order their optional extras of stamps and punches ahead of time so they had the unenviable task of fussy-cutting all those leaves and acorns out. I didn’t – I used the punches, which fit the images on the Gilded Autumn Designer Series Paper perfectly. 


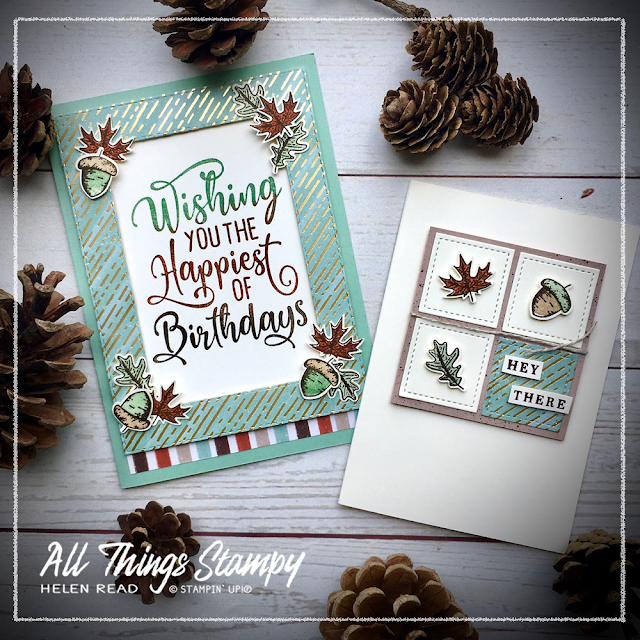
We began with this W-fold card, decorating the front with some strategically placed Gilded Autumn Designer Series Paper and punched out images using the Autumn Punch Pack.

I used this large greeting from Happiest of Birthdays, stamping it in Mint Macaron and Early Espresso for a bit of variety. You can do this using the Stamparatus, or sponges, or simply by winging it with two ink pads. Just remember to start with the paler colour first, so you don’t cross-contaminate. 


Inside, it’s a simple case of adding some squares to a strip of cardstock, which you score in quarters. If you wish, you can download the class instructions here.


I’d sized the squares inside to fit the Stitched Shapes Dies, as I know almost all of my customers have those. But if they didn’t – or didn’t want to die-cut – they could cut them to size using a paper trimmer. I like the addition of a few popped up coloured leaves and acorns to embellish the metallic papers. 


I made two versions; one as a sample ahead of the class, then I changed things up a little on the day. Mainly because, although I am quite disorganised, even I don’t need to stockpile belated birthday cards! 


After the class I decided to go a step further by decorating the envelopes with some leftover strips of Designer Series Paper. This is simply a case of applying adhesive to the envelope flap, sticking it to the DSP and cutting around it carefully with scissors. 


Our second card was a simple aperture card – and the beauty of this is that you can cut any aperture in the front, depending on the dies or punches you have. 

Again, I changed the greeting on the day of the class to make a birthday card. I have lots of autumn birthdays so won’t struggle to find a suitable recipient. 
 

Cut the inside piece and hold it in place without sticking, then stamp the greeting through the aperture. This allows you to get it in position, while still giving you the opportunity to turn it over and have another go if it doesn’t stamp exactly how you planned.

I hope you have enjoyed these projects and are inspired to take a closer look at this gorgeous product suite. For more inspiration, please visit the other blogs in the hop here:


Monday, 17 August 2020

Gilded Autumn Suite - two beautiful cards for the best season of the year

 Gilded Autumn Beautiful Autumn Stampin Up Helen Read Allthingsstampy
 
It’s Monday! And let’s start the week with a look ahead to autumn, one of my favourite times of year.

Summer isn’t really my thing; I burn to a crisp in minutes and the heat just drags me down. Thankfully, not a major problem in the UK, although sadly becoming more of one. As the days shorten, I miss the long, light evenings, but I welcome the cooler weather and beautiful colours that autumn brings. 

It is no surprise, therefore, that the first products I bought from the new August-December Mini Catalogue was the whole of the Gilded Autumn Suite. I haven’t used every part of the Suite yet but I have been enjoying the Beautiful Autumn stamp set, the Autumn Punch Pack and the stunning Gilded Autumn Specialty Designer Series Paper which has beautiful copper and gold foil on some designs, such as the one you see here. 
 
Gilded Autumn Punch Pack Stampin Up Helen Read Allthingsstampy

I have to say, the stamps line up beautifully. They are photopolymer, which helps, and lining up the leaf and acorn centres with the outlines is really easy, although they look good offset, too, if there’s enough of a colour contrast.

Gilded Autumn Beautiful Autumn Stampin Up Helen Read Allthingsstampy

For this card, I used one of my favourite Annual Catalogue stamp sets, Happiest of Birthdays. This is SUCH a great stamp set and ideal for masculine and teen cards as the greeting does all the heavy lifting for you.

Gilded Autumn Beautiful Autumn Stampin Up Helen Read Allthingsstampy

Yes, this is a product-heavy card; on top of all the Gilded Autumn goodies and the Happiest of Birthdays stamp set, it uses the Stitched Rectangles Dies to create a DSP frame around the words. I’ve embellished the frame using those beautiful stamped and punched leaves and acorns.
 
Gilded Autumn Beautiful Autumn Stampin Up Helen Read Allthingsstampy
 
When it came to the second card, I had a bit of a wobble about my acorns, and decided the colours should be the other way round. Green cap, brown acorn. Then I checked with my husband, a keen naturalist (I said naturalist!!!!) and he confirmed that either is fine as they change colour over the course of the season. 
 
Gilded Autumn Beautiful Autumn Stampin Up Helen Read Allthingsstampy
 
This little Very Vanilla Notecard used up some leftover punched pieces and DSP, and the Stitched Shapes Dies. It’s always great to be able to product a second card from the bits left on your craft table, isn’t it? 
 
I love the colours, the crispness and the images... yes I know I shouldn’t say so myself but why not? I made a card and I love it. If you receive this – or indeed the first card – in the post, you know you’re pretty high up in my estimation!

Gilded Autumn Beautiful Autumn Stampin Up Helen Read Allthingsstampy
To get the three-colour greeting, I used the Stamparatus. Always start with the palest colour... inking the top of the stamp using your ink pad or sponges, or even a brayer if that’s easier.

Stamp it using the Stamparatus and then, without moving the cardstock (held down with the magnet), ink up with the next colour. It can be difficult to do this using an ink pad, and can give you a harsh line, which is where the sponges, sponge daubers or brayer come in handy. Even if you manage it with an ink pad, the sponge can soften the line. Stamp and repeat with the darkest colour at the bottom.

Using the Stamparatus allows you to avoid any gaps and go back and add more colour where required.


Monday, 27 July 2020

Sneak Peek: Beautiful Autumn One-Sheet Wonder

Beautiful Autumn Stampin Up One Sheet Wonder Allthingsstampy Helen Read

The theme of today's post is the wonderful One-Sheet Wonder which is an old technique that never goes out of style.

Each week in my customer Facebook Group and in our weekly Show & Tell Zoom sessions I set a challenge. Last week this was to create a One-Sheet Wonder then use it to make one or more projects.

I was blown away by their creativity; we had dogs, leaves, flowers, snowflakes, pine boughs and even cars – and some amazing projects made with their sheets. Not everyone made cards; some made scrapbook pages or boxes, too! Really, anything goes.

Best of all, everyone said they had really enjoyed the challenge and loved making their One-Sheet Wonders.

If you’re not familiar with the One-Sheet Wonder concept, it’s very simple. It’s just a fancy name for making your own patterned paper so all you have to do is take a sheet of any cardstock – it doesn’t have to be white – and stamp all over it.

Beautiful Autumn Stampin Up One Sheet Wonder Allthingsstampy Helen Read

I’ve stamped here using the new Beautiful Autumn stamp set – yes, this is my first Sneak Peek from the new August-December catalogue. I bought the whole Suite of products again because it’s just so lovely, but I have only had chance to use the stamps and dies so far.

Beautiful Autumn Stampin Up One Sheet Wonder Allthingsstampy Helen Read

I wouldn’t say this was the ideal set for a One-Sheet Wonder, mainly because the images are so small that it’s quite time-consuming. This A4 sheet took me over an hour to stamp ... but then I did use eight different ink pads!

Beautiful Autumn Stampin Up One Sheet Wonder Allthingsstampy Helen Read

However, I think it was worth it; I have to blow my own trumpet a little and admit I think it looks pretty fab. Hope you like it too!

Beautiful Autumn Stampin Up One Sheet Wonder Allthingsstampy Helen Read

Beautiful Autumn Stampin Up One Sheet Wonder Allthingsstampy Helen Read


The Beautiful Autumn Bundle includes the Autumn Punch Pack; three fab medium-sized punches which create these gorgeous little leaves. The stamps are all two-step, too, so I stamped the outlines in a darker shade and then filled in with a lighter one. They’re photopolymer, so positioning is really easy.

Beautiful Autumn Stampin Up One Sheet Wonder Allthingsstampy Helen Read


To mat the greeting, I used the Tasteful Labels dies on Soft Suede cardstock  and embossed them using the Greenery Embossing Folder. My obsession with leaves and trees means many of my products co-ordinate beautifully across different Suites.

Beautiful Autumn Stampin Up One Sheet Wonder Allthingsstampy Helen Read
My main tip for creating a One-Sheet Wonder is to start with the largest stamps and stamp randomly over the sheet, leaving roughly equal spaces between them. Remember to keep turning the stamps so you don't end up with a pattern.

Take the next largest stamp and stamp again in a different colour. Repeat until you get to the smallest stamps. This allows you to maximise the space and get as many images on there as possible.

I usually say to start with the palest colour and work your way through to the darkest colour, but this is one rule that is definitely made to be broken!

Beautiful Autumn Stampin Up One Sheet Wonder Allthingsstampy Helen Read

When your sheet is stamped, you can cut it up as you wish to make as many projects as you like. I simply cut my sheet into quarters, then cut each one down to fit onto a card front, slicing them into thirds. The excess strips were used to embellish the insides of the cards.

Beautiful Autumn Stampin Up One Sheet Wonder Allthingsstampy Helen Read
When you cut up your sheet, you may find you have some empty areas around the edges. Don't worry, you can fill these in with more stamping if necessary.

Another tip to maximise your One-Sheet Wonder is to stamp all over with your chosen colours, then cut in half and add another colour to one of the pieces. You can repeat this if you wish to get lots of different looks from one sheet.

One of the main advantages of a One-Sheet Wonder is that it’s a time-saving device if you have a lot of cards to make (unless you use tiny stamps and eight different ink pads!), which means it’s ideal for your Christmas cards or for party invitations.

The other main advantage is that it’s very therapeutic. You just stamp away merrily without having to think too hard about what you’re doing. And we all need a bit of mindless crafting these days, don’t we?

Beautiful Autumn Stampin Up One Sheet Wonder Allthingsstampy Helen Read

Friday, 3 November 2017

Painted Harvest with Woodland Embossing Folder


I love the clean crispness of this card, which I blatantly CASEd from the talented Monica Gale. The Woodland Embossing Folder has been around for a while now but it always worth adding to your craft supplies if you don’t already have it.

I used a splash of copper foil below the greeting and echoed this with my very last piece of copper trim. Might have to get some more...


SaveSave

Friday, 25 September 2015

Tutorial: Thankful Forest Friends matchbook


It’s said that there are only two certainties in life; death and taxes. But I would add a third … and that is what bears get up to in the woods. 

Perhaps it’s because my husband spends most of his time working with seven-year-olds, or maybe it’s just because I’m deeply immature, but I never tire of a poo joke. Subtlety’s not usually one of my virtues but I thought I’d play down my schoolboy humour in this project, keeping the joke purely in my head. I was making more than a dozen of these, so surely at least one person would “get it”?

And yes, a customer approached me at my Christmas workshop and said “this IS supposed to be bear poo, right?” Call ’em what you like, chocolate raisins are still one of my favourite foods of all time. 

For some inexplicable reason, considering how short of time I am at the moment, I decided to do a tutorial for this project. So here it is…

(I’ve used inches, purely on a whim, not sure why)

You will need:

Stamps
Thankful Forest Friends
Tin of Cards stamp set

Ink pads
Early Espresso
Old Olive

Tools
Fringe scissors
1 3/4” circle punch

Supplies
Tip Top Taupe cardstock measuring 2 3/4” x 7”
Farmers Market Designer Series Paper, wood pattern, measuring 2 5/8” x 2 5/8”
Old Olive cardstock: 2 3/4” x 1 1/4”
Old Olive cardstock: 2 3/4” x 1”
Very Vanilla cardstock for stamping
Small cello bag or similar to contain treats
Linen Thread

Instructions

1. Begin by scoring the Tip Top Taupe cardstock at 2 3/4” and 3” from one end

2. Measuring from the other end, score at 3/4” and 1” 


3. Put a few chocolate raisins in a bag, removing the very large ones because they’re poisonous to anyone except Stampin’ Up!® demonstrators. Don’t overfill or the bags won’t fit in the matchbooks. Also you may run out before finishing and the plan is to have lots leftover for research purposes


4. Take your square of DSP and attach to the square panel of Taupe cardstock 

5. Punch a circle from scrap paper and attach to the centre of the DSP. This will act as a guide so you can punch accurately


6. When you’ve punched it out, stamp the foliage just above the circle, with the crease at the top


7. Take your Old Olive pieces and cut a wavy line to about 1” and 3/4” as shown. Fringe with the scissors


8. Using tape to secure at the bottom edge only, attach the larger fringed piece to the Taupe cardstock, followed by the smaller piece on top. This will leave a little pocket into which you can slide the front of the matchbook


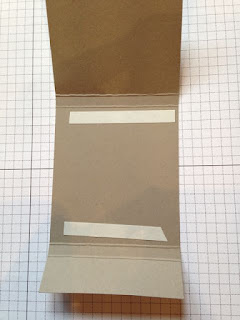
9. Fold along all score lines in the same direction, then apply tape on the inside as shown. Now you can use this to secure your treats


10. Stamp and cut out your bear. You don’t need to fussy cut around the toes as they won’t be seen
Apply tape to the bottom of the bear only - it needs to be free at the top or the matchbook won’t open


11. Slide the bear (carefully, this is REALLY tricky) between the two layers of fringed cardstock. Do the same with a greeting, if desired

12. Finally, carefully close the matchbook (I found this easier by putting it on its side so I could look down on the layers and see where to slide it in) and tie with linen thread for extra security.


The small print

This is my personal blog and my sole responsibility as an Independent Stampin' Up!® demonstrator. All images are © Stampin' Up!® All content including photographs, projects and text are © Helen Read, unless otherwise stated. Please feel free to copy my ideas for your personal use and inspiration - if you are a SU demonstrator you may use these ideas for your events but please give credit where it is due. Please do not use my ideas for monetary gain, competitions or publication. The images on this blog - including blog buttons - should not be copied and used elsewhere on the internet or on CDs.