Showing posts with label One-Sheet Wonder. Show all posts

Tuesday, 17 September 2024

Four simple cards in one using Autumn to Remember Stampin’ Up!® stamp set

Stampin Up Autumn to Remember simple cardmaking one sheet wonder

Sometimes life demands you keep things simple – and these cards made with the Stampin’ Up!® stamp set Autumn to Remember definitely fall into the simple category.

All I have used is the Autumn to Remember stamp set from the new Stampin’ Up!® Scrapbooking Brochure, four ink pads and some cardstock. 

Tuesday, 25 October 2022

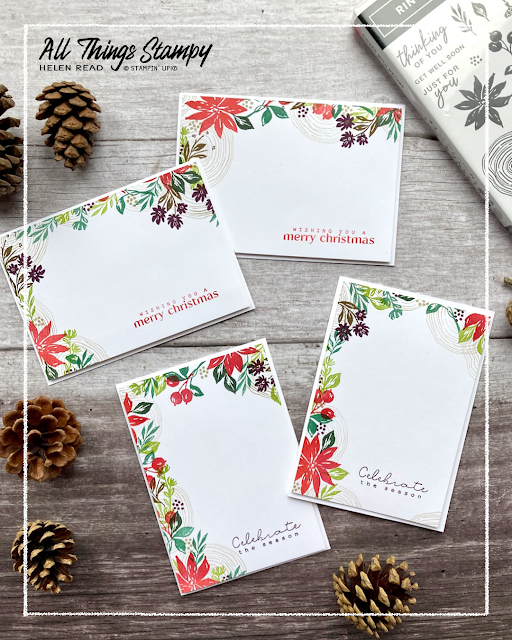
Four cards in one go with Ringed With Nature Stampin’ Up!® stamp set

Ringed With Nature Stampin Up UK card ideas
 
Today I am sharing a fantastic way to make four cards in one go, using any Stampin’ Up!® stamp set which features a variety of floral and/or leaf images –  I used the Ringed With Nature stamp set.

This technique is ideal for Christmas cardmaking as it’s relaxing, fun and easy – plus, as I said, you get four cards in one go!

Friday, 29 March 2019

Bloom by Bloom One-Sheet Wonder


I do like a One-Sheet Wonder; it's a really satisfying way to make a lot of cards in one session.

If you’ve never heard of this, you simply stamp all over your cardstock at random, then cut it up to make projects. There are lots of OSW templates out there – just Google "One sheet wonder A4" (or whatever size you want) – or you can just make your own up as you go along.


Here are my tips for One-Sheet Wonders:

1. Start with the largest image using the lightest colour.
2. Work your way to the smallest image in the darkest colour.
3. Don’t be afraid to overlap images.
4. Fill in any gaps with the smallest images in any colour – use this as an opportunity to balance the colour distribution.

Bonus tip: Stamp with just a few colours, then cut your sheet in half. Continue stamping in more colours onto one sheet only. This way you can get two completely different looks from just one sheet.


Friday, 11 January 2019

Bloom by Bloom one-sheet wonder


A one-sheet wonder was just the ticket to create a big batch of these for my team. My tip for a one-sheet wonder is this: Start with the largest stamps in the palest colours, and work your way down to the smallest stamps in the lightest colours. You can then use the tiny stamps to fill in any gaps and balance out the colours to they are relatively evenly distributed.

This is the Bloom by Bloom stamp set and I love its bold imagery. Even if you’re not keen on bright colours, don't dismiss this set as it looks fab in subtles, too!


Friday, 6 October 2017

Painted Harvest one-sheet wonder notebooks


I needed LOTS of notebooks to give to my All-Day Craftathon guests so the obvious solution was a One-Sheet Wonder... and Painted Harvest is the PERFECT set for this technique.

For those unfamiliar with the concept, you simply take a full sheet of cardstock - any size - and stamp all over it. Then you cut it up to make your projects.

My top tips for One-Sheet Wonders:

1. Always start with the biggest stamps, then work your way down to the smallest, using them to fill in any gaps.

2. Largest images usually (but not always) work best in the palest shades, working your way up to the darkest colours for your smaller images.

3. Once you’ve cut up your cardstock for your projects, don’t be afraid to go back and stamp in any gaps. It’s not cheating!

4. Don’t feel you have to follow an online “plan” for a One-Sheet Wonder... just go your own way!

I didn’t hold back on the colours, here’s my colour combo for this project...


The old-style ink pads don’t show their name on the edge; they are Wild Wasabi, Soft Suede and Pear Pizzazz

Friday, 9 December 2016

Mini one-sheet wonder with Hang Your Stocking


Today is Crafty Friday… a relaxed morning class for a small group of crafters. We take things slowly, learn new techniques and there’s usually a freestyle element to the event. 

Today we will be making boxes, just in time for our Christmas gift wrapping needs. 

But before that, I realise I haven’t yet shown you what we made last month, when we created a mini One-Sheet Wonder. This is where you stamp randomly all over a piece of cardstock, then cut it up to make several projects. Usually you stamp on a full sheet of cardstock but, due to time restraints we stamped on a half sheet, A5. 

The trick with a One-Sheet Wonder is always to start with your largest stamp, and work down to your smallest. Also, when you cut up your pieces, don’t feel you can’t add more images if you see any ‘bare’ areas which need filling in. 

These are the three cards I made and showed to the ladies, before letting them loose to copy whichever ones they liked, or create their own designs.  I love these clean, fresh colours - Real Red, Dapper Denim, Soft Sky, Old Olive and Pear Pizzazz. 


Monday, 28 December 2015

Mix It Up Monday: Botanical Blooms bundle One-Sheet wonder


It’s Mix It Up Monday again and time for another colour combination from my In Color charts.

I bet you thought I’d done a runner, didn’t you? Apologies for the long absence, I’ve been a little busy with Christmas which, coupled with the husband and I still feeling quite under the weather, has meant stamping and blogging has been put on the backburner. 

But I hope you had a good Christmas and, if in the UK, are enjoying the extended break. 

I’ve just had a fun session playing with new products with the intention of creating one card for Mix It Up Monday… which rapidly turned into four projects! That’s because this stamp set, Botanical Blooms, lends itself perfectly to the one-sheet wonder technique and, once I got started, I realised (to my surprise) just how much I liked this particular colour combination. 


For the uninitiated, a one-sheet wonder is where you stamp randomly all over a sheet of cardstock, then cut it up to make multiple projects. You’ll find lots of one-sheet wonder ideas on the web but I’m sure you can also make up your own, just as I did for these projects.

I began by cutting down the cardstock to 11in x 6in and creating a gift bag using the Gift Bag Punch Board, which is rapidly becoming my new favourite toy. Instead of punching the holes in the top to tie it closed, I punched two “half-holes” in the sides, to act as notches for some jute twine. 


I finished off by embellishing with some of the gorgeous flowers you can create using the co-ordinating Botanical Builder Framelits Dies.  No more fussy-cutting - yay!

Now to use the leftover pieces… and I soon rustled up the simple project, shown next to the bag, based on the sample in the Sale-a-Bration brochure. 

Next came this clean and simple Thank You card. Well, it’s clean now but it was never simple as I had a bit of an accident when I creased my lovely white cardstock with a very dirty bone folder. So, instead of a lovely white card base, I ended up cutting it down and mounting it onto a Mint Macaron one instead… and covering up some stray ink smudges with not-so-random flowers. 


Finally I made this Blushing Bride number with my largest piece of stamped cardstock and a simple greeting. I even have a piece of stamped cardstock left over but I ran out of steam so will have to save that for another day. Hope you like the projects and are inspire to create your own one-sheet wonder! 


The small print

This is my personal blog and my sole responsibility as an Independent Stampin' Up!® demonstrator. All images are © Stampin' Up!® All content including photographs, projects and text are © Helen Read, unless otherwise stated. Please feel free to copy my ideas for your personal use and inspiration - if you are a SU demonstrator you may use these ideas for your events but please give credit where it is due. Please do not use my ideas for monetary gain, competitions or publication. The images on this blog - including blog buttons - should not be copied and used elsewhere on the internet or on CDs.