Friday, 31 July 2020

One-Sheet Wonder using Just Jade and Forever Greenery

Forever Greenery Stampin up One Sheet Wonder allthingsstampy

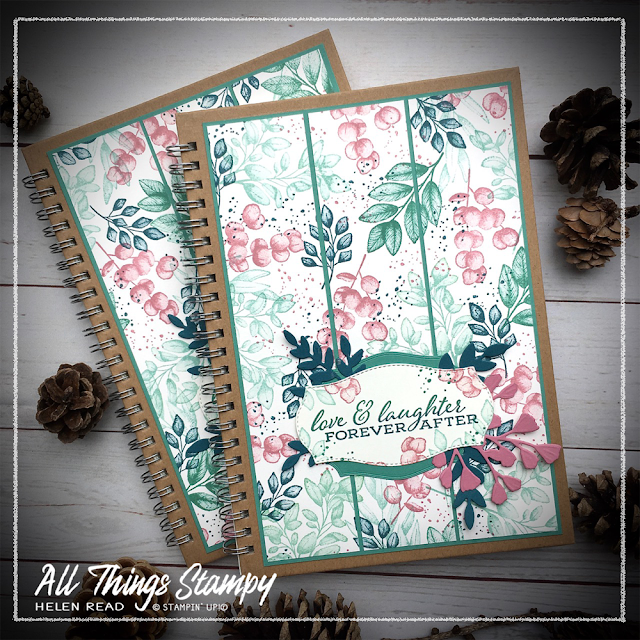
If an idea's worth using, it's worth reusing! I see no point in reinventing the wheel, so for these projects I simply revisited an old design in a new colour combination.

Forever Greenery Stampin up One Sheet Wonder allthingsstampy

I still had some more people to welcome into my team so decorated another batch of A5 notebooks and made matching cards.

Forever Greenery Stampin up One Sheet Wonder allthingsstampy

Again, it's a one-sheet wonder (spotted a theme this week?) which is a pretty speedy way of making your projects. And versatile, too – you can use your one-sheet wonder (OSW) in any way you like. I've simply cut mine into pieces a bit smaller than my finished project, then cut into thirds to create this triptych effect.

Forever Greenery Stampin up One Sheet Wonder allthingsstampy

The colour combo is a little different and is one I've taken from my In Color combinations charts. I figured I may as well use the combinations now I've gone to the trouble of creating them!
Forever Greenery Stampin up One Sheet Wonder allthingsstampy
Decorating a notebook is easy – it's just like a big card. Don't overthink it, just play around on a piece of card and then mount it onto your notebook front.


Monday, 27 July 2020

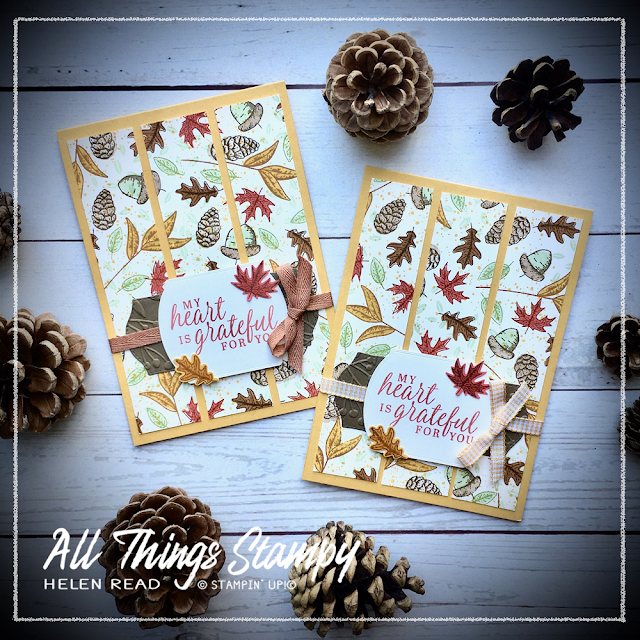
Sneak Peek: Beautiful Autumn One-Sheet Wonder

Beautiful Autumn Stampin Up One Sheet Wonder Allthingsstampy Helen Read

The theme of today's post is the wonderful One-Sheet Wonder which is an old technique that never goes out of style.

Each week in my customer Facebook Group and in our weekly Show & Tell Zoom sessions I set a challenge. Last week this was to create a One-Sheet Wonder then use it to make one or more projects.

I was blown away by their creativity; we had dogs, leaves, flowers, snowflakes, pine boughs and even cars – and some amazing projects made with their sheets. Not everyone made cards; some made scrapbook pages or boxes, too! Really, anything goes.

Best of all, everyone said they had really enjoyed the challenge and loved making their One-Sheet Wonders.

If you’re not familiar with the One-Sheet Wonder concept, it’s very simple. It’s just a fancy name for making your own patterned paper so all you have to do is take a sheet of any cardstock – it doesn’t have to be white – and stamp all over it.

Beautiful Autumn Stampin Up One Sheet Wonder Allthingsstampy Helen Read

I’ve stamped here using the new Beautiful Autumn stamp set – yes, this is my first Sneak Peek from the new August-December catalogue. I bought the whole Suite of products again because it’s just so lovely, but I have only had chance to use the stamps and dies so far.

Beautiful Autumn Stampin Up One Sheet Wonder Allthingsstampy Helen Read

I wouldn’t say this was the ideal set for a One-Sheet Wonder, mainly because the images are so small that it’s quite time-consuming. This A4 sheet took me over an hour to stamp ... but then I did use eight different ink pads!

Beautiful Autumn Stampin Up One Sheet Wonder Allthingsstampy Helen Read

However, I think it was worth it; I have to blow my own trumpet a little and admit I think it looks pretty fab. Hope you like it too!

Beautiful Autumn Stampin Up One Sheet Wonder Allthingsstampy Helen Read

Beautiful Autumn Stampin Up One Sheet Wonder Allthingsstampy Helen Read


The Beautiful Autumn Bundle includes the Autumn Punch Pack; three fab medium-sized punches which create these gorgeous little leaves. The stamps are all two-step, too, so I stamped the outlines in a darker shade and then filled in with a lighter one. They’re photopolymer, so positioning is really easy.

Beautiful Autumn Stampin Up One Sheet Wonder Allthingsstampy Helen Read


To mat the greeting, I used the Tasteful Labels dies on Soft Suede cardstock  and embossed them using the Greenery Embossing Folder. My obsession with leaves and trees means many of my products co-ordinate beautifully across different Suites.

Beautiful Autumn Stampin Up One Sheet Wonder Allthingsstampy Helen Read
My main tip for creating a One-Sheet Wonder is to start with the largest stamps and stamp randomly over the sheet, leaving roughly equal spaces between them. Remember to keep turning the stamps so you don't end up with a pattern.

Take the next largest stamp and stamp again in a different colour. Repeat until you get to the smallest stamps. This allows you to maximise the space and get as many images on there as possible.

I usually say to start with the palest colour and work your way through to the darkest colour, but this is one rule that is definitely made to be broken!

Beautiful Autumn Stampin Up One Sheet Wonder Allthingsstampy Helen Read

When your sheet is stamped, you can cut it up as you wish to make as many projects as you like. I simply cut my sheet into quarters, then cut each one down to fit onto a card front, slicing them into thirds. The excess strips were used to embellish the insides of the cards.

Beautiful Autumn Stampin Up One Sheet Wonder Allthingsstampy Helen Read
When you cut up your sheet, you may find you have some empty areas around the edges. Don't worry, you can fill these in with more stamping if necessary.

Another tip to maximise your One-Sheet Wonder is to stamp all over with your chosen colours, then cut in half and add another colour to one of the pieces. You can repeat this if you wish to get lots of different looks from one sheet.

One of the main advantages of a One-Sheet Wonder is that it’s a time-saving device if you have a lot of cards to make (unless you use tiny stamps and eight different ink pads!), which means it’s ideal for your Christmas cards or for party invitations.

The other main advantage is that it’s very therapeutic. You just stamp away merrily without having to think too hard about what you’re doing. And we all need a bit of mindless crafting these days, don’t we?

Beautiful Autumn Stampin Up One Sheet Wonder Allthingsstampy Helen Read

Friday, 24 July 2020

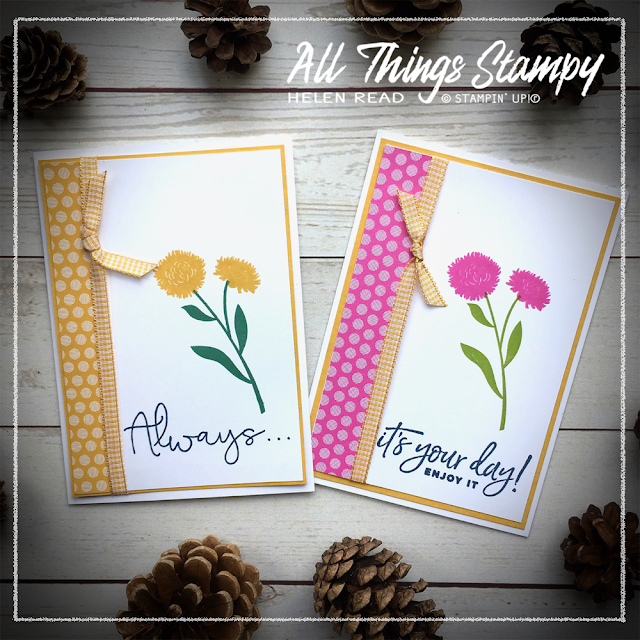
More ideas for the Flowers for Every Season Suite

https://www.stampinup.uk/products/flowers-for-every-season-ribbon-combo-pack?demoid=5000075

I’m finishing the week with yet more ideas for the Flowers for Every Season Suite from Stampin’ Up!® – this time focussing on the lovely Jar of Flowers stamp set

You can buy this stamp set on its own but really, you kind of need the punch, too, to get the most out of it. The Jar of Flowers bundle features some beautiful floral images and a fantastic Jar Punch.

 https://www.stampinup.uk/products/flowers-for-every-season-ribbon-combo-pack?demoid=5000075

But wait...  it gets better! The Jar Punch can be used to fit around the stamps, on its own – or with the Mason Jar Shaker Domes. Yes, you can make very quick and easy shaker projects, just like this one...
 
https://www.stampinup.uk/products/flowers-for-every-season-ribbon-combo-pack?demoid=5000075

And this one, which combines the Jar Punch and Mason Jar Shaker Domes with the gorgeous Celebrate Sunflowers bundle I showcased on Wednesday....

https://www.stampinup.uk/products/flowers-for-every-season-ribbon-combo-pack?demoid=5000075

And look at that lovely Just Jade gingham ribbon, too! Who doesn’t love gingham?


Please do let me know if I can help you with any of these products – if you’re in the UK, I would love to have you as a customer, or even as a member of my team!


Wednesday, 22 July 2020

Flowers for Every Season Suite ideas – celebrating sunflowers


Flowers for Every Season Stampin' Up Allthingsstampy

This week is all about the Flowers for Every Season Suite and I have some amazing projects to show you, which show off all the gorgeous products within the Suite.

This is a “Super Suite”... well, to be honest, I can’t remember the official Stampin’ Up!® term but what I mean to say is that it’s a BIG one, with two bundles, Designer Series Paper, Memories & More cards and a whole lot more. Check out some of the fabulous projects you can make with it here...

 Flowers for Every Season Stampin' Up Allthingsstampy

The Celebrate Sunflowers bundle is just fabulous – big showy sunflowers always bring a smile to people’s faces. 
 
Flowers for Every Season Stampin' Up Allthingsstampy

This card is made by masking with a torn piece of sticky note so you leave a rough centre panel when you stamp around it. Clever, simple and effective.  

Flowers for Every Season Stampin' Up Allthingsstampy

Two very different looks here – the card at the front is made using the Sunflowers Dies, while the one at the back is stamped onto Crumb Cake cardstock and coloured with Watercolor Pencils. Some spattering with Frost White Shimmer Paint gives it an extra touch.
  
  Flowers for Every Season Stampin' Up Allthingsstampy
This shows how you can mix things up... using the Flowers for Every Season Designer Series Paper with Ornate Thanks and some fancy gold heat embossing. Don’t have the paper? You could use the Flowers for Every Season Memories & More cards instead... or indeed any Designer Series Paper or Memories & More cards. Be creative and adapt!


Monday, 20 July 2020

10 quick cards using Flowers for Every Season Memories & More Cards

Flowers for Every Season Quick Cards allthingsstampy Helen Read Memories & More


Socially distant crafty get-togethers have been a bit of a life-saver during lockdown; it’s so lovely to meet up with other crafters via Zoom to create our projects.

For the past five weeks I have been running a One O’Clock Club on Tuesdays, where we make two quick cards at each session. These quick cards are easy to recreate at home with Stampin’ Up!®’s Flowers for Every Season Memories & More cards.

My first One O’Clock Club series comes to an end this week but I will be starting another round soon using the Whale of a Time Suite – please get in touch ASAP if you’d like to join in. This time the projects will be repeated in a Saturday session, so you can hop in and out of Tuesdays and the Saturday to fit around your other plans.

Check out the projects we made...

Flowers for Every Season Quick Cards allthingsstampy Helen Read Memories & More

We’ve been using the Flowers for Every Season Memories & More cards from Stampin’ Up!®, along with the Flowers for Every Season Memories & More cards and envelopes, with guests using their own greeting stamps and ink pads. Week 1 saw us use Bumblebee and Cinnamon Cider – two great new In Colors™ which work really well together.

One of the great things about these Memories & More Cards – from the Flowers for Every Season Suite – is that they use the new In Colors™, so many of the people who took part in my In Color Shares had their new ink pads to play with.

Flowers for Every Season Quick Cards allthingsstampy Helen Read Memories & More

For this project, we used ‘Feeling’ from the sticker sheet and cut out word strips from one of the Memories & More cards. The flowers and leaves are white stickers which we sponged using yellow and green inks.

Flowers for Every Season Quick Cards allthingsstampy Helen Read Memories & More

It’s no secret that Magenta Madness is my least favourite new In Color™ – I’m just not a pink fan at all. But I have to say I am warming to it, and think it packs a certain punch when used in small doses. No small doses for this project though! It’s a bit more subtle in this one...

Flowers for Every Season Quick Cards allthingsstampy Helen Read Memories & More

Flowers for Every Season Quick Cards allthingsstampy Helen Read Memories & More

It was all about the blues in Week 3, when we focused on Misty Moonlight. The Memories & More card does all the work here, with just a simple greeting stamped onto one of the stickers from the sheet which comes in the pack.

Flowers for Every Season Quick Cards allthingsstampy Helen Read Memories & More

I really love the sunflower pattern on this card. The greeting comes on the sticker sheet and we stuck it to some Misty Moonlight cardstock, then cut freehand around it to create an on-trend border.

Flowers for Every Season Quick Cards allthingsstampy Helen Read Memories & More

The colour combo is simple here: just the Poppy Parade of the Memories & More card, with white and the silver edged card base. The Tasteful Labels dies do a lot of the work here. Don’t have those yet? Trust me, you really need them!  

Flowers for Every Season Quick Cards allthingsstampy Helen Read Memories & More

You have have already noticed that once again I broke my personal rule not to use retired products. However, in these unprecedented times (aren’t you just SICK of hearing that?), I thought it would be ok to take advantage of the foil-edged cards and envelopes being heavily discounted at retiring time, so I could keep costs down for the guests. I stocked up big time but have completely run out now!

Flowers for Every Season Quick Cards allthingsstampy Helen Read Memories & More

It’s our last session tomorrow and we’re finishing off with two Just Jade cards. The sunflowers get another outing; they’re fussy-cut from two different Memories & More cards and the big greeting is from Rooted in Nature.

Flowers for Every Season Quick Cards allthingsstampy Helen Read Memories & More

It’s another appearance for the monochromatic look, too – this time in mellow Just Jade with a flower sticker to finish off. The Stitched Nested Labels dies provide layers to house the greeting, from the Tasteful Touches stamp set.

If you’re in the UK you are more than welcome to join my Zoom sessions – because with Zoom, location is no barrier. I’ve had several new ladies join me who can’t normally come to my events due to transport issues. 

And if you’re already a demonstrator, I hope this post has inspired you to try your own distance classes and workshops. Every guest received half a pack of Memories & More cards, half a pack of Memories & More cards and envelopes, plus card bases, cardstock, ribbon and embellishments. I did all the die-cutting in advance so the projects were really speedy – just right for a lunch break for those homeworkers out there!


Friday, 17 July 2020

Spotlight on the Nothing's Better Than bundle

Nothing's Better Than Stampin' Up cards projects allthingsstampy helen read
What’s your secret (or not so secret) vice? Coffee? Cocktails? Cookies? Chocolate? This set covers all of those addictions and I really love the retro colours and imagery on these projects. 

Nothing's Better Than Stampin' Up cards projects allthingsstampy helen read

My vice is definitely chocolate, so the Nothing's Better Than stamp set definitely speaks to me!

Have you spotted it yet? It's on Page 91 of the Annual Catalogue and features a great range of images and greetings to create fun cards like this. There’s the Nothing’s Better Than photopolymer stamp set... and, even better, the bundle features all these great dies, too, so you can cut out your words and shapes. 

Check out these fabulous samples...
Nothing's Better Than Stampin' Up cards projects allthingsstampy helen readChocolate? Yes please! But it has to be milk and good quality – for some bizarre reason people think I like dark chocolate but I don’t; that goes straight into the baking cupboard.
Nothing's Better Than Stampin' Up cards projects allthingsstampy helen read Coffee? No thanks! I’d much rather have a nice cup of tea. Well I AM British, after all!
Nothing's Better Than Stampin' Up cards projects allthingsstampy helen read
Cookies? Yes please! Chocolate chip, of course! I just love the clever creation of a plate using the Layering Circle Dies in this project.

Wednesday, 15 July 2020

Have you earned your Bonus Days Coupons yet?

Stampin Up Bonus Days coupon allthingsstampy special offer discount coupon

Have you earned your Bonus Days Coupons yet? This is a great summer promotion which is well worth taking advantage of.

Here’s what you need to know:
  • For every £45 you spend (before shipping) between now and 3rd August, you will receive an email coupon for £4.50 to spend between 4th and 31st August. 
  • You earn a £4.50 coupon for every £45 you spend with no upper limit.
  • You can earn and spend them via my store or by ordering directly through me.
  • Your coupon will be emailed to you so make sure your email address is up-to-date, either in the store or in my records.
  • The email will arrive shortly after you place the order, so if it doesn't, please check your junk mail then get in touch and I'll chase it up.
  • Hang onto your codes!
If you don’t have an email address and would like to order through me, you can still earn and redeem coupons through me.

Stampin Up Bonus Days coupon allthingsstampy special offer discount coupon

Monday, 13 July 2020

8+ card ideas using Stampin' Up!®'s Field of Flowers

Stampin up Field of Flowers card ideas allthingsstampy helen read

Following my cardmaking class on Saturday, using the Stampin' Up!® stamp set Field of Flowers, I have a mega post for you today.

Due to an absence of commonsense, I ended up offering eight cards in two hours, which was stretching the bounds of possibility a little but I think most people managed almost all of the cards in what turned into a three-hour session.

This was all held remotely via Zoom so we could keep safe, and everyone had their own Field of Flowers stamp set to play with, and stamp in their chosen colours. The Confetti Flowers Border Punch was offered as an optional extra.

As the elderly members of my family are running out of birthday cards and have been threatened with Dire Consequences if they go shopping, I decided to switch up the greetings for the cards I made during the session, so I can replenish their supplies.

You’ll notice I've used the silver foil-edged cards for this session; I don’t usually use retired Stampin' Up!® products but I these were such a bargain in May that I couldn't resist stocking up to keep class costs down. However, maybe I should have stocked up more because the class proved so popular that I ended up leaving myself short!

Stampin up Field of Flowers card ideas allthingsstampy helen read

I kept the card layers largely neutral – Misty Moonlight, Night of Navy and a splash of Bumblebee – so people could add their own inks without clashing. While I made the initial samples in a wide variety of colours to show people different options, my personal choice of colours for the session was Granny Apple Green, Magenta Madness, Misty Moonlight, Bumblebee and Coastal Cabana. Bright and cheerful!

Stampin up Field of Flowers card ideas allthingsstampy helen read

First card of the day was this one – as it was the most complicated. It uses a piece of the gorgeous
In Good Taste Designer Series Paper which goes with everything. I showed the project using the flowers punched out separately but not all guests had this option as the Confettie Flowers Border Punch was an add-on to the class.
If you don't have the Confetti Flowers Border Punch, when you’re stamping with Field of Flowers I suggest you use a paler green such as Pear Pizzazz, Mint Macaron or Soft Sea Foam for the grass and leaves. Then use a stronger colour for your flowers so they stand out. If you're using the punch, then anything goes!
 
 Stampin up Field of Flowers card ideas allthingsstampy helen read

Just changing one colour can give your project a whole new look. This is created using the One-Sheet Wonder technique but I swapped out the Misty Moonlight from my original sample on the left to use Coastal Cabana during the class. I think I prefer the darker version though, what about you?

Stampin up Field of Flowers card ideas allthingsstampy helen read

A simpler version of this same card is to stick to just one colour – Magenta Madness – to stamp tiny flowers all over your background. Because there are several flowers on one stamp, this is really quick to make.

Stampin up Field of Flowers card ideas allthingsstampy helen read

Another card I changed during the class was this one. I couldn’t find my strip of Bumblebee Designer Series Paper so thought (wrongly, as it happened) I must have run out and changed it to Magenta Madness. I hardly dare admit this but Magenta Madness is beginning to grow on me...

Stampin up Field of Flowers card ideas allthingsstampy helen read

A classic triptych design. You can do this in one of two ways; stamp the whole piece and cut it into three. Or cut it up first and stamp afterwards. I tried both and decided that the best route would be to stamp the grass and flowers while it's still in one piece (a bit of careful lining up is required), then add dragonflies once it's sliced up. Can you spot the not-so-deliberate ‘mistake’? I added an afterthought dragonfly in the wrong colour!

Need a small piece of cardstock but don't have the right shade? I created this Coastal Cabana strip by pressing a piece of Whisper White into an ink pad.

Stampin up Field of Flowers card ideas allthingsstampy helen read

When you’re making eight cards in a morning, you need at least one Simple Stamping project! And this one could hardly be simpler; just stamps, ink and one of our fabulous Whisper White Notecards & Envelopes. I use these All The Time, they’re just so handy to have.

Stampin up Field of Flowers card ideas allthingsstampy helen read

Field of Flowers is such a versatile stamp set. You can make subtle, tasteful, classy cards with it... or embrace the Brights! I've used Magenta Madness, Granny Apple Green, Bumblebee and Bermuda Bay and popped up a single flower to add interest.

Stampin up Field of Flowers card ideas allthingsstampy helen read

And finally, here’s the original version of the Bumblebee card you see in the first picture. Just a simple strip stamped with grass and flowers, to show someone you’re thinking of them.

I hope you’ve enjoyed this foray in to a Field of Flowers and will consider adding this beautiful set to your shopping list. You can buy the set from my website here. And if you add the Confetti Flowers Border Punch on, too, you’ll save 10%!

 

The small print

This is my personal blog and my sole responsibility as an Independent Stampin' Up!® demonstrator. All images are © Stampin' Up!® All content including photographs, projects and text are © Helen Read, unless otherwise stated. Please feel free to copy my ideas for your personal use and inspiration - if you are a SU demonstrator you may use these ideas for your events but please give credit where it is due. Please do not use my ideas for monetary gain, competitions or publication. The images on this blog - including blog buttons - should not be copied and used elsewhere on the internet or on CDs.