Showing posts with label Shaker card. Show all posts

Tuesday, 18 October 2022

Save money with my zero waste shaker card and tags

Budget crafts Stampin Up zero waste shaker card tags

Do you want to know how to save money on your Stampin’ Up!® projects? I am here to help you get the most out of everything you buy, and already own.

As the cost of living crisis deepens worldwide and, it seems, particularly here in the UK, I want you to know that I’ve got your back. I have lots of ideas to help you make your Stampin’ Up!® supplies stretch further, based on years of being a frugal crafter who hates waste and wants to save the planet. 

Today I want to show you my zero waste shaker card and matching tags. Other than the card base itself, everything you see here is made from scraps of Stampin’ Up! cardstock and Designer Series Paper, leftovers from other projects or kits, or actual waste. 

Monday, 24 August 2020

10 simple cards using the Whale of a Time Suite

Whale of a Time Stampin Up Allthingsstampy Helen Read

How fabulous is the Whale of a Time Suite? I bought the whole suite collection, which is not something I’d done until this year. Now I’m all over it as a concept as it’s so easy!
Public service announcement
 If you’re shopping online and the suite is showing as unavailable or on backorder, do check the individual items. It may be that just one item is temporarily out of stock which puts the whole suite on backorder. But you can still order the individual items separately.

Whale of a Time Stampin Up Allthingsstampy Helen Read

Ok, onto the projects! Above are all of the projects were are currently making in this month’s remote workshops. Guests have had the choice of attending every Tuesday at 1pm, or coming to the Saturday morning class which was this past weekend. They could even attend both if they wished – and one lady turned up “just to watch and heckle”. 😂

Each week the ladies make two simple cards using the Whale of a Time Designer Series Paper, adding their own greeting stamps or using the Whale Done stamp set if they chose it as an optional extra. For eight of the cards we used Whisper White Notecards and Envelopes, with two shaker cards on a standard Pool Party card base.

Whale of a Time Stampin Up Allthingsstampy Helen Read

We began with a double whale week and, thanks Stampin’ Up!®'s fabulous co-ordination, you can punch out the large whales from the DSP. Those who hadn’t upgraded to include the Whale Punch could fussy cut them instead. We set aside one of the whale patterned pieces to use just for this purpose. 

Whale of a Time Stampin Up Allthingsstampy Helen Read

I love this Pool Party Sheer Ribbon, too – it’s so soft and shimmery.

Whale of a Time Stampin Up Allthingsstampy Helen Read
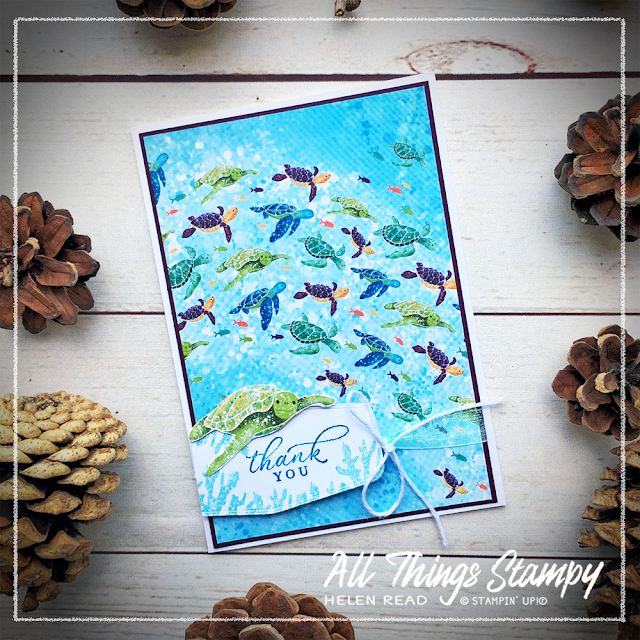
 Onto Week 2... which was turtle week and another opportunity to show off the gorgeous DSP...

Whale of a Time Stampin Up Allthingsstampy Helen Read

To provide a cute focal point for the projects, we fussy cut the turtles from the DSP. Again, we set aside the piece with the turtles on to use for this. 

Whale of a Time Stampin Up Allthingsstampy Helen Read

The Whale of a Time Sequins make great accents when stuck down with a Glue Dot. I love these tiny translucent shells. 

Whale of a Time Stampin Up Allthingsstampy Helen Read

I had die-cut a series of labels using the Tasteful Labels Dies and Stitched Rectangles Dies. All different, so I could cut them all for each person in one go.
I did throw in a couple of shaker cards to mix things up a little, which meant some preparation time using the Snow Globes Scenes Dies but worth it I think as they look so fab with the sequins behind.

Whale of a Time Stampin Up Allthingsstampy Helen Read

This was the first one; it’s hard to photograph a shaker card but you may just be able to see a cut-out turtle within the Snow Globe Shaker Dome.
This was accompanied by another turtle card; both show off the absolutely gorgeous Whale of a Time Designer Series Paper

Whale of a Time Stampin Up Allthingsstampy Helen Read

Whale of a Time Stampin Up Allthingsstampy Helen Read
This Tuesday we will be making another shaker card, this time with a sponged and embossed surround. Yes, more work for me die-cutting and embossing in advance but I really wanted to show off this gorgeous Seabed 3D Embossing Folder

Whale of a Time Stampin Up Allthingsstampy Helen Read
We’ll also be making this fab little notecard. I LOVE this piece of Designer Series Paper, it's so lovely. Guests at this series of classes received a quarter of a pack of the DSP; of course, if you have a whole pack, you get four pieces of this, so can make lots of lovely projects. 

Whale of a Time Stampin Up Allthingsstampy Helen Read

To finish off, we will be making these cards – I left these to the end because they can be adapted to suit any leftover scraps. This is a great way of using up scraps of any Designer Series paper.

Whale of a Time Stampin Up Allthingsstampy Helen Read

Whale of a Time Stampin Up Allthingsstampy Helen Read

So are you inspired by this Suite? My customers have been loving it. If you’re inspired enough to buy it and are in the UK, you can shop the Suite here

Whale of a Time Stampin Up Allthingsstampy Helen Read

Monday, 14 October 2019

Pizza box with shaker dome lid


Let's start the week off with an over-the-top, complicated project, shall we? Actually it's not as complicated as it first appears; it's just that I've overstuffed my dome and didn't have enough pizza boxes to make another one.


In fact, the hardest part of this project was cutting out the dome shape from the lid of the pizza box as you have to get through quite a lot of layers and the inside of the box has a plastic coating to make it food safe. Once that was done, it was just a case of assembling the pieces in the right order.

When die-cutting foil, you need either a really unblemished cutting plat on top, or a piece of scrap paper to protect it. Otherwise you will get imprints from the plate in the delicate foil surface. 


Monday, 23 September 2019

Snow globe Christmas ornament and shaker card


It was my autumn All-Day Craft Event at the weekend, with a distinctly festive theme, and we spent the morning creating these snow globe-themed projects.

I had completely overlooked the Snow Globe Scenes dies but was blown away by a project in Stampin’ Success, the magazine for Stampin' Up!® demonstrators. The ornament is created by sticking two shaker domes together with a miniature scene inside. The card is made to match, and I used the Noble Peacock Foil Sheets to provide the shimmer.


Take great care when adhering your shaker domes, whether on the card or when joining two together, as the adhesive is very strong. Once it’s stuck, it’s stuck!
 

Monday, 10 September 2018

A whole lotta shakin'...


I loved this card by Leslie Webster and just had to make a Stampin' Up!® version using the new Autumn/Winter catalogue projects. 

This was one of our projects at Crafty Friday last week, and the ladies loved making a fun shaker card. 

The background is stamped with Winter Woods in Crumb Cake onto Crumb Cake cardstock, then coloured using the chalk marker.  The rest is self-explanatory. I'm afraid the sequins aren't current items but we do sell very similar sequins in the Annual Catalogue; I just didn’t see the point of updating them when I have so many in stock!

What I love about these dies is a) the stag pops out of the die beautifully, with no effort at all and b) you get four of these little flower dies so you can make them all in one roll of the Big Shot!


Thursday, 26 November 2015

Double shaker mini treat bag


Why have one shaker when you can have two? That’s what ran through my head as I created this fun project. 

The picture isn’t great, and I was a bit tight with the sequins, but the centre star is actually a shaker, using vellum instead of the traditional window sheets. This gives a subtle - some would say disappointing - look  to the shaker element but hey, I make mistakes so you don’t have to; either be more generous with your shaker bits, or use a Window Sheet for a clearer view. 

It’s actually quite simple to make. All of the die-cutting is done with the dies from the Mini Treat Bag Thinlits set and the glimmer star shaker element is created in the usual way. 

The bag is lined with a folded piece of Whisper White cardstock (which I forgot to put on the recipe but I don’t have time to go back and change it now, sorry) and the little coloured stars (also created with the Mini Treat Bag Thinlits set) are simply placed inside the bag. Yep, the fatal flaw is that if you tip it upside down, they’ll probably fall out but then the recipient will simply be showered with coloured starry confetti… which would serve them right for being so silly. 


Monday, 6 July 2015

Mix It Up Monday: Sprinkles of Life with Mint Macaron


Today is, of course, Mix It Up Monday, so I thought I’d mix things up with some Mint Macaron by making a fun shaker card. 


At first glance you can’t tell it’s a shaker, as all the little flowers are hiding behind the tree, but they appear when shaken. I mixed them up with a little glitter which, in retrospect, was a mistake, so don’t do that if you CASE this one as the glitter sticks to the window sheet horribly and you effectively end up with frosted glass. So there you have it: I make mistakes, so you don’t have to!


I had to find a new spot in the garden to take this photo as my old spot is now covered in rubble. We are now a few days into our building project and so far, so good, although it’s the little things you miss… like being able to walk out your back door (which is no longer there - we’re bricked in!).

The small print

This is my personal blog and my sole responsibility as an Independent Stampin' Up!® demonstrator. All images are © Stampin' Up!® All content including photographs, projects and text are © Helen Read, unless otherwise stated. Please feel free to copy my ideas for your personal use and inspiration - if you are a SU demonstrator you may use these ideas for your events but please give credit where it is due. Please do not use my ideas for monetary gain, competitions or publication. The images on this blog - including blog buttons - should not be copied and used elsewhere on the internet or on CDs.