Tuesday, 3 July 2018

Dandelion Wishes and Northern Lights


Do children still use dandelion clocks to tell the time? Do they still use buttercups to find out if you like butter? And daisies to find out if he “loves you, loves you not”? Or have these innocent pastimes gone the way of scrumping and fishing for tiddlers?

Here’s another fun background technique to show off the Dandelion Wishes stamp set. This time it’s the Northern Lights technique - which is simply sponging in dark blue in with some streaks of Lemon Lime Twist thrown in. You finish it off simply by dotting with the Chalk Marker, freehand.


This background has been sitting in my UFOs (unfinished objects) box for some time, so this was the perfect opportunity to use it.

I stamped the image in Whisper White Craft Ink and then embossed in white embossing powder on top. I find this doubling up gives the crispest images.


Very little else was needed so I finished off with my last remaining pearls (must order some more!) and some white Baker's Twine. Hope you like!


Monday, 2 July 2018

It's Dandelion Wishes Week at All Things Stampy


I have a little treat for fans of the Dandelion Wishes stamp set. This week I will be posting a Dandelion Wishes project every day, from Monday to Friday.

We begin with this intensely coloured card with a bright watercoloured background, with a bit of salt technique thrown in.


On top of this we have the dandelions and greeting, embossed in Blackberry Bliss, using that oh so clever Stamparatus technique. This is where you stamp with the Stamparatus - in fact, I did this twice as it can be quite tricky to stamp onto watercolour paper, so stamping again gives you a sharper image.

Then, with the stamped cleaned off and the paper in the same position, you stamp on top with Versamark so you can add the clear embossing powder and heat it up for these stunning results.


And that’s just about all you have to do – with a background like this and such a beautiful image stamped on top, all you need is a piece of ribbon to finish things off.

Sunday, 1 July 2018

TWO fabulous offers for July!

Summer just got even better, with TWO fabulous offers which are hard to resist. 

The best deal of all is for new demonstrators... 


With this offer, during July if you join Stampin’ Up!® you pay just £99 (with free shipping) as normal and get:

£130 of craft supplies of your choice
PLUS
An ink pad collection worth £63 of your choice - this could be Subtles, Neutrals, Regals, Brights or all 10 In Color ink pads!

On top of this, you will receive a pack of business supplies including eight catalogues to share with your friends. 

As long as you are a demonstrator, you never have to pay full price for your craft supplies again!

Not for you? How about this fantastic Designer Series Paper offer?


Love all the papers but don’t know where to start? How about starting your collection with this fabulous offer?

Buy THREE packs of paper at £10.25 each, and choose a fourth pack FREE!

These are the papers included in the offer...


NB: It is not possible to combine the two offers - ie if you join SU, you can’t choose four packs of paper for the price of three as part of your kit, as your kit is already heavily discounted

So, which offer will you choose? Both are fabulous, so why not sign up now, and then order your paper with your demonstrator discount later in the month?


Saturday, 30 June 2018

Caturday: Ginger stunner


What a stunning kitty this is! We spotted him (I assume him, as most gingers are) on a walk not far from home and I couldn’t resist stopping to take a pic, even though it breaks my self-imposed rule of not photographing people’s homes.

Sadly, he was too scared to come up for a chin rub, so I had to settle just for the photo.

Friday, 29 June 2018

Peaceful Place - watercoloured onto Crumb Cake


Peaceful Place is a stamp set with my name all over it. Woodland, trees, a squirrel...

I confess I was a little put off by the sentiments but decided that the images more than made up for them. In fact, I’ve cut the long sentiment up so I can just use “Thinking of you” on its own, which will make the stamp set much more versatile, for me at least.


Using the Stamparatus, I stamped the image onto Crumb Cake with Soft Suede ink, then cleaned the stamp before stamping again in Versamark, then heat embossing with clear embossing powder.

The beauty of the Stamparatus is that you can do this in exactly the same place, which makes embossing in ANY colour really easy.


Next I painted the image, because I wanted to see what it would look like on Crumb Cake. I am quite happy with the effect; you just have to bear in mind that colours will come out much more subdued.

The water and sky are painted in Balmy Blue; the grass in Pear Pizzazz, the big tree in Old Olive, the pines in Mossy Meadow, the bush in Mint Macaron, riverbank in Crumb Cake and rocks in Gray Granite. What do you think?


Wednesday, 27 June 2018

Animal Outing cart


How cute are these animals? I must have another play with this stamp set, which I confess I haven’t used since creating the projects for my OnStage Telford display.

I used the Wood Crate Framelits to make the cart, which I stamped in Real Red with the Hardwood background stamp.  The handle is just a strip of Night of Navy cardstock with a punched circle folded in half to make a handle. As for the animals, they’re propped up like this...


There are three narrow strips of cardstock running along the inside, so the animals can be stuck onto the front and create the 3D effect. It was such a fun project to make - hope you like it!

Monday, 25 June 2018

Heat embossing with the Stamparatus


Thanks to Aussie demo Carolyn Bennie for the tutorial for this lovely card using the All the Good Things stamp set from the new Distinktive range. These are highly detailed stamps which give you an incredible depth of colour from just one impression. 

To make them stand out even more, the fish are embossed... which also makes it possible to watercolour in the background without muddying the colours. 

How do you emboss the fish? It’s so simple with the Stamparatus. Just ink up the stamp in Pumpkin Pie and stamp onto your cardstock. Then clean off the stamp, ink it again in Versamark and stamp on top so you can apply embossing powder and heat set. 

What would have been extremely challenging, even with the Stamp-a-ma-jig, is now REALLY easy... thanks to the Stamparatus. Yeah, I’ve done a U-turn. You can’t say you didn’t see it coming. Please don’t gloat. 


Saturday, 23 June 2018

Caturday: Ambergate (?) cat


I can’t remember exactly where we were when we saw this beautiful tortoiseshell cat but it was on a walk around the Ambergate area. She didn’t want to stop and chat...

Friday, 22 June 2018

Love What You Do with gorgeous Grapefruit Grove


I made this card a while ago but it seems to have slipped through the net. I CASEd and adapted it from Amy Koenders and the perfectionists among you will notice the slight mis-stamp on one of the green sprigs. Normally this sort of thing bothers me and I would stamp it again, but I decided to let it go – nothing in nature is perfect, after all.

Don’t you just love the colour combination? I’m a massive fan of the new Grapefruit Grove. And yes, I know it’s peach and I have not held back in my disdain for the thankfully now retired Pêche Fraiche, but this is a MUCH nicer peach which is a lot easier on the eye. That’s my story and I’m sticking to it.


Wednesday, 20 June 2018

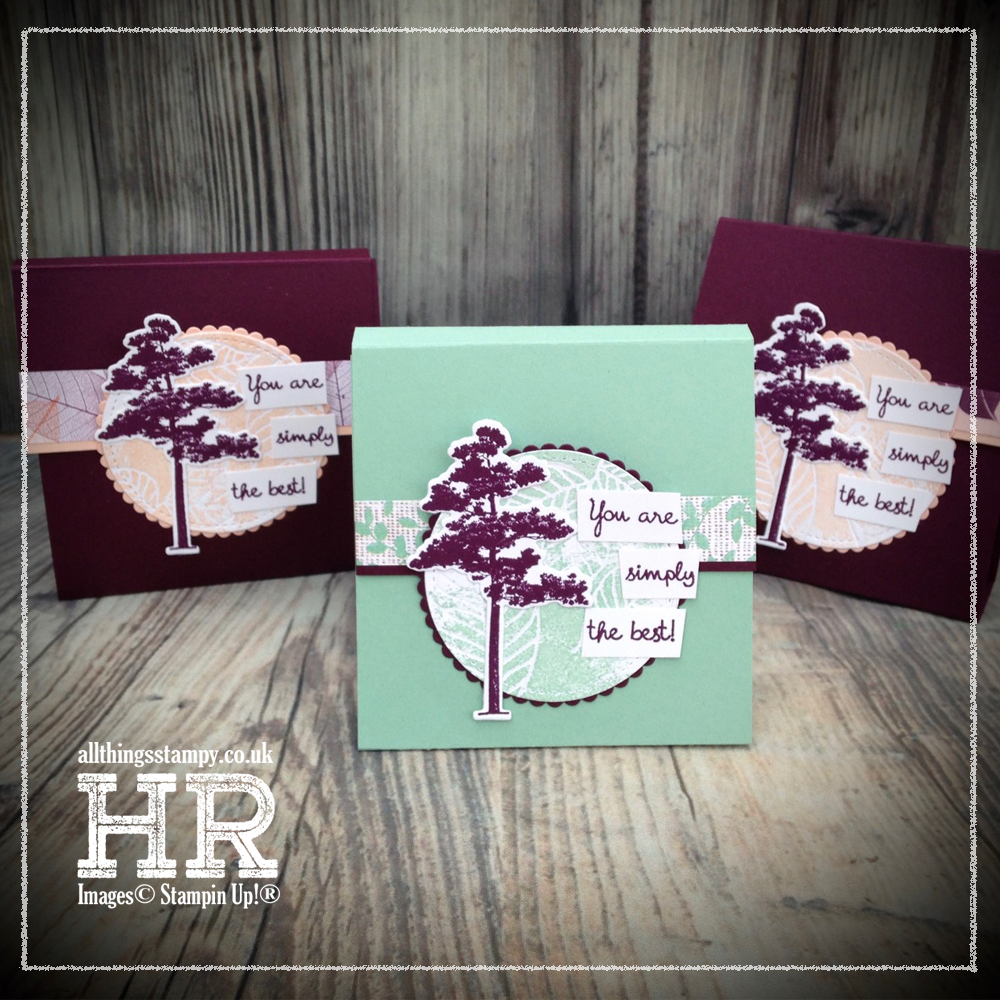
Tutorial: Rooted in Nature teabag holder


Every month I like to honour and reward my team members who have gone above and beyond. for my first level team members, there are rewards for promotions, achievements and for simply selling more than they did in the previous month.

For my extended team, I also send out three “random rewards” which are little handmade gifts to three people chosen at random (the only qualification is that they have placed an order during the month).


This month I sent out these cute teabag holders, inspired by a gift from my downline Stampy Sue and shown on Monday in this post. Inside are three little envelopes, each containing an individually wrapped teabag - plastic-free of course!

But before I show you how to make these, here’s a close-up of the front. For the circle panel, I embossed using the clever leaf embossing dies from the Rooted in Nature bundle. Then I stamped on top using the Artisan Textures stamp set, for a rustic look. 


Here are the measurements... you should be able to see a larger image if you click on it.

Once you’ve made the outer, as shown above, you simply make three little envelopes using the Envelope Punch Board. I’m turning to inches for these as it’s easier... 

They are made from 5.5" squares
The first score line is at 2 3/4"
Then simply proceed as normal, turning the DSP 90º anticlockwise to make the envelope.

These are then stuck inside - onto the green M shape in the diagram above. 


Finally, decorate the front, making sure you leave the top section of your decorative panel without adhesive, so the front flap can slide in and out easily. 

Hope you like it - and have fun!

The small print

This is my personal blog and my sole responsibility as an independent creator and craft coach. All content including photographs, projects and text are © Helen Read, unless otherwise stated. Please feel free to copy my ideas for your personal use and inspiration. Please do not use my ideas for monetary gain, competitions or publication. The images on this blog - including blog buttons - should not be copied and used elsewhere on the internet or on electronic files for sale or otherwise.