Sorry I can't update the blog right now. Please find me on Facebook

Showing posts with label Stylized Birthday. Show all posts

Wednesday, 18 April 2018

Retiring product focus: Pick a Pattern Suite


I know this wasn’t one of the most popular stamp sets in the 2017-18 catalogue but it was one of my favourites as it is so much fun. I love the little dinosaur and the Designer Series Paper is fab.

So it will soon be farewell to Pieces & Patterns and the Pick a Pattern Designer Series Paper. Not to mention the Emerald Envy cardstock that features in the DSP, the Stylized Birthday single stamp on the card on the left and the ribbon from both cards!
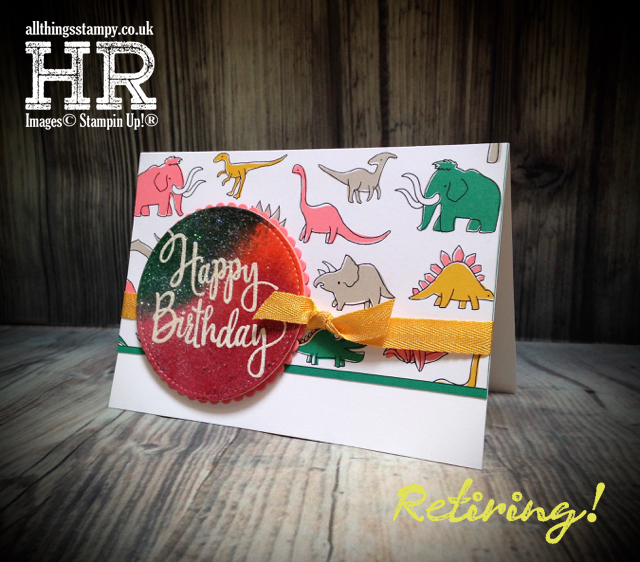

To create the main focal points on both of these cards I used a mixture of clear embossing powder and glitter. For the one above I “smooshed” some ink onto some wet watercolour paper and allowed it to dry. Next I stamped and heat embossed Happy Birthday in white, then covered the whole lot with clear embossing powder mixed with a little Dazzling Diamonds glitter and heat set it.


This one is the same principle but without the watercolouring. I simply stamped and embossed in white onto Tranquil Tide cardstock then covered the whole lot in clear embossing powder mixed with a little glitter. It’s a good way of stopping it from going everywhere!

Friday, 21 July 2017

Pick a Pattern DSP with glittery embossing


I’m going through a glittery embossing phase, and it all started with a video by Kristina Werner, which inspired me to try some sparkly techniques. While Kristina’s techniques didn’t directly translate to Stampin’ Up!® supplies, the concept certainly did, so I set to work.

I began by watercolouring a background in some bright colours, the die-cut a circle using the fabulous, must-have Stitched Shape Framelits. I embossed the greeting on top in white, then embossed the whole thing using a mix of clear embossing powder and Dazzling Diamonds glitter. Sparkly!


The only ribbon I had in a relevant colour was Crushed Curry, which didn’t quite look right, so I turned to my talented team for some help in finishing off the project, and this suggestion was put forward... curly strips of cardstock. I love it! And it means you can create fabulous embellishments from the bits you’d normally throw away. 


Here’s the card to go with the present – another sparkly greeting and the same fabulous Designer Series Paper. I’m so glad I finally plucked up the courage to start using this paper, instead of just looking at it.

Monday, 5 June 2017

Mix It Up Monday: Reverse stamp technique with Vintage Leaves


I never thought I’d be so excited about such a bright colour combo, especially one featuring Bermuda Bay! Maybe the advent of Lemon Lime Twist has turned my head?

For this Mix It Up Monday project, I used an exciting technique discovered by accident by my friend Kelly’s mum. One day, she accidentally mounted a stamp onto the block upside down, stamped it and produced a rough shape of the image. This got Kelly thinking, and she came up with this idea… stamp once with the stamp upside down, then repeat with it the right way round in a darker colour on top. 

It only works with photopolymer stamps and they need to be roughly symmetrical, as you will be stamping the first image in reverse. After examining my stamp collection, I was surprised at how few sets I have which are suitable, but settled on an old favourite, Vintage Leaves.


I stamped the reversed images in my four happy colours, then stamped on top with Basic Black, for a fun 50s feel, which I really love. 

And for a bonus tip… I cut a piece of Whisper White to the width of the new Pretty Label punch and slid it in carefully to punch the shape at both ends, creating this unique banner. 

Take a look at the rest of the colour combinations from my latest set of In Color charts, then why not join the challenge yourself?

When you’ve created a Stampin’ Up!® project using either this colour combination, or last week’s combo, there are several ways you can share it:
  1. Upload an image of your creation to your own blog, Pinterest board or Facebook page or Twitter, then post a link to your project in the comments section of the relevant post on this blog.
  2. Upload an image to the comments in the relevant post on my Facebook page. 
Whichever way you choose, please use the hashtag #mixitupmonday


Monday, 30 January 2017

Mix It Up Monday: Inside the Lines DSP


A simple project this week as we’ve all been under the weather this weekend, so I made this yesterday and then retreated to the settee with a poorly daughter and an opportunistic black cat. 

If you like colouring, you’ll love the new Inside the Lines Designer Series Paper. It’s part of the Sale-a-Bration promotion, which means you can, if you wish, choose it FREE with a £45 order.

It’s perfect for a colour challenge, as you can make it any colour you wish. So I thought I’d give it a go for this week’s Mix It Up Monday project, using another colour combination from my In Color charts.


This is a bright and cheery colour combination, which uses two of the latest set of In Colors; Emerald Envy and (my favourite) Dapper Denim. The Daffodil Delight IS there, it’s just not easy to see in the photo. The Stylized Birthday stamp makes the greeting the focus, and goes with just about everything, making it a useful addition to your stamp collection.  


Wednesday, 14 September 2016

Affectionately Yours gift bag and card


I made this card/gift combo for one of my club ladies, Sharon. In my previous Virtual Hostess Clubs, I’ve sent a small gift to every member each month but this year I decided to shake things up a bit, ditch the monthly treats and give them a proper present in their birthday month. 

Last month it was the turn of Sharon and Kelly but I’ve had to wait until now to show you as both had their birthdays right at the end of the month.  I won’t tell you what’s in them, as I may end up repeating gifts later in the club year… and also, I confess I can’t remember what was in this one! I do remember it being cylindrical and having to turn it on its side to fit it in… ah yes, it’s come back to me now. Still not telling you though.

The box is made with the Gift Bag Punch Board and one of the speciality sheets of DSP from the Affectionately Yours pack. I continued the theme through to the card with this very simple design, prettied up with some tiny flowers from the Tree Builder Punch.

And yes, I finally invested in the Layering Circle Thinlits. These are great, so much more versatile than the old circle dies, as there are scalloped dies to match each circle… and they’re a much more suitable size for cardmaking, too. 


The small print

This is my personal blog and my sole responsibility as an Independent Stampin' Up!® demonstrator. All images are © Stampin' Up!® All content including photographs, projects and text are © Helen Read, unless otherwise stated. Please feel free to copy my ideas for your personal use and inspiration - if you are a SU demonstrator you may use these ideas for your events but please give credit where it is due. Please do not use my ideas for monetary gain, competitions or publication. The images on this blog - including blog buttons - should not be copied and used elsewhere on the internet or on CDs.