Sorry I can't update the blog right now. Please find me on Facebook

Tuesday, 9 November 2021

Eden’s Garden projects – getting the most mileage out of this beautiful collection

Eden's Garden Stampin Up UK

There’s a new collection of craft products from Stampin’ Up!® in town – and there’s a lot to love here. The collection is called Eden’s Garden and it features stamps, dies, Designer Series Paper and more.

Now bear with me here because it’s not totally straightforward:

⭐️ Eden’s Garden stamp set and Eden Dies
These are an early release from the upcoming Jan-June Mini Catalogue, so will carry over to next year. They are available separately, as a bundle or as part of the full Eden’s Garden Collection.

⭐️ Ever Eden Speciality Designer Series Paper
⭐️ Ever Eden Cotton Paper
⭐️ Garden Gems
These are all exclusive products available now but only while supplies last. They will not carry over into the Mini Catalogue next year. They are available to purchase separately, or as part of the full Eden’s Garden Collection.

What I love about this collection – and the Ever Eden Speciality Designer Series Paper in particular – is that it can be used for year-round projects, or for Christmas as it features sumptuous greens and gold.

Eden's Garden Stampin Up UK

It can also be used with other products and I used the paper here to make a birthday card for my Mum, with an image from Nature’s Harvest.

The cotton paper has a lovely feel to it and I added more texture using the Timeworn Type 3D embossing folder, which comes in a mixed pack of Soft Succulent and Evening Evergreen. I then mounted it onto a Soft Succulent card base. 

Eden's Garden Stampin Up UK

I then decorated it with some of the gorgeous Ever Eden Speciality Designer Series Paper and added some gold ribbon and a Nature’s Harvest arrangement of flowers and grasses. This is one of my favourite stamp sets so I’m delighted to have more Designer Series Paper to use with it and give it a fresh new look. 

Eden's Garden Stampin Up UK

Eden's Garden Stampin Up UK
 

For my second project using this gorgeous Designer Series Paper, I made a little book-style box which happily holds one four-finger KitKat or two two-finger bars (other chocolate bars are available and I am sure will fit). 

gift box Stampin' Up UK

Everyone who purchased my Kit By Mail this month will receive instructions to make this cute little box. I added to the décor of mine using Forever Flourishing Dies – these and the Forever Fern stamps are yet more products which go well with the Eden’s Garden Designer Series Paper.

Eden's Garden Stampin Up UK

To decorate the top of the box I used some Ever Eden Cotton Paper in Evening Evergreen. I took a quarter sheet, measuring 6”x6”, then folded it into thirds along both edges, to create nine squares. I then cut a rough circle, freehand, using scissors.


Eden's Garden Stampin Up UK
 

I shuffled the nine circles a little so they weren’t sitting perfectly on top of each other and stapled them in the centre. Then I simply ruffled up the paper to create this pretty flower. The paper is soft and very thin but retains its shape when you do this, which is quite magical. 

I hope you like my Eden’s Garden projects. Now please take a look at some of the other projects you could make with this lovely collection…

Eden's Garden Stampin Up UK

This beautiful card uses a strip of Ever Eden Cotton Paper to create a ribbon effect – which is ideal if you are trying to avoid adding bulk to your project.


Eden's Garden Stampin Up UK

This is a cute tag which introduces Cherry Cobbler and Kraft into the mix. This could be used for Christmas or any other occasion. 
Eden's Garden Stampin Up UK
 

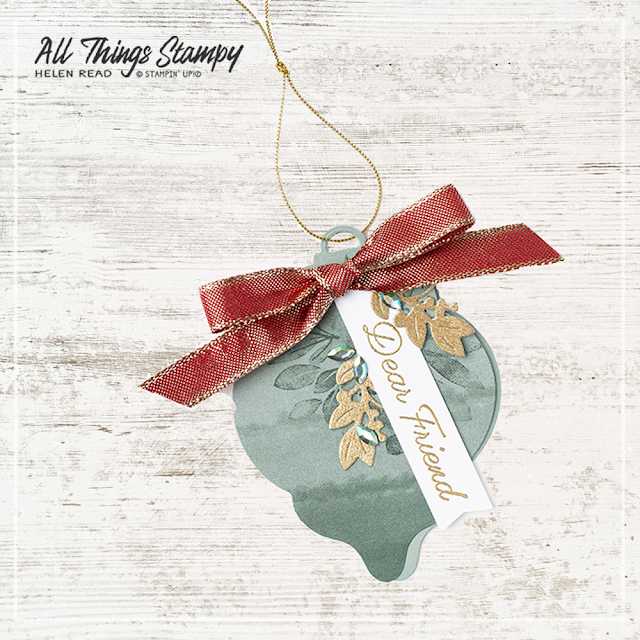
By die-cutting the Eden’s Garden Designer Series Paper using Delicate Baubles Dies, with another cut from cardstock underneath, this becomes a fabulously festive tag. A touch of Brushed Metallic Cardstock keeps the bling levels subtle and classy. 

Eden's Garden Stampin Up UK

By cutting out the centre of a die-cut image with the Delicate Baubles Dies, there’s a useful and versatile “Merry & Bright” to top this card – instantly transforming it into a Christmas card. 

Eden's Garden Stampin Up UK
 

Here the Ever Eden Cotton Paper really comes into its own. I have to say that, spectacular though it is, I don’t think I’d have the patience to make this beautiful bow.

If you like the look of the Eden’s Garden Collection or any other products you see here, please consider shopping at my store if you are in the UK. If you use the current host code P6VRQPMJ, I’ll send you a thank you gift in the following month.


Does your wish list come to more than £99? Please get in touch and I will help you get more for your money and unlock discounts all year round.  


Tuesday, 2 November 2021

Love, Santa Tag Kit - alternative projects


Have you seen Stampin' Up!®’s new kits? They are perfect for new crafters but also great fun for those who have more experience, too, as the elements can be used for all kinds of projects.

Today I am taking a closer look at the Love, Santa Tag Kit from Stampin' Up!®. I will show you what you can make with the kit, how you can use some of the stamps after you have completed the tag projects within the kit – and how you can modify the projects to make some stunning cards, too...
 

So please read on to find out everything you need to know about the Love, Santa Tag Kit from Stampin’ Up!®.

What does the Love, Santa Tag Kit make?
This kit makes 12 gift tags, three each of four quick and easy festive designs. There’s a Christmas tree, a Santa, a fun yellow car piled with parcels and a white tag with berries and foliage. These are the different tags the kit makes...

You can also purchase a pack of coordinating food-safe bags which I have, but haven’t used yet as I am saving them for some Christmas baking.


What’s in the Love, Santa Tag Kit?
All the tags and elements are pre-cut, you just need to pop them out. You get all the components to complete your tags, including a stamp set, Night of Navy Stampin' Spot, a roll of red and white baker's twine, some small gems and adhesives. 

What skill level is required?
None whatsoever. In fact, I would argue that this kit is a little too simple and doesn’t involve as much stamping as some of the other kits I have tried. For three of the tags, all you have to do is stamp the greetings. Only the foliage one requires a little more, in that you stamp the fir sprigs onto the tag before adding the leaf and greeting on top. 

What’s the Love, Santa Tag Kit stamp set like?
There are 10 stamps, including a large-ish fir sprig, some berries and a small square parcel. The remaining stamps are greetings, including ‘Love, Santa’ in reverse on a circle, ‘Joy’ in reverse on a rectangle, a bold “Merry” and some lovely small script stamps which say “Special delivery”, “To: From:” “Christmas”, “and bright”. 


Is it useful? Yes? Could you make other projects with it? Definitely. I use the stamp sets from kits all the time as they often have versatile greetings. Here are some tags I made using this set, with the addition of Seasonal Labels Dies, some red ribbon and ink pads in Real Red, Mint Macaron and Shaded Spruce.

I used some of the leftover Baker’s Twine from the kit and stamped Love, Santa onto a leftover circle.


Do you have to make tags with the Love, Santa Kit?
Not at all! As you can see above, you can adapt this kit to make cards or other items using the components.
Here I have trimmed off the top of the tag and mounted the images onto cards. This is something you can do whether you’re an experienced crafter or not


I was inspired to make this cheerful card by Stampin’ Up!® Demonstrator Mikaela Titheridge, who created a moody cityscape for her version. I decided to see what I could do using just the stamps in the kit so created a night-time forest background using the sprig stamp and Night of Navy ink (included in the kit) on some Pacific Point cardstock. I mounted it onto a Poppy Parade card base and stamped “Merry and bright” inside. 

I have speckled some white ink across the card but this faded a little, probably because the Night of Navy ink was quite intense and still drying. For my second card...

...I used the Christmas tree tag and created the same forest background using the stamp and ink from the kit. This time I mounted the card onto Pacific Point and added the snow at the end using a Chalk Marker. 

So to make these cards, all you need is a pack of assorted A4 Brights Cardstock and a Chalk Marker.


How much is the Love, Santa Kit?

  • The Love, Santa Kit (158375) on its own is £18, which includes everything you need to make the tags. 
  • Love, Santa Treat Bags (158381) are £6.50 and are printed to coordinate with the tags.
  • The Love, Santa Project Collection (159362) is £24.50 and includes the kit and the tags in one easy purchase.

Would I recommend the Love, Santa Kit?
If it’s a stamping experience you’re after, you may prefer to adapt this kit to make alternative projects like I did. If you want to make quick and easy tags, then it’s perfect as it is. I would even go as far as to say I would say the kit is worth purchasing for the stamp set alone.

Want to buy this or any of our other lovely kits? If you are in the UK and would like to order, please visit my store to shop using this link.


Does your wish list come to more than £99? Please get in touch and I will help you get more for your money and unlock discounts all year round.  


Tuesday, 26 October 2021

Sweet Stockings Designer Series Paper projects

Sweet Stockings Stampin Up Christmas Cards UK demonstrator
 
Do you love cats and dogs as much as I do? If so you won’t want to miss the beautiful Sweet Stockings Suite from Stampin’ Up!®. For my October kit of the month I used the Sweet Stockings Designer Series Paper and put together a selection of coordinating products. These are a really economical way to get your hands on everything you need to make fully coordinated projects and are idea if you find you don’t always manage to get through full packs.

Everyone who buys the kit from me gets access to an exclusive PDF of project ideas, with measurements, for them to copy or take inspiration from. I love that some of my customers then get together on Zoom to make the projects while they chat. 
 
Sweet Stockings Stampin Up Christmas Card UK demonstrator

These are some of the projects I shared with them this month. This is a Kraft Gift Box decorated with a fun tag made using the Seasonal Labels Dies and beautiful Pool Party striped ribbon. 

Sweet Stockings Stampin Up Christmas Card UK demonstrator
 
Isn’t that dog cute? And there are plenty more where that came from. To stamp the greeting, I used the little set that comes with the Christmas Whimsy Card Kit. It’s so useful.
 
Sweet Stockings Stampin Up Christmas Card UK demonstrator
 
Here are some more of the cut animals cut out from the Sweet Stockings Designer Series Paper. I love how grumpy the cat looks with his seasonal antlers on. All the greetings for the rest of the projects came from the Christmas to Remember stamp set – I particularly love this ’Tis the Season stamp as it gives you white on a colour without the hassle of embossing.
 
Sweet Stockings Stampin Up Christmas Card UK demonstrator
 
Behind the bottom edge of the Designer Series Paper layer, I have pleated the ribbon, which is one of my favourite ribbon techniques. Simply lay a strip of double-sided tape along the edge of the paper or cardstock then pleat the ribbon onto it, and lay a second strip of tape on top to hold it in place.
 

 When using double-sided table, always stick to the firmer surface first. So if you are using paper and cardstock, stick it to the cardstock. If using ribbon, stick to the paper or cardstock, then add the ribbon on top. Otherwise you’ll be there all day trying to peel off the backing.
 
 
Sweet Stockings Stampin Up Christmas Card UK demonstrator

This card uses the lovely Kraft cardstock which is something I have longed to see back in the catalogue for many years. It makes a beautiful warm neutral backdrop for this festive dog with his wreath collar. 
 
Sweet Stockings Stampin Up Christmas Card UK demonstrator

November’s Kit By Mail uses the brand new Eden’s Garden products – I am only taking orders for this kit until midnight on 31st October so I can order first thing on 1st November when these products go live to customers. This is because the Designer Series Paper, speciality cotton paper and Garden Gems are all only available while supplies last, and I would hate for anyone to miss out. 
 
Eden's Garden kit stampin up uk demonstrator
 
 
Please click here to order your kit today – I can post them out to anywhere in the UK.

Does your wish list come to more than £99? Please get in touch and I will help you get more for your money and unlock discounts all year round.  
 

Tuesday, 19 October 2021

Christmas season gift box, ornament and tags

Stampin' Up! Christmas Season ideas 

It was so good to be back with a group of crafty ladies again at the weekend, for my first major craft event in 19 months.

It was a Christmas-themed event and everyone received the Christmas Season stamp set from Stampin’ Up!® as part of their kit. 

We made several cards, which I’ll show you in a future post, plus this lovely Mini Paper Pumpkin box to hold an ornament and some tags.

You may have noticed that I have a bit of a thing for pine cones and woodland themes. The Christmas Season stamp set feeds into this obsession quite nicely so it was my first choice for this all-day event.

Stampin' Up! Christmas Season stamp set

I have always loved the Mini Paper Pumpkin boxes; they’re such a great size for lots of gifts, although not so great for posting as the depth of them bumps up the postage to small parcel rate here in the UK.

I’d saved a load of Designer Series Paper from Sale-a-Bration for the projects, so the guests could have half a pack each to work with. This silver birch design makes an ideal backdrop for the pine cones and berries on the Mini Paper Pumpkin box.

The stamped images are enhanced with a piece of ribbon made to look like a fir branch. We did this using the Evening Evergreen Chevron Weave ribbon. I sliced off one side seam, then frayed it to create the fringe you can just see below the greeting label. The strands I removed to create the fringe where then folded in half to create this fan of threads to resemble a branch of a fir tree. I can’t believe I thought of that all by myself!

Stampin' Up! Christmas Season ideas
 

Inside the box we made a little tray to separate the tags from the ornament, although guests had the option to leave this off if they wanted to use the box for something else.

They could also choose how they made their tags. I knew some would be fed up of die-cutting by this point so they had the option to punch these using a Tag Topper punch. We used Shimmery White cardstock for a touch of subtle glimmer. 

Stampin' Up! Christmas Season ideas

But those who were still up for some die-cutting could use the coordinating Seasonal Label dies to make pretty gift tags. 

Stampin' Up! Christmas Season ideas

All were stamped using the Christmas Season stamp set with added greetings. I used the lovely little word stamps from the Christmas Whimsy Card Kit which everyone is loving so much at the moment. (Hint: don't delay if you want this! While it’s still available in the Europe market, the French version has sold out and the English version is selling fast!)

Stampin' Up! Christmas Season ideas

The ornament – oh how I love a log slice ornament – is another fun way to show off these lovely pine cones and berries from the Christmas Season bundle. Again we used some threads from the Evening Evergreen Chevron Weave ribbon to create a fir sprig effect. Some ladies chose to stamp a greeting on the reverse, while others repeated the stamped and die-cut design so it looked the same from both sides.

A lovely day was had by all, and it felt so wonderful to be crafting together again. 
 
Stampin' Up! Christmas Season ideas
 
Want to craft with beautiful projects like these? If you’re in the UK, please head on over to my store to shop. If you use the host code ZKTV7U4Z before the end of October, I will send you a thank you gift next month. 


Does your wish list come to more than £99? Please get in touch and I will help you get more for your money and unlock discounts all year round.  


Tuesday, 12 October 2021

Pretty cards with Whimsy & Wonder Designer Series Paper

Stampin' Up Whimsy & Wonder card ideas

We are well into October so no apology needed for Christmas cards now. I have been creating with Stampin’ Up!'s Whimsy & Wonder Designer Series Paper for my monthly Crafty Friday class.

As these events are still partially on Zoom (I offer limited in-person places with the rest working remotely), we are sticking with the challenges of cutting out images from Designer Series Paper. Fortunately this Whimsy & Wonder Designer Series Paper has some perfect designs for doing this, so I was able to offer the ladies a choice of two cards to make with their kit. 

Stampin' Up Whimsy & Wonder card ideas

Version one really taps into the pink theme of the Whimsy & Wonder Suite, with a snowflake background covering the entire front of the card. The main focal point is a stack of presents, all cut out of the Whimsy & Wonder Designer Series Paper and overlaid onto one of the Wonderful Snowflakes. 

 
Stampin' Up Whimsy & Wonder card ideas

These snowflake elements are excellent, especially if you don’t have a die-cutting machine or simply want to save time when making your Christmas cards. The beautiful iridescent snowflakes come pre-cut, ready to be popped out of their backing paper. I attached them to the project using a single Glue Dot in the centre.

I’ve mounted the presents onto a panel cut with the Stitched So Sweetly Dies, which has a hint of Polished Pink peeping out behind it, as well as a hint of Be Dazzling Speciality Paper which I had left over from Sale-a-Bration.

Stampin' Up Whimsy & Wonder card ideas

For the alternative version, I used some strips of Whimsy & Wonder Designer Series Paper to create a panel mounted onto some Mint Macaron cardstock. Then the basic design is roughly the same, with a Christmas tree instead of a stack of presents. 

Stampin' Up Whimsy & Wonder card ideas
 
Stampin' Up Whimsy & Wonder card ideas
 

As I seem to have found myself short of greetings, both of these come from the new Christmas Whimsy Card Kit, which is excellent value, a great introduction to cardmaking and also ideal for seasoned crafters who want a relaxed and productive session. What these kits are also excellent for is building up your greeting stamps collection – these are both really useful sentiments which appeal to our understated British tastes and a nice neat size, too.

Stampin' Up Whimsy & Wonder card ideas

Stampin' Up colour color combination Polished Pink Mint Macaron Blushing Bride Mossy Meadow

If you are in the UK and would like to order any of these products, please visit my store and, if you use the October host code ZKTV7U4Z, I’ll send you a thank you gift next month. To make it easy, please shop using this link


Does your wish list come to more than £99? Please get in touch and I will help you get more for your money and unlock discounts all year round.  


Tuesday, 5 October 2021

Kraft gift box with Peaceful Cabin bundle


Peaceful Cabin Stampin Up Demonstrator UK

Do you like to escape to the wop-wops? I learned this wonderful new word the other week, courtesy of New Zealand demonstrator Julie Burt, who commented on my previous Peaceful Cabin projects and explained that it means "the middle of nowhere".

The Peaceful Cabin bundle from Stampin' Up!® Mini Catalogue is one of my favourites – I know, big surprise, eh? You may have gathered from the pine cones that appear in all of my photos that I love woodlands and escaping to the wop-wops in general, although these days a café and a toilet nearby are always welcomed.
 
Peaceful Cabin Stampin Up Demonstrator UK

I also love the look of Kraft cardstock – which again appeals to my love of all things natural – so these Kraft gift boxes went straight onto my order from the Mini Catalogue. They are food safe so good for biscuits or cookies, and could also be used for a couple of pairs of socks, some jewellery, chocolate or other small gifts. 
 
Peaceful Cabin Stampin Up Demonstrator UK

The window aperture allows you to see the contents but I liked the idea of creating a window onto the woods, so stamped this serene scene using the Peaceful Cabin stamp set and the coordinating Cabin Dies. 

Peaceful Cabin Stampin Up Demonstrator UK

I began by embossing a piece of Old Olive cardstock with the Evergreen Forest 3D Embossing Folder, then swiping over the trees with a Whisper White ink pad. 
 
I coloured the cabin using Stampin’ Blends, giving the wood a greenish hue using a mix of brown and green markers, and a bright red roof. This reminds me of a lovely cottage I saw in Nethy Bridge in the Cairngorms in Scotland. There’s a Scandinavian vibe to parts of the village and I wanted to echo this in my project. I mounted the die-cut cabin onto the embossed Old Olive panel and positioned them behind the window.

Whisper White ink is craft ink, so sits on the surface of the cardstock instead of soaking in which allows the white to show up but also means it takes a while to dry. Therefore, I used Stampin’ Dimensionals to distance it from the window sheet and minimise the chance of it rubbing off onto the acetate. 

 Peaceful Cabin Stampin Up Demonstrator UK
Around the window I stamped some tiny snowflakes in Whisper White, using a sticky note as a mask. On the top, on the outside of the window panel, I stuck some die-cut trees, which I swiped with white ink.

Peaceful Cabin Stampin Up Demonstrator UK

To finish off I tied up the box using some gold Simply Elegant Trim and a small greeting label stamped in Real Red. This label is created with the Rectangular Postage stamp punch. To make it smaller, I simply mounted my punched rectangle onto a sticky note to make it big enough to handle, then punched again to fit the greeting.

What do you think? Do you want to escape to the wop-wops in a cabin like this?
 
Peaceful Cabin Stampin Up Demonstrator UK
 

If you are in the UK and would like to order, please visit my store and, if you use the October host code ZKTV7U4Z, I’ll send you a thank you gift next month. To make it easy, please shop using this link


Does your wish list come to more than £99? Please get in touch and I will help you get more for your money and unlock discounts all year round.  


The small print

This is my personal blog and my sole responsibility as an Independent Stampin' Up!® demonstrator. All images are © Stampin' Up!® All content including photographs, projects and text are © Helen Read, unless otherwise stated. Please feel free to copy my ideas for your personal use and inspiration - if you are a SU demonstrator you may use these ideas for your events but please give credit where it is due. Please do not use my ideas for monetary gain, competitions or publication. The images on this blog - including blog buttons - should not be copied and used elsewhere on the internet or on CDs.