Sorry I can't update the blog right now. Please find me on Facebook

Showing posts with label UK Stampin' Up! Demonstrator. Show all posts

Tuesday, 19 October 2021

Christmas season gift box, ornament and tags

Stampin' Up! Christmas Season ideas 

It was so good to be back with a group of crafty ladies again at the weekend, for my first major craft event in 19 months.

It was a Christmas-themed event and everyone received the Christmas Season stamp set from Stampin’ Up!® as part of their kit. 

We made several cards, which I’ll show you in a future post, plus this lovely Mini Paper Pumpkin box to hold an ornament and some tags.

You may have noticed that I have a bit of a thing for pine cones and woodland themes. The Christmas Season stamp set feeds into this obsession quite nicely so it was my first choice for this all-day event.

Stampin' Up! Christmas Season stamp set

I have always loved the Mini Paper Pumpkin boxes; they’re such a great size for lots of gifts, although not so great for posting as the depth of them bumps up the postage to small parcel rate here in the UK.

I’d saved a load of Designer Series Paper from Sale-a-Bration for the projects, so the guests could have half a pack each to work with. This silver birch design makes an ideal backdrop for the pine cones and berries on the Mini Paper Pumpkin box.

The stamped images are enhanced with a piece of ribbon made to look like a fir branch. We did this using the Evening Evergreen Chevron Weave ribbon. I sliced off one side seam, then frayed it to create the fringe you can just see below the greeting label. The strands I removed to create the fringe where then folded in half to create this fan of threads to resemble a branch of a fir tree. I can’t believe I thought of that all by myself!

Stampin' Up! Christmas Season ideas
 

Inside the box we made a little tray to separate the tags from the ornament, although guests had the option to leave this off if they wanted to use the box for something else.

They could also choose how they made their tags. I knew some would be fed up of die-cutting by this point so they had the option to punch these using a Tag Topper punch. We used Shimmery White cardstock for a touch of subtle glimmer. 

Stampin' Up! Christmas Season ideas

But those who were still up for some die-cutting could use the coordinating Seasonal Label dies to make pretty gift tags. 

Stampin' Up! Christmas Season ideas

All were stamped using the Christmas Season stamp set with added greetings. I used the lovely little word stamps from the Christmas Whimsy Card Kit which everyone is loving so much at the moment. (Hint: don't delay if you want this! While it’s still available in the Europe market, the French version has sold out and the English version is selling fast!)

Stampin' Up! Christmas Season ideas

The ornament – oh how I love a log slice ornament – is another fun way to show off these lovely pine cones and berries from the Christmas Season bundle. Again we used some threads from the Evening Evergreen Chevron Weave ribbon to create a fir sprig effect. Some ladies chose to stamp a greeting on the reverse, while others repeated the stamped and die-cut design so it looked the same from both sides.

A lovely day was had by all, and it felt so wonderful to be crafting together again. 
 
Stampin' Up! Christmas Season ideas
 
Want to craft with beautiful projects like these? If you’re in the UK, please head on over to my store to shop. If you use the host code ZKTV7U4Z before the end of October, I will send you a thank you gift next month. 


Does your wish list come to more than £99? Please get in touch and I will help you get more for your money and unlock discounts all year round.  


Tuesday, 3 August 2021

Introducing the new Stampin' Up!® Harvest Meadow Suite

Harvest Meadow Stampin Up card idea

Today the new Stampin’ Up!® July-December Mini Catalogue goes live (yes I know it’s August but hey, Covid!) and I’m excited to introduce you to the new Harvest Meadow Suite.

It’s not often I buy a whole suite of products from a Stampin’ Up!® catalogue but just sometimes it’s easier to type that single item code than wade my way through all those different numbers. This was the case with this gorgeous suite. 

Harvest Meadow Stampin Up card idea

I love everything in this suite; the Nature’s Harvest stamp set, the Harvest Dies, the Timeworn Type 3D Embossing Folder, the Diamond Weave Ribbon, the Brushed Metallic Adhesive-Backed Dots, the Cork Speciality Paper and of course the lovely Harvest Meadow Designer Series Paper.

Not all of those products are shown here but I had a pretty good stab at many of them to make these two cards. 

Harvest Meadow Stampin Up card idea

The first card here is based on the one on page 71 of the new Mini Catalogue. You often find extra card ideas at the back of the catalogue where the bundles are displayed. The colours of the card sample in the catalogue didn’t speak to me so I swapped the paper for this lovely Misty Moonlight design from the Harvest Meadow Designer Series Paper pack. 

Harvest Meadow Stampin Up card idea

I coloured the image using Stampin’ Blends; Calypso Coral for the petals, Mango Melody for the flower centres and Mint Macaron for the leaves and stems.

Die-cut leaves, stems and flowers provide a fitting backdrop for the coloured image. I cut these from Crumb Cake, Bumblebee and some lovely gold paper from the Gold & Rose Gold 6" X 6" Metallic Speciality Paper pack.

Harvest Meadow Stampin Up card idea

The greeting is stamped in black, cut out with the long die from the set and overlaid onto a piece of gorgeous cork, which I’ve hand cut (and which no matter how hard I tried, still looks wonky!).

It’s finished off with a linen thread bow and dotted around are Brushed Metallic Adhesive-Backed Dots.

Harvest Meadow Stampin Up card idea

For the second card I repeated the same greeting on cork motif, along with a similar arrangement of stamped and die-cut images, but laid these onto a white panel which is popped up on Stampin' Dimensionals to make it stand out from the Designer Series Paper background. I love this sheet of paper from the same Harvest Meadow Designer Series Paper pack; this pack really is very varied, while keeping with the colour theme. 

Harvest Meadow Stampin Up card idea
 

This time I’ve used a greeting stamp from another set – Artistically Inked – and added the dots either side of the words. This is a good way of making it look like your sentiment fits the die-cut panel perfectly!

Behind the greeting panel is a swirl of linen thread. I confess I always struggle with these. The trick seems to be to use double-sided tape directly onto your project, then just loop your thread around and stick it to the tape to hold it down as you go. 

I had a great time playing with this new suite and hope you like the projects and products as much as I do! 

Harvest Meadow Stampin Up card idea

Remember, not only has the Mini Catalogue gone live but Sale-a-Bration has started! If you are in the UK, buying this whole suite collection would earn you two Level 1 Sale-a-Bration freebies, or one Level 2.


Alternatively, you could spend £99 and upgrade to the Starter Kit which would grant you access to my Stampin’ Up!® team, along with ongoing discounts and sneak peeks. I’d love to have you on board so please message me via my website if you would like more details or if you’d like me to give you a call. 


Tuesday, 15 June 2021

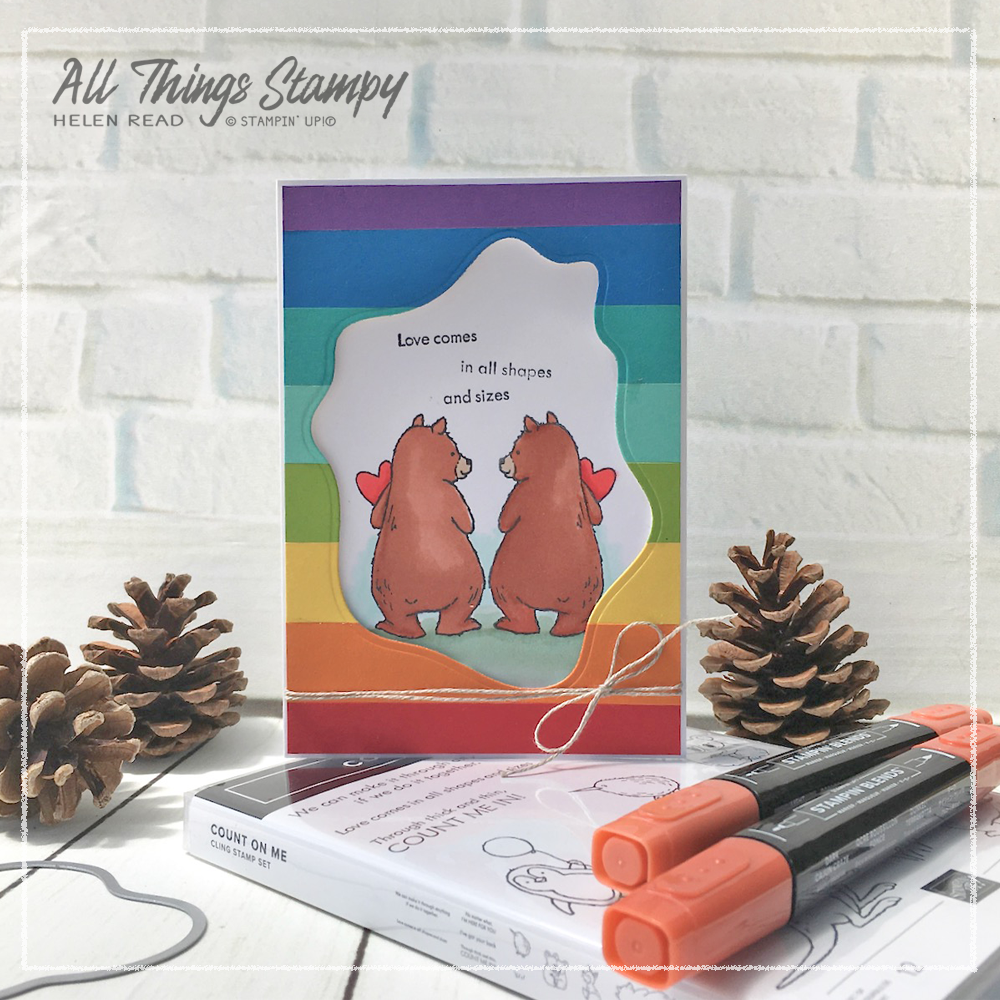
Mirror stamping with Count on Me for Pride Month

 
It’s Pride Month and it’s easy to look through the catalogue and think there’s nothing suitable for a same-sex couple. But sometimes we have to think outside the box in the name of #stampingdiversity.
 
I made these two cards using the new Count on Me stamp set and a bit of mirror stamping. I also had fun playing with my new Layering Diorama Dies and Checks & Dots  Embossing Folders. 


For this card I began by laying strips of coloured cardstock onto a piece of scrap white cardstock. Next I cut it out using the Layering Diorama Dies. I trimmed it to just a little smaller than my card front. 

I stamped my bears onto a separate piece because when you colour with Stampin’ Blends, the ink goes through to the other side.

You can create a mirror image of any stamp using the Stamparatus and a Silicone Sheet. It’s a really genius trick which is well worth giving a go. It’s not something you can describe; you really need to see it. Happily, I have video which shows you how to create this fun effect. 
 

I coloured the images using Stampin’ Blends. Cajun Craze Light and Dark for the bear bodies, Ivory for the noses, Poppy Parade Light and Dark for the hearts, Mint Macaron Light and Dark for the ground and a hint of Light Pool Party in the background. 
 

I stamped the words by masking the stamp to ink just a couple of words at a time. You have clean very thoroughly in between inking when using this method!

The diorama frame is popped up onto the image layer and finished off with some linen thread.


Next we have the very diverse relationship between a fox and a kiwi! I confess I had to Google kiwis to see what colour they were because my twisted brain was telling me to colour it in green. Yes, yes, I know that’s the fruit!

I have used the cut-off strip of rainbow colours to edge the inside of my card and cut the front a little smaller so it shows. Well, confession time: I accidentally scored my card incorrectly so had a shorter front to start with, then decided to use this to my advantage.

 
Again, the image is coloured using Stampin’ Blends; Cajun Craze Light and Dark for the fox body, Ivory for the ears, nose and tail. Crumb Cake Light and Dark for the Kiwi, with Light Smoky Slate for the feet and beak. The ground is Light and Dark Mint Macaron, with Mint Macaron grass stamped on top. 
 
Behind the main image are some pieces of diorama die-cuts to echo the rainbow stripes down the side. 
 
 
The whole front piece is embossed using the new Checks & Dots Embossing Folders. These are small folders designed to fit in the Mini Stampin’ Cut & Emboss Machine, but I used them in the standard machine so I could emboss a larger piece of cardstock. With some careful positioning, I was able to run the card through twice and avoid a line; I did this by only rolling it through up to the point I needed, so no double embossing. 
 

The card is finished off with this appropriate greeting once again, this time stamped in one go and simply cut out freehand to break it up.
 
So what do you think? Are you inspired to make your own cards for Pride Month for those LGBTQ+ people in your life?  
 
If you are in the UK and would like to order any of these lovely products, please visit my store. I don’t currently have a host code open but watch this space! 


Does your wish list come to more than £99? Please get in touch and I will help you get more for your money and unlock discounts all year round.  


The small print

This is my personal blog and my sole responsibility as an Independent Stampin' Up!® demonstrator. All images are © Stampin' Up!® All content including photographs, projects and text are © Helen Read, unless otherwise stated. Please feel free to copy my ideas for your personal use and inspiration - if you are a SU demonstrator you may use these ideas for your events but please give credit where it is due. Please do not use my ideas for monetary gain, competitions or publication. The images on this blog - including blog buttons - should not be copied and used elsewhere on the internet or on CDs.