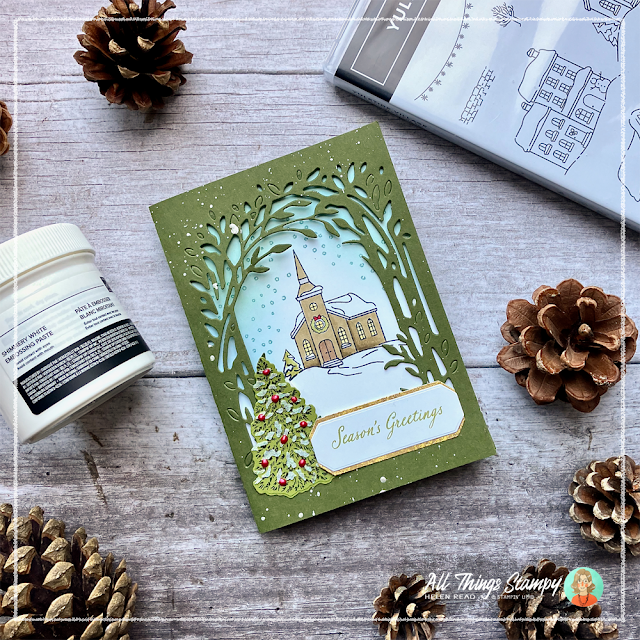
Are you looking for a special Christmas idea using the Yuletide Village stamp set from Stampin’ Up!®?
Look no further as I have a vintage Christmas card with matching gift tag in mellow greens with a hint of bling. I have used some messy techniques to give it a slightly shabby vintage look, making it a project for the avid crafter, I used a huge array of products too but you adapt it to your own supplies, and simplify it if you wish too.
Let’s start with this Yuletide Village Christmas card. This is heavily inspired by a beautiful project by Dutch Stampin’ Up!® demonstrator Monique de Kok. I didn’t have exactly the same products as Monique so adapted to what I had.
This meant starting with the gorgeous frame from Delicate Forest Dies (162679) to create an aperture card from Mossy Meadow. I splashed this with some old Frost White Shimmer Paint which I wish had never retired so I kept it.
The Christmas tree at the front is stamped in black then die-cut from Frosted Forest Dies (164136). The snow is added using Shimmery White embossing paste (145645) through Frosted Forest Decorative Masks (164350). Once this had dried – once it was stuck down and the card completed, in fact – I added some tiny red dots of Pearlized Enamel Effects Basics (156310) to give it a splash of colour.
While the tree and the main card base were drying, I stamped my main scene on Stampin’ Up!® Basic White cardstock.
The church image is stamped in Memento Tuxedo Black and coloured using Stampin’ Blends alcohol markers. Around the top of the white cardstock I used a blending brush to add some Balmy Blue ink, then stamped the snow image from Yuletide Village on top using Lost Lagoon.
The white panel is attached inside the card, behind the aperture, using Stampin’ Dimensionals.
The greeting is from an old Stampin’ Up!® because I’ve mislaid the Christmas greeting stamp set I wanted to use. This is die-cut using a frame from Delicate Forest Dies. The frame was die-cut twice – once in white, once in gold. The gold layer is cut in half horizontally and spread out to create the illusion of a frame.
The overall effect is of a snowy wintry scene with some rich greens and splashes of shimmer.
To go with this Yuletide Village card, I wanted to make a matching gift tag, so used Countryside Corners (161471) to make the main body of the tag. This is cut out of Old Olive cardstock.
I embossed the Old Olive layer using the Distressed Tile 3D Embossing Folder (162189) from Stampin’ Up!® then used a small Blending Brush (160518) to apply some Metallic Enamel Effects Basics (161610) on top.
I die-cut a tree from Mossy Meadow – I used the centre of the card front for this as it was exactly the right size and reduced waste. On top of this I stencilled Shimmery White embossing paste, using the same stencil as before. This means you could do both trees at the same time if you wished.
I stamped the house from Yuletide Village and coloured using Stampin’ Blends alcohol markers as before, this time fussy-cutting it out, giving it a little foreground of snow.
I then discovered that the tag wouldn’t take Tombow Multi-purpose adhesive because of it’s new shiny surface, so I attached the tree and house using Stampin’ Dimensionals.
Happy Christmas was stamped using an old kit stamp and cut out freehand. Again, it’s popped up using Dimensionals.
It’s tricky to write on an embossed surface, so I backed the tag with same die-cut shape in Basic White cardstock. As I was prepping for a class, I wanted to see if I could cut out the Old Olive and Basic White at the same time, or if it would be too much for my die. As it is a really simple shape, it worked, halving my die-cutting time. On the white cardstock I stamped a simple greeting, leaving space to write.
To attach the ribbon, I simply taped this onto the back of the Old Olive tag then sandwiched it between the two cardstock layers.
I hope you like my Yuletide Village projects and are tempted to add this gorgeous stamp set to your next Stampin’ Up!® order. There is still time to order for your Christmas projects this year, but not for much longer, so don’t delay!


No comments:
Post a Comment
Thank you so much for taking the time to comment.