Sorry I can't update the blog right now. Please find me on Facebook

Showing posts with label Mini 2011. Show all posts

Friday, 23 September 2011

Distressing class projects


Sorry for the lack of posts lately – I’ve been up to my ears in preparing for my new Catalogue Launch Party, trying to make samples, changing my email address, setting up new-style newsletters, not to mention nursing a stinking cold!

But now, better late than never, are some of the projects we made at last week’s Distressed About Distressing class. Unfortunately, I took a picture of the pirate card on my phone in a hurry before posting it to a friend, and the picture came out soooo badly that I can’t bear to post it here. But here are the other projects.

We made three cards – the aforementioned pirate card, which used the crumpled paper technique, plus this flower card (some people made a Cherry Cobbler version) and the birdcage card, which is a variation on this wedding card I made recently.

We used lots of distressing techniques, some of which I’ll talk you through.

Flower card
The flower card really took a hammering! The flower itself is punched twice – once from Newsprint and once from Basic Black cardstock. The Newsprint flower was inked at the edges using the flat stamp from the Distressing Essentials Kit, then run through the paper crimper. The flat stamp was used again to ink the raised areas formed by the crimper, then it was run through the crimper again, and again, inking occasionally. Once it was well and truly battered, we flattened it out using the bone folder, this broke down the fibres so that some of the petals “split”. Nice effect – and great to use up those bits of creased or marked Designer Series Paper!

The Eggplant panel is inked around the edges using the flat stamp, too.

The elaborate Crumb Cake panel is made with the Top Note die. Put it through once, then turn your cardstock 90ยบ and put it through again. I’d done these in advance to save time, but the classgoers got the opportunity to run it through the Big Shot again, with the Vintage Wallpaper embossing folder. Next we inked the raised areas using the flat stamp and Crumb Cake ink, then dabbed them with a sponge dauber and some beautiful Champagne Mist shimmer paint. You can’t see it in the photo but it gives it a really gorgeous sparkle.

The black strip is crimped and the ribbon is simply folded and twisted onto a length of Sticky Strip.

Birdcage card
The front of this card was stamped and stamped off using Crumb Cake ink and the foliage stamp from Nature Walk. Then it was spritzed using the Night of Navy marker. A section of the front was crimped, to add interest.

The main image was created by inking the En Francais background stamp lightly and erratically with the flat stamp, so that areas were missed. Then the foliage was stamped and stamped off.  The edges were inked with the flat stamp, too. The birdcage was stamped separately, cut out and popped up.

The edges of the cardstock were distressed using the files from the Distressing Essentials Kit.

Pirate card (not shown)
For this card we used the crimper again, plus the crumpled paper technique. For this, we took a piece of perfectly good cardstock, soaked it in water and screwed it up tightly. We opened it out and left it to dry, then tore it into a random shape. You at home can use damaged cardstock for this technique – it’s brilliant for salvaging seemingly useless scraps. If your cardstock is marked, you can ink it once it’s dry, using the flat stamp, or the Direct to Paper technique with your ink pad.

Recipe (retiring products in red)

Stamps: Just Believe, Nature Walk, En Francais
Cardstock: Elegant Eggplant, Basic Black Very Vanilla, Crumb Cake, Night of Navy
Paper: Newsprint
Ink: Night of Navy, Crumb Cake, Elegant Eggplant
Accessories: Distressing Essentials Kit, Colour Spritzer, Night of Navy Marker, Linen Thread, Regals Buttons, Fancy Flower Punch, 1” circle punch, ¾” circle punch, Big Shot, Top Note Die, Vintage Wallpaper embossing folder, sponge daubers, Champagne Mist shimmer paint, Paper crimper, Basic pearls, Satin Ribbon – Night of Navy (now out of stock)

We also used Beware, Pirates, which is retiring

All products by Stampin’ Up!®            

Friday, 16 September 2011

Elegant butterflies


You don’t want to let these beautiful papers slip away do you? You only have until the end of September to order any of the Designer Series Papers in the current catalogue. Well, I say “any” – Jolly Holiday has already sold out and other items are selling fast, so don’t delay! Shipping is £4.95 to anywhere in the UK – and if you spend £50 or more, I’ll pay the shipping for you!

This card was the birthday card I made for my friend Kelly. She’s a super-talented stamper and all-round genius, so the pressure was on.  I know she loves the Elegant Soiree papers and colours but only had a few bits left. Never mind – there was enough colour crossover with this piece of Blueberry Crisp (small butterfly) to finish it off.

I pasted the patterned paper to some thick cardstock – I use the backing from Designer Series Paper all the time for this, it’s perfect. Once it was fully dry, I ran it through the Big Shot using the Butterfly die. Next I painted both butterflies all over with a thin layer of Crystal Effects® and set aside to dry.

I faffed around for ages with the ribbon as really wanted some narrow ribbon in Soft Suede but we don’t carry it... yet. New catty hint: Soft Suede taffeta coming soon! The Early Espresso (retiring) was close enough though, and I tied it in a knot, topped with a flower button and a large pearl.

The butterflies are popped up on Dimensionals – both layers, as is the Modern Label with its tiny pearl and linen thread. The only stamping is the word “friends” on the front and the greeting inside, which is decorated, too, but I forgot to photograph it. Doh!

Retiring products are shown in red:

Stamps: Tiny Tags
Cardstock: Crumb Cake, Soft Suede, Baja Breeze, Very Vanilla (inside)
Paper: Elegant Soiree, Blueberry Crisp
Ink: Soft Suede
Accessories: Crystal Effects®, Basic Pearls, Butterfly Die, Modern Label Punch, Linen Thread, Neutrals Buttons, Early Espresso Taffeta ribbon, Scallop Edge Punch

All products by Stampin' Up!®

Monday, 29 August 2011

Sailing in a stormy sepia


In preparation for my Distressed About Distressing class, I’ve been playing around with a few distressing techniques. Not sure if this one will make it to the class due to time restraints though. I have no idea what this technique is called – perhaps someone can enlighten me?

I took a piece of acetate and swiped with one of the ink spots from the Distressing Essentials Kit. I spritzed it lightly with water and then placed my piece of cardstock face down in the ink. I dried it with the heat gun – this created my background. I wasn’t sure how it would turn out but I thought this one looked like a stormy sea (albeit in sepia) so I stamped the Sail Away yacht on top. So that the sails would stand out, I stamped the yacht again on some Designer Series Paper and cut out those, paper piecing them on top. I quite like the effect of this image.

What I’m not so sure about is the distressing around the edges of the card – I think I got a bit carried away. Oh well!

And look! Another use for the Top Note Die! As a mat for your image - and your image doesn't have to fit perfectly; as you can see, I've trimmed the Top Note so that only about three quarters of it is showing. 

Stamps: Sail Away
Cardstock: Soft Suede, Early Espresso, Whisper White
Paper: Botanical Gazette
Ink: Early Espresso
Accessories: Distressing Essentials Kit, Top Note Die, Taffeta Ribbon – Early Espresso

All products by Stampin' Up!®

Friday, 26 August 2011

For a beautiful baby...


Can’t believe I’ve forgotten to post this baby card – baby Grace must surely be walking by now!

This is a for a friend who is currently enjoying her gorgeous new baby girl, Grace Elizabeth - who, I notice from the latest photo, looks just like her! There’s hardly any stamping on this card because the papers do all the work – they’re from the Nursery Suite collection, which is really beautiful (and not just for baby cards!).

I stuck strips of different papers across the card, then die-cut the letters using my beautiful Big Shot and the Timeless Type Junior Alphabet dies from the Mini catalogue. I’ve made quite a few name cards using these dies and was quite sorry when they had to go back to their rightful owner, my downline Alison.

Stamps: Something to Celebrate (hostess)
Cardstock: So Saffron, Regal Rose
Paper: Nursery Suite
Ink: Early Espresso
Accessories: 1/8” taffeta ribbon – Daffodil Delight, Neutrals Buttons, Timeless Type Junior Alphabet Dies

All products by Stampin' Up!®

Saturday, 20 August 2011

Distressed and doodled


Sorry about the long absence – school holidays and all that. To celebrate my return, though, how about a scrapbook page for a change?

We created this page at my recent Scrapping Wednesday class – I would love to be able to hold these classes monthly, so get in touch if you’re interested in scrapbooking, whether you are starting from scratch or just want to build up your pages.

Everyone received the kit to make two pages, with lots of extra bits so they had options to customise their pages to suit their pictures.

The theme for the class was doodling – a technique which is daunting to some but really is very simple and actually requires no teaching, just a bit of practice on a sheet of scrap paper. As you can see, I doodled all the way around the edge of my Baja Breeze 12x12.

We also did a bit of distressing on this page, to give the ladies a taste of what’s to come at my forthcoming Distressed About Distressing class (details on my Events page). I used the flat stamp from the Distressing Essentials Kit to rub some Baja Breeze ink around the corners and edges of the cardstock. If you do this in a circular motion, it creates a really nice effect.

I used the Early Espresso marker in the Colour Spritzing Tool to create a paint spattered effect across the background, too. I didn’t want the page to be too girlie, but I added some foliage from Just Believe, to finish off the background.

The journaling is handwritten in my not particularly neat writing, but I do think handwriting on your scrapbook pages is very important, for me anyway. The main reason being that it’s quick! I used to have loads of scrapbook pages unfinished because I just need to get the journaling done on the computer. Now I scribble it on and I’m done! My theory is that our descendants will be happier to have a full scrapbook full of messy handwriting than a few odd pages printed perfectly neatly on the computer.

Oh, one cheeky trick we did with the Pear Pizzazz cardstock strip: I didn’t have any 12x12 and didn’t want to buy any when I only really needed one sheet, so the strip is created from a piece of A4 and joined behind the centre picture. Nobody would know... if I hadn’t just told you.

Stamps: Just Believe
Cardstock: Baja Breeze 12x12, Pear Pizzazz, Chocolate Chip, Whisper White
Ink: Baja Breeze
Accessories: Big Shot, Timeless Type, Junior Alphabet dies, Corner Rounder, Colour Spritzer, Distressing Essentials Kit, Spiral Punch, Pear Pizzazz ribbon, Hodgepodge Hardware®, Early Espresso Marker

All products by Stampin' Up!®

Thursday, 4 August 2011

Perfectly pillowed

When my team members reach Stampin’ Up!® milestones, I like to reward them in addition to the rewards they receive from the company. When they get to Bronze 2 they get a keyring/bag charm from me with a bead on it. Further achievements earn them more beads.

I was delighted recently that two of my team achieved promotions, so I made these cute little boxes to hold their beads. This one was for Tracy M, who earned her keyring with its first bead – Tracy has only been a demonstrator since January so has done very well to get this far so quickly!

Stamps: Oval All
Cardstock: Perfect Plum, Whisper White, Wild Wasabi
Paper: Woodland Walk
Ink: Perfect Plum, Wild Wasabi
Accessories: Pillow Box Die, Large Oval punch, Scallop Oval Punch


And here's another pillow box for another fantastic member of my team. This was for Jacqui, who promoted to Bronze 3, which is a great achievement.

Cardstock: Rose Red
Paper: Sweet Stitches
Accessories: 5-Petal Punch, Neutrals buttons, Pillow Box Die

All products by Stampin' Up!®

Tuesday, 2 August 2011

Naturally sweet


These are such sweet little cards, made with my favourite stamp set from the Mini catalogue and the gorgeous Springtime Vintage papers. This was the Make & Take for my recent parties – if you fancy making cute projects like this, why not book your own party?

I began by stamping the sprig in Rose Red on a small square of Very Vanilla cardstock. I stamped repeatedly without re-inking; this gives various shades of the same colour. Next I stamped the bee on top using Not Quite Navy ink. My version of this stamp set is clear-mount so I could see to do this easily.

Stamps: Nature Walk
Cardstock: Rose Red, Not Quite Navy, Very Vanilla
Paper: Springtime Vintage
Ink: Rose Red, Not Quite Navy
Accessories: Scallop Edge Punch (top), Eyelet Border Punch (bottom), Seam-binding ribbon – Rose Red (top), Baja Breeze (bottom)

All products by Stampin' Up!®

Sunday, 17 July 2011

It's Christmas at last!

I’m so behind with blogging but finally have my Christmas in July projects photographed and ready to show you. Please scroll down for a bonus project!

This year I decided not to try to be trendy with non-traditional colour schemes and stick to my favourites: greens and reds. There’s a reason these colours are the most popular for Christmas and that’s because they work. And, of course, plenty of opportunities for me to use Old Olive!

I also decided to try using "work stations", where the guests move around to different tables to create each project. I have been told by demonstrators in America that this isn't popular with customers but decided to risk it as we needed the Big Shot at one table and would have to be next to the wall for the embossing project so we could use the heat gun next to the one and only socket in the hall we use!

Anyway, I thought it worked really well and we didn't overrun for once, which was a bonus. Feedback from the afternoon session was that they preferred it as it was more relaxed, so I'd love to hear what the morning crowd thought. 

As for the projects, I'm starting with this card because I haven’t shown you a Top Note Die sample for a while, so am running behind on my target.

This was made by cutting strips of Jolly Holiday paper and pasting them onto a piece of backing that comes in Designer Series Paper packs. We then ran it through the Big Shot using the Top Note Die – a big favourite at the moment!

This was stuck to the card front and a piece of Old Olive grosgrain ribbon wrapped all the way round the card and double backed twice to create this funky loop.

“Joy at Christmas” was stamped twice – once in Cherry Cobbler on Very Vanilla and once in Old Olive (yay!) on Old Olive. The Old Olive cardstock was punched out using the Scallop Circle punch and the centre of the Vanilla cardstock was punched out using the 1 3/8” circle punch and popped up on the Olive.

Finally, a touch of bling! Yes, bling! A rhinestone on the end of the “y” gives it the finishing touch.

Oh, forgot to mention – and photograph – the inside, which has a Very Vanilla panel and a strip of Jolly Holiday paper for a further festive touch.

Stamps: Perfect Punches
Cardstock: Cherry Cobbler, Old Olive, Very Vanilla
Paper: Jolly Holiday
Ink: Cherry Cobbler, Old Olive
Accessories: Top Note Die, Big Shot, 5/8” Grosgrain Ribbon – Old Olive, Basic Rhinestones, 1 3/8” circle punch, Scallop Circle Punch

And here’s a bonus card... I couldn’t go without posting this beautiful creation from one of my customers.  Emily bought some glass glitter at a workshop recently and, as I don’t have any, I’d asked her to tell me what it was like and how she was getting on with it. She very kindly made me this gorgeous card to show me - look carefully and you'll see that the flower centres are created from glass glitter. You’ll look at this card and think it’s lovely, with all the carefully cut-out flowers from Vintage Vogue – but when I tell you that Emily is only 10 years old, I just know you’ll be REALLY impressed! So, forget about commenting on my card, but please leave a comment for Emily!

All products by Stampin' Up!®

Wednesday, 13 July 2011

Floral bunting


Springtime Vintage papers are so gorgeous, I’m surprised I haven’t been taking orders for them from everyone! They feature pretty florals reminiscent of old-fashioned wallpaper, little girls’ dress prints or patchwork fabrics.

Here I’ve used them to create bunting, which is perfect for a little girl’s birthday. Wouldn’t it be lovely to have bunting like this at your birthday party?

To make it easy for myself (because I seem to be running around like the proverbial fly at the moment), I stamped the bunting repeatedly on Very Vanilla cardstock. I dusted off the old Stamp-a-ma-jig® for this one as my Party This Way set is wood-mounted, received at Stampin’ Up!® Convention last year.  I’ve become such a convert to clear-mount stamps that I’d almost forgotten how to use the Stamp-a-ma-jig®!

I then stamped the bunting again directly onto the Designer Series Paper. In the corner, obviously, so as not to “spoil” the whole sheet! I cut out just the triangle (ie, the easy bit) and stuck it onto the stamped Vanilla cardstock. It’s the paper-piecing technique, if you want to give it a fancy name.

The Happy Birthday greeting comes from Something to Celebrate, a Level 2 hostess set from the current Mini catalogue. It’s a really useful set and I find myself using it all the time.  If you’d like to get your hands on this set, why not drop me a line to book a party and we’ll do our best to get you to a Level 2 (£300 workshop total).

Stamps: Party This Way, Something to Celebrate
Cardstock: Rose Red, Always, Very Vanilla
Paper: Springtime Vintage
Ink: Rose Red, Always Artichoke
Accessories:  Scallop Edge Punch

All products by Stampin' Up!®

Tuesday, 5 July 2011

I'm back!


Hello! Remember me? Are you still there? So sorry for such a long absence, you wouldn’t believe what a busy week I’ve had. All good stuff though!

Saturday and Sunday was the Fabulous Places Food & Gift Fair at the Roundhouse. I don’t have pictures of our stand yet but will have soon, I promise. I have to say that we looked suitably fabulous with our huge Stampin’ Up! wall and banner. I’m so grateful to the company for loaning these to us for the occasion.

Lots of people visited us over the weekend – some familiar faces, some new. Hope to see you ALL again soon!

And while I’m waiting for picture of our stand, here is the Make & Take we offered – very simple, perfect for beginners as it uses Getting Started colours and a simple single stamp, Sail Away.

Can't promise there will be much blogging this week either - I'm now deep in preparations for Christmas in July this weekend. 

Stamps: Sail Away
Cardstock: Daffodil Delight, Old Olive, Night of Navy, Whisper White
Ink: Night of Navy
Accessories: Satin Ribbon – Night of Navy

All products by Stampin’ Up!®            

Tuesday, 28 June 2011

Nautical news

Sorry for the lack of blog posts, I’m having a really busy week, trying to prepare for the big Fabulous Places event at the Roundhouse in Derby at the weekend, while also getting ready for Christmas in July the weekend after. Please bear with me over the next few days as I won’t be around much to post to my blog.

But, to keep you going for a while, here’s an idea which I saw on the great Shelli Gardner’s blog. Shelli, as many of you know, is the co-founder and CEO of Stampin’ Up!® If Shelli and her sister hadn’t had the idea to set up a rubber stamping home party business from their living room 20-odd years ago, you wouldn’t be reading this blog today! Here’s a link to Shelli’s blog post which inspired today’s card. I just love the idea of using Newsprint (one of my favourite Designer Series Papers) for sails.

All you do is stamp once on Very Vanilla cardstock and then again on the Newsprint. Cut out the sails and stick them on top. It’s called “paper piecing” – and if you ever wondered if that was a complicated technique, now you know it’s not!

I kept the colours simple – just Sahara Sand (love that colour!) with Basic Black and a bit of linen thread and a button.

Stamps: Sail Away
Cardstock: Basic Black, Sahara Sand, Very Vanilla
Paper: Newsprint
Ink: Basic Black
Accessories: Linen Thread, Neutrals Buttons

All products by Stampin’ Up!®            

Friday, 24 June 2011

Sail Away

Have I introduced you to this sailing boat yet? I don’t think so, and yet I’ve been using it quite a lot recently. It’s from the very back of the Mini Catalogue, where you’ll find some really nice individual stamps – perfect for presents, for those getting started who don’t want to splash out on everything immediately and, of course, for those who just like the images.

I’m a sucker for all things nautical – before I became a Stampin’ Up!® demonstrator I had an entire box devoted to seaside images, lighthouses, seagulls etc – so couldn’t resist this boat stamp.

This is a really simple card – just a bit of corrugating, some linen thread and a splash of red. I coloured the image – just the sails and the sea – with Watercolour Wonder™ crayons and a blender pen.

Stamps: Sail Away
Cardstock: Tempting Turquoise, Night of Navy, Real Red, Basic Grey, Whisper White
Ink: Basic Black
Accessories: Paper Crimper, Linen Thread, Watercolour Wonder™ crayons, blender pen

All products by Stampin’ Up!®

Sunday, 19 June 2011

Such a great team!

My team have been working very hard lately – so hard that, in fact, two of them promoted! It’s a complicated system but the short version is that, through sales and recruiting, we demonstrators have the opportunity to promote to different levels, and receive recognition and rewards from Stampin’ Up!

I was delighted to be able to congratulate Jacqui and Tracy recently for their efforts – and can’t wait to see them at our next team meeting to give them their team reward, too. Tracy will be getting a special bead keyring, while Jacqui will be getting an extra bead to add to the keyring she earned previously.

Meanwhile, this is the card I sent them both, again using my favourite set of the moment, Nature Walk.

I inked the stamp in Pear Pizzazz, then cleaned off the flower with a cotton bud so that I could ink it up with a Bravo Burgundy marker.

Stamps: Nature Walk, Something to Celebrate (hostess)
Cardstock: So Saffron, Bravo Burgundy, Pear Pizzazz
Ink: So Saffron, Pear Pizzazz, Bravo Burgundy
Accessories: Modern Label punch, taffeta ribbon – Old Olive, Stampin’ Pastels

All products by Stampin’ Up!®

Saturday, 18 June 2011

Appreciating Eileen

Here’s the second card I sent off to Germany for Demo Support Appreciation Day, this time for the lovely and super-helpful Eileen.

Again I used the Nature Walk stamp set, my favourite from the Mini. I inked the stamp with markers. Let’s pretend I used Early Espresso and Cherry Cobbler, as that’s what it looks like, although I have a horrible feeling it was Real Red on a dirty stamp!

The strip of Designer Series Paper is Elegant Soiree, which is one of the most popular collections in the main catalogue. I topped it with a strip of Baja Breeze seam-binding ribbon and my very last piece of Early Espresso taffeta.

Stamps: Nature Walk, Tiny Tags
Cardstock:  Baja Breeze, Early Espresso, Very Vanilla, Cherry Cobbler
Paper: Elegant Soiree
Ink: Baja Breeze, Cherry Cobbler, plus markers
Accessories: Word Window Punch, Modern Label Punch, Scallop Edge Punch, Seam Binding Ribbon – Baja Breeze, 1/8” taffeta ribbon – Early Espresso

All products by Stampin’ Up!®            

Thursday, 16 June 2011

Egging Chris on...

June 9th has been unofficially designated Demo Support Appreciation Day, by some of the demonstrators over on In Love With Stamping.

As demonstrators, we all help each other out and our upline (the person you sign up under) is your first port of call for any advice and questions. But there are always times when you upline isn’t available, or the question requires an answer direct from Stampin’ Up! – and, of course, some of us signed up too early in SU’s UK career to have an upline... and this is where Demonstrator Support comes in.

The US demo support team is huge – we have just two people, Chris and Eileen, which is lovely as we really get to know them. They couldn’t be more helpful and friendly – so thanking them once a year with a card is the least we can do!

This one I made for Chris. I tried to keep it masculine but couldn’t resist some ribbon – it looked too plain without it! I sincerely hope this card has reached Germany by now as I know that Chris can’t resist stalking our blogs on occasion.

The eggs are stamped in Early Espresso and then coloured very carefully with a blender pen and Baja Breeze ink. In fact, I had to “dot” the ink on (there’s a fancy word for that, isn’t there?) to stop it smudging.

Stamps: Nature Walk, Tiny Tags
Cardstock: Crumb Cake, Baja Breeze, Early Espresso, Very Vanilla
Paper: Elegant Soiree
Ink: Early Espresso, Baja Breeze
Accessories: Jewellery Tag, Scallop Edge Punch, Seam Binding Ribbon – Baja Breeze

All products by Stampin’ Up!®            

Saturday, 11 June 2011

Oh what a beautiful morning...


Somehow this card feels just right for such a glorious morning. I made a few of these to welcome some new recruits to my Stampin’ Up!® team. My team have been very busy in May, recruiting more demonstrators to our little family and I’m looking forward to meeting some of the new ladies at our forthcoming team meeting.

If you’re interested in joining our team as a demonstrator, please do get in touch – you are welcome to attend one of our meetings to find out more information before you decide whether to sign up or not. There will be no pressure – just lots of enthusiastic demonstrators happy to share their experiences with you. If you’d like to find out more, or come along to our next meeting, please email me.

Meanwhile, back to the card, which is made with Nature Walk, my most favourite set from the new Mini catalogue. I began by repeatedly stamping the foliage stamp in Pear Pizzazz – I stamped a few times without reinking, to get the paler images; this is called “stamping off”. Next I stamped the bee in Bravo Burgundy, although the photo makes it look like Cajun Craze, which would have worked just as well.

As I couldn’t lay my hands on my Distressing Kit (MUST have a sort-out!), I sponged chalk around the edges of the Very Vanilla panel in various colours; can’t actually remember which ones I used, sorry.  This was mounted on a Bravo Burgundy panel.

The “Welcome” comes from Something to Celebrate – I inked just the “welcome” part using a Bravo Burgundy marker. It was a bit tricky, as there’s a comma attached to the E but I mastered it after a few attempts.

The ribbon is Old Olive but, because it’s that lovely taffeta, it’s a little paler than Old Olive, so goes perfectly well with Pear Pizzazz. Pear Pizzazz ribbon is available, too, but I don’t have any unfortunately.

Finally, I stamped the sprig again in So Saffron on the edge of the card base.

Stamps: Nature Walk, Something to Celebrate (hostess)
Cardstock: So Saffron, Bravo Burgundy, Pear Pizzazz
Ink: So Saffron, Pear Pizzazz, Bravo Burgundy
Accessories: Modern Label punch, taffeta ribbon – Old Olive, Stampin’ Pastels

All products by Stampin’ Up!®

Tuesday, 7 June 2011

More fun with the Top Note Die

Top Note Die idea no. 5. I don’t know if I dare admit how many ideas I’m aiming for... no, I’ll keep quiet until I know I can reach my target!

This is simply a background panel for a card... although if you look carefully you’ll see it’s so much more than that because the raised flowers are paler than the background. I borrowed this idea from Monica, another UK demonstrator; here’s how you do it:

1. First create a Top Note from cardstock of your choice – choose one that you have the ink pad to match. I used Sahara Sand.

2. Take your Elegant Bouquet embossing folder, the matching ink pad and a brayer. Sorry folks, you’ll have to dust off the brayer for this one! Now brayer all over one side of the inside of the embossing folder – make sure it’s the side with the flowers indented, not raised.

3. Sandwich your Top Note in the folder and run through the Big Shot. The result should be raised flowers which are unlinked, with a darker background. Experiment with different colours to see what other effects you can create.

Now you’ll notice that I’ve slipped in the Strength & Hope stamp set which I have just taken delivery of and am having fun playing with. It’s not proved very popular with my customers but it’s very pretty, really, and it’s for sale for a very good cause. My Strength & Hope fundraiser is being rescheduled, but in light of the reaction to the stamp set, I will be offering an alternative. However, maybe you will all be won over by then!

I inked the butterfly using the rocking and rolling technique. This means I inked it with Baja Breeze ink and then rolled the stamp around the edges on the Soft Suede ink pad to ink up the edges. I also inked just the antennae of the butterfly in Soft Suede and stamped it directly onto the Top Note, then stuck the cut-out butterfly on top. I used SNAIL in the centre of the butterfly so that it was flat to the card and Dimensionals under each wing to raise them up.

Stamps: Something to Celebrate (hostess)
Cardstock: Baja Breeze, Sahara Sand, Soft Suede, Very Vanilla
Paper: Elegant Soiree
Ink: Soft Suede, Baja Breeze, Sahara Sand
Accessories: Top Note Die, Elegant Bouquet embossing folder, Modern Label Punch, Word Window Punch, Basic Pearls, Seam Binding Ribbon – Crumb Cake

All products by Stampin’ Up!®

Thursday, 2 June 2011

Using those paper scraps

Another Top Note Die idea to add to the collection... and a brilliant way to use up those little scraps of Designer Series Paper. I only have scraps of this Blueberry Crisp paper as it’s leftover from my paper share which I used to make a DSP sampler. It was only when I made up the sampler that I realised how beautiful this paper is!

First you need a piece of scrap card, about A6 (a quarter of an A4 sheet) will do. I used the backing from a pack of Designer Series Paper, no need to waste perfectly good cardstock! Cover the piece thinly with Tombow adhesive and apply the strips of Designer Series Paper to cover it completely. No need to overlap, just but them up right against each other.

Now you need to run it through the Big Shot with the Top Note Die.  NB: Somebody left me a comment the other day expressing concern about putting Tombow adhesive through the Big Shot, in case it spills out the sides and damages the die. I have to say I have never had any problems because I always spread the Tombow very thinly (so there is no excess to spill out) and allow it to dry thoroughly first.  There should be no problems if you take these precautions but, if you’re still not convinced, use SNAIL or Sticky Strip instead. I prefer Tombow because it's the most economical way to get 100% coverage.

The flower is another project I saw on the internet and it’s made up of several punched-out flowers. I used the Fancy Flower punch, the Five-Petal Flower punch and the largest flower from the Boho Blossoms Punch; three of each punched in Crumb Cake cardstock.  I punched a hole through the centre and added a rhinestone brad to hold them all together. I arranged the petals so they were “staggered” and then spritzed the whole lot with water before beginning to scrunch them all up. Once I was happy with how the flower looked (you may need to add more water as you lift the top petals), I left it to dry. Finally, I added a pearl on top of the rhinestone brad, which was a little extravagant by my standards!

The ribbon is Seam Binding, ruffled to create texture and the Happy Birthday banner is curled and stuck down to remain curled for dimension. Frankly, this card is never going to fit in an envelope, so I may as well have some fun with it!

Stamps: Something to Celebrate (hostess)
Cardstock: Crumb Cake, Very Vanilla
Paper: Blueberry Crisp
Ink: Not Quite Navy
Accessories: Top Note Die, Fancy Flower Punch, Five Petal Flower punch, Boho Blossoms Punch, rhinestone brads, basic pearls, Seam-binding ribbon – Crumb Cake

All products by Stampin’ Up!®

Sunday, 29 May 2011

Another use for the Top Note Die - and the Mother of Pearl technique


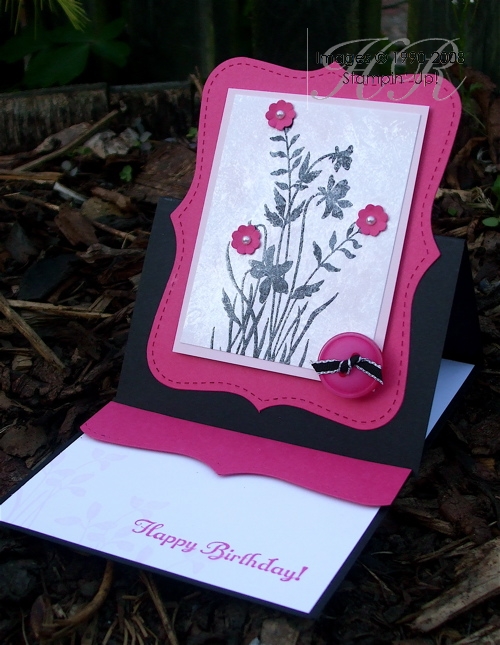
You know how I said you absolutely MUST get the Top Note Die? Well, here’s another reason: easel cards! Here are two easel cards from my May workshops; the first one, with the black, was the demonstration card, and the pink and white one was the Make & Take.

Making easel cards is very easy. All you do is cut your A4 cardstock in half lengthways, so measuring across the short edge at 10.5cm. Then you fold it in half (score at 14.8cm) and then, on one half, score in half again (at 7.4cm). 

There are two things you need to remember with easel cards:

1. The flat base must have something raised on it, to stop the top half of the card sliding down. Here I’ve used a strip of cardstock popped up with Stampin’ Dimensionals. You could also use brads, buttons etc – as long as there’s a “step”. 

2. You need to make sure the top folded piece sits down – my early efforts saw the top piece floating in mid-air. To make it sit down, you can add weight such as buttons etc, but by far the easiest way is to ensure that the score-lines are well creased. The important one is the one at the back, which is the halfway score. Get your bone folder on it and crease it well and you’ll have no problems!

Now, I’m not sure if you can see from the photo but on the first sample there’s a rather groovy technique. It’s called the Mother of Pearl technique and I learned it from Impressions magazine, the monthly newsletter sent by Stampin’ Up!® to all demonstrators.

You will need Whisper White cardstock, Frost White shimmer paint, a pale-coloured ink pad, Black StazOn® ink pad and a piece of cling film scrunched up into a ball.

  1. Put a few drops of shimmer paint onto a paper plate.
  2. Using the scrunched-up clingflim, dab the paint onto your Whisper White cardstock.
  3. Allow to dry.
  4. Once dry, you can add coloured ink either by sponging or brayering (brayering is quicker, but sponging will allow you more precision if doing lots of different colours). I brayered Pink Pirouette ink over the top for a really gentle effect.
  5. Now you can stamp on this very cool background – but you must use StazOn® ink because ordinary ink pads won’t work on what is now a non-porous surface. 
Have fun!

Stamps: Just Believe, Something to Celebrate (hostess set)
Cardstock: Whisper White, Basic Black, Melon Mambo, Pink Pirouette
Ink: Pink Pirouette, Melon Mambo, Black StazOn®
Accessories: Frost White shimmer paint, brayer, Itty Bitty Punches, Top Note Die, Scallop Edge Punch, Basic Pearls, Big Designer Buttons, 1/8” taffeta - Basic Black

All products by Stampin’ Up!®            

Thursday, 26 May 2011

Something borrowed, something blue


Another wedding, another card... but I have to say I don’t like this one as much as the Melon Mambo one I made earlier.  I was completely thrown by the fact that I had no Baja Breeze cardstock left... must have used it all up at my Mini catalogue launch. So I compromised with a combo of Marina Mist, Basic Gray and Whisper White.

There's nothing old on this card, it's all new - stamps, embossing folder, die, ribbon are all from the new Mini. Something borrowed? Yes, the flower die belongs to my lovely downline, Kelly. And something blue is self-evident!

Stamps: Something to Celebrate (hostess set)
Cardstock: Marina Mist, Basic Gray, Whisper White, Vellum cardstock
Ink: Baja Breeze
Accessories: Seam Binding ribbon – Baja Breeze, Big Shot, Elegant Bouquet Embossing folder, Fun Flowers die, Neutrals buttons, Whisper White taffeta ribbon

All products by Stampin’ Up!®

The small print

This is my personal blog and my sole responsibility as an Independent Stampin' Up!® demonstrator. All images are © Stampin' Up!® All content including photographs, projects and text are © Helen Read, unless otherwise stated. Please feel free to copy my ideas for your personal use and inspiration - if you are a SU demonstrator you may use these ideas for your events but please give credit where it is due. Please do not use my ideas for monetary gain, competitions or publication. The images on this blog - including blog buttons - should not be copied and used elsewhere on the internet or on CDs.