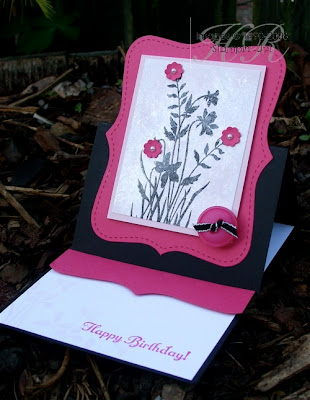
You know how I said you absolutely MUST get the Top Note Die? Well, here’s another reason: easel cards! Here are two easel cards from my May workshops; the first one, with the black, was the demonstration card, and the pink and white one was the Make & Take.
Making easel cards is very easy. All you do is cut your A4 cardstock in half lengthways, so measuring across the short edge at 10.5cm. Then you fold it in half (score at 14.8cm) and then, on one half, score in half again (at 7.4cm).
There are two things you need to remember with easel cards:
1. The flat base must have something raised on it, to stop the top half of the card sliding down. Here I’ve used a strip of cardstock popped up with Stampin’ Dimensionals. You could also use brads, buttons etc – as long as there’s a “step”.
2. You need to make sure the top folded piece sits down – my early efforts saw the top piece floating in mid-air. To make it sit down, you can add weight such as buttons etc, but by far the easiest way is to ensure that the score-lines are well creased. The important one is the one at the back, which is the halfway score. Get your bone folder on it and crease it well and you’ll have no problems!
Now, I’m not sure if you can see from the photo but on the first sample there’s a rather groovy technique. It’s called the Mother of Pearl technique and I learned it from Impressions magazine, the monthly newsletter sent by Stampin’ Up!® to all demonstrators.
You will need Whisper White cardstock, Frost White shimmer paint, a pale-coloured ink pad, Black StazOn® ink pad and a piece of cling film scrunched up into a ball.
- Put a few drops of shimmer paint onto a paper plate.
- Using the scrunched-up clingflim, dab the paint onto your Whisper White cardstock.
- Allow to dry.
- Once dry, you can add coloured ink either by sponging or brayering (brayering is quicker, but sponging will allow you more precision if doing lots of different colours). I brayered Pink Pirouette ink over the top for a really gentle effect.
- Now you can stamp on this very cool background – but you must use StazOn® ink because ordinary ink pads won’t work on what is now a non-porous surface.
Have fun!
Stamps: Just Believe, Something to Celebrate (hostess set)
Cardstock: Whisper White, Basic Black, Melon Mambo, Pink Pirouette
Ink: Pink Pirouette, Melon Mambo, Black StazOn®
Accessories: Frost White shimmer paint, brayer, Itty Bitty Punches, Top Note Die, Scallop Edge Punch, Basic Pearls, Big Designer Buttons, 1/8” taffeta - Basic Black
All products by Stampin’ Up!®


I love both cards Helen, but the one with the Mother of Pearl Technique is beautiful. I haven't tried it but certainly will now. A great idea for the Top Note Die as well. Thanks for the inspiration
ReplyDeleteAnn
thanks for the mother of pearl technique it looks fab your cards are lovely.
ReplyDeletettfn
Charlie.xx