Showing posts with label Easel cards. Show all posts

Friday, 28 June 2019

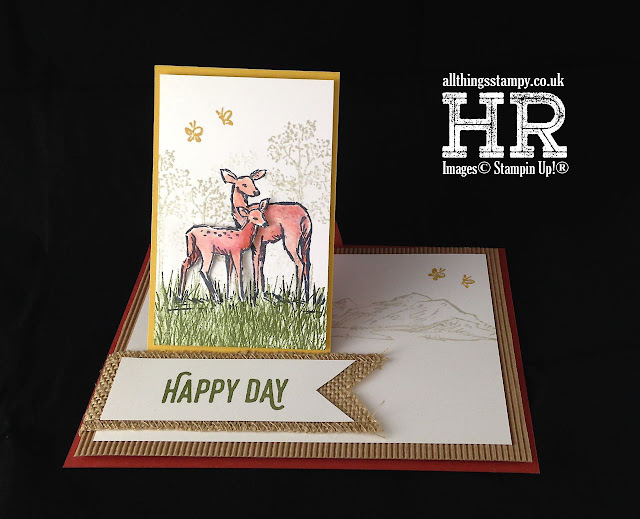
Tent fold easel card with Come Sail Away Suite


I was inspired to make this card by Karen from Donemark Papercrafts but wanted to change it to fit inside a standard C6 envelope. I also simplified the easel mechanism.

So please do follow Karen’s instructions but if you want to make the smaller version for a C6 envelope, it is as simple as cutting a square of cardstock which is no longer than your envelope. So I used a 14.8cm x 14.8cm square of cardstock, scored into quarters.

For the easel mechanism, I cut an 8cm x 2cm cardstock strip and scored at 2cm and 4cm.
This is where you need to score (dotted lines) and fold (solid line) your main piece:


You can make this card any size you like, just score the square in quarters, as shown in the diagram. To make it fit in your envelope, just make sure the square is no longer than your envelope - for a C6 card (which is just over 16.2cm long), I used a 14.8cm square. I could have made it bigger but this way I could get two from a sheet of A4 cardstock. 

The key fold is the centre vertical – make this crisp to ensure the card stands up nicely, with the two base squares overlapping. 

As with any easel card, weight is the key to making it sit properly. If the decorated section isn’t heavy enough, it will float mid-air. 

Finally, your easel needs something to rest against, which is why the greeting panel is popped up. This creates a step to stop the decorated panel from sliding forwards.


Friday, 8 September 2017

Painted Harvest in rich purple shades


The first Friday of each month is Crafty Friday – a relaxing class suitable for all abilities. There is often an element of freestyle, where we all begin from the same starting point and then go our own way, if we wish. 

So we all made the card on the left, then moved onto a simple easel card. The Painted Harvest stamp set proved really popular, especially in these gorgeous rich colours of Berry Burst, Fresh Fig, Soft Suede, Tranquil Tide and Lemon Lime Twist. Yum!

To see the projects made by the six ladies who came to the class, please visit my Facebook page


Tuesday, 19 January 2016

Tutorial: In The Meadow half easel card


I really don’t know what’s come over me this year. I keep making projects which are so out of character that I hardly recognise myself. Now it’s time for another fancy fold – this time a half easel card using one of my new favourite stamp sets; In The Meadow. I teamed it with another new set, Perfect Pairings, which is free with a £45 order during Sale-a-Bration


I was surprised how easy this one was to make; it’s simply a case of sandwiching a flap between two pieces of card and sticking an image to it. I made lots of these, trying to perfect the design for a Make & Take. When I say “perfect”, sometimes this just means making sure I have enough of the right colour cardstock. 


I created a tutorial for you to download if you wish, although please do bear in mind that the measurements are in metric. But I’m sure you can adapt them. The tutorial is for the design you see below, but obviously you can switch the colours around to suit. I used the Botanical Blooms cardstock pack, as the colours lend themselves perfectly to the stamp set, and you can get all three in one pack, eight sheets of each. 


Wednesday, 14 October 2015

Peaceful Pines easel card


Here’s another project from the Shoebox Swap I held with my team the other week. This was Patsy’s creation and we all really loved it. The only difficulty we had was stamping the images directly onto the Christmas tree shapes as Patsy had very kindly cut them out in advance for us. Naturally mine was wonky, but I stamped it again with much better results… then only went and stuck it down with the “bad” side facing up! Doh!


Sunday, 29 May 2011

Another use for the Top Note Die - and the Mother of Pearl technique


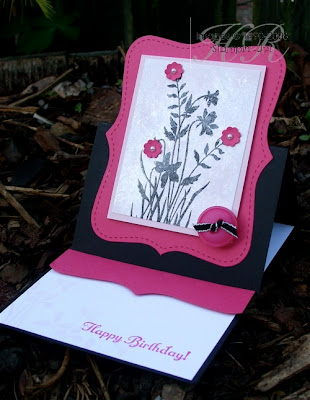
You know how I said you absolutely MUST get the Top Note Die? Well, here’s another reason: easel cards! Here are two easel cards from my May workshops; the first one, with the black, was the demonstration card, and the pink and white one was the Make & Take.

Making easel cards is very easy. All you do is cut your A4 cardstock in half lengthways, so measuring across the short edge at 10.5cm. Then you fold it in half (score at 14.8cm) and then, on one half, score in half again (at 7.4cm). 

There are two things you need to remember with easel cards:

1. The flat base must have something raised on it, to stop the top half of the card sliding down. Here I’ve used a strip of cardstock popped up with Stampin’ Dimensionals. You could also use brads, buttons etc – as long as there’s a “step”. 

2. You need to make sure the top folded piece sits down – my early efforts saw the top piece floating in mid-air. To make it sit down, you can add weight such as buttons etc, but by far the easiest way is to ensure that the score-lines are well creased. The important one is the one at the back, which is the halfway score. Get your bone folder on it and crease it well and you’ll have no problems!

Now, I’m not sure if you can see from the photo but on the first sample there’s a rather groovy technique. It’s called the Mother of Pearl technique and I learned it from Impressions magazine, the monthly newsletter sent by Stampin’ Up!® to all demonstrators.

You will need Whisper White cardstock, Frost White shimmer paint, a pale-coloured ink pad, Black StazOn® ink pad and a piece of cling film scrunched up into a ball.

  1. Put a few drops of shimmer paint onto a paper plate.
  2. Using the scrunched-up clingflim, dab the paint onto your Whisper White cardstock.
  3. Allow to dry.
  4. Once dry, you can add coloured ink either by sponging or brayering (brayering is quicker, but sponging will allow you more precision if doing lots of different colours). I brayered Pink Pirouette ink over the top for a really gentle effect.
  5. Now you can stamp on this very cool background – but you must use StazOn® ink because ordinary ink pads won’t work on what is now a non-porous surface. 
Have fun!

Stamps: Just Believe, Something to Celebrate (hostess set)
Cardstock: Whisper White, Basic Black, Melon Mambo, Pink Pirouette
Ink: Pink Pirouette, Melon Mambo, Black StazOn®
Accessories: Frost White shimmer paint, brayer, Itty Bitty Punches, Top Note Die, Scallop Edge Punch, Basic Pearls, Big Designer Buttons, 1/8” taffeta - Basic Black

All products by Stampin’ Up!®            

Monday, 19 April 2010

My first easel card... well, kinda

Easel cards are all the rage at the moment – and they’re easy to make, so why has it taken me so long to make one?

Well, truth be known, I still haven’t, as this wasn’t made by me – not entirely anyway. It was created for a challenge at the Stampin’ Up!® training day in Sheffield last month and was a team effort using the box of supplies provided.

The stamp set is Vintage Vogue, from the new Mini catalogue, and the wheel is the co-ordinating Very Vintage. I can’t remember what my input was – oops! I do remember that our table won the challenge to prepare a workshop in 45 minutes, so we must have done something right!

Stamps: Vintage Vogue, Very Vintage jumbo wheel
Cardstock: Old Olive, Whisper White, Chocolate Chip
Ink: Chocolate Chip, Old Olive
Accessories: ¼” Grosgrain Ribbon - Whisper White, Silver brad

All products by Stampin' Up! ®

The small print

This is my personal blog and my sole responsibility as an Independent Stampin' Up!® demonstrator. All images are © Stampin' Up!® All content including photographs, projects and text are © Helen Read, unless otherwise stated. Please feel free to copy my ideas for your personal use and inspiration - if you are a SU demonstrator you may use these ideas for your events but please give credit where it is due. Please do not use my ideas for monetary gain, competitions or publication. The images on this blog - including blog buttons - should not be copied and used elsewhere on the internet or on CDs.