Tuesday, 29 June 2021

You’re a Peach - three stages of stamping

Stampin Up! card using You’re a Peach Suite Sweet as a Peach stamp set

When you’ve been a Stampin’ Up!® demonstrator for a long time (13.5 years here!), you tend to have gathered a LOT of supplies and can lean towards cards which are rather complicated. This can result in beautiful projects which cost hundreds of pounds to be recreated by a crafter starting from scratch.

This is why Stampin’ Up!® developed the three stages of stamping, for three types of stamper – and here I have created a You’re a Peach Suite project for each one. 
 
Stampin Up! card using You’re a Peach Suite Sweet as a Peach stamp set

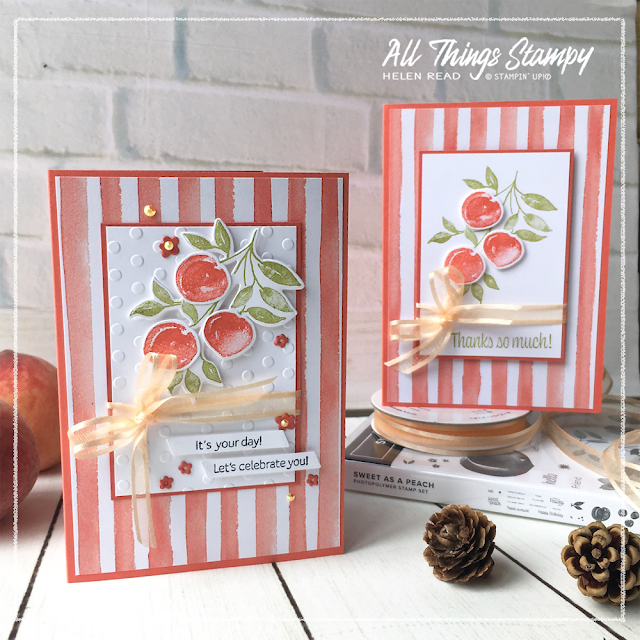
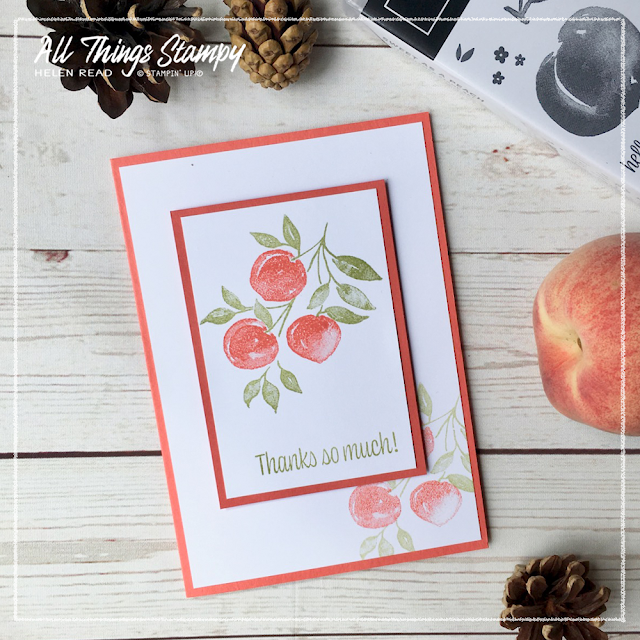
The first card takes stamping right back to basics, using just stamps, ink and paper for our New Crafters. Two ink pads – Calypso Coral and Pear Pizzazz – are used on the Sweet as a Peach stamp set, with some stamping off on the background layer to show how to get different shades from the same ink pad. It’s a basic design but very easy to recreate if you’re a new crafter, or even if you are just new to Stampin’ Up!® so don’t have all the bells and whistles yet!
 
Stampin Up! card using You’re a Peach Suite Sweet as a Peach stamp set

The second steps things up a little for our Casual Crafters with the addition of some Pale Papaya Open Weave Ribbon. I’ve cut out the peaches using the Peach Dies, and popped them up on Stampin’ Dimensionals, but a new crafter could just as easily use scissors to cut them out.

Stampin Up! card using You’re a Peach Suite Sweet as a Peach stamp set

I’ve also added some lovely stripey paper from the You’re a Peach Designer Series Paper Pack to give the background some interest. Simple touches which really lift a project to the next level. 
 
Stampin Up! card using You’re a Peach Suite Sweet as a Peach stamp set
 
Finally, this is the ‘bells and whistles’ project for our Avid Crafter friends. The one where it’s best not to add up the cost, although I did stay largely within the You’re a Peach Suite!

Stampin Up! card using You’re a Peach Suite Sweet as a Peach stamp set

I’ve used the same basic design, with the Designer Series Paper background and cut-out peaches, but this time I’ve also cut out the leaves and popped them up onto some Basic White cardstock which has been embossed using the Checks & Dots embossing folder. 
 
Stampin Up! card using You’re a Peach Suite Sweet as a Peach stamp set

I’ve die-cut some tiny Calypso Coral flowers and topped these with some 2021-2023 In Color Jewels... the Pale Papaya ones, to match the ribbon. The greeting here is stamped onto Basic White and cut out using the banner die from the Peach Dies set. 
 
Stampin Up! card using You’re a Peach Suite Sweet as a Peach stamp set
 
I’ve made this one into a birthday card to reflect the extra effort which has gone into it and even remembered to decorate the inside! 
 
Stampin Up! card using You’re a Peach Suite Sweet as a Peach stamp set
 

Seen a card you love but don’t have all the ‘bells and whistles’? Just as I started simple and worked my way up to a more product-heavy card, you can look at a complicated project and scale it back to something more simple. This is handy if you’re in a hurry – and essential when you’re just starting out and don’t have a room full of craft supplies!

What do you think of this Suite? If you love these peaches – or any Stampin’ Up!® products – you’ll be delighted to know that during July 2021, the You’re a Peach Designer Series Paper is available at 15% off. If you are in the UK and would like to order, please visit my store and, if you use the current host code DQPJEQF9, I’ll send you a thank you gift in the following month.


Does your wish list come to more than £99? Please get in touch and I will help you get more for your money and unlock discounts all year round.  


Tuesday, 22 June 2021

Totally wild about In The Wild Suite


When I first saw the In The Wild Suite, I just knew I’d struggle to resist it. But I wasn't sure it would have universal appeal and my job is, of course, to show you things that you will like too.
 
Naturally I caved in (it didn’t take long) and tentatively demoed a few products from the Suite at my Catalogue Launch Party the other weekend. Guess what? They were as wild about it as I am! It’s the colours... the designs... the everything, actually.

What’s more, everywhere I look at the moment, I see wild animal themes, in these colours, too. I’ve seen wallpaper and I swear a shop near me has a lampshade which is not dissimilar to the Just Jade cheetah paper. 
 
 
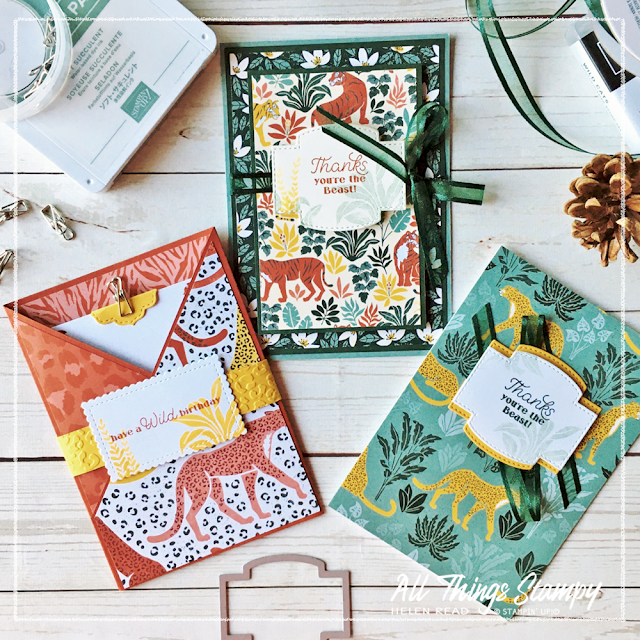
This is the card I demoed at the launch. It’s a simple pocket card made by attaching two card bases together then slicing off the diagonals to make pocket flaps. Not my idea, of course – I totally CASEd this from New Zealand demonstrator Jan Clothier

I’d been so busy in the run-up to my launch event that I hadn’t had chance to practise my demo, so this was my very first time stamping the leopard. I say this to illustrate just how easy it is to line up the head and the spots onto the body. 
 
Here’s what the card looks like ‘closed’. That clasp is a bit too fat to post as a standard letter but I was sending this card with a gift so the extra bulk didn’t matter in this instance. 


This is a simpler card, which is actually my go-to design of the moment after seeing it demonstrator by UK demonstrator Julie Kettlewell. The design works with any Designer Series Paper and I love it with these rich dark colours. 
 

Yes it’s quite cardstock-heavy but you could omit the bottom layer of Evening Evergreen and stick your largest DSP layer directly to the card front. 

You could even simplify it further to make something like this...

 
For this card, I’ve covered the whole of the card front, which is a favourite thing of mine at the moment. Then I’ve simply added some ribbon and a couple of labels, slicing the Crushed Curry one in half horizontally and spreading it out behind the white label to provide a border. 

Yes, the stripes are designed to fit both cats – the sitting one and the standing one. I didn’t know this until it was pointed out to me in a ‘behind the scenes’ presentation to Leaders (demonstrators who are Silver Elite and above). I love this –  so clever. And yes I’ve tested it and yes it works! Look out for more In The Wild projects here in the future.


I hope you are as wild about these products as I am. If you are in the UK and would like to order any of these or any other products, please visit my store to shop. 


Does your wish list come to more than £99? Please get in touch and I will help you get more for your money and unlock discounts all year round.  


Tuesday, 15 June 2021

Mirror stamping with Count on Me for Pride Month

 
It’s Pride Month and it’s easy to look through the catalogue and think there’s nothing suitable for a same-sex couple. But sometimes we have to think outside the box in the name of #stampingdiversity.
 
I made these two cards using the new Count on Me stamp set and a bit of mirror stamping. I also had fun playing with my new Layering Diorama Dies and Checks & Dots  Embossing Folders. 


For this card I began by laying strips of coloured cardstock onto a piece of scrap white cardstock. Next I cut it out using the Layering Diorama Dies. I trimmed it to just a little smaller than my card front. 

I stamped my bears onto a separate piece because when you colour with Stampin’ Blends, the ink goes through to the other side.

You can create a mirror image of any stamp using the Stamparatus and a Silicone Sheet. It’s a really genius trick which is well worth giving a go. It’s not something you can describe; you really need to see it. Happily, I have video which shows you how to create this fun effect. 
 

I coloured the images using Stampin’ Blends. Cajun Craze Light and Dark for the bear bodies, Ivory for the noses, Poppy Parade Light and Dark for the hearts, Mint Macaron Light and Dark for the ground and a hint of Light Pool Party in the background. 
 

I stamped the words by masking the stamp to ink just a couple of words at a time. You have clean very thoroughly in between inking when using this method!

The diorama frame is popped up onto the image layer and finished off with some linen thread.


Next we have the very diverse relationship between a fox and a kiwi! I confess I had to Google kiwis to see what colour they were because my twisted brain was telling me to colour it in green. Yes, yes, I know that’s the fruit!

I have used the cut-off strip of rainbow colours to edge the inside of my card and cut the front a little smaller so it shows. Well, confession time: I accidentally scored my card incorrectly so had a shorter front to start with, then decided to use this to my advantage.

 
Again, the image is coloured using Stampin’ Blends; Cajun Craze Light and Dark for the fox body, Ivory for the ears, nose and tail. Crumb Cake Light and Dark for the Kiwi, with Light Smoky Slate for the feet and beak. The ground is Light and Dark Mint Macaron, with Mint Macaron grass stamped on top. 
 
Behind the main image are some pieces of diorama die-cuts to echo the rainbow stripes down the side. 
 
 
The whole front piece is embossed using the new Checks & Dots Embossing Folders. These are small folders designed to fit in the Mini Stampin’ Cut & Emboss Machine, but I used them in the standard machine so I could emboss a larger piece of cardstock. With some careful positioning, I was able to run the card through twice and avoid a line; I did this by only rolling it through up to the point I needed, so no double embossing. 
 

The card is finished off with this appropriate greeting once again, this time stamped in one go and simply cut out freehand to break it up.
 
So what do you think? Are you inspired to make your own cards for Pride Month for those LGBTQ+ people in your life?  
 
If you are in the UK and would like to order any of these lovely products, please visit my store. I don’t currently have a host code open but watch this space! 


Does your wish list come to more than £99? Please get in touch and I will help you get more for your money and unlock discounts all year round.  


Tuesday, 8 June 2021

Celebrating Pale Papaya with Hand-Penned Petals

Stampin’ Up! Hand-Penned Petals card ideas

I enjoyed a wonderful crafting treat at the weekend; an actual real live in-person event! This was my first in-person event since March 2020 and it was so wonderful to get people back together. 
 

Although we are all now fully vaccinated, to keep us all safe, I held two sessions in the garden and. I had borrowed a very large gazebo but thankfully we didn’t need to put it up (it’s very heavy!) as the sun shone brightly all day.
 
It was ostensibly a catalogue launch party but there wasn’t a lot of crafting – just one demo and one Make & Take – because I knew everyone would want to chat properly for the first time in ages.
 
 
Stampin’ Up! Hand-Penned Petals card ideas

This was the Make & Take card, which used the beautiful Hand-Penned Petals stamp set and the co-ordinating Hand Penned Memories & More Cards & Envelopes. These are gorgeous and a great way to give your card a lift without having to cut into your Designer Series Paper. 
 
Stampin’ Up! Hand-Penned Petals card ideas

But cut into the Hand Penned DSP we did, just for this little strip at the bottom of the Stitched So Sweetly die-cut shape. The image is stamped in Mint Macaron, Pale Papaya and Calypso Coral. The envelope actually uses Cinnamon Cider, but I found that a little dark.

During the week I have been playing a lot with Hand-Penned Petals and making lots of projects using Pale Papaya, which is a really lovely new In Color™ for 2021-2023. 
 
Stampin’ Up! Hand-Penned Petals card ideas

For this card I’ve used a Pale Papaya base and two designs of the Hand-Penned Designer Series Paper. I was playing around with some spritzing for this card – spritzing the stamp before stamping onto the paper. Unfortunately, I forgot to use Stazon ink so there is some smudging on the top right flower. It’s a fun technique though and one worth revisiting with this set as I think I could get some better results. 

Stampin’ Up! Hand-Penned Petals card ideas

The sentiment is stamped onto a die-cut shape created with Tasteful Labels. This is one of my most-used die sets, but I believe it will soon be equalled if not overtaken by Stitched So Sweetly. Either would make a really useful addition to your craft stash.

Stampin’ Up! Hand-Penned Petals card ideas

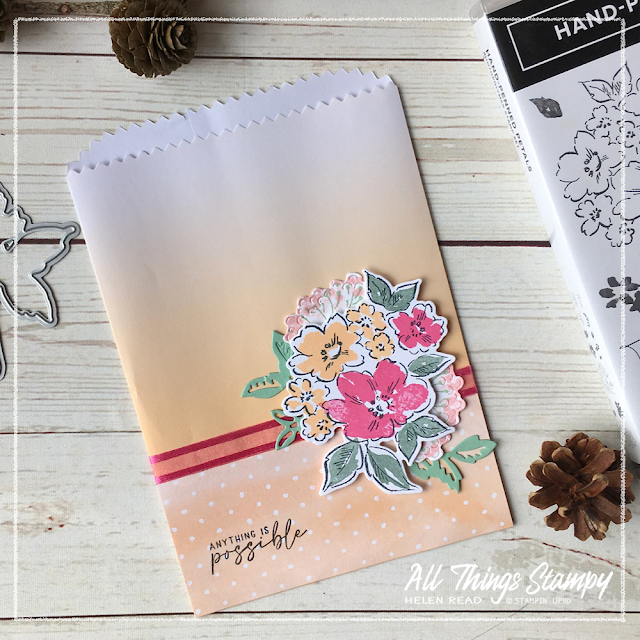
This bag was kinda thrown together with some leftovers. The main image is stamped in Polished Pink, Soft Succulent and Pale Papaya – all new In Colors™ for 2021-2023 – while the little flowers behind are stamped in Soft Succulent and Blushing Bride. The die-cut is Mint Macaron; what I love about Soft Succulent is that it is a darker shade of Mint Macaron so they coordinate beautifully.

Stampin’ Up! Hand-Penned Petals card ideas

These new Ombre Gift Bags are lovely and come in a mixed pack of our five new In Colors™– I’ve used Pale Papaya here with a strip of Polished Pink Open Weave Ribbon.

Stampin’ Up! Hand-Penned Petals card ideas

This card uses a large piece of Designer Series Paper to cover the whole card front – it’s my new favourite thing to do! I love how it gives a seamless look to your projects.

For the main image, I’ve stamped the same flower cluster as above along the bottom edge, turning it slightly each time so it doesn’t look like a uniform row. Then I’ve just stamped on top as before, this time using Pale Papaya, Soft Succulent and Blushing Bride. 

Stampin’ Up! Hand-Penned Petals card ideas
 

The greeting is popped up onto a Stitched So Sweetly die-cut, stamped lightly with some of the tiny flower heads in Blushing Bride. 

Stampin’ Up! Hand-Penned Petals card ideas

I hope you like my Hand-Penned Petals projects. They are a bit of a departure for me, as I don’t usually gravitate towards floral images and pale colours. But it’s good to climb out of your comfort zone now and again to see where it takes you. 

All of the products you see here are available from my online store. If you are in the UK and would like to order, please visit my store and, if you use the June host code HVTHW7HM, I’ll send you a thank you gift next month.


Does your wish list come to more than £99? Please get in touch and I will help you get more for your money and unlock discounts all year round.  


Thursday, 3 June 2021

For the Guys All-inclusive kit from Stampin’ Up!®

masculine cards made with Stampin' Up! For The Guys Kit

I couldn’t let the week go by without showing you the projects I made with one of our wonderful new kits, which launched on Tuesday. This one is called For The Guys and it’s an absolute must for anyone who struggles with masculine projects as it’s all done for you.
 
masculine stamp set from Stampin' Up! For The Guys Kit
 
Best of all, you get a really handy photopolymer stamp set featuring greetings for pretty well the full set of male family members. And because it’s photopolymer and they are all in capitals, you can mix and match to make Grandad or Granddad from Grandpa plus Dad. 
 
masculine cards made with Stampin' Up! For The Guys Kit


masculine cards made with Stampin' Up! For The Guys Kit

I had a very quick play with this set at the weekend and made one of each card design. These kits are designed to be copied exactly so that’s what I did... but I’m sure nobody would mind if you bought one and did your own thing, too. 
 
Stampin Up For the Guys masculine card kit contents

I love the fact that we now have something which is totally perfect for the new stamper, at an affordable price, and which includes stamps, ink, clear block and even adhesive. The kits like this one, which include stamps, are just £18. Those without stamps are an even more affordable £11.25.

These fab kits are also ideal for gifts and again, you won’t have to supplement your gift with a block, ink pads etc.

Take one on holiday and you won’t have to worry about forgetting anything, either. Just pack some scissors and you’ll have everything you need to keep you busy on a long journey or a rainy day. 

See how easy it is to make the projects in this kit in this video:


masculine cards made with Stampin' Up! For The Guys Kit

This kit is ideal for Father’s Day and beyond so if you are in the UK and would like to order this (or any other kit or product), please visit my store and, if you use the June host code HVTHW7HM, I’ll send you a thank you gift next month!


Does your wish list come to more than £99? Please get in touch and I will help you get more for your money and unlock discounts all year round.  


masculine cards made with Stampin' Up! For The Guys Kit

The small print

This is my personal blog and my sole responsibility as an Independent Stampin' Up!® demonstrator. All images are © Stampin' Up!® All content including photographs, projects and text are © Helen Read, unless otherwise stated. Please feel free to copy my ideas for your personal use and inspiration - if you are a SU demonstrator you may use these ideas for your events but please give credit where it is due. Please do not use my ideas for monetary gain, competitions or publication. The images on this blog - including blog buttons - should not be copied and used elsewhere on the internet or on CDs.