Today I want to share a Stampin’ Up!® project with you based on my May Moodboard.
Each month I share a mood board inspiration post with my team and customers, and finally I got round to using one to make a project for myself.
I love the idea of the mood board but some people seem to struggle with the concept. The idea is you can use it as inspiration for a project, using the images and/or the Stampin’ Up!® colours as your starting point.
The colours are Sweet Sorbet, Bubble Bath, Wild Wheat, Crumb Cake and Early Espresso; a nice mix of carryover colours and new colours to ensure nobody is left out.
Because you can choose from the various elements, one mood board could trigger dozens of different project ideas – and they could all look completely different.
Sadly, I only had time to make one project and this is it.
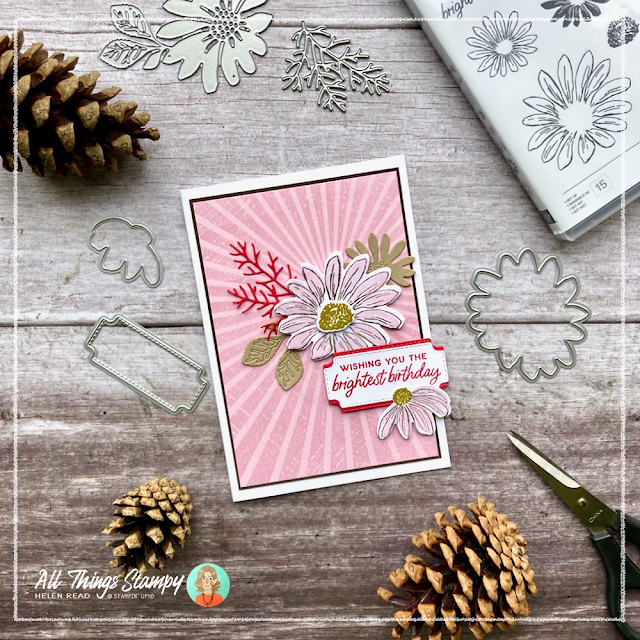
My card is quite a literal interpretation of the mood board, drawing on the pink sunburst in the top right section, the floral theme of the middle right and bottom left sections and of course the colour combo.
The sunburst theme provided the perfect opportunity to use my Rays of Light background stamp, which I stamped using my new Bubble Bath ink pad onto new Bubble Bath cardstock.
Bubble Bath is one of the four brand new Core colours which have been added to the Stampin’ Up!® collection. It’s a really pretty “pure” pink, with no hint of murk like the now-retired Blushing Bride.
For colour combination ideas using this and our other new Stampin’ Up!® colours, please go here:
I had planned to use a bright Sweet Sorbet flower on top of the Rays of Light image, inspired by the bottom left section, but I got side-tracked. I was drawn to my new Cheerful Daisies bundle, which features in the latest Stampin’ Up!® Annual Catalogue, and for the big flowers Bubble Bath and Early Espresso seemed to be the natural choices.
Cheerful Daisies is a two-step stamp set, which means you can stamp the outline and the petals in different colours, as I’ve done here. Pale pink and dark brown was one of my favourite colour combos many years ago when I was first introduced to Stampin’ Up!®, so it’s fun to revisit the pairing with new products.
The flower centre is a separate stamp, too; I’ve stamped it in Wild Wheat and the larger one is die-cut and attached separately.
The Cheerful Daisies dies cut out these flowers perfectly but here’s a tip I learned along the way.
If you stamp both elements, they don’t always fit in the dies, as it’s so easy to slip a little. So my tip is is to stamp one element – the outline or the infill, it doesn’t matter – and then die-cut the shape before stamping the second element.
This especially goes for the smaller flower at the bottom as you could easily slip to the left or right when stamping the flower centre. But if you die-cut it after stamping the petals, and only the petals, you can position the second and third stamps much more easily, especially as the stamps are photopolymer, so you can see where you are going.
To bring Sweet Sorbet into the mix, I used a splash of this cheerful Stampin’ Up!® In Color™ in the form of some die-cut foliage from the Cheerful Daisies Dies, and as a border to my greeting panel.
Crumb Cake is used on the die-cut flower and leaves in the background. These are created with one big die but I trimmed them apart to make them more versatile.
It was a pleasant surprise to discover this greeting label in the Cheerful Daisies dies set. It fits some of the greetings, including this birthday sentiment, perfectly and has fun stitched edges.
To create a border in a contrasting colour, simply die-cut again, slice it in half horizontally, and attach behind the white layer. This is a great tip which works with many punches too.
Here’s another great tip (I’m full of them today!) – this time for using background stamps. Forget about investing in a huge unwieldy clear block; simply leave the stamp in its case and apply the cardstock to it direct, smoothing it down with a piece of scrap or grid paper.
One final tip – yes, another one! – is really useful when making a card like this with lots of seemingly random elements. I arrange them on my card front then take a quick photo with my phone. That way, when I remove them to add glue or Stampin’ Dimensionals, I still have something to refer back to.
Inside the card I stamped another greeting using a different Stampin’ Up!® stamp set (Wildlife Wonder, since you asked) and used a leftover die-cut flower which hadn’t made it to the front to add interest.
I hope you like my Cheerful Daisies and Rays of Light card using some of our gorgeous new Stampin’ Up!® colours and are inspired to have a go at using the mood board yourself.
If you are in the UK and would like to order, please
visit my store and use the host code listed below, which qualifies you for a thank you gift from me next month.
BUT... if your wish list comes to more than £99, before you shop please get in touch and I will
help you get more for your money and unlock discounts all year round.


.png)


No comments:
Post a Comment
Thank you so much for taking the time to comment.