

Thursday, 23 April 2015
Tuesday, 21 April 2015
Online store up and running again
Good news! The online store is up and running again. Go directly to the retiring products by clicking here. Thanks for your patience!
Stampin Up! retiring list 2015

The Retiring List is here! Check it carefully because anything you want from that list will NOT be in the new catalogue, and will only be available while supplies last.
Click HERE for the list!
I may be ordering later today but after that, if you want something, please order through my online store.
UPDATE: It's currently 5.30pm and the system is down for maintenance. Please be patient while this is resolved and try your order again later.
Monday, 20 April 2015
Saturday, 18 April 2015
Caturday: Maud

Today’s Caturday is the third of the Staffordshire triumvirate who rule the house of my colleague Jane. Maud is eight years old and, according to my records, likes shiny things, open spaces and wet dishcloths. She dislikes “mild racism and fact-based literature”.
Eagle-eyed readers will spot a Stampin’ Up!® card in the background of this pic. Remember this one? I gave it to Jane for her birthday and she was most entertained by the shaker element. A bit like a cat, in fact.
Wednesday, 15 April 2015
AW39 - Around the World Challenge mixed media project

It’s Around the World Challenge time again! And this month I was asked create a project inspired by this image:

I decided to take my inspiration from the colours of the flowers and foliage, so began with a watercolour-style background. This one uses a fun salt technique which was shown to me by Karina Goodman at Studio 61 here in Derbyshire.
TIP: If you want to play around with this kind of project, make a few backgrounds at a time, so you can get started quicker next time.
So, how did this card happen? I really should start writing these posts immediately after creating this sort of project, as it’s hard to remember all the many steps that go into them, but here goes… and please bear in mind that I am still learning this technique so some of the steps are purely experimental.
- Take a piece of watercolour paper and wet it, with a brush, aquapainter or with a spray bottle
- With a paintbrush or aquapainter, drop or swish some ink so that the colours blend
- While the ink is still wet (this is important) sprinkle some coarse seasalt on top. I did this on the red section only.
- Allow to dry completely before brushing away the salt. You’ll see that it has absorbed the ink and leaves paler spots behind; it’s a little unpredictable but you can get some amazing patterns this way.
- Now you can begin adding some fun elements to the project. I began by cutting and tearing strips of Typeset DSP and laying them across the left hand side of the project. This was inspired by the March page from this lady’s smash book.
- With the brayer inked up, tap just the edge of it onto the project, to create vertical lines - you can make flower stems, grass or patterns this way
- Stamp around the top using Gorgeous Grunge and red and black inks
- Using the brayer, colour a piece of Typeset DSP in red… and another in purple. Alternatively, if your ink pad isn’t too wet, you can simply press the paper into it. Don’t worry about perfection; it’s over-rated.
- Using the bird punch, punch out six wings from each of the coloured pieces of DSP. Trim the purple ones down so they’re slightly smaller, then arrange both sets in a flower pattern.
- Now you can decorate the petals as you wish, by outlining them in black pen, white pen (or both) and adding dots and lines. I also hand-drew the stems and a leaf, doodling dots along the stem and colouring the leaf white with the Chalk Marker.
- I created a third flower with the Itty Bitty Accents Punch pack flower, but cut out the petals individually (you may need to punch two or more flowers), again arranging them in a flower pattern and inlining them in black pen.
- All three flowers are topped with a circle of gold glimmer paper.
- Next I added some white splodges of various sizes, simply freehanding them with the chalk marker. I outlined them in black pen. This was inspired by this lady’s project.
- I found words from two different stamp sets, stamped them in black and cut them out roughly. Once stuck down, I outlined them in black pen.
- Individual sequins were added with Glue Dots. I haven’t found anything else which will stick them down successfully.
- Finally, I spritzed the whole project with Vanilla Smoosh Spritz for a gentle shimmer.
Now it’s your turn to create a project inspired by the photo. It doesn’t have to be as complicated as this one - take a look at what the rest of the team made for some more ideas.


Links by TheseAreMyStamps.com
Tuesday, 14 April 2015
15 Stampin' Up!® products you can used for Mixed Media projects

Yes you CAN use SU products for mixed media, as I’ve been enjoying finding out lately. I decided to make a list of some of the items you can use. I bet you already have loads of these, so what are you waiting for? Get messy!
Monday, 13 April 2015
Fabulous items added to the Clearance Rack
Hello!
I’ve just come back from a week in the Lake District and, before you ask, no it didn’t rain. We nearly always have great weather and I actually had to nip to Boots to buy suncream!
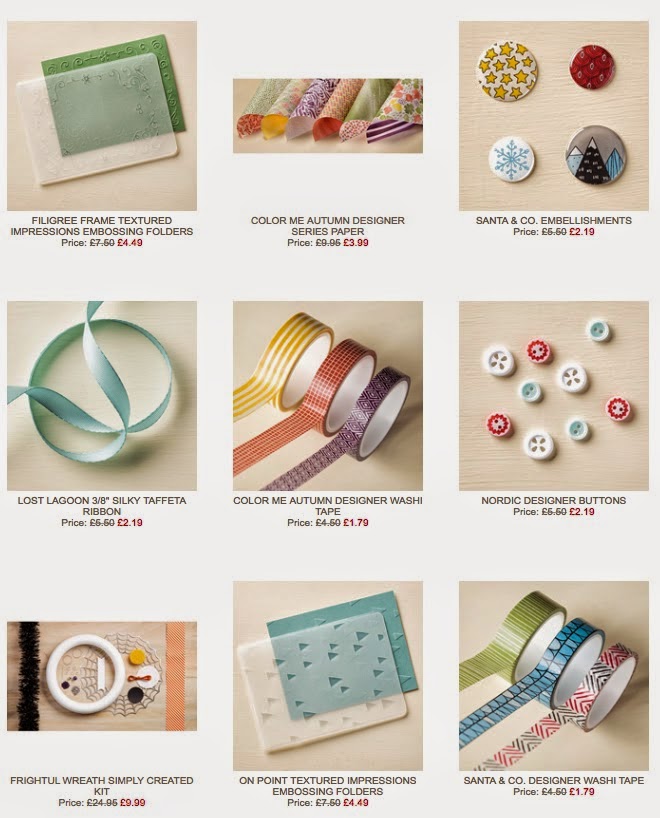
With being away, I’m only just catching up on all the SU news, and I’ve noticed that the Clearance Rack has been updated with some fab.u.lous items from the Autumn/Winter catalogue! Check them out to grab yourself a bargain.
You can purchase direct from my online store, any time of day or night, by clicking HERE. Below is a selection of the goodies on offer...


Saturday, 11 April 2015
Caturday: Trudy

Another submission for Caturday from my work colleague Jane. This is Trudy, aged eight, and also from Staffordshire. She apparently likes Curly Wurlies and playing Candy Crush! Her dislikes include “jealousy, rudeness and dandelion and burdock”. Frankly, I think she looks a little shameless!
Thursday, 9 April 2015
Chicken picture with Sweet Dreams DSP

We certainly tried lots of different projects on our homemade crafty retreat. This had us all way out of our comfort zones as we had to hand-draw and hand-cut the elements to make three chickens. Even now, as I look at it, the beaks get on my nerves. I might buy another canvas (it’s A4 and was only 99p from Home Bargains) and have another go.
Still, check out the supplies list... minimal, eh?

Links by TheseAreMyStamps.com
Subscribe to:
Posts (Atom)