Showing posts with label Background stamps. Show all posts

Friday, 23 May 2014

Tutorial: Flower Shop Smarties favour


I love finding fun ways to package little gifts and this is one I created for a party for my latest hostess in my Virtual Hostess Club. Everyone at the party made one of these and I thought it was such a fun project that I sent a kit out to all the members of the club, too. 

If you’d like to join the next round of my club, I’d love to welcome you on board! The only commitment is that you spend a minimum of £15 per month for 10 months. You will be the hostess for one of those months, earning yourself at least £25 of free products… which could be more if you decide to hold a party on top to boost the total. 

I have a pretty high level of returning members, but do have a few places going spare so please shout up if you’d like to join. There are other benefits, too, including free catalogues for the duration of the club, discounted admission to catalogue launch parties and, of course, a little gift like this each month to say thank you. Please send me an email if you’d like more information. 

And now, how to make this fun little project?


  • As I like to keep things simple, I started with a strip of cardstock cut from the width of A4, so it measures 21cm x 5cm. I scored at 9.5cm from each end and that gave me my basic structure.
  • As you can see, I decorated the top using the Scalloped Tag Topper Punch. I know I’m late to the party but I really cannot recommend this punch highly enough – it’s so versatile and is certainly useful for so much more than tags!
  • I stamped both front and back using the gorgeous Hardwood stamp. Scroll down for tips on using a large background stamp.
  • The inside holds a tiny box of Smarties (from Lidl), which I’ve wrapped in a piece of Fresh Prints DSP from the paper stack. Again, keeping measuring to a minimum, this is cut from the width of a piece, so measures 11.5cm x 5.5cm. Wrap it around the Smarties but don’t glue to the Smarties box – you want to be able to slide them out.
  • Now decorate the front as desired. I’ve used the Flower Shop bundle and the two samples here show flowers stamped in Real Red, and stamped in Black Stazon then coloured with ink pads and blender pen.
  • Stick the Smarties inside the stamped outer. Line it up with the base. When the gift is opened, you should be able to slide the Smarties out without destroying your handiwork.
  • Finally, tie it up with ribbon. You can do a simple knot, a bow or as I’ve done here, which is ruche the seam-binding. I did this by tying the knot first. Next I frayed the ends, then found a single strand in the centre (roughly!) and gently pushed the remaining ribbon towards the knot. Start by working nearest the knot and pushing the ribbon towards it. Then move along the ribbon and repeat until the whole strand is ruched. Finish by trimming in a V-shape; this seems best for preventing further fraying. 

Using background stamps
These babies are BIG and, unless you have long fingers or big hands, you’re going to struggle to pick  up a stamp and use it effectively. Here’s how I was shown (by my talented cousin Leslie)
  1. Lay the stamp on its back, rubber side up, on one side of a piece of scrap/grid paper
  2. Ink it all over by applying the ink pad to the stamp. (This is why our ink pads have those handy finger grips on the sides!)
  3. Lay the piece of card you wish to stamp onto the inked surface
  4. Lift up the empty half of scrap paper and lay it over the top of your cardstock on top of the stamp. Rub gently to ensure it’s all covered. OCD types may wish to use a brayer (I don’t). 
  5. Gently lift up your cardstock and you should have perfect coverage. 
TIP: If you wish to create a shabby chic effect, you can do the same but instead of rubbing evenly, just dab here and there, to create a deliberately uneven stamped image. Try it – it’s really effective.

TIP: If you prefer clear-mount stamps and don’t have the gigantic clear block, you can use a brand new (ie unused, not scratched or bent) Big Shot plate as your block instead. As you will be using the stamp on its back, it won’t matter that you can’t lift it with one hand. 


Friday, 26 March 2010

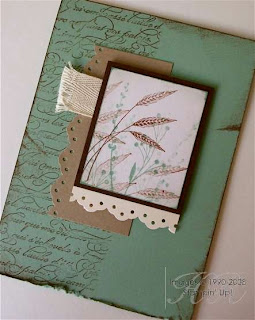
My swap card

Remember that training day I went to in Sheffield the other week? I completely forgot to show you my swap card.

My top tip for making swaps is this: keep it simple. Because you’ll get REALLY fed up making the same card over and over again if there are lots of steps to complete. Wish I’d followed my own advice when making these. I don’t even particularly like it any more.

It is based on this card, which I made during Sale-A-Bration but the design is much more suited to the elegant birdcage than the earthy stamps from Autumn Days.

Stamps: En Francais, Autumn Days
Cardstock: Sage Shadow, Chocolate Chip, Kraft, Very Vanilla
Ink: Close to Cocoa, Sage Shadow
Accessories: Eyelet Border Punch, Twill Tape

All products by Stampin' Up! ®

Friday, 5 June 2009

All-American invite

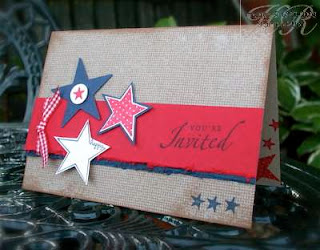
There’s a story behind this card. We’re having some friends to stay on July 4th and I jokingly said we should have an American (ie Independence Day) themed barbecue. They ran with the idea and now I’m frantically (well, not that frantically, to be honest) trying to find authentic recipes that can be recreated with British ingredients! Not to mention the fancy dress... don’t ask... unless you can lend me a cowboy hat. 

So this is their invite. Even though they know they’re coming, I thought it would be fun to send an all-American invitation. And what better stamp set to use than In The Stars? I’m really enjoying this set – it’s very versatile and evidently not just for baby cards! 

Stamps: In The Stars, Sincere Salutations
Cardstock: Kraft, Real Red, Night of Navy, Whisper White
Ink: Night of Navy, Real Red
Accessories: Large Star Punch, ½” circle punch, red gingham ribbon

All products by Stampin' Up! Please email me to order a catalogue, or click the link on the right to view it online.

Thursday, 4 June 2009

Dreams coming true

This is a congratulations card for a friend who has, after a very long haul and a lot of ups and downs, adopted a little boy. He’s a beautiful little fellow and I’m thrilled that he’s been given the chance of a loving, stable home and that they have been given the chance of a family.

He’s not a tiny baby so I didn’t want to make the card too pastel and babyish... but he’s still only a toddler so I could have held back on the dark colours a bit more than I did! But you know how these things evolve... I actually started with Brocade Blue and Bashful Blue cardstock, and some Bashful Blue Designer Series Paper. I don't know what happened! 

Stamps: In The Stars, Circle of Friendship
Cardstock: Kraft, Bravo Burgundy, Night of Navy, Bordering Blue, Brocade Blue, Whisper White
Ink: Brocade Blue, Bravo Burgundy
Accessories: Large Star Punch, 1” Circle punch, Rich Regals buttons, Linen Thread

All products by Stampin' Up! Please email me to order a catalogue, or click the link on the right to view it online.

Thursday, 10 January 2008

Stepping things up...


Here are two cards which are the same... but different.

Both cards are inspired by a blue and yellow card made by a Canadian demonstrator called Natasha (I can't show it to you as it's in a subscription-only gallery.)

I changed the stamp set and the colours but kept to the same design. The first card is quite simple while the second one is "stepped up"... I added some distressing and paper piercing, and popped up the image with Stampin' Dimensionals to give it ... er... dimension.

The patterned paper is Prints Designer Series which come in packs of 12 sheets of double-sided paper. They come in six colours; as you can see, I chose Certainly Celery because - as you've probably guessed by now - it is one of my favourites.

Two-step Stamping & Stamping Off
The main image comes from the Hostess set, Heartfelt. It's such an absolutely gorgeous set that it's worth getting everyone you know round to your house for a Stampin' Up! party so that you can earn it for free.

This is two-step stamping. I inked the first stamp - the solid image - with markers; the flower head Rose Red, the leaves and stem Always Artichoke. I then "stamped off" on scrap paper before stamping on the white cardstock. For the detailed image, I inked the second stamp with markers and stamped straight on top of the first image. This doesn't require any special equipment, I just guess... as you can probably tell. But I don't think it needs to be "perfect"; I like it as it is.

Background Stamping
I stamped the background with En Francais, one of Stampin' Up! large background stamps. I used to hate these. See? Another U-turn! I hated them because I didn't know how to use them. Now I think they're fantastic. Here's how to use them - it works every time:

1. Turn the background stamp upside down, rubber facing up, on top of a piece of A4 scrap paper. Have the paper lengthways (landscape) and the stamp to one end of the paper.

2. Ink the stamp all over - SU's inkpads are designed to be able to do this easily, with finger grips and a raised pad. Tap, tap, tap; don't rub your pad in a circular motion as it makes the edges fray. Ask me how I know!

3. Place your piece of cardstock on top of the inked stamp.

4. Fold the scrap paper over the top of the cardstock and rub gently all over. I suppose you could do it without the scrap paper but you'd get filthy.

Finally, the recipe...

Stamps:  Heartfelt (p20), En Francais (p58)
Cardstock: Certainly Celery, Always Artichoke, Rose Red, Whisper White
Paper: Prints Designer Series Paper - Certainly Celery (p73)
Ink: Certainly Celery
Accessories: Markers - Rose Red, Always Artichoke; 5/8" grosgrain ribbon - Certainly Celery (p86); 1/4" grosgrain ribbon - Always Artichoke (p86), Crafters' Tool Kit (p85)

(All page numbers refer to the UK Stampin' Up! Idea Book & Catalogue 2007-2008)

The small print

This is my personal blog and my sole responsibility as an Independent Stampin' Up!® demonstrator. All images are © Stampin' Up!® All content including photographs, projects and text are © Helen Read, unless otherwise stated. Please feel free to copy my ideas for your personal use and inspiration - if you are a SU demonstrator you may use these ideas for your events but please give credit where it is due. Please do not use my ideas for monetary gain, competitions or publication. The images on this blog - including blog buttons - should not be copied and used elsewhere on the internet or on CDs.