Tuesday, 25 January 2022

How to add colour to Awesome Otters using Watercolour Pencils, Blender Pens and Blending Brushes

Stampin Up UK Awesome Otters

Stampin’ Up!® is really good at creating cute stamp sets that everyone wants to own – and Awesome Otters, the new Sale-a-Bration stamp set, is a prime example. It’s been really popular with my customers here in the UK, as many of them love wildlife as much as I do. We do have otters here in Derbyshire but they are very elusive – maybe 2022 will be the year that I see one?
 
Stampin Up UK Awesome Otters

This stamp set, which is free with a £45 order, is perfect for new crafters or those who are new to Stampin’ Up!® and want to start building up their collection as it features both greetings and images; three fun otters which can be used separately or together.
 
Stampin Up UK Awesome Otters
 
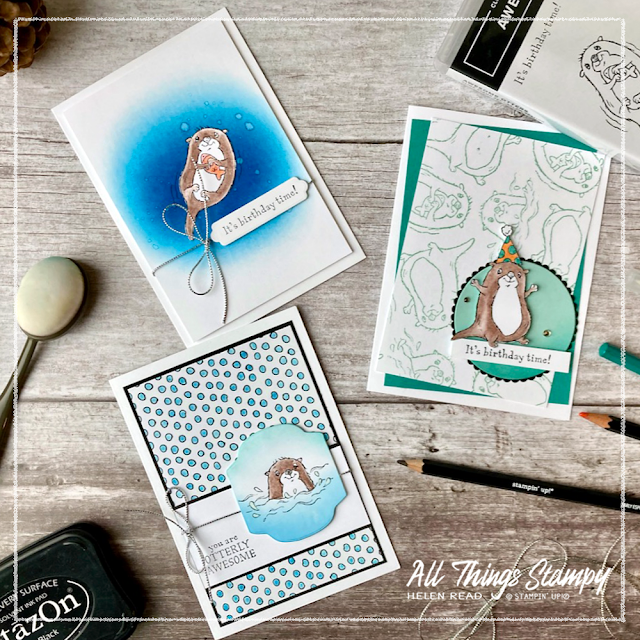
I’ve made a card with each of the otter images to add to my very depleted birthday card stash. I think these cards could be sent to anyone – men, women and children – and I would be more than happy to receive an otter birthday card myself. 
 
These cards show you how to add colour to your images using watercolour pencils with blender pens, and also how to add depth using Blending Brushes. 

All the images on my cards are stamped in Stazon and coloured with watercolour pencils and Stampin’ Up!® Blender Pens. When I say Blender Pens I mean the clear markers that you use with ink or pencils and not Stampin’ Blends, which are coloured alcohol markers. I know there is often some confusion because of the very similar product names.

When using Blender Pens (the clear ones), ideally use a permanent ink such as Stazon, although you can get away with a water-based ink such as Memento Tuxedo Black if you allow it to dry fully and work sparingly. 
 
Colour with your pencils, concentrating on the areas where you want darker colour to appear. Make sure you have enough colour on before you start blending as it’s difficult to add extra colour with the pencils once you have used the Blender Pens. When you are happy with the level of colour, gently blend it with your Blender Pens, working towards the uncoloured areas to create a soft graduated look.

Stampin Up UK Awesome Otters

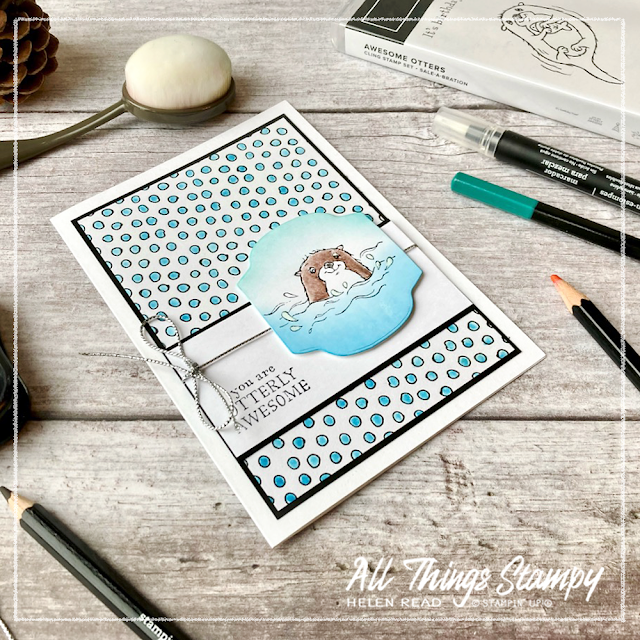
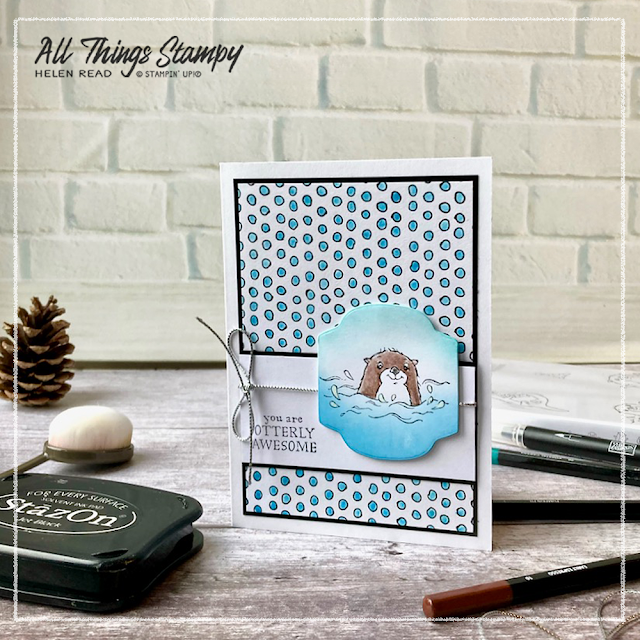
For my first card, I have created a background panel using patterned paper from the Pattern Party Designer Series Paper Pack, which is one of the host products in the Stampin’ Rewards section of the Stampin’ Up!® catalogue. This means you cannot buy it, but you can earn it free when you host a party with a workshop total of £150 or more or place your own order to this amount. The paper has bright colours one one side and black and white designs on the reverse; I’ve used one of these to create a blue spotty panel, adding the colour using my Pacific Point ink pad and a Blender Pen.

Stampin Up UK Awesome Otters

For my main element, I stamped the partially submerged otter onto a label die-cut using Seasonal Labels Dies. These dies were in the July-December Mini Catalogue but have carried over into the first part of 2022. I coloured the image using an Early Espresso watercolour pencil, then added extra colour using Stampin’ Up!® Blending Brushes; a hint of Pool Party at the top and some Pacific Point at the bottom. Blending brushes are an excellent way to add colour and depth to an element. 
 
Stampin Up UK Awesome Otters
 
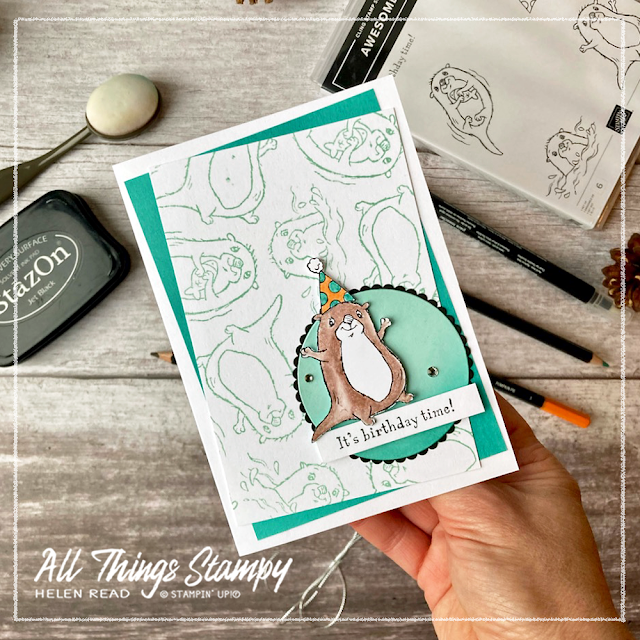
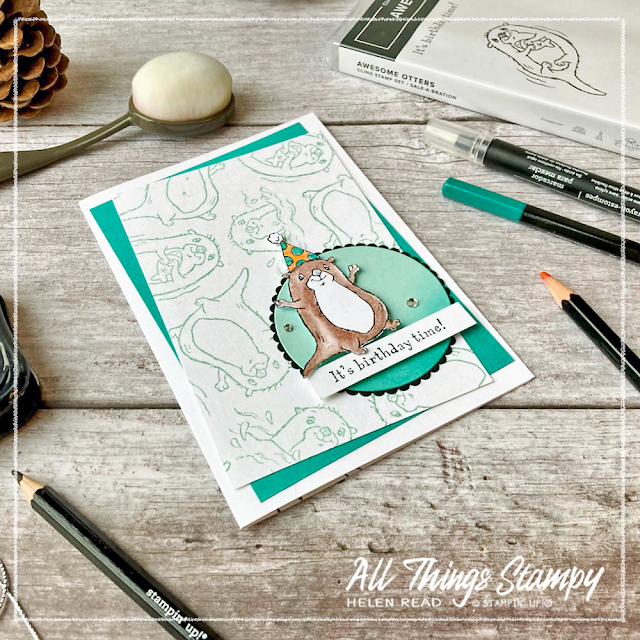
I’ve used a Blending Brush on this second card, too, to add a little depth to the Pool Party circle. The Pool Party theme is continued on the background, where I’ve stamped all the different otters at random, as close together as possible. This is a quick and easy way to make your own patterned paper to match your project perfectly.

Stampin Up UK Awesome Otters
 
The main otter image is stamped and cut out freehand, with a little party hat cut out and added on top. I’ve popped him up onto the Pool Party circle using Stampin’ Dimensionals, just resting his little foot and tail to overlap onto the greeting banner.
 
Stampin Up UK Awesome Otters
 
By positioning the stamped panel and the Bermuda Bay panel behind it at jaunty angles, this emphasises the fun feel of the card. It’s not necessarily something I would do for a more serious occasion, such as a sympathy card. 
 
Stampin Up UK Awesome Otters

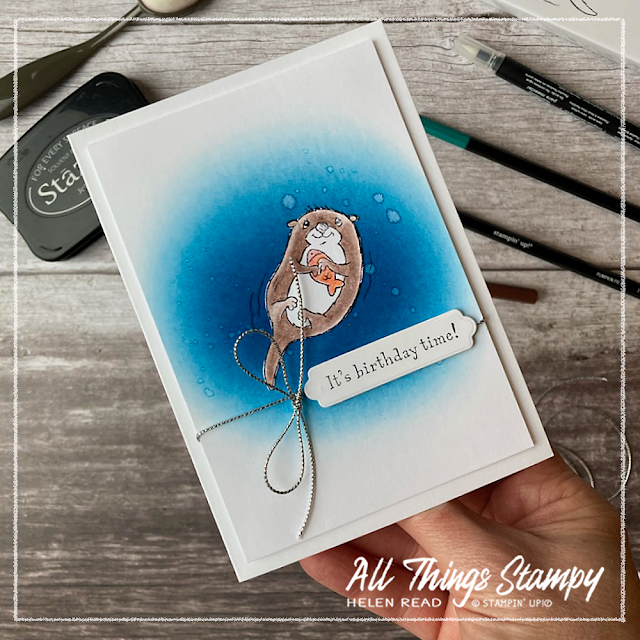
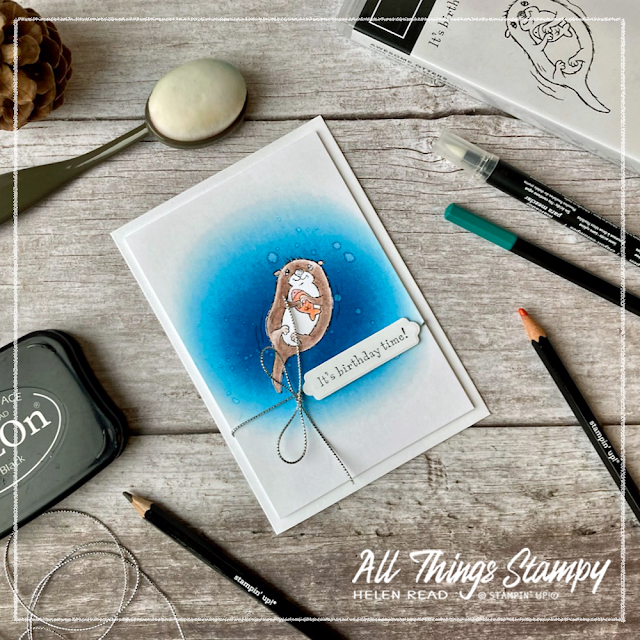
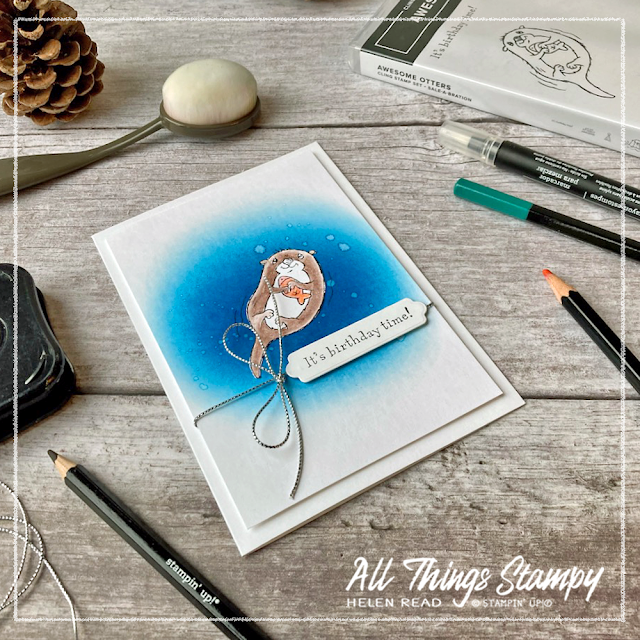
My third card really makes use of the Blending Brush by creating a dark pool of blue water in the centre of the card with the bright otter standing out from the background. I did this by stamping the otter onto a separate piece of Basic White cardstock and cutting it out closely. 
 
Stampin Up UK Awesome Otters

For the background, I applied Pacific Point ink with a Blending Brush in a circular motion, which creates much darker colour in the centre, graduating out to paler blue towards the edge of the cardstock layer. I stamped the otter directly on top of this blue ink, which meant I retained the finer details such as the movement lines. 
 
Stampin Up UK Awesome Otters

After I did this, I flicked some clear tap water onto the blue ink and allowed it to dry. This soaks up some of the ink to create pale splashes and is one of my very favourite techniques. Next I stuck the cut-out otter on top of the stamped blue layer, matching up the images perfectly. This is a great tip if you have fine details, such as whiskers or hair, that you really can’t fussy cut successfully.

The banner on this card, too, is cut out with Seasonal Labels Dies, and fits the “It’s birthday time!” greeting perfectly. It’s finished off with some Elegant Trim from the Stampin’ Up!® Annual Catalogue, for quite a clean and simple card. 
 
Stampin Up UK Awesome Otters
 
What I love about these projects is that they are largely created with white cardstock, which means you can adapt them to suit the ink pads you have. Any blue will do for this final card, although I love the richness and depth of Pacific Point. 
 
Stampin Up UK Awesome Otters
 
The fun birthday card could use any colours which can be picked up in the party hat and the background layer could be swapped to match.

Stampin Up UK Awesome Otters
 
And the Pattern Party Designer Series Paper, with its black and white designs, can be coloured in any colour – or none! – depending on what supplies you already own. These designs would also work with other animal images. 
 
It just shows you don’t have to own everything to make great projects; you can often work with what you have.
 
I hope you enjoyed my Awesome Otter projects and will consider adding this fabulous stamp set to your order next time. If you are in the UK and would like to order, please visit my store and, if you use the current host code RNU3JCR9, I’ll send you a thank you gift next month month. 


Does your wish list come to more than £99? Please get in touch and I will help you get more for your money and unlock discounts all year round.  


Monday, 17 January 2022

How to make seeded paper from your Stampin’ Up!® scraps

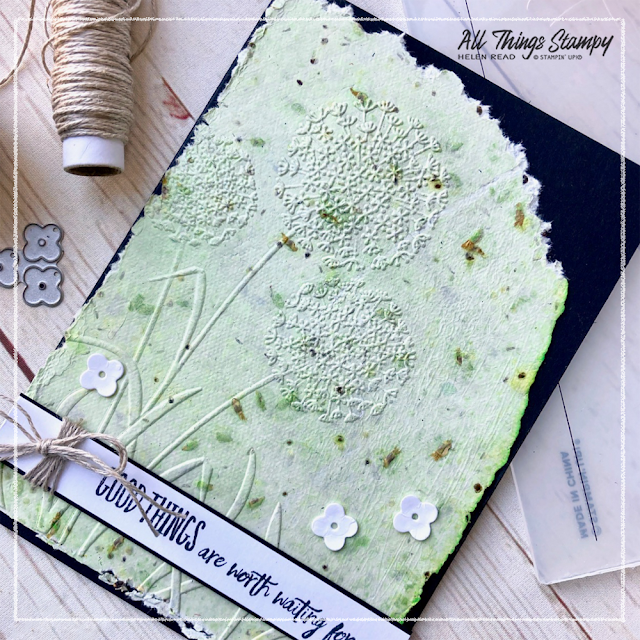
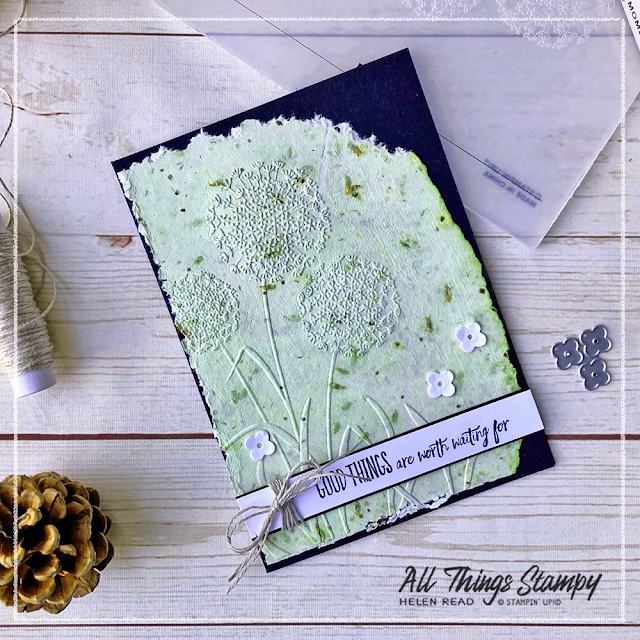
Stampin Up handmade paper Dandelion embossing folder
 

Today I am proud to be taking part in a Zero Waste blog hop, showcasing Stampin’ Up!® projects which re-use or repurpose waste to create beautiful new projects. 


The three main principles of Zero Waste are Reduce, Reuse and Recycle... in that order. Recycling is the last resort so to repurpose my little scraps of Basic White cardstock for another day, I used them to make some seeded paper for this rustic-looking card. 


Stampin Up handmade paper Dandelion embossing folder

This beautiful handmade paper can be used to make cards, gift tags and more – and the recipient can plant it in their garden to grow wild flowers to attract pollinating insects. 

Want to know how to make handmade seeded paper for your own craft projects? I’m happy to say it was really easy. 
 
Handmade seeded paper Stampin Up

I always save those narrow strips of Basic White cardstock as they are useful for greetings and sentiments. But for the past few weeks I have also been saving those oddly shaped scraps left behind by punches or dies. It soon became a habit to throw them into this bucket instead of putting with my other paper waste for recycling. 
 
My tip for saving small scraps of cardstock or paper for making handmade paper is to cut or tear it into smaller pieces as you go. Doing so will take barely any time at all compared to doing it all in one go when it comes to making the paper. 
 

Tutorial: how to make seeded paper from your Stampin’ Up!® paper scraps

 
To make the paper you will need:
  • Paper scraps. For this first attempt I used only Basic White but you could experiment with different colours
  • Water
  • Wildflower seeds - try to use wildflowers which are native to your area
  • A food processor or blender. Most tutorials tell you to use an old one you won't use for food but as my Basic White scraps don’t contain any harmful inks, I used my usual processor and washed it thoroughly afterwards
  • Ink (optional)
  • Towels/tea towels. One tutorial I saw used kitchen paper which rather defeats the object I think. Use something you can use again!
  • A flat baking sheet
  • Greaseproof paper (optional)
  • A rolling pin or glass bottle
  • A wire cooling tray or cooking spatter guard.


1. If you haven't already done so, cut or tear the Basic White cardstock scraps into small pieces. Place them in a blender; I filled my food processor about halfway which resulted in two sheets of handmade paper, each a little larger than a standard sheet of A4 cardstock.

2. Cover the paper with water and leave to soak. I left it overnight.

3. Blend in short bursts, moving it around with a wooden spoon between bursts. The texture you are aiming for is that of a very thick soup or cake mixture, so I added a little more water to achieve this. If you make it too wet, tip it onto a towel and squeeze of the moisture some out.

4. Tip the pulp into a large mixing bowl. Before adding any seeds, first I would advise removing half of the pulp and storing it in a sealed jar for later, or for making other colours.

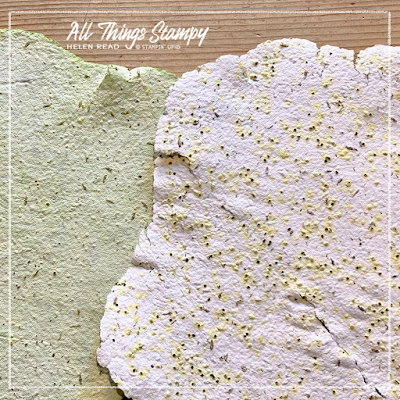
5. Now add the seeds to the half in the bowl. Go easy here – I think I added way many. I also noticed that some of my seeds stained the paper yellow. If you wish, add a few drops of ink or food colouring to dye it. I used some retired Wild Wasabi ink for my second batch and ended up with something akin to Soft Sea Foam.

6. Make a pad of towels on top of a baking sheet and press the paper as flat as you can. Cover with a fine-weave towel or piece of greaseproof paper and flatten further with the rolling pin or glass bottle.

7. Add a towel on top and carefully flip over so the new towel is at the bottom. This is where the baking sheet comes in really handy. Repeat the rolling a couple of times, removing the wet towel and replacing with a dry one.

8. When the paper is as flat and thin as you dare, transfer it to a cooling rack or a spatter guard and leave to dry for a day or two, or even longer if required. 
 
Handmade seeded paper Stampin Up

Now you have your handmade seeded paper which you can use as you wish. As you can see, my first batch has yellow speckles where the seeds stained the paper, which is why I added ink to my second batch to make green. 
 

Before using your handmade paper, flatten it further in the Stampin’ Cut & Emboss Machine or other die-cutting machine. This gives it a nice smooth finish to stamp on, and makes it thinner. 
 
Handmade seeded paper Stampin Up
 
 
 Be careful when using handmade paper with punches, especially if you have added seeds. I’ve blunted a tag topper punch on this paper, but big simple shapes worked well. You still run the risk of a seed catching so be very careful. 
 
If using your handmade paper with dies, flatten it first, as shown above, then run it through with the die a few times and be prepared to trim with scissors as well. Big simple shapes work best – don’t attempt it with anything complicated. Again, be aware of hard seeds.
 
Stampin Up handmade paper Dandelion embossing folder

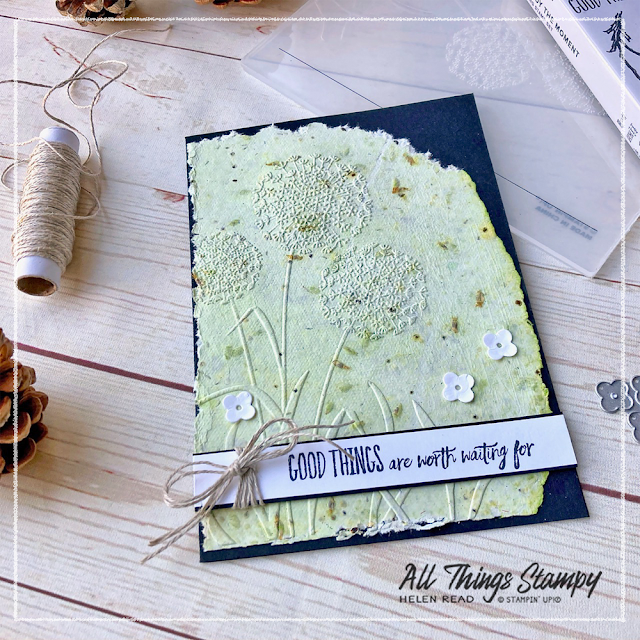
Now I have lots of die cut shapes ready to use on future projects, but for my blog hop project I have embossed the paper using the Dandelions 3D Embossing Folder. Embossing folders work really well – just make sure your paper isn’t too thick as this could split the folder at the hinge. 
 
Stampin Up handmade paper Dandelion embossing folder

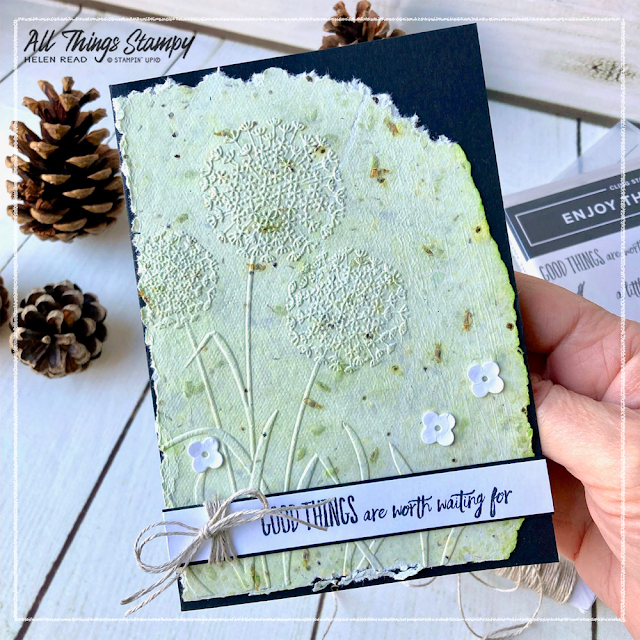
I embossed my dandelions towards the edge of my handmade paper – you can see where the ink is a little more concentrated – and tore the rest of the shape to fit the card. I folded the paper around the card which weakened the paper and allowed me to tear in a fairly straight line.

I have avoided all plastic on this card so used linen thread and some tiny die-cut flowers (from the Floral Squares Dies) as my embellishments. I want the recipient to be able to plant the whole card if they wish. 

Stampin Up handmade paper Dandelion embossing folder

The greeting says “Good things are worth waiting for” from the Enjoy the Moment stamp set, which is especially relevant in this case as the flowers won’t be blooming until the summer at least.

This Zero Waste blog hop has come about as a result of the recent launch of the SU Demonstrators Against Waste Facebook Group (#SUDemosAgainstWaste), which already has 250+ members. I am constantly seeking ways to live a greener lifestyle and do my best to reduce waste wherever I can. All my class kits are sent out in recyclable or reused packaging – and many mailing boxes get used time and again as customers kindly return them to me.

I'm not going to save the world but every little helps – which is the whole point of #ZeroWaste. We as individuals can never achieve Zero Waste but, as Anne Marie Bonneau, author of The Zero Waste Chef, said:
 

“We don’t need a handful of people doing zero waste perfectly. We need millions of people doing it imperfectly.”

 
Stampin Up handmade paper Dandelion embossing folder
 
Please now follow the links below to see what other Stampin’ Up!® demonstrators around the world have made for this Zero Waste blog hop.

Blog Hop Index


If this project has inspired you and you are a Stampin’ Up!® demonstrator, please get in touch for details of the SU Demos Against Waste Facebook Group. If you are a customer in the UK and would like to order any Stampin’ Up!® supplies, please consider me as your demonstrators. If you shop online using the January host code RNU3JCR9, I will send you a thank you gift next month.


Does your wish list come to more than £99? Stop right there! I can help you get more for your money all year round, so please message me via my website 
 

Tuesday, 11 January 2022

Grassy Grove bundle cards with Expressions in Ink DSP

 
You know how every time a new Stampin’ Up!® catalogue comes out, there’s usually one stamp set or bundle which you absolutely MUST have? In the January-June Mini Catalogue, for me it was the Grassy Grove bundle. 
 

I’ve always loved the look of intricate laser-cut and paper-cutting designs but would never attempt them myself as I just know I would end up cutting my finger. Honestly, I have previously cut myself on a guillotine which was described as “impossible to cut yourself”, a Stampin’ Up!® ink pad and even some ribbon. Yes, ribbon. 
 

So when I saw this Grassy Grove bundle it tapped into both my love of intricate paper-cut designs and my love of wildlife. In the January-June Mini Stampin’ Up!® Catalogue, these gorgeous dies are used with New Horizons Designer Series Paper but due to global shipping issues, this product has not yet arrived in the European warehouse. I believe it’s due in next week. 
 
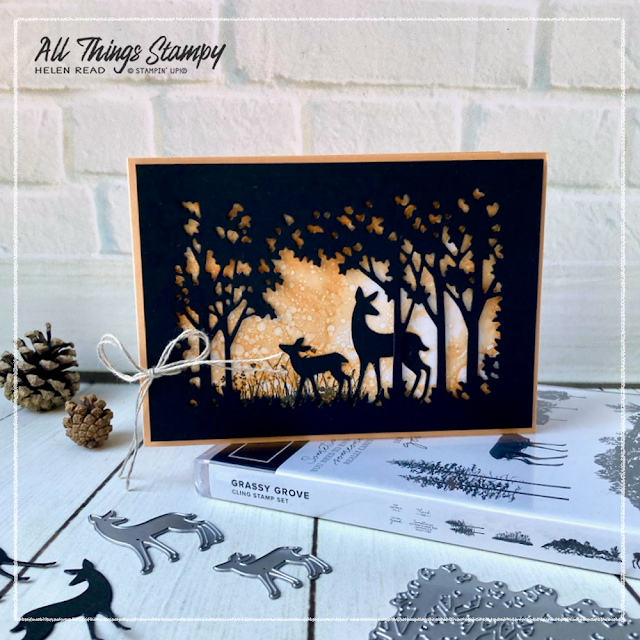
However, I had almost a full pack of Expressions in Ink Designer Series Paper which I love but haven’t really used much yet. This proved ideal for serene sunset/sunrise backgrounds like this one...
 
 
For this card I have also stamped some of the beautiful detailed grasses onto the Expressions in Ink Designer Series Paper. By flipping the deer around, you can mix up the scene. I haven’t added a greeting to this one as I didn’t want to detract from the scene but may add a small happy birthday later as I am very low on birthday cards. 
 
With these dies you can create stunning cards very quickly – these cards I have made are really simple, but I love the look of the amazing backgrounds behind the stark black silhouettes.


This card uses a different and more intense piece of Expressions in Ink Designer Series Paper to create a lovely orange sky. Again I have stamped with the grasses directly onto the paper to add further interest. 


In this version (how many did I make? I think I’ve lost count!), I added a small thank you banner on a die-cut panel using Tasteful Labels Dies, plus some coordinating Pale Papaya ribbon. 


For a gorgeous enchanted woodland effect, there is this piece in the Expressions in Ink DSP pack, with its dreamy greens and threads of gold. For this card, I have added an extra die-cut piece behind the main trees. This die cuts out a stamped image of a grassy mound, but I think it works well on its own too. 
 

I love that you can create such very different looks with just Basic Black cardstock and simply by changing the background. You could also leave the background plain, stamp it, ink it, watercolour it, blend it with our fabulous Blending Brushes or use any number of fun background techniques. 


I love this bundle so much that it will be the focus of my All-Day Craft Event in March. This will take place on Zoom, to give us all an element of certainty. 


The price will include the Grassy Grove bundle (Grassy Grove stamp set and Grove dies), as well as a full pack of Simply Marbleous Designer Series Paper from the Sale-a-Bration brochure. There is also the option to swap to a different SAB item if you already own this paper or have something which would work just as well. 
 
As the event will be held on Zoom, it is open to anyone in the UK. If you are unable to attend the event you can still register to receive the kit and instructions to complete the projects at your leisure.

Alternatively, if you would just like to order the bundle, or anything else from Stampin’ Up!®, I would love it if you used my store. If you use the current host code RNU3JCR9, I’ll send you a thank you gift in the following month.


Does your wish list come to more than £99? Please get in touch and I will help you get more for your money and unlock discounts all year round.  


Thursday, 6 January 2022

Jan-June Mini Catalogue Blog Hop - masculine card with Wildlife Wonder

Wildlife Wonder Stampin Up card ideas
 

It’s been a long while since I took part in a blog hop but January always brigs with it good intentions so here I am. Today I invite you to hop around the world to see some amazing projects featuring brand new Stampin’ Up!® products from the January-June Mini Catalogue.

Stampin Up Mini Catalogue blog hop

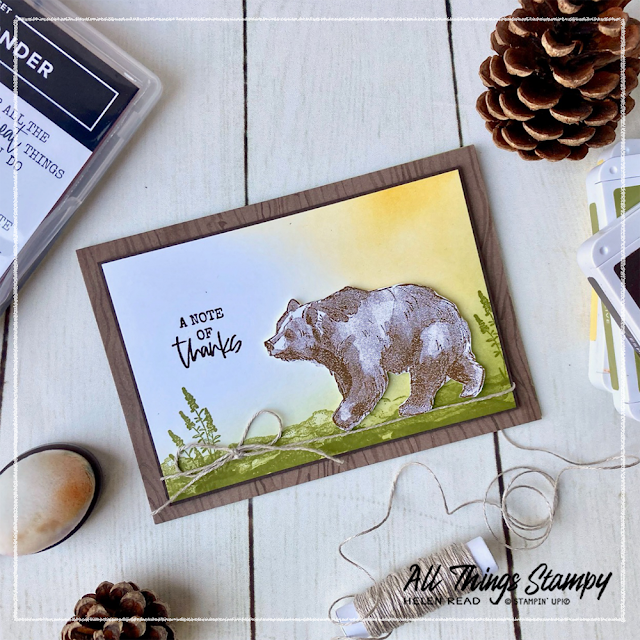
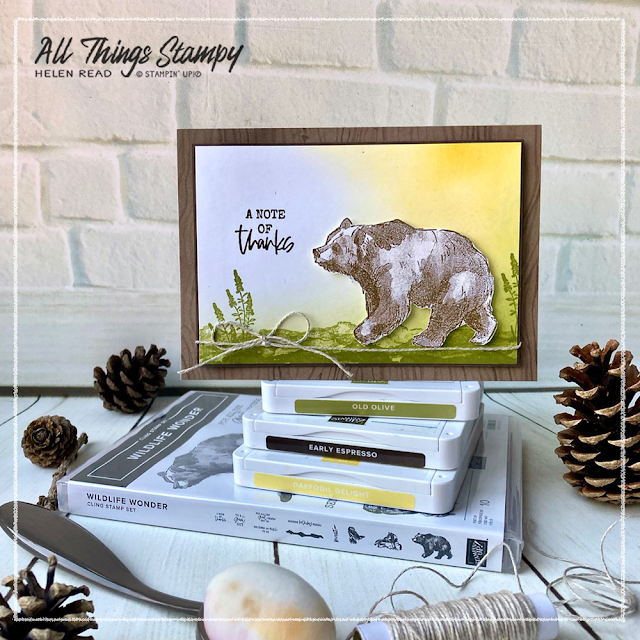
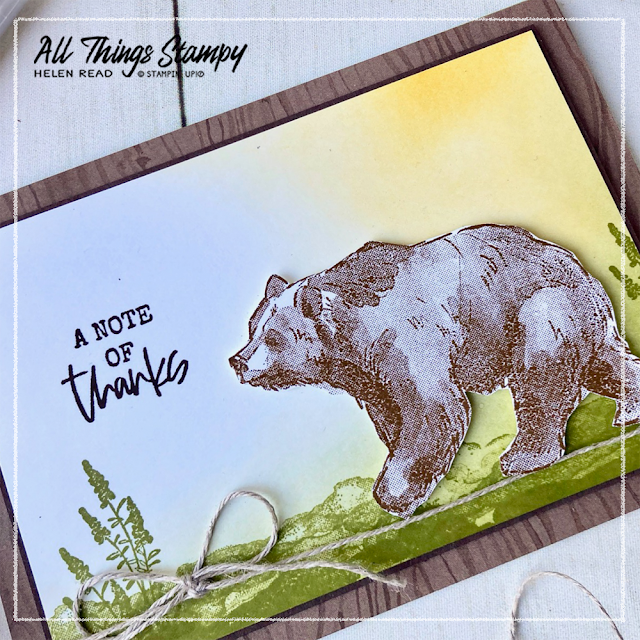
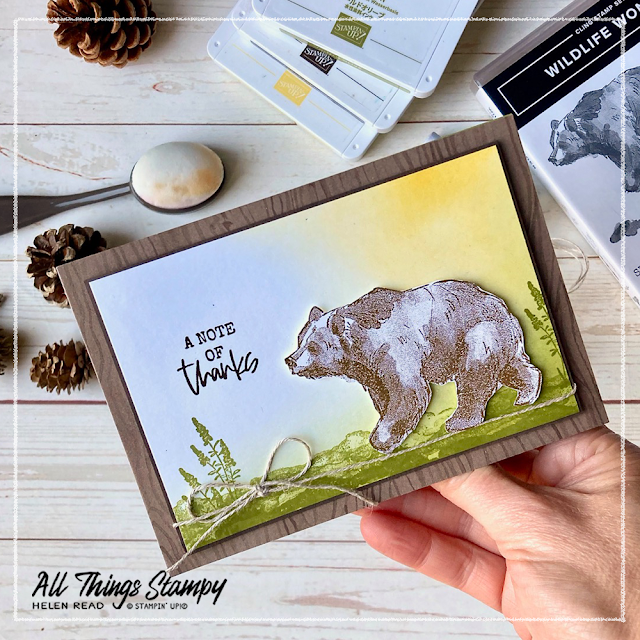
I have a project to show you today which uses the lovely Wildlife Wonder stamp set. We love bears, wolves and owls in this family, so I couldn’t resist adding this set to my order. Bears top that list so my first card with this set uses the lovely bear image. 
 
Wildlife Wonder Stampin Up card ideas
 
This is a Distinktive stamp set, which means you don’t have to do anything clever to get that amazing shaded image on the bear. Just ink it up in a colour of your choice – I used Early Espresso – and stamp. 
 
Wildlife Wonder Stampin Up card ideas

 
After fussy cutting the bear, I stamped a simple scene in Old Olive ink using the stamps in the set. There's a “splodge” which is useful to create a base for the bear to stand on, and a simple grassy sprig which can be used at different heights and angles to create a scene. 
 
Wildlife Wonder Stampin Up card ideas
 
I covered the whole of the front of the card base with some woodgrain paper from the Beauty of the Earth Designer Series Paper pack. This whole pack of paper from the Annual Catalogue is perfect to go with the animal images from this Wildlife Wonder stamp set. 
 
Wildlife Wonder Stampin Up card ideas


The moody sky was created using the fabulous Blending Brushes and some Daffodil Delight ink, blended into a little Old Olive at the base. These brushes are a delight to use and really raise your projects to the next level. 
 
Wildlife Wonder Stampin Up card ideas
 
Wildlife Wonder Stampin Up card ideas


The Wildlife Wonder set is a really great set for making masculine cards. I know a lot of people struggle to make cards for men but this will make it easy. I have to say though, as someone who loves bears, wolves and owls, I’d be more than happy to receive a card made with this set, too!
 
Wildlife Wonder Stampin Up card ideas
 
Have you had a good look at the Stampin’ Up!® January-June Mini Catalogue yet? Please visit the blogs in this hop to see lots more inspiration for stamp sets from this fab new collection. 


Is the Wildlife Wonder stamp set on your wish list? If you are in the UK, you can shop for any Stampin’ Up!® products at my online store and, if you use the current host code RNU3JCR9, I’ll send you a thank you next month. 


Does your wish list come to more than £99? Please get in touch and I will help you get more for your money and unlock discounts all year round.  


The small print

This is my personal blog and my sole responsibility as an Independent Stampin' Up!® demonstrator. All images are © Stampin' Up!® All content including photographs, projects and text are © Helen Read, unless otherwise stated. Please feel free to copy my ideas for your personal use and inspiration - if you are a SU demonstrator you may use these ideas for your events but please give credit where it is due. Please do not use my ideas for monetary gain, competitions or publication. The images on this blog - including blog buttons - should not be copied and used elsewhere on the internet or on CDs.