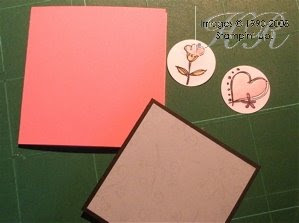
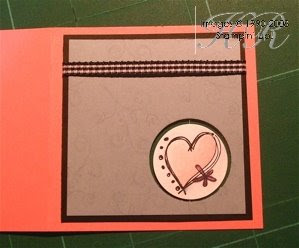
Sorry I have no new samples to show you - it's hard to find time for crafting when the children are off school. Oh well, only another five weeks to go!!!
Thursday, 31 July 2008
Summertime blues
Avoid the summertime blues by booking a Stampin' Up! party! And, with our fab special offer for August, why not ask for a Paper Party? The details of this fab special offer are here.
Labels:
SU news
Tuesday, 29 July 2008
Chocolate pyramid
 This is a really fun and easy template; it’s just a square with four triangles coming from it. No fiddly flaps to line up, just join at the top and leave gaps in the sides to offer a tantalising glimpse of the contents. Inside this one is a bag of Quality Street, so I can’t see this box lasting long before it’s dismantled!
To decorate the sides, I used the Stampin’ Around® Watercolour Vine wheel on Certainly Celery cardstock. Here’s a great tip for saving money and making life easier when using the wheels: I mostly use my wheels to create backgrounds and wanted the flexibility of different colours without having to buy lots of cartridges. So I bought an unlinked cartridge (p83) and a Versamark® refill (p82) and inked up the cartridge with Versamark ink. This means I can create tone-on-tone background with my wheels… in any colour! I’d love to claim that idea as my own but it was actually one of my customers who put the idea into my head.
So, sides decorated, I added the chocolates, then joined the tips of the triangles at the top with linen thread, although you can’t see it so that was a bit of a waste of time. I finished it off with a punched image layered on some Designer Paper and some Certainly Celery ribbon.
Here's a close-up... the faint black line is most likely a cat hair. They're moulting madly.
 Stamps: Circle of Friendship (p62), Watercolour Vine (p89)
Cardstock: Certainly Celery, Whisper White
Paper: Prints Designer Series Papers - Certainly Celery (p73)
Ink: Versamark®, Certainly Celery
Accessories: 1”, 1 3/8” circle punches, Scallop Circle Punch (p80), linen thread (p87), 3/8” Grosgrain Ribbon - Certainly Celery (p86)
All products by Stampin' Up! Please email me to order a catalogue, or click the picture of the catalogue on the right to view it online.
Labels:
3D projects,
gift ideas
Monday, 28 July 2008
Rusty little box
 I’ve been having fun with box templates, as you can see. I really like this one – it’s like a mini takeaway box… not that we get takeaways in boxes like this on this side of the Atlantic but I have seen instant noodles in them in one of the supermarkets.
I think you were supposed to enlarge the template but I couldn’t be bothered so this is a very cute little box suitable for about four chocolates.
To scallop the edge of the Designer Paper, I carefully removed the guard from my corner rounder, then punched along the edge of the paper.
And look! I used another button!
 Stamps: Circle of Friendship (p62), Shapes & Shadows (p54)
Cardstock: Really Rust, Chocolate Chip, Very Vanilla
Paper: Fall Flowers (p72)
Ink: Chocolate Chip, Really Rust
Accessories: 1”, 1 ¼”, 1 3/8” circle punches, Scallop Circle Punch, corner rounder (p80), linen thread (p87), Earth Elements buttons (p87)
All products by Stampin' Up! Please email me to order a catalogue, or click the picture of the catalogue on the right to view it online.
Labels:
3D projects,
gift ideas
Sunday, 27 July 2008
Free Designer Papers!
There's something very appealing about background papers. I know very few crafters who don't hoard it - I have stacks. Sometimes I'm even brave enough to cut it up and use it!
If you love Stampin' Up!'s Designer Series Papers as much as I do, you'll be thrilled to hear about this fabulous offer coming up for August.
Throughout August, if you buy three packs of Designer Series Paper, you'll get a fourth one FREE! Each pack retails at £8.50 and includes 12 double-sided sheets (two each of six designs). It works out at about 70p a sheet which is excellent value for such good quality, double-sided paper. The special offer brings each sheet down to about 53p.
The best thing about Stampin' Up!'s Designer Series Papers is that they all co-ordinate with Stampin' Up!'s colours, so that your projects will match perfectly. If you have a favourite colour, you'll love the Prints Designer Series Papers. These packs offer 12 monochromatic designs in some of Stampin' Up!'s most popular colours. I have the Certainly Celery, Close to Cocoa and Rose Red and they're fabulous.
You don't have to be a scrapbooker to enjoy patterned papers - they look great on cards, too. They are also useful for covering containers and journals to make special gifts.
Email me today if you want to take advantage of this great offer. You don't have to be at a workshop to place an order but why not book a workshop for August, so I can show you some projects using Designer Series Paper?

Labels:
SU news
Friday, 25 July 2008
Special offer on the Crop-A-Dile
I have to admit to being a late convert to the Crop-A-Dile™. But, once I saw what it could do, I was convinced that it was a crafters’ necessity! It cuts through even the thickest chipboard like a knife through butter and sets eyelets silently. I remember the days when my crafting friends and I used to nip outside to set our eyelets with a hammer, so that we didn't wake the kids up. No need to do that any more!
I was browsing the internet and found this really useful video on YouTube. It explains the benefits of the Crop-A-Dile™ far more efficiently than I could.
There’s no commentary, so no need to turn your sound up, unless you want to hear music on a continuous loop. The Crop-A-Dile™ shown is pink but, apart from that, is exactly the same as the one in the Stampin’ Up! catalogue.
Now, here’s some exciting news… throughout August, I am offering a special price on the Crop-A-Dile™. It retails in the Stampin’ Up! catalogue for £22.95 but, if you buy it from me during August, you will pay just £19.95! This special price is being offered by me and not by Stampin’ Up! and is only available during August 2008.
Watch the video to see just how useful a tool you’ll be getting for less than £20. And see if you can spot the typo!
Don’t forget you can order at any time – as well as at workshops and classes, I can take orders over email, the phone or by mail. Postage is £3.95 on orders up to £80, then 5% thereafter.
Watch out for another great August offer from Stampin’ Up! More news soon…
Labels:
Product info,
Tutorials
Thursday, 24 July 2008
Penguins: pronto!
 I made this card from scraps I had lying around at the end of a manic crafting session, which is why it’s not exactly how I’d have liked it. But it was quick and just what I needed in a hurry.
Stamps: Wild About You (p32), Daily Flexible Phrases (p65)
Cardstock: Really Rust. Basic Black, Whisper White
Paper: Fall Flowers (p72)
Ink: Basic Black
Accessories: 1 ¼” circle punch (p80), 1 3/8” circle punch (p80), ¼” Grosgrain Ribbon – Pumpkin Pie (p86)
All products by Stampin' Up! Please email me to order a catalogue, or click the picture of the catalogue on the right to view it online.
Tuesday, 22 July 2008
Small and glittery
 A small thank you card which will form part of a set… when I eventually complete it! The deadline is looming, too…
Just a reminder of the glitter trick used on the brad: take an ordinary brad, cover it with a glue dot and dip it in glitter. It’s (almost) a no-mess glitter technique! I used a Pretty in Pink brad on this one, so that the pink shows through slightly.
Stamps: Shapes & Shadows (p54), Basic Phrases (p65)
Cardstock: Pretty in Pink, Close to Cocoa, Whisper White
Ink: Pretty in Pink, Close to Cocoa
Accessories: Soft Subtles brads (p85), Glue Dots® (p81), Stampin’ Glitter (p82)
Labels:
Card samples,
TECHNIQUES
Monday, 21 July 2008
Button it!
 Something a bit different today… using (gasp!) buttons! It’s a well-known fact among my crafting friends that I don’t really like buttons on cards but, for some reason, I got the urge to buy some of Stampin’ Up!’s coloured buttons and, even more surprisingly, I got the urge to use them!
The buttons are stuck on with Glue Dots® which made it really easy. I cut one of the flowers out of the Designer Paper and popped it up with Stampin’ Dimensionals to give it some depth.
Stamps: Basic Phrases (p65)
Cardstock: Really Rust, Old Olive
Paper: Fall Flowers (p72)
Ink: Always Artichoke
Accessories: Earth Elements buttons (p87), 3/8” Grosgrain Ribbon – Old Olive (p86), Linen thread (p87)
All products by Stampin' Up! Please email me to order a catalogue, or click the picture of the catalogue on the right to view it online.
Labels:
Card samples
Saturday, 19 July 2008
Suspension card tutorial
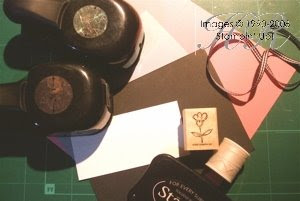 These care are really fun as they feature a suspended spinning image. You don’t have to make the image round but Stampin’ Up!’s circle punches make it very easy if you do.
(Sorry for the ropey pictures, I took them at night.)
You will need:
Stamps, cardstock and ink
2 circle punches, one slightly larger than the other
cotton thread or similar (some people use dental floss)
Double-sided tape, such as Sticky Strip™
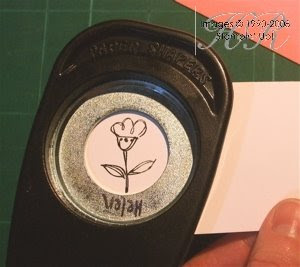 The idea is to have two different images on the spinning circle, so start by stamping these images and punch them out using the smaller circle punch. TIP: Stamp first, then punch, holding your punch upside down so that you can see to centre the image.
 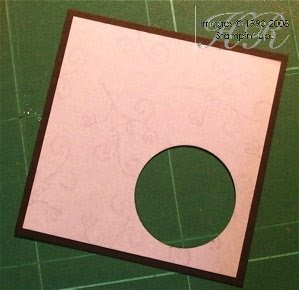 Take your top layer and punch a hole in it. I made a mistake here of having two layers of cardstock, which was almost too much for the punch. Designer Paper would have been a better idea, or punching the two layers separately. TIP: Don’t push the punch all the way in, or you won’t be able to punch the card base, which will be larger.
 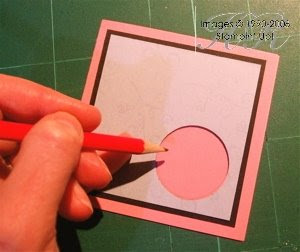 Take the punched layer and lay it in the correct position on top of your card base. Using a pencil, lightly draw the position of the punched hole. Now take the card base and punch the hole according to the pencil marks, then rub out any remaining marks.
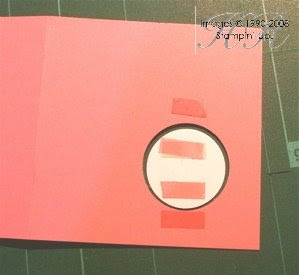 Now for the fun bit! Position one of the circle images, plain side up in the card base hole. Apply tape to the back of the image and the front of the card base, as shown.
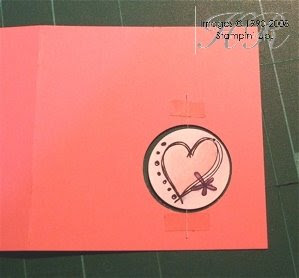 Attach a short length of cotton vertically, from just above the aperture to just below then stick the other circle image exactly on top, as shown.
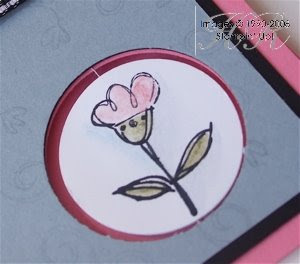 You can make your image spin in different direction by sticking the thread at different angles. You can also experiment with different shaped apertures and images. Have fun!
 Stamps: Doodle That (p55), Daily Flexible Phrases (p65)
Cardstock: Rose Red, Basic Black, Bordering Blue, Whisper White
Ink: Black StazOn®, Versamark®
Accessories: Watercolour Wonder™ crayons (p82), 1 3/8” circle punch (p80), 1 ¼” circle punch (p80), 1 1/16” handheld circle punch (p80), black gingham ribbon (p86), linen thread (p87)
All products by Stampin' Up! Please email me to order a catalogue, or click the picture of the catalogue on the right to view it online.
Friday, 18 July 2008
Coaster Book
 I made a batch of these for my daughter to give to her friends as she leaves her primary school and they go their separate ways.
It’s a coaster book; the front and back cover are made from plain coasters. I have no idea where to get plain coasters from but was lucky enough to be given some by my Canadian cousin. However, you can easily improvise and, in fact, you can make these little books any size you like (see below for instructions).
To make the coaster book, you will need:
2 coasters
patterned paper, cut to just larger than 4in/10cm square
cardstock to make pages
stamps and cardstock to decorate
2 book rings (I bought mine in Staples)
ribbon (optional)
Corner Rounder
Crop-A-Dile™ or other heavy duty hole punch
PVA glue, Mod Podge, or other adhesive
Cover one side of both coasters with adhesive then place them, glue side down, on the patterned paper. Make sure the paper is smooth and completely stuck. I put mine between some scrap paper and left them under a heavy book for a while just to make sure.
Trim the excess paper from around the edges. I found this easier than trying to line up a piece of paper the same size as the coaster. Decorate as desired.
To make the pages, I used cardstock cut to the same size and rounded the corners. The angle isn’t quite the same but it doesn’t matter.
Finally, punch the holes with the Crop-A-Dile™, which makes short work of the job as it’s strong enough to go through really thick chipboard, and has a handy little gadget to line up the holes exactly. Add the book rings and decorate with ribbon, if desired.
To make the same sort of thing without coasters, use chipboard, or cereal packets (double thickness). I wouldn’t round the corners if you’re using cereal box card as it makes it hard to cover. Use patterned paper to cover the front and back cover of the book - click here for details – then proceed as for the coaster book.
Recipe for Snail Coaster Book
Stamps: Unfrogettable (p33)
Cardstock: Tempting Turquoise, Real Red, Naturals Ivory
Paper: Petals & Paisleys (p73), Dashing (p73)
Ink: Black StazOn®, Tempting Turquoise, Old Olive
Accessories: 1 ¼” circle punch, 1 3/8” circle punch, Scallop Circle Punch (p80), Crafters’ Toolkit (p85), blender pens, ¼” Grosgrain Ribbons – Real Red, Tempting Turquoise, Very Vanilla, book rings (from Staples)
All products by Stampin' Up! unless specified. Please email me to order a catalogue, or click the picture of the catalogue on the right to view it online.
Labels:
3D projects,
gift ideas,
Journals,
Tutorials
Thursday, 17 July 2008
Suspended snail
 I’m getting really into these suspension cards now – they’re great fun to make and irresistible to play with with completed! On this one the circle spins around to show a red snail and a blue snail. I despise snails but it fit so perfectly in the circle that I couldn’t resist.
I have a tutorial half prepared for this technique but it will have to wait until the weekend as I get in a mess uploading multiple pictures.
 To colour the image, I used ink pads and blender pens. I think I did a better job of the blue side than the red.
 Stamps: Unfrogettable (p33), Big Deal Alphabet (p66)
Cardstock: Tempting Turquoise, Real Red, Very Vanilla, Naturals Ivory
Paper: Petals & Paisleys (p73)
Ink: Old Olive, Real Red, Tempting Turquoise, Black StazOn®
Accessories: ¼” Grosgrain Ribbon – Real Red, ¼” circle punch (p80), 1 3/8” circle punch (p80), cotton thread
All products by Stampin' Up! Please email me to order a catalogue, or click the picture of the catalogue on the right to view it online.
Wednesday, 16 July 2008
On the fourth day of Christmas
 This is the final card from the Christmas in July event – and another one designed and made by Alison. The trees and snowflakes are from Happy Winter. It was supposed to have the little snowman from Happy Winter, too, but we suddenly realised that we needed that stamp on another table. So we adapted and used the little Santa from the hostess set, Little Hellos.
Stamps: Happy Winter (p27), Little Hellos (p18). Daily Flexible Phrases (p65)
Cardstock: Bashful Blue, Real Red, Mellow Moss, Whisper White
Ink: Basic Black, Always Artichoke, Real Red
Accessories: Red gingham ribbon (p86), linen thread (p87), red marker
All products by Stampin' Up! Please email me to order a catalogue, or click the picture of the catalogue on the right to view it online.
Labels:
Card samples,
Christmas
Tuesday, 15 July 2008
On the third day of Christmas...
 I cannot lay claim to any part of this card – it was designed and made by my downline, Alison, who held the Christmas in July event with me.
This is the third card from the event – and very cute it is, too.
Stamps: Happy Winter (p27), Daily Flexible Phrases (p65)
Cardstock: Kraft (p69), Ruby Red, Mellow Moss, Whisper White
Ink: Basic Black
Accessories: Black gingham ribbon (p86), linen thread (p87), red marker, 1 1/4" circle punch, 1 3/8" circle punch, scallop circle punch (p80)
All products by Stampin' Up! Please email me to order a catalogue, or click the picture of the catalogue on the right to view it online.
Labels:
Card samples,
Christmas
Monday, 14 July 2008
On the second day of Christmas...
 This is the second of the Christmas cards we made on Saturday. We made this by stamping the image in Basic Black then, allowing it to dry (ahem, learned that one the hard way!), sponging chalk over the background. The details were added with a marker.
The card base is Ballet Blue although, on the day, we used Brocade Blue which I preferred as it was gentler. The top half of the card and the greeting were stamped using The Snowflake Spot and Versamark.
There’s a secret hole in the Night of Navy layer behind the Real Red layer – this makes the ribbon possible.
Then it was just a simple case of layering.
Stamps: A Tree for All Seasons (p44), The Snowflake Spot (p30)
Cardstock: Ballet Blue, Real Red, Night of Navy, Whisper White
Ink: Basic Black, Versamark®
Accessories: Stampin’ Pastels (p82), Red Gingham ribbon (p86)
All products by Stampin' Up! Please email me to order a catalogue, or click the picture of the catalogue on the right to view it online.
Labels:
Card samples,
Chalks,
Christmas
Sunday, 13 July 2008
Twas the day after Christmas...
It feels a bit like Boxing Day here today. Christmas over and done with and nothing but leftover mince pies to eat.
Thank you to everyone who came to our Christmas in July event. We were very impressed by those who’d gone to so much trouble to wear something Christmassy – we certainly weren’t expecting to get a visit from Santa Claus!
BIG thanks, too, to Betty and Sue, whose help proved invaluable. The mince pies were delicious (thanks, Mum!); didn’t get to try any of Alison’s mincemeat cake unfortunately.
 Over the next few days I’ll be posting pictures of the cards we made. Here’s the first.
To make it, we wheeled the background using the Woodcut Holly wheel. For this sample I masked the central panel to leave a plain border around the Very Vanilla layer but decided it would be too fiddly for the event and didn’t look quite as impressive as I’d hoped.
The Happy Christmas is stamped using two stamp sets and the Stamp-a-ma-jig® for precise positioning.
The wheel was used again on Very Vanilla then the holly image cut out and stuck to the Vanilla panel, before attaching the red brads.
Stamps: Woodcut Holly wheel (p29), Happy Everything (p65), Basic Phrases (p65)
Cardstock: Naturals Ivory (p78), Handsome Hunter, Very Vanilla
Ink: Handsome Hunter, Ruby Red
Accessories: Bold Brights brads (p85)
All products by Stampin' Up! Please email me to order a catalogue, or click the link on the right to view it online.
Thank you to everyone who came to our Christmas in July event. We were very impressed by those who’d gone to so much trouble to wear something Christmassy – we certainly weren’t expecting to get a visit from Santa Claus!
BIG thanks, too, to Betty and Sue, whose help proved invaluable. The mince pies were delicious (thanks, Mum!); didn’t get to try any of Alison’s mincemeat cake unfortunately.
 Over the next few days I’ll be posting pictures of the cards we made. Here’s the first.
To make it, we wheeled the background using the Woodcut Holly wheel. For this sample I masked the central panel to leave a plain border around the Very Vanilla layer but decided it would be too fiddly for the event and didn’t look quite as impressive as I’d hoped.
The Happy Christmas is stamped using two stamp sets and the Stamp-a-ma-jig® for precise positioning.
The wheel was used again on Very Vanilla then the holly image cut out and stuck to the Vanilla panel, before attaching the red brads.
Stamps: Woodcut Holly wheel (p29), Happy Everything (p65), Basic Phrases (p65)
Cardstock: Naturals Ivory (p78), Handsome Hunter, Very Vanilla
Ink: Handsome Hunter, Ruby Red
Accessories: Bold Brights brads (p85)
All products by Stampin' Up! Please email me to order a catalogue, or click the link on the right to view it online.
Labels:
Card samples,
Christmas
Saturday, 12 July 2008
Ho! Ho! Ho!
Dashing through the snow, on a one-horse open sleigh. Nope, even the Christmas CD doesn't make it feel Christmassy here! I think I'll have to sneak one of the mince pies to get me in a festive mood for the Christmas in July class this afternoon!
Will post the samples we make over the next few days...
Labels:
Events
Thursday, 10 July 2008
Penguin in a spin
 This card is hugely inspired by two of my “imaginary” friends, Victoria and Taylor. Taylor set a challenge to create a spinner card… Victoria took up the challenge and made a beautiful card… then I set out to copy it! In my (very weak) defence, I did change the colours, the papers and the stamps.
A word about the greeting. The “happy” is from Happy Everything and the “birthday” is from Basic Phrases. Happy Everything contains a “birthday” stamp which is perfectly adequate but the Basic Phrases stamp was already dirty from the previous penguin card (inside) so I used that. In case you were wondering.
All the papers are from the Wintergreen pack of Designer Series Papers – it’s a kind of Christmassy themed pack but the ones I’ve used here are suitable for other occasions, too.
 The spinner card is fun because the little penguin circle spins around to reveal another image; in this case the Circle of Friendship words which you can see in the smaller picture.
This was my first spinner card ever so, naturally, I’m not 100% happy with it. I want to move the penguin over to the right a little but, of course, I can’t.
Next time I make a spinner I’ll prepare a tutorial so that, if you don’t already know, you can see how it’s done.
Edited to add: Apparently this is a suspension card, not a spinner card! I'm so confused now.
Stamps: Wild About You (p32), Happy Everything (p65), Basic Phrases (p65)
Cardstock: Certainly Celery, Basic Black, Whisper White
Paper: Wintergreen (p72)
Ink: Basic Black, Certainly Celery
Accessories: 1 ¼” circle punch, 1 3/8” circle punch, 1” circle punch (p80).
All products by Stampin' Up! Please email me to order a catalogue, or click the picture of the catalogue on the right to view it online.
Wednesday, 9 July 2008
P-p-p-pick up a pile of penguins
 A little bit unusual for me but I really wanted to make a pile of three penguins for a friend’s little girl who is turning three… and LOVES penguins. So I made this really simple but fun card.
I positioned the penguins using the Stamp-a-ma-jig®, which rarely leaves my side these days. There’s no way those penguins would have managed this death-defying feat without it!
The black line was drawn freehand, then I added a little pale blue using a Bashful Blue marker and blender pen.
I cut the flags out freehand… which is why they’re all different sizes. The sticks are just cocktail sticks, trimmed to length.
Stamps: Wild About You (p32), Daily Flexible Phrases (p65)
Cardstock: Lovely Lilac, Pretty in Pink, Basic Black, Whisper White
Ink: Basic Black
Accessories: Stampin’ Write markers, blender pen (p81), black gingham ribbon (p86)
All products by Stampin' Up! Please email me to order a catalogue, or click the picture of the catalogue on the right to view it online.
Tuesday, 8 July 2008
Bag toppers
 Here’s a very sneaky sneak preview of what’s on offer at the Christmas in July event on Saturday. Sneaky because I’m not showing you what’s in these little prize packets!
But, due to the large turnout for the event, there will be not one but three prizes of Christmassy Stampin’ Up! products.
These toppers for cellophane bags are really easy to make. They’re great if you want co-ordinated gifts or, for example, party bag presents. All you need is a piece of cardstock slightly wider than your cello bag, scored down the centre and decorated.
Fold the top of your cello bag over and staple it closed. Then add double-sided tape to the inside of your topper and attach – this way you don’t get any unsightly (and sharp!) staples.
Stamps: The Snowflake Spot (p30), Shapes & Shadows (p54)
Cardstock: Glorious Green, Whisper White
Ink: Versamark®, Basic Black, White StazOn®
Accessories: 1 3/8” circle punch (p80)
All products by Stampin' Up! Please email me to order a catalogue, or click the picture of the catalogue on the right to view it online.
Labels:
3D projects,
gift ideas
Sunday, 6 July 2008
Stamping with bleach
Stamping with bleach can be very exciting - because you never really know what’s going to happen.
There are several important things to know before you start:
1. Work in a well-ventilated area and don’t get bleach on your hands or clothing.
2. If you want to keep a small bottle of bleach specifically for craft use, make sure the bottle is clearly labelled to avoid accidents and don’t store it in a clear bottle as the light will reduce the effectiveness of the bleach.
3. Work quickly – the power of bleach is soon diminished by light. However, you can use this to your advantage to gain different effects.
4. Clean your stamps thoroughly immediately after stamping.
Will it harm your stamps? If you used the same stamp with bleach over and over again, in time I would expect some damage to occur. But for occasional use, as long as you clean your stamp thoroughly straight away, you should be fine.
 You will need all your stamping supplies to hand plus a pad of kitchen roll in a small flat pot. Today I placed my pad of kitchen paper on a plastic takeaway pot lid.
Have everything you need to hand before you open the bleach. When you’re sure you’re ready, pour a small amount of bleach onto the paper pad then stamp…
 On this card I then overstamped with the co-ordinating stamp using the same colour as the cardstock. I used the Stamp-a-ma-jig® to position the images where I wanted them.
 I made this card for an Inspiration Challenge I’m posting over on In Love With Stamping next week, so this is a sneak preview for blog-readers. The inspiration piece was an Andy Warhol painting called Four Monkeys which you can see here.
Stamps: Heartfelt (p20), Daily Flexible Phrases (p65)
Cardstock: So Saffron, Basic Black, Bravo Burgundy, Rose Red, Always Artichoke, Elegant Eggplant
Ink: Bravo Burgundy, Rose Red, Always Artichoke, Elegant Eggplant, White StazOn®
Accessories: ¼” Grosgrain Ribbon - Elegant Eggplant (p86), Round Tab Punch (p80), Stamp-a-ma-jig® (p81), household bleach
All products by Stampin' Up! Please email me to order a catalogue, or click the picture of the catalogue on the right to view it online.
There are several important things to know before you start:
1. Work in a well-ventilated area and don’t get bleach on your hands or clothing.
2. If you want to keep a small bottle of bleach specifically for craft use, make sure the bottle is clearly labelled to avoid accidents and don’t store it in a clear bottle as the light will reduce the effectiveness of the bleach.
3. Work quickly – the power of bleach is soon diminished by light. However, you can use this to your advantage to gain different effects.
4. Clean your stamps thoroughly immediately after stamping.
Will it harm your stamps? If you used the same stamp with bleach over and over again, in time I would expect some damage to occur. But for occasional use, as long as you clean your stamp thoroughly straight away, you should be fine.
 You will need all your stamping supplies to hand plus a pad of kitchen roll in a small flat pot. Today I placed my pad of kitchen paper on a plastic takeaway pot lid.
Have everything you need to hand before you open the bleach. When you’re sure you’re ready, pour a small amount of bleach onto the paper pad then stamp…
 On this card I then overstamped with the co-ordinating stamp using the same colour as the cardstock. I used the Stamp-a-ma-jig® to position the images where I wanted them.
 I made this card for an Inspiration Challenge I’m posting over on In Love With Stamping next week, so this is a sneak preview for blog-readers. The inspiration piece was an Andy Warhol painting called Four Monkeys which you can see here.
Stamps: Heartfelt (p20), Daily Flexible Phrases (p65)
Cardstock: So Saffron, Basic Black, Bravo Burgundy, Rose Red, Always Artichoke, Elegant Eggplant
Ink: Bravo Burgundy, Rose Red, Always Artichoke, Elegant Eggplant, White StazOn®
Accessories: ¼” Grosgrain Ribbon - Elegant Eggplant (p86), Round Tab Punch (p80), Stamp-a-ma-jig® (p81), household bleach
All products by Stampin' Up! Please email me to order a catalogue, or click the picture of the catalogue on the right to view it online.
Pictures won't upload
I'm trying very hard to give you the stamping with bleach tutorial I prepared yesterday... but the pictures won't upload. Sorry - will try again later.
Wednesday, 2 July 2008
The long-awaited Altoid tin tutorial
 These little tins are great for altering. You can recycle old mint tins – I think Marks & Spencer and Asda sell them in the same size. Plain ones are hard to find in this country but I’m working on it!
Of course, you don’t have to find exactly the same tins – any will do. You can get smaller tins of mints in Aldi if you don’t mind working on something fiddly.
I was lucky enough to be given some plain tins by my Canadian cousin, so I’m using this plain aluminium one for this project. You can see a mint tin in the picture, too – I’m gradually scrounging these off a mint-chomping colleague who visits the States fairly frequently.
For this project you will need:
(all measurements apply to Altoid-type tins)
1. A tin for altering
2. Piece of cardstock measuring slightly larger than the top of the tin, or exactly 6cm x 9.5cm if you have a steady hand.
3. Piece of Designer Series Paper measuring 5.5cm x 9cm
4. Short length of ribbon
5. Corner rounder
6. Glue – I used Mod Podge matt finish, but ordinary PVA should be fine
7. Glue spreader or foam brush
8. Scissors
8. Stamps, ink, ribbon and scraps of cardstock to decorate
Start by spreading your glue all over the top of the tin. I use these foam brushes – I actually prefer the smaller ones which you can buy in Wilko for about 20p (in the decorating section) but couldn’t lay my hands on one.
 Lay your gluey tin upside-down on to the cardstock and press firmly. Smooth it all over to make sure it’s secure. If you’ve used an oversized piece you can now simply trim off the excess carefully using scissors.
You now have a plain covered tin. Boring! So decorate it!
 I decorated mine using some Designer Series paper. I cut this slightly smaller than the top of the tin and rounded the corners using the corner rounder.
 To finish off, I embellished the top with gingham ribbon and the Polka Dots & Paisley stamp set. I used the I used the two largest circle punches from the Stampin’ Up!® catalogue – 1¼” and 1 3/8”.
 Now then, what to put inside your tin? Well you could put some mints in it! Or any small gift. But for this tine I made a set of five small gift co-ordinating gift cards. Each one was made from a piece of 8cm x 5cm cardstock, scored down the centre.
 Here’s another tin I covered – this time in cheerful Real Red. This tin is a recycled mint tin which had a red edge to the lid. But it was slightly scratched around the top edge, so I used Sticky Strip to attach red gingham ribbon around the rim, joining it at the back.
All products by Stampin' Up! apart from Mod Podge and tin. Please email me to order a catalogue, or click the picture of the catalogue on the right to view it online.
8. Scissors
8. Stamps, ink, ribbon and scraps of cardstock to decorate
Start by spreading your glue all over the top of the tin. I use these foam brushes – I actually prefer the smaller ones which you can buy in Wilko for about 20p (in the decorating section) but couldn’t lay my hands on one.
 Lay your gluey tin upside-down on to the cardstock and press firmly. Smooth it all over to make sure it’s secure. If you’ve used an oversized piece you can now simply trim off the excess carefully using scissors.
You now have a plain covered tin. Boring! So decorate it!
 I decorated mine using some Designer Series paper. I cut this slightly smaller than the top of the tin and rounded the corners using the corner rounder.
 To finish off, I embellished the top with gingham ribbon and the Polka Dots & Paisley stamp set. I used the I used the two largest circle punches from the Stampin’ Up!® catalogue – 1¼” and 1 3/8”.
  Now then, what to put inside your tin? Well you could put some mints in it! Or any small gift. But for this tine I made a set of five small gift co-ordinating gift cards. Each one was made from a piece of 8cm x 5cm cardstock, scored down the centre.
 Here’s another tin I covered – this time in cheerful Real Red. This tin is a recycled mint tin which had a red edge to the lid. But it was slightly scratched around the top edge, so I used Sticky Strip to attach red gingham ribbon around the rim, joining it at the back.
 So go hunt down some mint tins and get altering!
All products by Stampin' Up! apart from Mod Podge and tin. Please email me to order a catalogue, or click the picture of the catalogue on the right to view it online.
Labels:
3D projects,
gift ideas,
Tins,
Tutorials
Oops
Oops, it's Wednesday and I'm sorry I have no samples to post. But I am working on a little tutorial for you! And, of course, Christmas cards for the Christmas in July event which, I realised this morning, is VERY soon! So please do watch this space and I will try to do better...
Subscribe to:
Comments (Atom)
The small print
This is my personal blog and my sole responsibility as an Independent Stampin' Up!® demonstrator. All images are © Stampin' Up!® All content including photographs, projects and text are © Helen Read, unless otherwise stated. Please feel free to copy my ideas for your personal use and inspiration - if you are a SU demonstrator you may use these ideas for your events but please give credit where it is due. Please do not use my ideas for monetary gain, competitions or publication. The images on this blog - including blog buttons - should not be copied and used elsewhere on the internet or on CDs.


