Monday 28 September 2015

Mix It Up Monday with a retro vibe


It’s Mix It Up Monday and, once again, I’m pushing the deadline right into the day. One day, when the house is straight again, I’ll get back to more efficient service, honest!


Today’s colour combo has quite a retro vibe so out came my “You’re So Vintage” stamp set as a starting point. As you can see, it didn’t make the final cut!

I tried to create the look of a vintage print using the Summer Silhouettes stamp set. I needed something tiny to put in the gaps and ended up doodling some little dots with my marker pens; very simple, but quite effective I think. 

I scrunched up a strip of cotton paper was very tightly, then opened it out for a nice creased effect, then created rough pleats along the back of the stamped strip, using Tear and Tape to hold it in place. 

You’re So Vintage was just too big for this card in the end, so I resorted to Tin of Cards; a really useful stamp set to have, even if you don’t have the tin kit. So there you have it… there would have been some white dots on the scallop circle, too, if I’d been able to find my chalk marker!

Saturday 26 September 2015

Caturday: George... and an extension update


It doesn’t take much for me to become smitten with a kitten, and with George it was even quicker than most. For a start, he’s a black cat and they are the best… plus when I picked him up, he climbed onto my shoulder. So I tried him on my kneed but that wasn’t enough for him; he climbed right up to my neck and settled there. Awww.


Meanwhile, back at AllThingsDusty, we have some major progress to report this week on the extension front. Those who have lived through a similar project will appreciate that it’s the little things that mean the most, so when I returned from the bank on Monday to find that the skip had gone from the drive, I actually whooped like a US demonstrator! 


Mid-week we had the floor laid (bar a few little finishing touches), which we’re really chuffed with, not least because it meant we could move out of the front room and spread out a little. No more fridge in the hallway; no more microwave and computer desk in the front room which, frankly, was more than a little claustrophobic.


Next week the real magic happens: the kitchen is being fitted, hurrah!

Friday 25 September 2015

Tutorial: Thankful Forest Friends matchbook


It’s said that there are only two certainties in life; death and taxes. But I would add a third … and that is what bears get up to in the woods. 

Perhaps it’s because my husband spends most of his time working with seven-year-olds, or maybe it’s just because I’m deeply immature, but I never tire of a poo joke. Subtlety’s not usually one of my virtues but I thought I’d play down my schoolboy humour in this project, keeping the joke purely in my head. I was making more than a dozen of these, so surely at least one person would “get it”?

And yes, a customer approached me at my Christmas workshop and said “this IS supposed to be bear poo, right?” Call ’em what you like, chocolate raisins are still one of my favourite foods of all time. 

For some inexplicable reason, considering how short of time I am at the moment, I decided to do a tutorial for this project. So here it is…

(I’ve used inches, purely on a whim, not sure why)

You will need:

Stamps
Thankful Forest Friends
Tin of Cards stamp set

Ink pads
Early Espresso
Old Olive

Tools
Fringe scissors
1 3/4” circle punch

Supplies
Tip Top Taupe cardstock measuring 2 3/4” x 7”
Farmers Market Designer Series Paper, wood pattern, measuring 2 5/8” x 2 5/8”
Old Olive cardstock: 2 3/4” x 1 1/4”
Old Olive cardstock: 2 3/4” x 1”
Very Vanilla cardstock for stamping
Small cello bag or similar to contain treats
Linen Thread

Instructions

1. Begin by scoring the Tip Top Taupe cardstock at 2 3/4” and 3” from one end

2. Measuring from the other end, score at 3/4” and 1” 


3. Put a few chocolate raisins in a bag, removing the very large ones because they’re poisonous to anyone except Stampin’ Up!® demonstrators. Don’t overfill or the bags won’t fit in the matchbooks. Also you may run out before finishing and the plan is to have lots leftover for research purposes


4. Take your square of DSP and attach to the square panel of Taupe cardstock 

5. Punch a circle from scrap paper and attach to the centre of the DSP. This will act as a guide so you can punch accurately


6. When you’ve punched it out, stamp the foliage just above the circle, with the crease at the top


7. Take your Old Olive pieces and cut a wavy line to about 1” and 3/4” as shown. Fringe with the scissors


8. Using tape to secure at the bottom edge only, attach the larger fringed piece to the Taupe cardstock, followed by the smaller piece on top. This will leave a little pocket into which you can slide the front of the matchbook


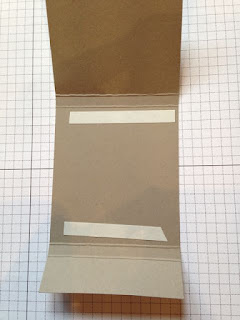
9. Fold along all score lines in the same direction, then apply tape on the inside as shown. Now you can use this to secure your treats


10. Stamp and cut out your bear. You don’t need to fussy cut around the toes as they won’t be seen
Apply tape to the bottom of the bear only - it needs to be free at the top or the matchbook won’t open


11. Slide the bear (carefully, this is REALLY tricky) between the two layers of fringed cardstock. Do the same with a greeting, if desired

12. Finally, carefully close the matchbook (I found this easier by putting it on its side so I could look down on the layers and see where to slide it in) and tie with linen thread for extra security.


Monday 21 September 2015

Mix It Up Monday: Vintage Leaves... and many more


Had a busy weekend/day but it’s still Monday, right? So I’m not too late to post my Mix It Up Monday project!

I made this one this afternoon in my new living room. It’s not really conducive to comfortable living but it currently has a table and a chair and that’s all a crafter needs. I wasn’t too sure about this colour combination from my In Color charts to begin with but I soon warmed to its gentle tones and thought it was perfect for another Vintage Leaves card. Couldn’t resist throwing in some other stamp sets, too!


I began by stamping some fun images onto some Very Vanilla cardstock, which I then layered up with some die-cut leaves, finishing off with a Antique brad and some linen thread. I actually thought Antique brads had retired but a customer ordered some last which, which alerted me to the fact that they’re still current. Hurrah for customers… for this and many other reasons!

The small print

This is my personal blog and my sole responsibility as an Independent Stampin' Up!® demonstrator. All images are © Stampin' Up!® All content including photographs, projects and text are © Helen Read, unless otherwise stated. Please feel free to copy my ideas for your personal use and inspiration - if you are a SU demonstrator you may use these ideas for your events but please give credit where it is due. Please do not use my ideas for monetary gain, competitions or publication. The images on this blog - including blog buttons - should not be copied and used elsewhere on the internet or on CDs.