Showing posts with label Stamp-a-ma-jig®. Show all posts

Monday, 16 November 2009

Circle Christmas

You don’t need Christmas stamps to make Christmas cards – here’s one made with Circle Circus and some festive paper.

You will need your Stamp-a-ma-jig® for this one and this was my second attempt to get it right. Lucky our Whisper White cardstock has two sides, eh?

The pot is made from another Circle Circus stamp cut to shape; it would have perhaps been better in red, I don’t know.

Stamps: Circle Circus
Cardstock: Ruby Red, Chocolate Chip, Close to Cocoa, Whisper White
Paper: Merry Moments
Ink: Garden Green, Chocolate Chip
Accessories: Striped Grosgrain Ribbon - Chocolate Chip, Stamp-a-ma-jig®, Scallop Edge Punch, Earth Elements and Neutrals buttons, linen thread

All products by Stampin' Up! Please email me to order a catalogue, or click the link on the right to view it online.

Wednesday, 7 May 2008

Wild about elephants

Two baby cards – one to send, one to keep as a sample. They are gender non-specific not because I don’t know the sex of the baby but because the lady in question is expecting twins... one of each!

Eagle-eyed Stampin’ Up! fans will spot the Sage Shadow grosgrain ribbon on the bottom sample. How can this be? We don’t sell Sage Shadow grosgrain! But… I dyed some Whisper White Grosgrain with the Sage Shadow ink pad by pressing it firmly into the pad. It’s a messy job and it takes a while to dry but it’s worth the wait.

I love using the little bird stamp and flower stamp with this elephant – it’s really easy with the Stamp-a-ma-jig®.

The Stamp-a-ma-jig® comes in two parts – a black plastic T-piece and a square of thick acetate. Just to recap – and this time with pictures! – this is what you do:

1. Position the square of acetate in the corner of the T-piece. On the right if you’re right-handed, on the left if you’re “special”.  Holding the acetate in position, square up your stamp into the corner of the T-piece and stamp on to the acetate.


2. Take the stamped acetate and position it over your project, exactly where you want your image to appear. Now take the T-piece and square it up to the acetate again. Remove the acetate but keep the T-piece in exactly the same position. It has a non-slip base which helps.


3. Now position your stamp into the corner of the T-piece again and stamp. Your image should be exactly where you want it.

It sounds long-winded but it’s very simple really. I also used it to position the polka dot background exactly where I wanted it.


Stamps: Wild About You (p32), Polka Dots & Paisley (p51)
Cardstock: Barely Banana, Sage Shadow, Whisper White
Ink: So Saffron (elephant – it was too pale in Banana), Barely Banana, Sage Shadow
Accessories: ¼” Grosgrain Ribbon – Whisper White, Stamp-a-ma-jig®

All products by Stampin’ Up! Please email me to order a catalogue, or click the link on the right to view it online.

Friday, 22 February 2008

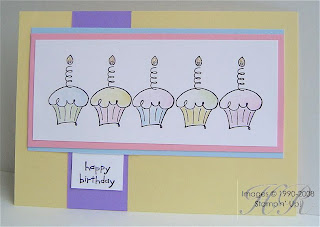
Tasty cakes


As soon as I got my Stamp-a-ma-jig® I knew I had to make a row of fairy cakes. They look so delicious with their coloured cakes and different shades of icing – I wish I could make them look like this instead of the lumpy messes I produce.

I don’t know if you can see it but there’s glitter on the flames. Glitter only in moderation is my motto!

The Stamp-a-ma-jig® is a marvellous tool. I already have a stamp positioner which is in the shape of large T but I've never really got on with it. When I saw the Stamp-a-ma-jig® demoed at the Birmingham Open Night I had to have it! It comes with a clear imaging sheet which you position in the corner of the tool (I can't keep typing its proper name!) and then stamp on. Remove the sheet and use it to position exactly where you want your image on your project. Place the tool around the imaging sheet, then remove the sheet and position your stamp into the corner of the tool. It's hard to explain but I can demo it if you  book a workshop. 

Stamps: Birthday Best (34)
Cardstock: Barely Banana, Bashful Blue, Pretty in Pink, Lavender Lace, Whisper White
Ink: Basic Black
Accessories: Stampin’ Write Markers (p71), Stampin’ Glitter (p82)

All products by Stampin' Up! Please email me to order a catalogue, or click the link on the right to view it online.

The small print

This is my personal blog and my sole responsibility as an Independent Stampin' Up!® demonstrator. All images are © Stampin' Up!® All content including photographs, projects and text are © Helen Read, unless otherwise stated. Please feel free to copy my ideas for your personal use and inspiration - if you are a SU demonstrator you may use these ideas for your events but please give credit where it is due. Please do not use my ideas for monetary gain, competitions or publication. The images on this blog - including blog buttons - should not be copied and used elsewhere on the internet or on CDs.