Combining Stampin’ Up!® stamps and Frosted Forest masks (they’re stencils!) – opens up a world of creative possibilities.
I love the brand new range of Stampin’ Up!® Online exclusives and the stamp set which jumped straight out at me was of course Frosted Forest as I cannot resist any tree-themed craft products.
I love that the Frosted Forest bundle comes not just with a photopolymer stamp set and coordinating dies, but with a set of six fabulous masks, which I personally would call stencils.
I had a fun craft session creating projects with this gorgeous Frosted Forest bundle. Take a look at the three very different cards I made, then check out the rest of the Stampin’ Up!® Online Exclusives here:
Stampin’ Up!® Online Exclusives
My first card has a pretty watercolour background which was left over from a baby card I made last month.
I mounted this onto some Stampin’ Up!’ Early Espresso cardstock and an Old Olive card base.
The image was such fun to create using the Stampin’ Up!® Frosted Forest bundle. The masks/stencils make colouring the image so easy. I began with Early Espresso for the trunk and branches, then added some green using a dirty blending brush which was already inked up, then some Garden Green on top. I cut it out using the coordinating Frosted Forest dies and mounted it onto the watercolour panel.
All it needed then was a stamped bird and a greeting. I used Simply Said as I wanted a long birthday greeting which I stamped in Early Espresso and finished off with some torn Early Espresso cardstock.
Inside I stamped one of the beautiful greetings from Frosted Forest, with the little bird again, both in Early Espresso.
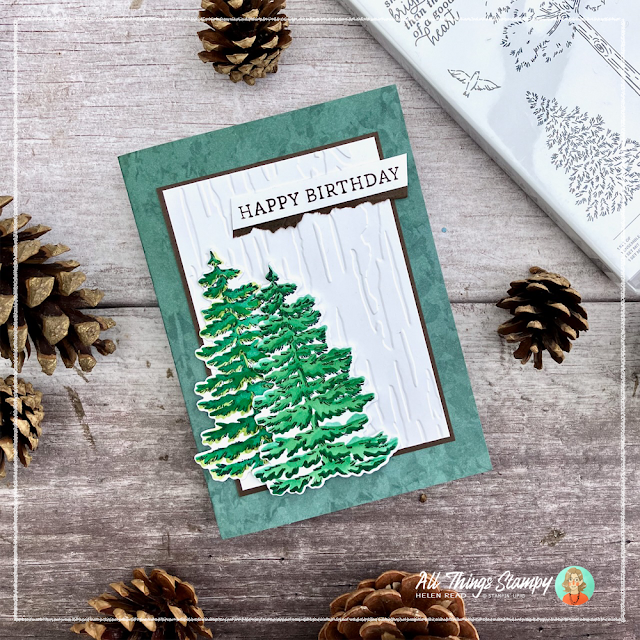
The second card was the result of experimenting with different greens to colour the pine tree. I was playing around with dirty blending brushes, Old Olive, Garden Green and Shaded spruce to come up with these two, which I cut out using the Frosted Forest dies.
The card base is covered with Designer Series Paper. Do you recognise it? It is one of the plainer reverse patterns from Perennial Lavender Designer Series Paper pack, which happily has carried over into the current Annual Catalogue.
The white panel is embossed in a brand new, as yet unavailable, embossing folder which will be released in the upcoming Mini Catalogue in September. I was able to purchase it early for a special demonstrator-only crafting event.
Once again I stamped Happy Birthday using Simply Said and finished it off with some torn Early Espresso cardstock.
My third and final Frosted Forest card is very simple. Again I was playing around with different greens with the Frosted Forest masks and created this densely coloured small pine tree.
This is die-cut and popped up onto a Note Card, and finished off with a stamped bird and a simple greeting, both from the Frosted Forest stamp set.
I hope you enjoy my Frosted Forest projects and are inspired to have a go at using these fun masks (they'll always be stencils in my mind!).
Frequently asked questions
Do I have to shop online to buy Stampin’ Up!® Online Exclusives?
Not at all. The name simply means you will only find them online, but you can shop directly with your Stampin’ Up!® demonstrator as normal. If you’re in the UK simply get in touch and I will happily place the order for you if you prefer.
How do I ink through a Stampin' Up!® mask?
It's easy to ink your project using Frosted Forest masks – or stencils. You can use Stampin' Up!® blending brushes, sponge daubers, a brayer, or even a simple household sponge.
How do I keep my Stampin’ Up!® masks lined up?
It's easy to line up these masks – or stencils. Simply secure them on your paper with some tape, ensuring you always keep the number or letter in the same position. Or you can use in a stamp positioning tool such as the sadly now retired Stamparatus.
Do I have to use Stampin’ Up!® masks in a certain order?
Stampin’ Up!® stencils are helpfully numbered so you know which one is which. The Frosted Forest masks contain two sets of stencils so one set is numbered and the other is lettered A, B and C. You don’t have to use them in number or letter order; this just helps you know which colour to use with each one.
How do I clean my Stampin’ Up!® masks?
Just rinse them with water then pat dry with kitchen paper or leave to dry naturally. Make sure they are fully dry before storing to avoid mould, and before using again to avoid smudges.
How does the Frosted Forest stamp set coordinate with the Stampin’ Up!® masks?
Three stamps in the Frosted Forest stamp set fit perfectly on top of your stencilled images These are the three trees images.
Do I need Frosted Forest masks if I buy the stamps or bundle?
You don't need the masks; you can always colour the images using your chosen method. The masks add depth of colour and are of course very fun to use.


No comments:
Post a Comment
Thank you so much for taking the time to comment.