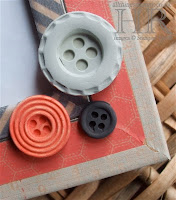
Have you seen the new clay yet? It’s
enormous fun – like playing with Plasticine! Here’s my first clay project – a picture
frame decorated with Epic Day washi tape and embellished with buttons.
These are the first buttons I made with the
clay and it was a steep learning curve. So I’ll tell you what I did and then
you can read the tips below to avoid some of my problems.
- The large button was coloured with two drops of Crumb Cake reinker.
- The medium button was an attempt to colour with a Calypso Coral marker but it came out more like Crisp Canteloupe… so I coloured directly on to the button with the marker afterwards. This made it a little blotchy.
- The smallest button was coloured with a drop of Basic Black reinker. I foolishly didn’t use gloves – and it took more than a week for my fingers to lose the stains! You can also see some rough edges on this one as I trimmed it after taking it out of the mould. See below for how to avoid this.

If you haven’t yet seen this clay, I have
to tell you that it’s like no clay you’ve ever seen before.
- It’s very white, so you need super-clean hands before you start working.
- It’s very lightweight, too, so excellent for posting, although you’ll still have to watch out for the bulk.
- When it dries, it doesn’t set hard like plaster, more soft and rubbery like, er, rubber.
- It takes up colour very well and you can colour it various ways.
Colouring your clay:
- Only colour small amounts at a time. It’s easier and you won’t
be left with a load of one colour that you might not get round to using
for a while.
- The easiest method is to use a couple of drops of reinker. Make
a well in the centre and knead it together well.
- You can also take a piece and swipe it along the inside of an
ink pad lid. Don’t put it directly onto the ink pad itself.
- You can attempt to colour the clay using markers but it’s not
ideal, as it takes ages. You can, however, colour the finished shape with
markers.
- You can even mix glitter with your clay for a sparkly effect!
Making the shapes:
- Roll a small piece of clay into a small ball and press into the
mould. If you have lots of excess around the edge, I find it best to
remove this, ball up the clay again and press it in again. You CAN trim
off the excess when it’s dried, but it doesn’t look as good. You are
aiming for there to be no overlapping clay on top of the mould.
- To speed up the setting process, put the mould into the freezer
for a couple of minutes. This will make it easier to pop the shapes out of
the mould. Don’t worry if you
forget – I left one in for over a week once!
- The flowers are easier than the buttons, because the buttons
are such precise shapes. You may wish to leave the buttons in the freezer
a little longer.
- Don’t worry if you don’t have access to a freezer; your shapes
will just take a little longer before you can remove them from the moulds.
- Leave them on a flat surface to air dry.
- As mentioned above, the finished shapes will not be hard like
clay – they will be more like a soft eraser. Once dry, they can be cut
with scissors (eg if you want to trim off any excess), sanded down (for the
same reason) or coloured with markers. For a shiny surface, you could coat
them with Crystal Effects.


I thought the clay and moulds looked like they might be fun and now I'm convinced, they look fab and funky!
ReplyDelete