Wednesday, 31 July 2013

Tips for using clay and moulds


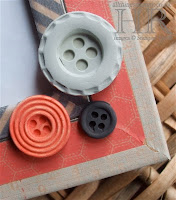
Have you seen the new clay yet? It’s enormous fun – like playing with Plasticine! Here’s my first clay project – a picture frame decorated with Epic Day washi tape and embellished with buttons.

These are the first buttons I made with the clay and it was a steep learning curve. So I’ll tell you what I did and then you can read the tips below to avoid some of my problems. 
  • The large button was coloured with two drops of Crumb Cake reinker.
  • The medium button was an attempt to colour with a Calypso Coral marker but it came out more like Crisp Canteloupe… so I coloured directly on to the button with the marker afterwards. This made it a little blotchy.
  • The smallest button was coloured with a drop of Basic Black reinker. I foolishly didn’t use gloves – and it took more than a week for my fingers to lose the stains! You can also see some rough edges on this one as I trimmed it after taking it out of the mould. See below for how to avoid this. 
If you haven’t yet seen this clay, I have to tell you that it’s like no clay you’ve ever seen before.

  • It’s very white, so you need super-clean hands before you start working.
  • It’s very lightweight, too, so excellent for posting, although you’ll still have to watch out for the bulk. 
  • When it dries, it doesn’t set hard like plaster, more soft and rubbery like, er, rubber.
  • It takes up colour very well and you can colour it various ways. 

Colouring your clay:

  1. Only colour small amounts at a time. It’s easier and you won’t be left with a load of one colour that you might not get round to using for a while.
  2. The easiest method is to use a couple of drops of reinker. Make a well in the centre and knead it together well.
  3. You can also take a piece and swipe it along the inside of an ink pad lid. Don’t put it directly onto the ink pad itself.
  4. You can attempt to colour the clay using markers but it’s not ideal, as it takes ages. You can, however, colour the finished shape with markers.
  5. You can even mix glitter with your clay for a sparkly effect! 
Making the shapes:

  1. Roll a small piece of clay into a small ball and press into the mould. If you have lots of excess around the edge, I find it best to remove this, ball up the clay again and press it in again. You CAN trim off the excess when it’s dried, but it doesn’t look as good. You are aiming for there to be no overlapping clay on top of the mould.
  2. To speed up the setting process, put the mould into the freezer for a couple of minutes. This will make it easier to pop the shapes out of the mould.  Don’t worry if you forget – I left one in for over a week once!
  3. The flowers are easier than the buttons, because the buttons are such precise shapes. You may wish to leave the buttons in the freezer a little longer.
  4. Don’t worry if you don’t have access to a freezer; your shapes will just take a little longer before you can remove them from the moulds.
  5. Leave them on a flat surface to air dry.
  6. As mentioned above, the finished shapes will not be hard like clay – they will be more like a soft eraser. Once dry, they can be cut with scissors (eg if you want to trim off any excess), sanded down (for the same reason) or coloured with markers. For a shiny surface, you could coat them with Crystal Effects.


Monday, 29 July 2013

Soho Subway - not too distressing


Here’s another Soho Subway card, this time teamed with the new Label Love stamp set and co-ordinating Artisan Label Punch. I’ve sponged some Crumb Cake ink around the edges of the card base and the DSP pieces to add to the distressed look, but not gone too mad – if I was distressing it properly, I’d have crinkled the paper and roughed up the edges, too.  This card is CASEd from Shannon Jaramillo.

Stamps: Label Love
Cardstock: Naturals White, Very Vanilla
Paper: Soho Subway
Ink: Early Espresso, Crumb Cake
Accessories: Artisan Label Punch

Saturday, 27 July 2013

Caturday: itty bitty kittens!


These “itty bitty kitties” are the youngest residents at the cat shelter and, now that they are moving around, we can see just how cute they are! There are four of them and their mother, Bella, has been working really hard to feed them. So hard that she is most definitely having to eat for five!

This is how the kittens were last weekend; eyes open and beginning to become inquisitive. They were a little wobbly on their legs so I’m looking forward to seeing how they’ve developed, as they’re changing so fast!

And then Bella is pictured with one of her kittens a couple of weeks ago, before their eyes even opened. 

Busy weekend this weekend. Today I’m off to Studio 61 at Holloway, near Matlock, to take part in an Art Boot Sale with the last few bits of my retired craft products. I’ll be there from 2pm-4pm.

Tomorrow it’s the Woodland Nook Cat Rescue fundraiser from 10am-4pm. This will include barbecue, cakes, stalls and, of course, tours of the shelter (although I don’t think they’ll let you into the kitten section). If you want to pop along and have a look at this remarkable and fabulous cat shelter, it’s at 27 Delves Bank Road, Swanwick, near Alfreton.

Hope to see you at one or both of these events!

Friday, 26 July 2013

Soho Subway triptych


I LOVE this paper – it’s one my absolutely favourite sets in the new catalogue. It’s called Soho Subway and has all the elements I really like in a paper; it’s dark and “dirty”, it has maps, letters, woodgrain… what more could you want?

Here I’ve CASEd a card by Amy Storrie, who cleverly embossed hers with the Woodgrain embossing folder. I left mine plain for speed and decorated it with a simple flag and button.

Stamps: Happy Day
Cardstock: Naturals White, Very Vanilla
Paper: Soho Subway
Ink: Early Espresso
Accessories: Naturals Buttons, Linen Thread

Wednesday, 24 July 2013

Flower Shop get well card


One of my team is currently out of action, following an operation. She is a big fan of flower cards, so I decided to climb out of my comfort zone and make her something pink, floral and pretty.

I stamped the background using Flower Shop, masking each image in turn (I missed one – can you spot it?). To do this, I punched the flower from a piece of scrap paper and used my Tombow as a temporary adhesive (just let it dry before using) to create a mask. I coloured them using Primrose Petals ink and blender pen.

I stamped and coloured a couple more flowers using Raspberry Ripple ink and blender pen – I wanted these to stand out more. I curled them slightly (bet they go flat in the post though) and stuck them on.

Here’s a secret: I stamped “Get Well Soon” at the top left but didn’t use the Stamp-a-ma-jig. So it was VERY wonky. But, as we all know, there are NO mistakes in rubber stamping, so I simply stamped it again and cut it out using the Bitty Banner framelits. She’ll never know!

This stamp set and punch bundle is proving REALLY popular. People love flower stamps, they love co-ordinating punches, so this one was sure to be a winner. To avoid frustration when using it for the first time, I strongly advise you to watch THIS video. 

In other news, time is running out to order my ribbon shares. More details in THIS post. The shares are an excellent way to build up your supplies without breaking the bank, so don't miss out!

Stamps: Flower Shop, Hopeful Thoughts
Cardstock: Pink Pirouette, Raspberry Ripple, Primrose Petals Core’dinations, Whisper White
Ink: Black Stazon, Raspberry Ripple, Primrose Petals
Accessories: Pansy Punch, Bitty Banner framelits, blender pen

Tuesday, 23 July 2013

Storytime Friends baby card


For the past month, the gender of the royal baby has been inevitable… because my former colleague, Jonny, and his wife, Laura, had a baby boy. Why inevitable? Because the couple are living parallel lives with the Duke and Duchess of Cambridge.

Not totally parallel, obviously – Jonny and Laura don’t do many state visits. Nor did people camp outside the hospital waiting for news. But they got married at around the same time, and then produced their first-born at roughly the same time. Ok, not very parallel at all – but there were at least commemorative tea towels made for both weddings!

So today seems the right time to show you the baby card I made for Jonny and Laura. There’s only one new product on this one, just a clean design and some soft, gentle colours.

I’ve employed the Simply Scored tool here to add a bit of interest around the edges of the Whisper White panel. Colouring was kept to a minimum – just a little So Saffron around the edges of the lamb, a little Pear Pizzazz on the grass and a tiny amount of Pool Party around the outside edges of the lamb for shading.

Stamps: Storytime Friends, Happy Day
Cardstock: Pool Party, Pear Pizzazz, So Saffron, Whisper White
Ink: Black Stazon, Pool Party, Pear Pizzazz, So Saffron
Accessories: Blender Pen, Paper Doilies, Simply Scored

Monday, 22 July 2013

Flower Shop with Chalk Talk framelits


I always get nervous making cards for my Canadian cousin, Leslie. For a start, she taught me almost everything I know about stamping, so I feel I need to impress. And then she has a very different style to me. She likes cute images and busy designs, the complete opposite to me.

A few years ago, she moved away from this style, just as I was moving tentatively towards it and, for a few glorious months, we met in the middle … then we both reverted to type!

So making Leslie’s birthday card was a challenge and, I’m afraid, in the end, it was just too hot to do anything clever. The result was some experimentation with a new colour combo and my new Chalk Talk Framelits. Ok, I admit it, I panicked and just made “a card”, instead of a “wow”.

Love these Framelits though – this one is like an oversized bread tag. Do you still get those plastic bread tags? I’ve not seen one for years.

Stamps: Flower Shop, Happy Day
Cardstock: Soft Sky, Baked Brown Sugar, Pistachio Pudding, Whisper White
Ink: Soft Sky, Baked Brown Sugar, Pistachio Pudding
Accessories: Chalk Talk Framelits, Pansy Punch, Hexagon Embossing Folder

PS: To Sooty, who commented yesterday that she though I’d be at Convention... I can't reply direct to you but here's the explanation: I’m in the UK and Convention is in the USA. Some of the top achievers are going, as an extension to the incentive trip. But I’m not one of the top achievers, unfortunately!

Saturday, 20 July 2013

Caturday: Lady

I'm back - it was lovely to see some of my regulars - and some new faces, too. Lots of craft supplies have been rehomed but there are still lots to go! Am exploring other avenues to get rid. Will keep you posted.

Let's not forget that it is Caturday. Received some very sad news last weekend about Max, who died on the road outside his house. His owners, neighbours and friends are understandably devastated. He was a gorgeous creature and at least he had the freedom to enjoy lots of catty adventures.

Meanwhile, here's a friendly face from the cat shelter. Her name is Lady and she shouts A LOT.


Craft Sale TODAY

It's my craft sale this morning, when I sell off my retired and remaining non-SU items, so please come along to

Craft Sale
Royal British Legion
Main Street 
Horsley Woodhouse
10am-noon.

(If you arrive early, I'm afraid you will have to wait outside or in the foyer for this one.)

Be there or be sorry you missed the bargains!

Tea/coffee and biscuits will be available in return for a donation to Woodland Nook Cat Rescue. And there will be a craft tombola in aid of the same great cause.

I'll be back later with Caturday and to report back.

See you soon!

Thursday, 18 July 2013

Alphabet Press masculine card


Ask almost any cardmaker which cards they struggle with the most and they will answer “masculine”. For me, masculine doesn’t present quite as much of a problem as “young masculine”. This is for my nephew, who turned 11– not an easy age to make a card for, unless you’re willing to find out what the latest fad is and get busy with some punch art.

So I went with the gorgeous new Alphabet Press embossing folder, used on Early Espresso Core’dinations cardstock and sanded slightly. I added a greeting on a panel made with the Chalk Talk Framelits and sponged the edges with Crumb Cake ink.

But it was still missing something. Aha! A finger! Vintage, masculine and suitable for almost any occasion. Love it.

Oh, by the way, inside the card it says “{YOU} Happy Birthday”

Stamps: Morning Post Alphabet, Remembering Your Birthday
Cardstock: Soft Suede, Soft Sky, Early Espresso Core’dinations
Ink: Soft Suede, Crumb Cake
Accessories: Alphabet Press embossing folder, Chalk Talk framelits, Natural Trim

Wednesday, 17 July 2013

Ribbon shares - order yours now!


I know I’m a little late to the party with this but I am running THREE shares, purchasing at the beginning of August.

Shares are a fantastic way of getting a little bit of everything. I appreciate that not everybody wants nine metres of ribbon. Or you may be struggling to decide between three or four colours and not be in a position to buy them all in one go.

Details are as follows:

Chevron Ribbon Share
- Chevron Ribbon: One metre of each colour (12 in total).
Price: £11 if you can collect from me. £12 if you require it posting.

In Color Share
- Ruffle Stretched Trim: One metre of each of the new In Colors
- Boutique Details: Five embellishments – one in each of the new In Colors
- Core’dinations Cardstock: One 12x12 sheet of each of the new In Colors
Price: £9 collected; £10 posted

Other New Ribbon Share (snappy title, eh?) 
In a slight change from my newsletter which I sent out yesterday, this will include the following:

- 3/8” Taffeta Ribbon – Pear Pizzazz: TWO metres
- 1/8” Taffeta Ribbon – Melon Mambo: ONE metre
- 1/8” Taffeta Ribbon – Bermuda Bay: ONE metre
- Seam Binding Ribbon – Soft Sky: TWO metres
- Stitched Grosgrain Ribbon – Blushing Bride: TWO metres
Price: £5 collected: £6 posted

The reason for the change is that I accidentally missed out the Bermuda Bay ribbon. To keep the price the same, I am including just one metre of each of the 1/8” taffeta ribbons. Alternatively, you may go for two metres of each and pay an extra £1. So it would be £6 collected, £7 posted.  Sorry about the confusion!

NB: These shares are not available as part of any workshop or club order.

Please email me ASAP if you’d like to take part. 

Monday, 15 July 2013

Soho Subway journal


Everyone loves a journal, don’t they? And I love decorating journals. So, as soon as I saw this gorgeous Soho Subway paper, I knew I wanted to cover a journal with it.

I couldn’t find any ribbon wide enough to cover the spine, so improvised by using the cotton tape sideways. I think it works quite well, and solves that problem nicely. You can’t see any of the grey of the original journal at all now. There's always a way...

To colour the main Postage Due image, I had to improvise again, as I don’t have a Crumb Cake marker. I began by inking the whole stamp with Crumb Cake, then cleaned off the flower, bike and 3 with a cotton bud, before reinking them with the markers that I do have. A quick “huff” and it was as good as new! As I say, there’s always a way...

I wasn't sure what word to put on the front, but felt it needed one. I eventually settled on “stuff’ as I’ll probably just write “stuff’ in it!

Products used are a mix of old and new as I only had my pre-order when I made this. But if you like it, we can hold a class to make something similar. Just let me know!

Stamps: Happy Day, Postage Due
Cardstock: Summer Starfruit (inside), Early Espresso, Very Vanilla
Paper: Soho Subway
Ink: Early Espresso, Crumb Cake
Accessories: Cotton Tape, Cute clips, Postage Punch, Crochet Trim, Vintage Buttons, Linen Thread, Artisan Label Punch, Bigz Alphabet Dies, Paper Doilies

Sunday, 14 July 2013

Crafty Friday projects with Flower Shop bundle (mini colouring tutorial)


The first Crafty Friday was a success, I think. We made two projects using the fab new Flower Shop bundle. This consists of the Flower Shop stamp set and the new Pansy punch. Most exciting of all, shortly after finishing, one of the ladies, Jenny H, became a grandma for the first time – congratulations, Jenny!

The Pansy punch fits all six flowers in the Flower Shop stamp set perfectly… but only if you have it the right way round, so I strongly advise you to follow the instructions in this video by Kay Kalthoff, as it will make your life a lot easier! Kay doesn’t use the optional image labels on her stamp set, but the technique still works with the labels as it shows through.

For this first class, I wanted to go back to basics, so we made this very simple card and a co-ordinating box. It was very relaxing – for me, too, as I simply cut and prepped the cardstock as we went along.

I showed the ladies three different ways of colouring the image. We were using blender pen and Raspberry Ripple ink pad.  You can just colour it, of course, but if you want to add some shading, there are several ways of doing it.

The first is the easiest – and that involves simply following the shading on the stamped image. So I coloured the shaded areas with a darker shade of ink and left the unshaded areas lighter:


Not all stamp images have these markings, though, so I showed them another way, which is pretty simple, too. For this one, you colour around the inside edges of the image first, then get paler as you move towards the centre:


The third, and arguably most complex, colouring method was told to me by my daughter as I was preparing the samples for Friday’s class. She says this will give you the most realistic image. First decide where the light is coming from and draw an arrow on your paper. This will show you which parts of your image will be ligher (receiving the light) or darker (in the shade):


We curled the edges of the flower using a bone folder and I showed the ladies how to make a simple flag (bang on trend, you know!) by cutting down the centre of a strip of cardstock and then from the corner to the end of the cut.

Next we tackled a box – and this is a very simple box made from a full sheet of A4 cardstock. We started by stamping the image all over at random. It’s best to do this before scoring, so that your images aren’t interrupted by the scorelines.
           
To make this box, all you need to know is your seven times table. Score along the length at 7cm from the edge. Turn your cardstock 90º and then score again at 7cm, 14cm, 21cm and 28cm. Assemble as normal. It’s a larger version of the 5-10-15-20 box – there’s a pattern and tutorial here


To tie the top, we pushed in the sides and pinched the top, then held it together with a mini bulldog clip. This made it possible to tie the ribbon around and knot it tightly before removing the clip.

So that was Crafty Friday – looking forward to the next one!

Stamps: Flower Shop, Sweet Essentials, Remembering Your Birthday
Cardstock: Raspberry Ripple, Primrose Petals, Gumball Green, Whisper White
Ink: Black Stazon, Raspberry Ripple, Gumball Green
Accessories: Stitched Grosgrain – Whisper White, Blender Pen

Saturday, 13 July 2013

Caturday: Gorgeous Grace


Yesterday was my first Crafty Friday and we have a very relaxing morning, crafting in the sunshine with the French windows open. I’ll show you what we made tomorrow because today is, after all, Caturday, which is why we have the gorgeous Grace. Isn’t she beautiful? Playful, inquisitive and very affectionate... although she doesn't like to be picked up. 


Thursday, 11 July 2013

Butterflies and washi tape


How could these little butterflies resist the colourful charm of the Gingham Garden washi tape? I know I couldn’t. Did you know that yellow is one of my favourite colours? It always has been and yet my friend and downline Alison was absolutely staggered by this discovery recently. Very strange.

This card was copied from one made by Lisa Curcio, who confesses that she CASEd it from her downline, Jennifer Timko. I love the fact that the idea has been copied, adapted and is now making its way around the world. 

Hmmm... you can tell I made this a while ago as I've just been outside to take a pic of another project in the same spot, and those flowers are all brown now. Shame. 

Stamps: Happy Day
Cardstock: Daffodil Delight, Whisper White
Ink: Island Indigo
Accessories: Gingham Garden Washi Tape, Basic Rhinestones, Bitty Butterfly

Monday, 8 July 2013

Washi tape tip


Morning! And to my UK readers, what a glorious weekend that was, wasn't it? In between my manic weekend, I did manage to pull in a bit of sitting in the garden (in the shade, obviously, as I fry instantly in the sun) and some harvesting... as we have a bumper strawberry crop this year. 

While sitting in the shade, I did do a fair bit of worrying about my cat shelter fundraiser. Lots of people have told me they want to come to this... but not many have booked so far and I need to order the supplies very soon. I do blame myself, of course, as I didn't release details early enough. Too busy enjoying my new products. But anyway, if you could register for this event, I'd be enormously grateful (and so would the cats!). Just click here... 

On to today’s projects... and don’t you go thinking that I’ve forgotten all about washi tape. Oh no, it’s always there in the back of my mind, or being stuck to something new.


This is one of the techniques I showed at my catalogue launch. I learned it at Stampin’ Up!® Regionals but, again, I’ve forgotten who did the demo. How bad is that? I hope someone will enlighten me.

So this talented lady (it was Charlotte Harding from the European head office in Frankfurt - thanks to Val, who must have written everything down or has a better memory than me!) showed us how to use washi tape and said we should always make sure to save our little offcuts and stick them on a piece of scrap cardstock. To say I was sceptical would be an understatement.

But then she did “the big reveal” and punched out a shape from the scraps, just as I have done here with these cute little butterflies. Waste not, want not!

Stamps: Happy Day
Cardstock: Melon Mambo, Whisper White, Daffodil Delight
Ink: Melon Mambo
Accessories: Gingham Garden washi tape, Bitty Butterfly Punch, Scallop Edge Punch, Rhinestones

Saturday, 6 July 2013

Caturday - Poseidon


WHY is this beautiful cat still languishing at the shelter when he could be somebody’s pet? His name is Poseidon and he has an almost identical brother called Pan. They are really elegant cats – probably because they came over from Crete, where they seem to make cats longer and thinner.

I think the problem for Poseidon and Pan is that they are quite shy, so they tend to hide from visitors to the shelter. But, once they trust you, they are really affectionate and sweet. Go on, you know you want them!

Talking of cats, if you're planning to come to the Fur and Feathers workshop, please do register ASAP as I have to order the products soon. I have some cute projects planned and £5 from every admission will go to the cat shelter. There will also be a craft tombola - now that sounds a lot more fun than winning a tin of beans, doesn't it?

Friday, 5 July 2013

Shabby Soho Subway mosaic card


I finally managed to get round to putting in my first order last night. And did I stick to my wish list? No, of course I didn’t. Does anybody ever do that?

I had some free stamp sets to redeem thanks to a bumper Sale-a-Bration (demonstrators are rewarded for sales and recruiting with free stamp sets during SAB)

*** If anyone heard shrieking in the Amber Valley area just now, that was me… one of the cats brought a bird into the house, just like it was a normal, everyday thing to do. He’s never done that before. ***

Anyway, back to stamping.. and relax.

So on my list of stamps to get, I have Chalk Talk, Gorgeous Grunge (desperate for this one!), Tape It, Giggle Greetings (with a question mark), World Map, Wetlands, Remembering Your Birthday and Sketched Birthday. I don’t have many sets left after the new catty clearout, so I can justify a lot, eh?

So what did I order? Chalk Talk, Wetlands, Remembering Your Birthday and Flower Power Shop (thanks, Kathy!) Flower Shop? That wasn’t even on the list! But… but… but… it has a co-ordinating punch! And we all know how much we love a co-ordinating punch. And WHY didn’t I get Gorgeous Grunge, when I’m so desperate for it? All I can say is I DON’T KNOW!!!

But those lovelies aren’t even on their way yet, so back to today’s project, which I shamelessly CASEd from Sera Lewis at Pink Paper Bakery.  It has lots of elements which please me, from the Summer Starfruit background (love that colour) to the Soho Subway paper (have I mentioned that I LOVE that paper? Probably) to the dirtiness around the edges, which I achieved with a sponge dauber and some Crumb Cake ink.

Hope you like it – and thanks to Sera for the inspiration!

Stamps: Happy Day, Mosaic Madness
Cardstock: Summer Starfruit, Shimmery White
Paper: Soho Subway
Ink: Crumb Cake, Early Espresso
Accessories: Msoaic Punch, Sponge dauber

Wednesday, 3 July 2013

Grab Your Greetings promotion and Virtual Hostess Club update


There’s great news for those who want to stock up on greetings stamps. During July, you can purchase three sets at 25% off in the new Grab Your Greetings promotion: They are: 

Sassy Salutations (page 39)
Wood-mount:
132070
Normally £20.95
offer price £15.75
Clear-mount
126707
Normally £16.95
offer price £12.71

Sweet Essentials (page 41)
Wood-mount:
132085
Normally £17.95
offer price £13.46
Clear-mount:
126457
Normally £13.95
offer price £10.46

Petite Pairs (page 73)
Wood-mount: 
128706
Normally £25.95
offer price £19.46
Clear-mount:
122497
Normally £20.95
offer price £15.71

The French and German translated sets are also available as part of the offer but are not listed above. The prices are the same; see catalogue for codes.


The other great news is that my Virtual Hostess Club will be going ahead, starting this month, although I do still have one place left if you’d like it! Sorry that I didn’t have time to email everyone yesterday – had a really busy day. Will try this evening if I get chance.  and there’s no let-up likely until Friday.

So, let’s try something new. If you are in the Virtual Hostess Club, please email me with your first and second choice of months to be hostess. I will try my best to please everyone (and we know that’s always a plan doomed to failure!).

If you are NOT in the Virtual Hostess Club and would like to be, please email me ASAP and I will allocate that final place on a first come, first served basis. More details can be found HERE

Tuesday, 2 July 2013

Tutorial: Selective Faux Watercolour... plus new catalogue goes live

Today is the day that the brand new 2013-14 Annual Catalogue goes live! Whoohoo! So, for those who don't already have a shiny new hard copy, here is the link to the online version. Get your pencils sharpened and your wish lists ready, because it's packed with fab products!


And now, as promised, is the stepped up version of yesterday's technique, as illustrated in the finished card, above. My friend Kelly and I were having a play the other day and decided to elaborate on the faux watercolour technique using a new stamp, Wildflower Meadow. This is a big background stamp, designed to cover the whole of your card base. There are loads of ways to use it – and it has a co-ordinating embossing folder, too. I call this new technique the...


Selective Faux Watercolour Technique

Supplies are the same as yesterday but I used stronger colours so that they’d show up in the photos. Paler colours are arguable nicer.

 1. Begin by placing your clear block on top of your stamp, with the rubber facing upwards.

2. Roughly colour the image – I scribbled Pool Party around the top corners, then followed the lines of the stems and leaves with Old Olive, adding rough flowers in Primrose Petals. 


The photo shows a double effect – this is merely the effect of the block; I only drew one image!


3. As with the technique shown yesterday, spritz the image with water.


4. Again, “stamp” onto Whisper White cardstock but this time don’t press down. If you do, you’ll lose what semblance of definition you had and all the colours will blend into each other. Of course, that’s an effect you may wish to achieve – it’s pretty random, this technique. Be patient. You need to wait for the water to be absorbed into the paper.


5. As with the other technique, lift when there is no longer any resistance from the paper and allow to try thoroughly. You’ll end up with something like this … or not. Really, you get different results every time and you may need to be prepared to sacrifice some cardstock to the cause, until you’ve worked out the best number of water squirts and the best soaking in time. 


6. Finally, decorate as you wish. I've cut out some flowers and and the bird and popped them up. As you can see, I didn't colour the bird area this time round, because I thought it looked a little odd on my first effort.  


Markers used in tutorial: Raspberry Ripple, Pool Party, Old Olive
Ink pads used in tutorial: Island Indigo, Raspberry Ripple

Supplies used in finished card (top)
Stamps: Wildflower Meadow
Cardstock: Raspberry Ripple, Whisper White
Ink: Island Indigo, Raspberry Ripple
Accessories: Wildflower Meadow embossing folder, Stitched Satin Ribbon - Raspberry Ripple, Vintage Faceted Buttons, Basic Rhinestones


The small print

This is my personal blog and my sole responsibility as an Independent Stampin' Up!® demonstrator. All images are © Stampin' Up!® All content including photographs, projects and text are © Helen Read, unless otherwise stated. Please feel free to copy my ideas for your personal use and inspiration - if you are a SU demonstrator you may use these ideas for your events but please give credit where it is due. Please do not use my ideas for monetary gain, competitions or publication. The images on this blog - including blog buttons - should not be copied and used elsewhere on the internet or on CDs.