Monday, 31 January 2011
Ladybird treat holders
This was another of the punch projects we made at my recent Punch Pals class. By the way, there are still lots of places on my forthcoming classes - I picked a duff date and lots of my regulars can't make it, so why not come along and try it? We're in the Amber Valley area, about 20 mins from Derby
I totally CASEd this from this project I found on the internet.
It’s a little favour box which you can fill with anything red – perfect for Valentine’s Day! As you can see, I haven’t got round to filling it yet. You pull the head out to reveal a circular hole at the back, so you can fill it and, of course, empty it again.
The body is made from two circles of about 2”. I used a die-cutting machine to make these but you could draw around a small cup or similar. In the centre of one of the circles, punch a 1 ¾” circle. To find the centre, I punched first from scrap paper and use this to stick on the larger circle as a template. This shows you exactly where to punch to create an even border.
In the other 2” circle, we punched a 1” circle from the centre. Again, we punched a 1” circle from scrap paper first and laid it on the large circle as a guide.
The head is a 1 ¼” circle of black cardstock. Next take the black cardstock you’ve left behind and punch a narrow crescent shape from it with the same circle punch. You can cut this in half to create two antennae.
The head is attached to a large tag punched in red. This is the loose part which pulls out.
The important thing to remember for this project is this: when you peel off the backing from the treat cup, you must leave some of the backing behind. The cup does not need to be stuck all the way round – there must be a gap for the head/tag piece to slide in and out.
Cardstock: Real Red, Basic Black, Whisper White
Punches: 1 ¾” circle, 1 ¼” circle, ¼” circle (retired)
Accessories: Sweet Treat Cup, Black journaling pen
All products by Stampin' Up!®
Thursday, 27 January 2011
Still using Kelly's stamps...
“So what other stamp sets have you brought with you then?” I asked Kelly at our stamping session recently. Great news: she had For Everything with her! Another set I’ve been hanging my nose over but resisted... so far.
So I made this card, with beautiful Marina Mist and Early Espresso – gorgeous colour combo! The main images are stamped in Early Espresso and coloured with blender pens, picking up ink from ink pad lids.
Stamps: For Everything
Cardstock: Marina Mist, Early Espresso, Whisper White
Ink: Early Espresso, Marina Mist
Accessories: Scallop Trim Border punch, blender pens
All products by Stampin' Up!
Tuesday, 25 January 2011
Phone fixed!
Phone line fixed, hurrah! Actually the BT man had fixed it by 8.30am yesterday but I had a really busy day and then discovered that my internet connection was so slow and erratic that I gave up trying to use it. I did manage to pull in a little bit of crafting with my lovely downline Kelly, but neither of our mojos were flowing yesterday for some reason! Still, the biccies were nice...
Onto today’s project... I know this set is called Sweet Summer but it makes me think of spring, so I dug out springy Bashful Blue cardstock and lovely Certainly Celery ribbon from the Subtles Collection. But I do like a dark colour so I couldn’t help teaming them with Early Espresso, just to give the card a bit of “weight”.
Want this lovely set for free? You know what to do...
Stamps: Sweet Summer (SAB), Sincere Salutations
Cardstock: Bashful Blue, Whisper White, Early Espresso
Ink: Early Espresso, Certainly Celery
Accessories: ¼” Grosgrain Ribbon - Certainly Celery, blender pens, Scallop edge punch
All products by Stampin' Up!®
Saturday, 22 January 2011
No email shocker!
I am typing this from my Mum's but I just wanted to let everyone know that our phone line is dead at home so I cannot read or reply to my emails. However, if you phone me, your call will be diverted to my mobile at no extra charge to you.
Sorry for any inconvenience.
Spotlight on... Punch Bunch
Look at this gorgeous stamp set - isn't it cute? Each one of these stamps fits inside one of our punches, hence the name: Punch Bunch.
You can't buy this set, as I'm sure you're aware by now. But you can earn it for FREE if you place a £45 order.
Don't know what to buy? Or, at least, open to suggestion? Good news! I have put together a list of co-ordinating products for each of the Sale-A-Bration stamp sets. Each shopping list comes to £45 or just over, so you can add the stamp set for free.
Please click here to view the document - it should open as a PDF in Google Docs.
PS: If you're a UK demonstrator, please feel free to print off and use this flyer in your own classes and workshops. Please also feel free to direct people to my blog!!!
Thursday, 20 January 2011
A hint of In Color
I had a lovely Bank Holiday Monday at the beginning of the month, stamping with some of my crafty friends. And one of the best things about crafting with friends is seeing what they are making and borrowing their supplies!
I couldn’t help noticing that Kelly was using all In Color cardstock... which is something I haven’t used yet. Of course, when Kelly uses something, everybody wants it because she makes such lovely projects, so I scrounged a piece of Peach Parfait to team with Old Olive and Pretty in Pink. She had the markers with her, too, so I could colour the toadstools (from Kelly’s Funky Four set) individually. Oh, and I borrowed her punch, too!
Stamps: Funky Four
Cardstock: Old Olive, Peach Parfait, Certainly Celery, Whisper White
Ink: Old Olive
Accessories: Scallop Trim Border Punch, In Color Markers, Old Olive marker, ¼” taffeta ribbon – Old Olive
All products by Stampin' Up!
Tuesday, 18 January 2011
Roaring success?
Another of my internet finds when searching for inspiration for my Punch Pals class. I got the idea for this clever card from an American demonstrator called Tami White. Here’s her version. Honestly, I’d never have thought of using an upside-down heart to create a lion’s body all on my own! (I did, however, adapt the lion’s face to make him a bit more “fuzzy”)
The biggest trouble I had with this card was finding something small and yellow to fit inside. I could have sorted through a bag of M&Ms, Skittles or similar to find the yellow ones, but I was trying to cater for 12 people at my class and even I’m not that dedicated! I scoured the aisles of several supermarkets, as well as my beloved Home Bargains, and eventually settled on lemon bonbons.
I opened them at the class to discover, horror of horrors, that they were too big! I couldn’t even fit one in! So everyone took their card home to fill later. I gave up looking and used white chocolate chips in the end.
To get to said chips, you open the card to reveal a perforated section which you can poke your finger through to make a hole. This will leave the front of the card unspoiled. We used the cutter kit, which has a perforation tool, but you could easily use your paper piercer to create dotted lines.
So, to the lion at last: his head is created with the Scallop Circle Punch. You attach the scallop circle to a piece of scrap paper and put it back into the punch, twisted slightly so you get this lovely rosette or, in this case, lion’s mane.
The ears are the wings from the bird punch. The face is the largest flower from Boho Blossoms, with one petal cut off. The middle flower from the same punch is punched in Pretty in Pink – you cut two petals off; one for the nose and one for the tongue. The bird punch is used again to create the tail – it’s the branch with all but the end leaf cut off! Punch it again in brown to create the tail tip. I do love this lion!
Cardstock: Daffodil Delight, Early Espresso, Crumb Cake, Whisper White, Pretty in Pink
Paper: Woodland Walk
Punches: Scallop Circle Punch, ½” circle, ¼” circle, Boho Blossoms, Bird, Scallop Trim Border, Large Heart
Accessories: Heart Treat Cup
All products by Stampin' Up!
Sunday, 16 January 2011
Sweet Summer sensations
Remember this card? I made it right at the beginning of this Stampin’ Up! year using brand new stamp sets. It was the Make & Take at my team meeting and at my hostess appreciation event.
After the events, I had a few of the Make and Take kits left over. Usually I take the cardstock and ribbon out and put the pieces in my scraps boxes but this time I’d see what I could do with the “bits”.
I came up with this, using the gorgeous Sale-A-Bration stamp set, Sweet Summer. The images are stamped and coloured in Riding Hood Red - I used the blender pen on the ink pad lid. The bee is stamped twice - once on the Word Window piece and again on some scrap. This saved me having to cut out the antennae as they show underneath the top bee, which is popped up using a tiny piece of a Dimensional.
Would you like this stamp set for free? If so, just place an order of £45 or more and you can have this set – or one of three other exclusive sets which are only available during Sale-A-Bration (ends 28th Feb). And if you fancy a fun evening with friends to banish the winter blues, why not hold a workshop in your home – there are extra hostess benefits available during Sale-A-Bration!
Stamps: Sweet Summer (SAB), Pocket Silhouettes
Cardstock: Crumb Cake, Whisper White, Basic Black
Ink: Crumb Cake, Riding Hood Red
Accessories: Scallop Edge Punch, Word Window Punch, blender pen, 1/8” taffeta ribbon - Basic Black
All products by Stampin' Up!
Friday, 14 January 2011
Punch pals from last weekend's class
As punch art isn’t usually my “thing”, for my class last weekend I had to go Googling for ideas. There are LOADS out there and some of them are spectacular. I’ve seen all the Sesame Street characters, Shrek and Donkey, people, and just about every animal possible. There were too many to choose from so all the class attendees received a handout giving them some more ideas to have a go at later. I’m pleased to report that Angela and Judie at least have had another go.
The pig crops up everywhere, but I know that I found the cat on another UK demonstrator’s blog. It’s Joanne again – she’s very talented, I know you’ll find lots of inspiration on her blog.
Cat
We made him in grey because all the class attendees received a black journaling pen but he’d look just as cute in Pumpkin Pie or Tangerine Tango, if you have a co-ordinating marker to use to decorate him.
It’s important to put the stripes on before you start assembling. The whiskers and eyes can be added at the end.
Basic Gray pieces
Body: 1¾” circle
Ears: 5-petal flower, two petals cut out
Feet: ¾” circle
Tail: Use the 1 ¾” circle again to punch the template left behind by the body
Whisper White pieces
Chest: 1 ¼” circle
Ears: 5-petal flower, two petals cut out – trim these a little smaller to overlay on the grey
Eyes: ¼” circle x 2
Muzzle: ½” circle
Pretty in Pink
Nose: Boho blossoms, two petals cut off together. OR one petal cut from the middle flower.
Pig
It was funny how everybody’s pig looked different, even though we used the same punches. It’s all in the eyes, I reckon.
Pretty in Pink pieces
Body: 1 ¾” circle
Head: 1 3/8” circle
Nose: ½” circle
Tail: ½” circle, cut in a spiral
Feet: Heart to Heart punch – the smallest heart
Ears: Heart to Heart punch – the largest heart
Whisper white
Eyes: ¼” circle (now retired)
All products by Stampin' Up!®
Wednesday, 12 January 2011
An invitation to find out more about Stampin' Up!®
Have you considered becoming a Stampin’ Up!® Demonstrator but something is holding you back? Maybe you are worried about meeting your minimums? Or maybe you feel you won’t have time to pull in lots of workshops?
The good news is, we demonstrators can most probably allay all of your fears about signing up. Your minimums are just £250 net per quarter (that’s about £300 with the VAT). Sign up now and you won’t have to meet your first minimum until the end of June. Yes, JUNE!
As for finding the time, how much you do is up to you. Hold workshops when you like... or don’t hold any at all. It really is that flexible. And, if you decide it’s not for you at some point down the line, there are no penalties to pay and you get to keep the kit.
If you’d like to find more about this exciting opportunity, why not come along to my next team meeting in Derby? It’s at Pride Park on Saturday, 5th February, 9.30am-noon.
We have demonstrations, a make and take, some business talk, the all-important cake (!) and, best of all, the chance to meet up with other demonstrators, bounce ideas off each other and chat.
As we are in the middle of the most exciting promotion of the year – Sale-A-Bration – this is a great time to join us as you can add an extra stamp set of any value to your Starter Kit if you sign up before the end of Feburary. The kit costs £119 and is already worth more than £240; add an extra stamp set and it could be worth over £280!
Please send me an email if you’re interested in finding out more. I’d love to hear from you!
Tuesday, 11 January 2011
Vintage clock
Ooooh, I am going to blow my own trumpet now and say isn’t this gorgeous? I had a lot of fun making this card. It’s certainly not a quick one but it was worth it – I think so, anyway!
I particularly love the sponging and spritzing on the clock face and the lovely flower, which was made using the Fancy Flower punch coupled with the paper crimper, along with some direct-to-paper, sponging and general messing about.
Let me know if you’d like a class on distressing... it will give me an excuse to buy the distressing kit!
You can’t get this ribbon any more - it was from the November/December promotion – but this card would look just as good with the same ribbon in Early Espresso. Ooh, might have to buy some of that, too.
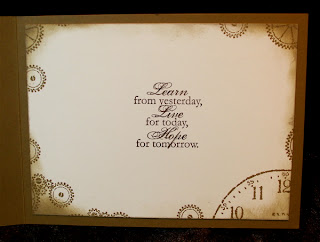
I really pushed the boat out on this one and decorated the inside, too!
Cardstock: Soft Suede, Riding Hood Red, Very Vanilla, Early Espresso
Ink: Soft Suede, Early Espresso, Riding Hood Red
Accessories: Sponge Dauber, Scallop Edge Punch, Fancy Flower punch, Paper Crimper, linen thread, Regals buttons, ¾” circle punch, ½” circle punch
All products by Stampin’ Up!®
Sunday, 9 January 2011
Sarah and Percy and Bill
Yesterday was my first class of the year – and first of all I’d like to say a big THANK YOU to all the ladies who came along, had fun creating with me and, because my usual helper couldn’t be with me, even served the tea and coffee, washed up and tidied up at the end! It was like having magical elves!
I have updated the events page with some more classes, so be sure to take a look. And I promise I won't make you make the tea next time!
We jumped straight in at the deep end for this class with Punch Pals. It was a bit unusual because we didn’t use a single stamp – only punches! Ok, so this card has a greeting stamped on it, but we missed this out at the class as we were running out of time. And no wonder - because we made two cards, a little ladybird treat holder and a couple of other animals to be used on projects at home.
This was one of the cards. These owls are soooooo cute – and I have to hold my hands up here and say they were NOT my idea. As far as I know, they were the creation of Stampin’ Up!® Demonstrator Sarah Makin – you can see her version, here.
Kelly nicknamed these owls, "Sarah, Percy and Bill", after the characters in the gorgeous children's picture book, Owl Babies by Martin Waddell. It was one of my favourite books when our children were tiny, and I'm sure we still have it somewhere even now - it's definitely a keeper!
These cute cardstock owls are really easy to make – you just punch a circle and then feed the circle into the Round Tab Punch and punch again to create the ears at the top. The feet are created by punching the largest flower with the Boho Blossoms punch then cutting it into quarters. You’ll get four feet from each flower.
The beak is one petal from the 5-petal flower punch – just offer it up to the edge of your cardstock scrap and you won’t waste anything! The eyelids are ½” circles, cut in half.
I only discovered this weekend that the ¼” circle punch that I’d used on so many of the projects has been retired! That completely passed me by. But you could use the circles created by the largest hole punch on the Crop-A-Dile as a substitute on this card.
Stamps: Basic Phrases
Cardstock: Pacific Point, Daffodil Delight, Whisper White, Basic Black
Ink: Pacific Point
Punches: Bird, 1 ¾” circle, 1 3/8” circle, ½” circle, Boho Blossoms, 5-Petal Flower, 1/4 “ circle, Modern Label
Saturday, 8 January 2011
Thursday, 6 January 2011
Flower power
“Make that really nice card that Kelly made,” said Alison one afternoon. “Narrow it down,” I said. “You know, the one with the circle and the flower punch...” Nope, can’t remember it. So she carried on bossing me about (sorry, “instructing” me) and eventually we came up with this. A nice card – but not at all like Kelly’s which, when we tracked it down, had a bird on it and pearls in the middle of the circle!
In fact, Kelly’s is a variation of a card in the current catalogue which, as you will see if you turn to page 106, is not very much like mine at all.
Stampin' Up!® are still ironing out manufacturing problems with this flower punch but be sure I will let you know when it becomes available again.
Stamps: Artistic Etchings, En Francais
Cardstock: Cherry Cobbler, Crumb Cake, So Saffron, Pear Pizzazz
Paper: Newsprint
Ink: Crumb Cake, Cherry Cobbler
Accessories: Bird punch, 1 3/8” circle punch, Fancy Flower punch
All products by Stampin’ Up!®
Tuesday, 4 January 2011
Ahoy there!
I have found loads of cards which I don’t think I’ve posted on my blog yet. Don’t know why they’ve slipped through the net. If you’ve seen this before, just pretend you haven’t.
It’s made with Kelly’s Beware Pirates set which I love... but haven’t caved in and bought yet. Maybe I’ll get it free, who knows?
Isn’t it a fun set? And it goes brilliantly with the map paper from the Newsprint collection. This stamp set would made great projects for boys’ birthdays, for pirate parties, for men (there’s a ship in the set)... I have even sent a card like this to a Johnny Depp fan!
Stamps: Beware Pirates
Cardstock: Cherry Cobbler, Basic Black, Very Vanilla
Paper: Newsprint
Ink: Cherry Cobbler, Crumb Cake, Basic Black
Accessories: Taffeta Ribbon - Basic Black, 1 ¾” circle punch
All products by Stampin’ Up!®
Monday, 3 January 2011
Simple sweet summer
It’s been a long time coming – especially considering that I made this ages ago – but here’s my first Sale-A-Bration sample made with Sweet Summer. It’s a really cute set; very pretty, very elegant but quite whimsical, too. You’ll love it, I’m sure!
This is a very simple card – a subdued colour scheme with just a few pearls to add a touch of elegance.
Stamps: Sweet Summer (SAB), Party This Way
Cardstock: Crumb Cake, Cajun Craze, Very Vanilla
Ink: Cajun Craze, Marina Mist
Accessories: Scallop Edge Punch, Pearls, 5/8” Grosgrain Ribbon – Marina Mist
All products by Stampin’ Up!®
Sunday, 2 January 2011
Christmas creations
Look at all these beautiful Christmas cards! I received an unprecedented number of handmade cards this year... every one of them a work of art. They came from family (even *gasp* my Mum – the anti-crafter – made a card this year!!!), from friends, downlines, customers and from my “imaginary” friends across the Pond.
I am really sorry if I’ve missed your creation off the photo but I found at least one (sorry, Hazel!) after I’d packed away the camera, cleared away the black cloth and special lighting.
Most images by Stampin’ Up!®
Subscribe to:
Posts (Atom)
The small print
This is my personal blog and my sole responsibility as an Independent Stampin' Up!® demonstrator. All images are © Stampin' Up!® All content including photographs, projects and text are © Helen Read, unless otherwise stated. Please feel free to copy my ideas for your personal use and inspiration - if you are a SU demonstrator you may use these ideas for your events but please give credit where it is due. Please do not use my ideas for monetary gain, competitions or publication. The images on this blog - including blog buttons - should not be copied and used elsewhere on the internet or on CDs.