Thursday, 30 April 2009
Beside the seaside... and a date for your diary
What a gorgeous set this is – and perfect for honing my blender pen skills in readiness for my May workshop.
Yes in May I finally launch my monthly workshops. They’re at the usual venue (please email for details) and will hopefully eventually take place every fourth Monday of the month, although getting the hall that day every is proving tricky.
So the May workshop will not be on the fourth Monday but on Monday, 18th May, 7.30pm-9.30pm and the topic will be colouring with blender pens. The cost is £5.50 per session, which includes three or four projects (occasionally two, when the projects are larger), all materials, equipment and refreshments (please bring your favourite adhesive). There will also be a Loyalty Card system – earn a stamp on your card every time you attend one of my events for which you pay a fee and, when you have five stamps on your card, you’ll get a free gift of Stampin’ Up!® ribbon, ink pad or cardstock.
If you want to come along, please email me to let me know as payment is required at least a week before the workshop to allow me to buy the supplies. See side panel for dates of future workshops.
But back to this set... isn’t it lovely? I’ve always been a sucker for seaside images so I don’t know how I’ve resisted it for so long. It’s called Seaside and features various shells... more of which you’ll see on projects over the next few days. I coloured the images with Watercolour Wonder™ crayons and blender pens.
The base of this card is made with Kraft cardstock, which I’ve stamped with the Canvas background stamp. I don’t have a Creamy Caramel inkpad (yet!) so used Close to Cocoa, stamped off... ie I stamped it on to scrap paper first. I didn’t want an even stamped effect, so gently laid my card on to the inked stamp then dabbed at the areas I wanted inking, which was round the edges with a bit in the middle. I quite like this shabby look. Then I gently went around the edges of the card using the direct-to-paper technique, which is when you apply your ink pad directly to the cardstock. I was careful, though, as I didn’t want large amounts of Close to Cocoa on it.
A bit of punching, a bit of distressing and that’s about it really. This is a good luck card for someone at work – we have several people leaving this week but one of them is so close to retiring age that, for him, it will just one long holiday... hence the seaside theme.
Stamps: Seaside, Basic Phrases
Cardstock: Kraft, Chocolate Chip, Close to Cocoa, Bordering Blue, Confetti White
Ink: Close to Cocoa, Basic Grey, Chocolate Chip
Accessories: Scallop edge punch, blender pens, Watercolour Wonder™ crayons, linen thread, handheld hole punch
All products by Stampin' Up! Please email me to order a catalogue, or click the link on the right to view it online.
Wednesday, 29 April 2009
Cakes... and a winner
For this card I borrowed a friend’s Crazy for Cupcakes set. It's for a pre-teen girl; a difficult card category, I find, but nobody ever outgrows cakes so I thought I was on to a winner.
Talking of winners, I have some good news for Helen J, of Borrowash, who is the winner of my prize draw. I sent out craft surveys to people on my emailing and snail-mailing list and drew one of the surveys at random (using www.random.org) to find a prize-winner. Helen wins a Botanical Blooms stamp set, which she’ll be receiving shortly.
If you’d like to receive regular updates from me about Stampin’ Up!® offers and events, just email me and say so, and I’ll stick you on the list. And if you’re reading this but receive my updates in the post, please please please send me your email address as I’ve just spent a very laborious couple of hours stuffing envelopes and I'd love to cut that job down a little!
Back to today’s project, here’s the recipe:
Stamps: Crazy for Cupcakes, Basic Phrases, Daily Flexible Phrases
Cardstock: Regal Rose, Close to Cocoa, Very Vanilla
Paper: Sweet Always
Ink: Basic Black, Chocolate Chip
Accessories: Watercolour Wonder™ crayons, blender pens, ¼” Grosgrain Ribbon - Chocolate Chip, scallop edge punch
Tuesday, 28 April 2009
A deer friend from the forest
You weren’t expecting that, were you? The little deer from Forest Friends. I’ll admit I’ve been neglecting the deer but it’s been Easter so the bunny deserved to be used most, right?
But the deer is very cute and really helped to make a quick, easy card for an emergency birthday. I chose an unusual colour combination – with the help of Laura’s fabulous Scraptitude colour combination website. I stamped the deer in Really Rust because it felt like the right thing to do. Then I added some “grass” with a scrap of Sage Shadow because it just happened to be there.
Then I panicked and didn’t know where to go next (as you’ve probably guessed, I’m not much of a “planner” when it comes to cardmaking) so headed to Scraptitude, selected these two colours from the list on the left, clicked “search” and then had several combinations to choose from. I chose Not Quite Navy, as you can see, although I don’t have a Not Quite Navy ink pad (yet!) so compromised with Night of Navy for the word on the tab.
Stamps: Forest Friends, Daily Flexible Phrases
Cardstock: Sage Shadow, Not Quite Navy, Whisper White
Paper: Fall Flowers (retired but still available)
Ink: Really Rust, Night of Navy
Accessories: Round Tab Punch, Scallop Edge Punch
All products by Stampin' Up! Please email me to order a catalogue, or click the link on the right to view it online.
Monday, 27 April 2009
Fresh-cut notes
These little cards are proving to be really popular, as is the stamp set that co-ordinates with them.
The cards are Fresh-Cut Notes, which are 4” square Whisper White cards with the flower cut out of the front. You press out the flower petals (which you can use on another project if you wish) and then embellish the card.
The set that goes with them is Fresh Cuts which, as well as several small stamps (florals and greetings) has one large stamp that’s just perfect to go behind the flower. I have stamped it here on to a square of Whisper White cardstock in Versamark®, then used the Poppin’ Pastels technique to create a multi-coloured effect. I stamped one of the floral stamps inside and one of the greetings on the front.
I embellished the front with a punched-out flower some felt flowers and a silver brad, which is covered with a Glue Dot® and then dipped into glitter.
Stamps: Fresh Cuts
Cardstock: Fresh-Cut Notes, Whisper White
Ink: Versamark®, Pumpkin Pie
Accessories: Stampin’ Pastels, sponge daubers, Flower Fusion felt flowers, silver brads, Dazzling Diamonds Stampin’ Glitter, boho blossoms punch, ¼” Grosgrain Ribbon - Pumpkin Pie
All products by Stampin' Up! Please email me to order a catalogue, or click the link on the right to view it online.
Saturday, 25 April 2009
Soft summer blooms
Thank you to everyone who turned out for the Mini Catalogue launch/open night on Monday – it was very well-attended - I hope everyone enjoyed themselves.
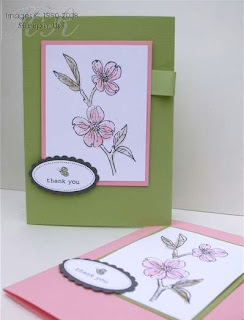
This is what I demoed. It’s not a million miles away from a card I posted previously but I managed to get hold of my friend Alison’s Oval All set so used that with the much-in-demand oval punches.
I demoed the misting technique, which you can read about here, using Watercolour Wonder™ crayons. I then used the Stamp-a-ma-jig® to stamp the outline image over the top in Basic Grey.
The Oval All image is stamped in Basic Grey then the tiny butterfly is coloured in using a Certainly Celery marker.
What you probably can’t see is that I used textured cardstock for the card base. I did the demo twice, once with a Certainly Celery card and once with the Pretty in Pink card that you can see lying down.
Stamps: Soft Summer, Oval All
Cardstock: Certainly Celery, Pretty in Pink, Whisper White, Basic Grey, textured Certainly Celery, textured Pretty in Pink
Ink: Basic Grey
Accessories: Watercolour Wonder™ crayons – Rich Regals, Stamp-a-ma-jig®, 5/8” Grosgrain Ribbon - Certainly Celery, large oval punch, scallop oval punch, Certainly Celery marker
All products by Stampin' Up! Please email me to order a catalogue, or click the link on the right to view it online.
Friday, 24 April 2009
A very late Easter card
This is soooo late – Easter seems like ages ago now. But I just haven’t had the chance to photograph this card and upload it until now. It was the Make & Take for a Stampin’ Up!® party I did just before I went away. It’s that cute little bunny again but I promise I’ll give him a rest for a while now. Well, probably.
The rabbit is stamped in Almost Amethyst above the Easter Wishes stamp in Certainly Celery. The corners were cut using the ½” circle punch and the white piece is layered on to textured Almost Amethyst cardstock.
Stamps: Forest Friends, Seasonal Wishes
Cardstock: Certainly Celery, So Saffron, Whisper White, textured Almost Amethyst
Paper: Tea Party
Ink: Almost Amethyst, Certainly Celery
Accessories: Scallop Edge Punch, ¼” Grosgrain Ribbon - Whisper White, ½” circle punch, Stamp-a-ma-jig®
All products by Stampin' Up! Please email me to order a catalogue, or click the link on the right to view it online.
Wednesday, 22 April 2009
Little notepad cover
At last I have a project to show you, albeit an old one which I never posted. At least I can’t remember posting it – I’m sure someone will correct me if I’m wrong. This is a post-it note holder which I made for a class held by one of my downlines, Alison. She was running a little behind (cough cough) so handed me a bag of bits and said “make something with that please”. This is what I came up with – and I even had some pieces leftover!
The middle, Chocolate Chip, panel is stamped using a small stamp from the Roses in Winter set. It really does not do this beautiful set justice – you can see a better example of what this stamp set can do here.
Stamps: Roses in Winter, Basic Phrases
Cardstock: Chocolate Chip, Rose Red, Bashful Blue
Paper: Patterns Designer Series Paper - Bashful Blue
Ink: Chocolate Chip
Accessories: Felt Flowers, Boho Blossoms punch, Soft Subtles brads, blue gingham ribbon, corner rounder
All products by Stampin' Up! Please email me to order a catalogue, or click the link on the right to view it online.
Monday, 20 April 2009
Otterly exhausted
Sorry for the lack of posts - I've been away for a week to the Lake District (of course!). I do have projects to show you but haven't had chance to photograph and upload just yet. Still prepping frantically for tonight's Mini Catalogue Launch - email me asap if you want to come along!
Do you like this otter though? It's very cute - we saw it (her, actually) at the Lakes Aquarium at Newby Bridge; just a boat ride away from where we were staying. The otters are the cutest creatures there by far... although the tiny weeny baby seahorses were amazing. Only born that morning, they were only about 5mm long!
Friday, 17 April 2009
Even more recycling...
And yet another recycled card – I have been trying to get on top of all those leftover kits! This one was a leftover from my recent Christmas card class, so hasn’t been hanging around too long. But I’ve turned it into a loyalty card for my new evening classes which start in May. Drop me an email if you’d like to find out more about these classes.
Stamps: Office Accoutrement
Cardstock: Ruby Red, Old Olive, Bravo Burgundy, Whisper White
Ink: Bravo Burgundy, Ruby Red
Accessories: Scallop Edge Punch, Boho blossoms punch, ¼” Grosgrain Ribbon – Whisper White, Crafters’ Toolkit, Hodgepodge Hardware (or vintage brads)
All products by Stampin' Up! Please email me to order a catalogue, or click the picture of the catalogue on the right to view it online.
Wednesday, 15 April 2009
Summer elegance
And now for something completely different... no rabbit, no owl, no Earth Elements... just very plain and clean pastels.
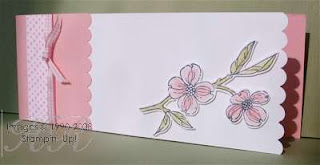
This stamp set is so elegant that it needs no adornment so I kept this card really simple to show off the beautiful image.
There are many ways to use this two-step stamp set; you can colour the solid image using markers, Watercolour Wonder™ crayons, go monochromatic with a single colour from an ink pad...
On this occasion I just used the outline image, stamping in beautiful Basic Grey which is more subtle than Basic Black and almost gives a pencil-drawn effect. I coloured the image with Watercolour Wonder™ crayons (I used Regal Rose and Always Artichoke – looks like I forgot to colour the middles of the flowers, although I may have used So Saffron) and then blended with blender pens. I cut the whole image out using my fabulous paper snips and then popped it up to make it stand out.
But what really makes this card stand out is that I’ve used textured cardstock which is absolutely gorgeous – don’t know why I don’t use it more often!
Stamps: Soft Summer
Cardstock: Whisper White, textured Whisper White, textured Pretty in Pink
Paper: Tea Party
Ink: Basic Grey
Accessories: Scallop Edge Punch, Pink gingham ribbon, Watercolour Wonder™ crayons, blender pens
All products by Stampin' Up! Please email me to order a catalogue, or click the link on the right to view it online.
Monday, 13 April 2009
And another recycled card...
And just to show that there are many ways to use the same supplies, here’s another card made with a leftover card kit (almost) – this time I’ve used Office Accoutrements and turned the card sideways. You’ll be pleased to know that I have now run out of these kits so you won’t have to look at any more versions!
This card will actually mean an awful lot to the recipient because it's destined to become a Loyalty Card for my classes.
From May, who attends one of my fee-based events will have their Loyalty Card stamped - and when they have five stamps on their card they will receive a Stampin' Up! gift of ribbon, ink pad or cardstock. How cool is that?
Stamps: Office Accoutrements
Cardstock: Really Rust, Chocolate Chip, More Mustard, Very Vanilla
Ink: Really Rust, Chocolate Chip, More Mustard
Accessories: Round Tab Punch, ¼” Grosgrain Ribbon - Chocolate Chip
All products by Stampin' Up! Please email me to order a catalogue, or click the link on the right to view it online.
Saturday, 11 April 2009
It's an owl for a change, not a rabbit
Another “recycled” card kit from this kit from a previous workshop – but this time I added a few bits to it. This is the third and final card I made to send to Canada and it has now safely arrived.
I stamped the tree in Pumpkin Pie onto cardstock of the same colour for a subtle background for the owl to sit on. The owl is stamped on white, cut out and popped up.
Stamps: Forest Friends
Cardstock: Regal Rose, Blush Blossom, Chocolate Chip, Pumpkin Pie, Whisper White
Paper: Sweet Always
Ink: Chocolate Chip
Accessories: ¼” Grosgrain Ribbon, Scallop Square punch
All products by Stampin' Up! Please email me to order a catalogue, or click the picture of the catalogue on the right to view it online.
Thursday, 9 April 2009
Forest friends
Thanks for all the comments yesterday - in answer to Ann's question, the test tubes can usually be bought on ebay.
This is another Forest Friends sample I’ve made for my cousin in Canada - and yes, there's that bunny again!
I cheated here, reusing some leftover cardstock from a class last October. This is the card I made with the same supplies back then.
This is quite a simple card but I was in a hurry!
Stamps: Forest Friends
Cardstock: Really Rust, Chocolate Chip, More Mustard, Very Vanilla
Ink: Chocolate Chip, Really Rust, More Mustard, Close to Cocoa
Accessories: Jumbo brads – pewter, ¼” Grosgrain Ribbon - Chocolate Chip, 1 ¼” circle punch
All products by Stampin' Up! Please email me to order a catalogue, or click the picture of the catalogue on the right to view it online.
Wednesday, 8 April 2009
Chock full of chocs
Are you sick of this rabbit yet? Hope not because I think it’s really sweet and will be popping out the rabbit projects right up until Easter... and beyond!
Don’t tell but this is what I’ve made for the children for Easter. I bought these really cute mugs last spring in the Whittards Sale and have been hoarding them ever since.
I’ve filled them with goodies and wrapped them in cellophane. They don’t photograph well in cellophane, though, so here are some pix before I wrapped them.
This is the mug filled with mini Easter eggs (see? I told you I’d found a good use for all the non-blue ones!).
There’s a covered chocolate lollipop (Sainsbury’s) in there, too. I used the same method as used for these Valentine’s lollies.
And then the test tube full of mini Smarties. I think someone’s going to be feeling a little queasy!
Once wrapped with polka dotted cellophane (local florist’s), I made a little gift card to finish off. I only had a small scrap of Apricot Appeal cardstock so improvised by adding a Certainly Celery layer to show underneath. There’s always a way!
Here’s the same gift in a different colour scheme – just so that there’s no arguing about which set belongs to which child! You’ll notice the gift card is a simpler version – I’d like to say this was because I felt it was less girly and therefore more appropriate for a boy but really it was because I ran out of time.
Stamps: Forest Friends, Seasonal Wishes
Cardstock: Apricot Appeal, Certainly Celery, Bashful Blue, Whisper White, Almost Amethyst, So Saffron
Paper: Tea Party
Ink: Basic Gray, Bashful Blue, Certainly Celery, Apricot Appeal
Accessories: 1 ¼” circle punch, 1 3/8” circle punch, Scallop Circle Punch, Crop-A-Dile™, ¼” Grosgrain Ribbon - Whisper White, pale pink gingham ribbon, 3/8” Grosgrain Ribbon - Certainly Celery, Striped Grosgrain Ribbon – So Saffron, Scallop Edge Punch, Crafters’ Toolkit, Rich Regals brads, ½” circle punch
All products by Stampin' Up! Please email me to order a catalogue, or click the link on the right to view it online.
Tuesday, 7 April 2009
Easter basket
This basket is remarkably simple to make. I found some really great instructions by a UK Stampin’ Up!® demonstrator called Monica Gale – you can see the tutorial by clicking here.
You need:
Apart from the colours and the stamps, the only thing I did differently to Monica was to use Sticky Strip to attach the Designer Series Paper to the top of the basket, because I thought it would be stronger and better suited to carrying a load of chocolate.
I stuffed some pale blue tissue paper in the bottom of the basket so that the little eggs (Home Bargains, of course!) wouldn't fall out. And yes I had to sort out the eggs so that they were all blue – but don’t worry, you’ll see what I did with the others soon enough!
Stamps: Forest Friends
Cardstock: Bashful Blue textured, Whisper White textured, Bashful Blue smooth, Whisper White smooth
Paper: Patterns Designer Series Paper - Bashful Blue
Ink: Bashful Blue
Accessories: Scallop Edge Punch, Crafters’ Toolkit, 1 ¼” circle punch, 1 3/8” circle punch, Scallop Circle Punch, blue gingham ribbon, Rich Regals brads
All products by Stampin' Up!® Please email me to order a catalogue, or click the link on the right to view it online.
You need:
- Four strips of Designer Series Paper cut to 3cm x 22cm.
- The cardstock that goes around the top of the basket measures 4.5cm x 26cm.
- The handle is 3.5cm wide and the length of a sheet of A4, although I don’t think mine was.
- Ribbon and scraps to decorate
- Two brads to hold on the handle (optional)
- You can’t see it but along the handle there’s a strip (about 1cm) of Designer Series Paper – I used the a piece of striped paper for this.
Apart from the colours and the stamps, the only thing I did differently to Monica was to use Sticky Strip to attach the Designer Series Paper to the top of the basket, because I thought it would be stronger and better suited to carrying a load of chocolate.
I stuffed some pale blue tissue paper in the bottom of the basket so that the little eggs (Home Bargains, of course!) wouldn't fall out. And yes I had to sort out the eggs so that they were all blue – but don’t worry, you’ll see what I did with the others soon enough!
Stamps: Forest Friends
Cardstock: Bashful Blue textured, Whisper White textured, Bashful Blue smooth, Whisper White smooth
Paper: Patterns Designer Series Paper - Bashful Blue
Ink: Bashful Blue
Accessories: Scallop Edge Punch, Crafters’ Toolkit, 1 ¼” circle punch, 1 3/8” circle punch, Scallop Circle Punch, blue gingham ribbon, Rich Regals brads
All products by Stampin' Up!® Please email me to order a catalogue, or click the link on the right to view it online.
Monday, 6 April 2009
These rabbit cards are breeding like...
My cousin in Canada is a Stampin’ Up! demonstrator, too (it’s in our genes!) and she also has a new Mini Catalogue to launch this month. Some of the sets are the same so we’re doing a swap of samples. She wanted the same card as this but without the greeting as they don’t have that stamp – she’ll add her own greeting when it arrives. But I’m not keen on making the same card twice so I just had to change the colour scheme.
I also had a go at making this card again but it turned out like this:
Stamps: Forest Friends
Cardstock: Almost Amethyst, So Saffron, Certainly Celery, Basic Gray, Pretty in Pink, Whisper White
Paper: Tea Party
Ink: Basic Grey
Accessories: 1 ¼” circle punch, 1 3/8” circle punch, Scallop Oval Punch, Scallop Edge punch, Crafters’ Toolkit, Boho Blossoms punch, Rich Regals brads, striped ribbon – So Saffron
All products by Stampin' Up!® Please email me to order a catalogue, or click the link on the right to view it online.
Saturday, 4 April 2009
Down to earth
I’d forgotten to post this – this was one of the simple projects for a large class I did in Derby for an existing craft group.
They are a lovely group of ladies - some of them are in their 80s and 90s and are still producing amazing crafts, including beadwork, needlework and more. They meet up twice and month and will have a go at anything.
We made three cards – one from each of three of Stampin' Up! colour families. This was the Earth Elements card and uses True Friend. The only ink used here is Versamark® - the colour comes from chalks, using the poppin’ pastels technique.
Stamps: True Friend, Polka Dots & Paisley
Cardstock: Pumpkin Pie, Summer Sun, Old Olive, Very Vanilla
Ink: Versamark®
Accessories: Stampin’ Pastels®, Scallop Edge Punch, 5/8” Grosgrain Ribbon – Old Olive
All products by Stampin' Up! Please email me to order a catalogue, or click the link on the right to view it online.
Friday, 3 April 2009
Shower of snowflakes
This is Alison’s second creation for last Saturday’s Christmas card class and very pretty it is, too. I’m going to have to guess the recipe though!
Stamps: Best Wishes & More
Cardstock: Brocade Blue, Night of Navy, Whisper White
Paper: Patterns Pack (hostess)
Ink: Bordering Blue, Brocade Blue, Night of Navy, Real Red
Accessories: 1 3/8” circle punch, Scallop Circle Punch, Spiral punch (didn’t know she had that!), ¼” Grosgrain Ribbon – Real Red
All products by Stampin' Up! Please email me to order a catalogue, or click the link on the right to view it online.
Thursday, 2 April 2009
A starry New Year
This is one of Alison’s cards for the Christmas card class last Saturday – she went for a New Year theme, a radical black, red and white colour scheme and non-traditional stamps. Cool!
Stamps: Watercolour Vine wheel, In The Stars, Seasonal Wishes
Cardstock: Basic Black, Real Red, Whisper White, Basic Gray
Ink: Basic Black, Real Red, White StazOn®
Accessories: Silver brads, Large star punch, white gel pen
All products by Stampin' Up! Please email me to order a catalogue, or click the link on the right to view it online.
Wednesday, 1 April 2009
Christmas pocket
This is the second card we made on my table at the Christmas card class at the weekend. It’s a pocket card.
Pocket cards are really simple to make but look really impressive. I prefer to make them by cutting a sheet of A4 in half lengthways. Score half way as if you were making a portrait card which opens at the bottom, then score again about an inch from one end.
Fold this into a card, then fold the 1” flap outwards.
You now need to seal the card to make it into a pocket. I used Sticky Strip down the sides on this one – it’s strong, it’s narrow and it will do the job brilliantly. If you don’t have sticky strip, beware of ordinary double-sided tape as it’s probably not going to be strong enough and may also be too wide, which restricts the width of the inside tag. To get round this you could seal the pocket using eyelets or brads... or even sew the sides.
The Large Oval Punch and accompanying Scallop Oval Punch proved really popular – we’ve used both on this card; on the front, as you can see, and the Scallop Oval again on the tag. To make the top of the tag, we folded a scalloped oval in half, punched a hole on the crease, then poked the loop of a short piece of ribbon through the hole, sealing it on the inside. This was then attached to the top of the tag, which slides into the pocket.
Stamps: Season of Joy, Basic Phrases
Cardstock: Old Olive, Always Artichoke, Real Red, Whisper White
Paper: Summer Picnic
Ink: Old Olive
Accessories: Scallop Oval Punch, Large Oval Punch, ¼” Grosgrain Ribbon – Real Red, Red Gingham Ribbon, Crafters’ Toolkit, Stampin’ Glitter – Dazzling Diamonds, Sticky Strip, Crop-A-Dile™
All products by Stampin' Up! Please email me to order a catalogue, or click the picture of the catalogue on the right to view it online.
Subscribe to:
Posts (Atom)
The small print
This is my personal blog and my sole responsibility as an Independent Stampin' Up!® demonstrator. All images are © Stampin' Up!® All content including photographs, projects and text are © Helen Read, unless otherwise stated. Please feel free to copy my ideas for your personal use and inspiration - if you are a SU demonstrator you may use these ideas for your events but please give credit where it is due. Please do not use my ideas for monetary gain, competitions or publication. The images on this blog - including blog buttons - should not be copied and used elsewhere on the internet or on CDs.