Sorry I can't update the blog right now. Please find me on Facebook

Thursday, 6 February 2014

Springtime Hello canvas


I love this tiny little stamp set, which is odd for me as small stamps usually get on my nerves. But I do love a bee image, so I suppose it was bound to be a winner. It’s only £9.95 for the clear-mount version, which is a bargain. I am considering holding a class using this stamp set, and including it in the price; do let me know – either by commenting or by emailing me – if you’re interested. 

Here I’ve stamped on a tiny canvas (four for £1 from the Pound Shop!) and finished off with some ruffled ribbon and rhinestones. 

Stamping in the canvas wasn’t as straightforward as it sounds, though, and two canvases were wasted in the process, so here are my tips:

  • Place a clear block behind the canvas to create a solid surface
  • Use Black Stazon
  • Don’t expect perfection - the use of the ruffled ribbon arose from the fact that the image didn’t quite reach the bottom, because of the differing levels.
Stamps: Springtime Hello
Ink: Black Stazon, markers - Pool Party, Daffodil Delight, Gumball Green
Accessories: Ruffle Stretch Ribbon - Baked Brown Sugar, Basic Rhinestones
Other: Mini canvas, mini easel

Tuesday, 4 February 2014

Starburst Technique with See Ya Later stamp set


This cheerful card was one of the demonstrations at my Launch Party at the weekend. It shows two new products and a fun technique. 

The main new product that you’ll notice right away is the See Ya Later stamp set from the Sale-a-Bration brochure, which has really fun images and words. I stamped this in Smoky Slate. 

The second new product on there is the cloud die. But hold on, we don’t have a cloud die, do we? Well yes we do if you use the thought bubble from the Word Bubbles Framelits. I cut these out using Vellum cardstock, to represent the wispy nature of clouds. They are stuck down with SNAIL, secured only behind the main image so that it doesn’t show through - it makes them look a bit more like they’re “floating” too, I think. Or am I just deluded?

Now for the technique. It’s called the Starburst Technique and it’s fun to do. There are lots of variations you can try, too. I could go into a long explanation or take dozens of photos to illustrate the technique, but this video from Stampin’ Up!® explains it brilliantly, so why reinvent the wheel?


After creating my paper mask, instead of spritzing, as Carrie does in the video, I sponged Daffodil Delight ink onto the cardstock, concentrating my efforts nearer to the centre and gradually easing off as I reached the edges of the card. To hold the mask in place, I used tiny dabs of Tombow adhesive on the back of my mask, allowing it to dry clear – this turns it into a temporary adhesive so the mask can be removed. 

I love this effect and hope you try it! 

Stamps: See Ya Later (SAB)
Cardstock: Daffodil Delight, Whisper White, Vellum Cardstock
Ink: Daffodil Delight, Smoky Slate

Accessories: Word Bubbles Framelits, Sponge Daubers

Sunday, 2 February 2014

See Ya Later Sale-a-Bration stamp set


Happy February! Let’s hope it’s a bit drier and less windy than January. 

First of all, a big thank you to everyone who came along to my Launch Party yesterday. It was great to see everyone and we had a relaxing time eating cake, making cards and chatting about the fab new products in the Spring/Summer catalogue and Sale-a-Bration. 

Secondly, what do you think of my new-look blog? I’ve been working on it behind the scenes for a while but yesterday decided I may as well just roll out the changes, even if I still have some little bits I’d like to tweak. 

I made the background, header and buttons in My Digital Studio, with the addition of a free downloaded font and a secret bit of clipart which I’m sure you’ll spot! The blog background came out darker than I’d hoped but I’m sure we’ll get used to it. Let me know if you have trouble loading the page - if it’s an issue, I can remove the background to speed things up a bit. 

So, today’s project features a bit of February sunshine to give the weather some encouragement to stay nice! I made this card using the new Banner Punch from Stampin’ Up!® It’s a Sale-a-Bration item which means you can earn it FREE with a £45 purchase. That’s pretty cool as everyone loves freebies!

There’s a stamp set to match, too, which I showed you on this card. But here I’ve used it to make some funky sun rays behind this very cheery greeting. The clouds are made using the Word Bubbles Framelits dies, which co-ordinate with the Just Sayin’ stamp set. They’re actually thought bubbles but make perfect clouds. This set of dies was one of the products I demoed at my Launch Party - but I still haven’t photographed all the projects, so they will just have to wait I’m afraid. 

Stamps: See Ya Later
Cardstock: Soft Sky, Coastal Cabana, Daffodil Delight, Whisper White
Ink: Daffodil Delight
Accessories: 2 1/2” circle punch, Banner Punch, Word Bubbles dies, Soft Sky Seam-binding ribbon

Saturday, 1 February 2014

Caturday - Kitty

This afternoon is my catalogue launch party which is exciting as it will be good to catch up with some of my customers for the first time this year. I have Make & Takes and demonstrations and, of course, cake for them!


Meanwhile, it’s Caturday, so meet the unimaginatively named Kitty! She really wants a new home as her owner died and she has had to return to the cat shelter. She isn’t keen on other cats but loves people!

She looks a lot like our own cat, Cobweb, with those spectacular whiskers!


Thursday, 30 January 2014

New Texture Boutique Embossing Machine - and extended Valentine's promotion


Are you back for news of an exciting new product? Good. Because I’m here to tell you about the brand new Texture Boutique Embossing Machine... and, if you scroll down, there's more exciting news to share, too!

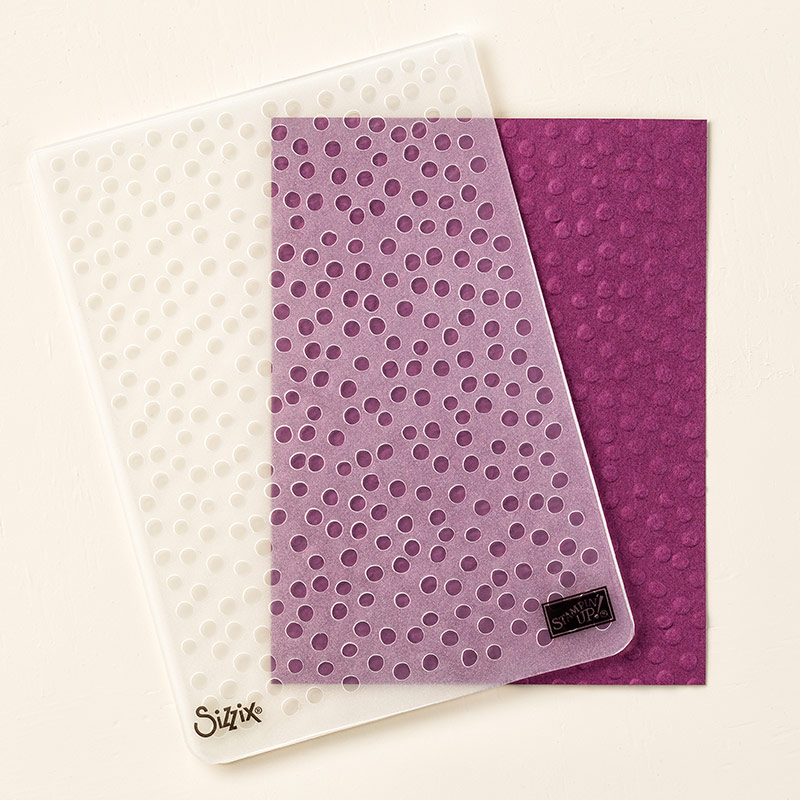
Small and portable, the Texture Boutique Embossing Machine is designed to be used with our Textured Impressions embossing folders, to add an extra dimension to your projects. 

We have three new embossing folders in the new Spring/Summer catalogue. Order all three at £7.50 each and the Texture Boutique Embossing Machine at £26.95 and you'll qualify for a FREE Sale-a-Bration gift. Why not stay with the embossing theme and order the Textured Impressions Decorative Dots folder?

Decorative Dots Textured Impressions Embossing Folder

Check out the Stampin’ Up!® video for more about this new tool.


Ok, are you ready for some more news? I am absolutely DELIGHTED to be able to tell you that some of the products from the Whole Lot of Love promotion are still available!

This is something I’ve been emailing Stampin’ Up!® about in the past few weeks as I felt that these products were lost over the Christmas period and have much wider appeal than just Valentine’s Day. And you know how excited I am about the Monster Hugs!


Check out the list of what’s still available*. But they’re not around forever... they will be here until 14th February, so hurry!
  • 131850: Love You More Stamp Set (wood-mount)
  • 131853: Love You More Stamp Set (clear-mount)
  • 134611: Follow My Heart Stamp Set (wood-mount)
  • 134617: Flowerfull Heart Stamp
  • 132862: Toujours + d’amour Stamp Set
  • 134610: Sweetheart Treat Bags
  • 132162: Monster Hugs Boy
  • 132163: Monster Hugs  Girl
  • 134609: Sweet Sayings Cards and Envelope
* Just compared lists - looks like the only thing which isn’t available is the German stamp set. 

Wednesday, 29 January 2014

Just Sayin' card with Word Bubbles Framelits

Yesterday I told you about Sale-a-Bration, the most exciting promotion in the Stampin’ Up!® calendar. Sale-a-Bration (SAB) means freebies for everyone – customers, hostesses, new demonstrators (and existing demonstrators)!

In the very unlikely event that you’re thinking “but I don’t need anything else from the current catalogue”, help is at hand…


We have a brand new catalogue packed with gorgeous seasonal products for spring and summer. You can view it here, or follow the link at the right of this page. 

One of my favourite products in the new catalogue is the Just Sayin’ bundle. This consists of seven fun speech bubble images, with Framelits to match. Use them separately or together… or ink up the outlines of the speech bubbles and add your own words. 


Here’s a card I made with this set, inspired by this card by Cathy Caines. It uses another favourite product from the new catalogue; the Fresh Prints DSP Stack. These stacks are ideal for those people who can’t cut into a sheet of 12x12 because “it’s too nice”. You know who you are! Sized at 6.5” x 4.5”, they are perfect for card making or for matting photos on a scrapbook page. I love the colour combo in this new pack; Coastal Cabana, Crumb Cake and Real Red. So fresh and springy but also ideal for Christmas (if you can bear to keep it that long!). Hmmm… that’s just given me an idea actually…

Stamps: Just Sayin’
Cardstock: Coastal Cabana, Crumb Cake, Whisper White
Paper: Fresh Prints DSP Stack
Ink: Real Red
Accessories: Word Bubbles Framelits Dies, Scallop Edge Punch, Candy Dots, Corner Rounder, Black Marker


I have news of another new product for you tomorrow, so be sure to come back then! 

Tuesday, 28 January 2014

Sale-a-Bration is here!

January and February can be a dull time of year – and the weather isn’t helping right now. 

But help is at hand because today sees the start of the most exciting promotion in the Stampin’ Up!® calendar!

Yes, Sale-a-Bration begins today and will see us all the way through to spring, with special offers and freebies for everyone.


The SAB brochure is now available online - you can download it by clicking here – and I have lots of paper copies available, too. Let me know if you’d like one. 

To get the absolute best out of Sale-a-Bration, it’s a good idea to have a party and the good news is that I have a few dates left, so please contact me ASAP to grab your date. For your party, all you need to do is invite your family and friends into your home, serve a few simple refreshments, and I’ll do the rest. I can even send out email invites if you want to save some time!

At your party, I will demonstrate some new products and then everyone gets to make something before placing their orders. Everyone who spends £45 will get to choose a FREE item from the SAB brochure. This is just one reason why Sale-a-Bration is so popular!

As for you, the hostess, you’ll get to choose freebies based on the workshop total. A £150 party will get you £25 of freebies… and as the party total increases, so do your freebies! If you reach the magical £250, you’ll get an additional £25 on top of usual hostess benefits, so you'll get £65 of freebies of your choice. This is another reason why Sale-a-Bration is so exciting!


Of course, SAB is also a great time to launch your new craft business! Whether you want to fund your hobby, supplement your income or start something big, we have room for everyone in Stampin’ Up!® Joining during SAB means you can choose £150 of craft products to set up your business, for just £99. You’l also get a business kit including catalogues, order forms and more. To get your business off to a great start, I suggest you join at the beginning of SAB, so you can encourage your new customers with all the benefits that Sale-a-Bration has to offer. 

So, what are you waiting for, please get in touch ASAP to place an order, book a party or find out more about signing up!


Monday, 27 January 2014

MDS scrapbook page


I’m back with another My Digital Studio (MDS) scrapbook page, again made entirely using the free trial software with no add-ons. It actually makes sense to start off with the bare minimum as it allows you to focus on the techniques used rather than be distracted by extra stamp sets and background papers.

In an attempt to hone my skills, I have been CASEing a few MDS creations by other people and, using this page as inspiration, came up with this 12x12 page. Still no journalling, but I’m working on that, I promise!

The background is Soft Sky, with strips of DSP from the Delight in the Day kit. The word “BEyouTIFUL” is a stamp (digital, of course) and one my discoveries while creating this page was that you can colour stamps with different colours, just as you would with markers on a real stamp. So I coloured it with Basic Gray, then changed the “you” to Real Red.

Another exciting discover was the ability to round the corners of an element. This was simply a case of a right click and hitting “round corners”.

I kept the page simple, in line with the original, and because it’s all too easy to keep adding element after element and losing sight of the photo.

If you haven’t tried My Digital Studio yet, I dare you to have a go! You can download it for free (30-day free trial) at my online store, here.  It’s quite easy to learn to use and there are lots of free tutorials out there on the internet.

And, in case you’re concerned that I’m leaving paper behind, do not worry – I even have a paper scrapbooking project to show you soon. I just have to find some photos to put in it!

PS, if you know me in real life, please don’t tell my son I used this photo here! He’s unlikely to see it so hopefully I’m safe. He doesn’t look like this any more, needless to say, so won’t exactly get recognised in the street!

Saturday, 25 January 2014

Caturday - Ceefur


Jane from Woodland Nook Cat Rescue sent me this fabulous picture of Ceefur.

Ceefur used to hold court at the cat shelter, tolerating the odd stroke but hissing and scratching after a few minutes. This behaviour is thanks to some horrible person (can’t use the word I really want to use – this is a family blog) who used to abuse her while wearing gloves.

She was really poorly a few months ago but, after moving to Jane ’s cattery and having several teeth removed, she has blossomed. Here she is, chilling out in her luxury apartment.

You can find out more about Woodland Nook Cat Rescue at the blog, here.

Thursday, 23 January 2014

Monster Hugs - going soon!


Time is running out to buy these fab little monsters. 

My Virtual Hostess Club resumed after a break for Christmas and, as I always like to thank the members with a little gift, I thought they deserved a hug!

Out came the Monster Hugs and, within minutes, I’d rustled up 10 gifts. All you have to do is stick a little something on the self-adhesive panel on the monster’s belly, wrap the arms around and slot them together. Then, if you wish, you can seal with a self-adhesive heart. 

I wrapped a couple of mini chocolates in some brand new paper - there’s a tiny sneak peek for you. This paper is coming a brand new mini DSP stack (and we all LOVE those, don’t we?) in the Spring/Summer catalogue. 

Oh, you have to see the back, too - check out his little bottom!

I love these monsters and wish they were sticking around longer - they are part of a promotion which ends on 27th January. They’re perfect for party favours (available in pink, too), to use as gift tags, or even just to give to a friend who needs a hug. 


Supplies: Monster Hugs in Blue, Fresh Prints DSP Stack

The small print

This is my personal blog and my sole responsibility as an Independent Stampin' Up!® demonstrator. All images are © Stampin' Up!® All content including photographs, projects and text are © Helen Read, unless otherwise stated. Please feel free to copy my ideas for your personal use and inspiration - if you are a SU demonstrator you may use these ideas for your events but please give credit where it is due. Please do not use my ideas for monetary gain, competitions or publication. The images on this blog - including blog buttons - should not be copied and used elsewhere on the internet or on CDs.