Showing posts with label gift bags. Show all posts

Tuesday, 19 March 2024

Easter Bunny treat bags

Stampin Up Easter Bunny treat bags

Would you believe I have never bought an Easter stamp set before? Easter Bunny, which features in the January to April Stampin’ Up!® catalogue is my very first Easter set.

This year I was determined to make some cute little gifts and with Easter just around the corner, I thought I’d better get cracking! (See what I did there?)

Tuesday, 23 November 2021

Painted Season gift projects – with FREE tutorials

Painted Season Christmas Stampin Up UK Demonstrator

Some of you are way more organised than me and already have your Christmas cards made – and perhaps even written them. Therefore, your thoughts will be turning to gift packaging. 

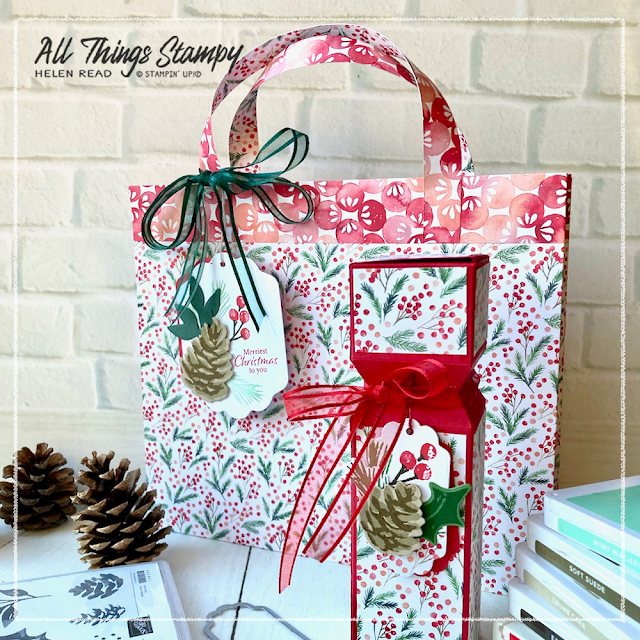
I made these gift wrap ideas using the beautiful Painted Christmas Designer Series Paper from Stampin’ Up!®. 
 
As you may guess from the fact that pine cones feature in all of my project photos, this Suite is absolutely right up my street – the designs, the colours, everything. Finally, those pine cones make sense!
 
Painted Season Christmas Stampin Up UK Demonstrator

The large bag is a great design which I borrowed from UK Stampin’ Up!® demonstrator Julie Kettlewell at The Paper Haven
 
 Painted Season Christmas Stampin Up UK Demonstrator
 
It requires two full sheets of 12x12 Designer Series Paper but produces a bag which is big enough for a book or box of chocolates. Hopefully the recipient will like the bag enough to use it again next year, too.

 
Painted Season Christmas Stampin Up UK Demonstrator

I decorated the bag with a gift tag made using the Christmas Season bundle. 

Painted Season Christmas Stampin Up UK Demonstrator

The tag can be as simple or as detailed as you like. I love the pine cones (obviously) so stamped these onto Crumb Cake cardstock to really make them stand out.
 
Painted Season Christmas Stampin Up UK Demonstrator

The half-cracker gift box is a brilliant little design which can be used as novelty gift packaging or as table crackers which can be used year after year. 
 
Painted Season Christmas Stampin Up UK Demonstrator
 
Regular readers with good memories will recall I made this half cracker gift box last year, too but it’s such a good little box that I wanted to repeat it at an event this year using this gorgeous Painted Christmas Designer Series Paper... after first checking that none of this year’s ladies had attended last year, of course!
 
 
Painted Season Christmas Stampin Up UK Demonstrator


Again, I made a gift tag using the Christmas Season stamp set and Seasonal Labels dies, which are available as a bundle. This time I used a smaller label die and the smaller of the two pine cones from the set.

I had two packs of this beautiful Painted Christmas Designer Series Paper which enabled me to create a matching cracker box to go with each bag. But if you mix and match they look beautiful, too. 
 
Painted Season Christmas Stampin Up UK Demonstrator

Painted Season Christmas Stampin Up UK Demonstrator

If you are in the UK and would like to order, please visit my store and, if you use the November 2021 host code P6VRQPMJ, I’ll send you a thank you gift in the following month.


Does your wish list come to more than £99? Please get in touch and I will help you get more for your money and unlock discounts all year round.  


Monday, 22 October 2018

Glamorous gold snowflake gift bag


I love these gold and white striped bags - but you don't have to leave them as they are; you can add more to them. Here I’ve used washi tape to add some extra stripes, as well as some Delightfully Detailed Designer Series Paper, which has some really pretty borders. They come in white and vanilla (one colour on each side) but I’ve sponged them in Cherry Cobbler for a festive look.

Snowflakes in gold add some glamour, and there’s some festive bling, too. The whole thing took less than five minutes to make. Result!


Tuesday, 15 May 2018

Citrus zing gifts for my crafty buddies


Today I’m returning from a weekend away in the beautiful Derbyshire Dales, where I spent several days crafting with some of my stamping friends. With one exception, these are all ladies I would not have known, if it wasn’t for Stampin’ Up!® Yes, SU really does Make a Difference. 


As we are crafty ladies, we like to celebrate each other by swapping handmade gifts. I put together these little pouches with a mix of old and new products. The bags are long retired but needed using up, the sequins and Tutti Frutti paper is going at the end of the month but I’m sure you’ve realised my obsession with this paper by now... and the rest of the produts are coming soon.

Look out for these gorgeous Tropical Thinlits – don’t they look great in acid colours? And don’t miss this Lined Alphabet stamp set; it’s so clear and clean and I love it.

I’ve given the leaves some texture by stamping with Artisan Textures; another new stamp set which I was lucky enough to win at OnStage Telford last month. It’s one of those sets you could be forgiving for overlooking in the catalogue, but it’s going to be so useful especially if, like me, you like a touch of grunge adding to your projects.


Monday, 19 March 2018

Springtime Foils Week Part 1: Mixed Metallics gift bags


No Mix It Up Monday project today as I’m working on a super-secret crafting project so have no time for any other crafting.

Instead, it’s Springtime Foils week here on AllThingsStampy, as I show you some projects using the gorgeous Springtime Foils Designer Series Paper (Sale-a-Bration).

These are the gift bags everybody received at my All-Day Craftathon on 10th March. I really milked the “mixed metallics” trent here with these gorgeous gold-striped bags, some silver glimmer paper and the Springtime Foils DSP which I sponged in Flirty Flamingo and *gasp* Peche Fraiche. The strip was brayered in black to give the copper dots a striking background.

Each bag contained a pretty guest soap, but my friend and helper Kelly needed a bigger gift, in a bigger package, so I made her this...


For the body of the pouch I used the beautiful floral sheet from Springtime Foils, and didn’t ink it or sponge it or colour it at all. It’s just beautiful as it is.
SaveSaveSaveSave

Friday, 15 December 2017

Year of Cheer Designer Series Paper gift bags with SAB sneak peek


Can you spot a sneak peek here? These are some little gifts I made for some of my stamping friends at a get-together last weekend. I used half a sheet of Year of Cheer DSP for each box, and the Gift Bag Punch Board.

These were literally thrown together before I set off in the morning, so they decoration is very simple; just a couple of strips of cardstock (Whisper White and Silver Foil), a piece of ribbon and the finishing touch... yes it’s that sneak peek!

This die comes from a brand new set; a Sale-a-Bration freebie which you can earn from 3rd January. How do I have it early? Demonstrator perk, of course! SAB begins in December for demonstrators, so we can earn freebies for FOUR months instead of three. Whoohoo!

If you’d like perks like this, please get in touch to talk to me about joining. There are literally NO drawbacks, I promise.


Friday, 21 July 2017

Pick a Pattern DSP with glittery embossing


I’m going through a glittery embossing phase, and it all started with a video by Kristina Werner, which inspired me to try some sparkly techniques. While Kristina’s techniques didn’t directly translate to Stampin’ Up!® supplies, the concept certainly did, so I set to work.

I began by watercolouring a background in some bright colours, the die-cut a circle using the fabulous, must-have Stitched Shape Framelits. I embossed the greeting on top in white, then embossed the whole thing using a mix of clear embossing powder and Dazzling Diamonds glitter. Sparkly!


The only ribbon I had in a relevant colour was Crushed Curry, which didn’t quite look right, so I turned to my talented team for some help in finishing off the project, and this suggestion was put forward... curly strips of cardstock. I love it! And it means you can create fabulous embellishments from the bits you’d normally throw away. 


Here’s the card to go with the present – another sparkly greeting and the same fabulous Designer Series Paper. I’m so glad I finally plucked up the courage to start using this paper, instead of just looking at it.

Thursday, 24 March 2016

Easter pull-out chocolate treats


When crafty friends get together, they can’t resist gifting each other with something fun and handmade, so for my crafty weekend in Matlock Bath, I made these. They are a variation on the Gästegoodies I made for my club members, but I adapted the template to allow for the bunnies, which are taller than Ferrero Rocher chocolates. Don’t ask me for measurements please, I don’t have them any more! But all you need to do is follow Alexandra Grape’s excellent tutorial (which is in German, but trust me, you’ll work it out) and make the longest strip longer, to create a taller tunnel. 


Banner Punch
[133519]
£11.50

Wednesday, 23 March 2016

Oh My Goodies - fabulous 3D "wow" project


How’s this for a project to take me out of my comfort zone? Not only is it pretty and pink, it is 3D and actually quite complex. I found the idea on Pinterest (where else?) and traced it back to a Youtube video by genius German demonstrator Alexandra Grape. The tutorial was in German but I didn’t let that put me off – and Alexandra had helpfully put the measurements across the screen. I even picked up a few new German words along the way, including my favourite, “Gästegoodies”. 


I won’t attempt a tutorial here as you really need to see the video. But I will say that the mechanism is extremely clever but very simple. It’s a strip of plastic (cut from a document wallet) wrapped around the cardstock, so that when you pull the chocolate out of the tunnel, the greeting pops out of the other side at the same time. Genius! Come back tomorrow for an Easter-themed variation on this project. 

Apologies for the ropey picture, by the way; I took them in a hurry before heading off for the weekend. 

Banner Punch
[133519]
£11.50

The small print

This is my personal blog and my sole responsibility as an Independent Stampin' Up!® demonstrator. All images are © Stampin' Up!® All content including photographs, projects and text are © Helen Read, unless otherwise stated. Please feel free to copy my ideas for your personal use and inspiration - if you are a SU demonstrator you may use these ideas for your events but please give credit where it is due. Please do not use my ideas for monetary gain, competitions or publication. The images on this blog - including blog buttons - should not be copied and used elsewhere on the internet or on CDs.